04/26/02
23
Revision 1.11
HPR Setup (assuming a ODMS-05 motions sensor)
1- Reopen the
Device Setup
window by clicking on
Devices
and again
on
Add Device.
Type in a name for the motion sensor i.e. ODMS
(
no
Enter).
2- Click on
Library
then
Browse
and scroll to find the right driver (for
the ODMS-05, select tss320.dll). Click on
OK
to return to the
Devices Setup
window.
3- Only the
Heave comp.
or
Motion Sensor
box should be marked.
Type in the
Update frequency
(100 ms in the case of the ODMS-
05). (
no
Enter).
4- Click
Connect,
select a Comm Port (normally 3) and configure for
9600 BAUD, 8 data bits, no parity, 1 stop, and no flow control.
Click
OK
to return to
Devices Setup
.
5- Click the
Offsets
button and type in the
Latency time
. Click
OK
to
return to the
Devices Setup
window and
OK
to return to the
Initialization
window.
At this point, the configuration should be saved. From the
Preparation
screen, select
File
/
Save As,
name the file, and save it. Before
continuing, click on
Make Current
under
File
menu. The next step is to
test the drivers to insure that HYPACK is reading them correctly.
I/O Testing
All drivers should be tested at this time to insure that HYPACK is reading
them properly.
1- 21-Open
HYPACK for Windows 6.4 / Preparation / Initialization
and
select
I/O Test
. Turn on all sensors including the ECHOSCAN. A
window for each of the devices configured should appear. Click on
a window to bring it forward and verify correct data input (consult
software manuals if there is a question).
Geodesy Setup
1- Under
HYPACK for Windows 6.4 / Preparation / Initialization / File
select
Geodesy / Parameters
. Input all parameters and translation
values necessary to define the local grid and horizontal accuracy. If
State Plane is used, the units will automatically default to feet.
Consult the software manuals for details.
Before continuing,
Save
the configuration again (
Save As
may also be
necessary) and
Make Current
if it is to be used immediately
.
Also, check
Содержание ECHOSCAN
Страница 19: ...04 26 02 19 Revision 1 11 Blanking aeration Figure 17 Blanking Feature...
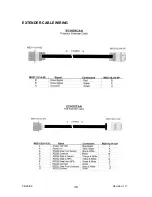
Страница 38: ...04 26 02 38 Revision 1 11 EXTENDER CABLE WIRING...
Страница 39: ...04 26 02 39 Revision 1 11 TRANSDUCER CABLES...
Страница 40: ...04 26 02 40 Revision 1 11...
Страница 41: ...04 26 02 41 Revision 1 11...
Страница 42: ...04 26 02 42 Revision 1 11 JUNCTION BOX WIRING...
Страница 43: ...04 26 02 43 Revision 1 11...
Страница 44: ...04 26 02 44 Revision 1 11 HEADING SENSOR WIRING...

