background image


BA_OLW I OTE3_SW5x_EN_20160815_V2 

45 /  48 

18.2  Flow rates OLWI (A) 


Heat pump 

Model 

Heating system 

Heat pump for heating 

Heat pump 

Article No. 

Nominal flow rate - 

heating system 

Internal pressure 

differential, heat pump 

plate heat exchanger 

(condenser) 


[m³/h] 

[l/min] 

[mbar] 

[mWS] 

OLWA 9 

Yonos-Para RS 25/7.5 

922523 

1.55 

25.83 

70 

0.71 

OLWA 13 

Yonos-Para RS 25/7.5 

922523 

2.12 

35.33 

110 

1.12 

OLWA 18 

Yonos-Para RS 25/7.5 

922523 

2.64 

44.00 

200 

2.04 

OLWI 9 

Stratos-Para 25/1-8 

internal 

1.55 

25.83 

70 

0.71 

OLWI 13 

Stratos-Para 25/1-8 

internal 

2.12 

35.33 

110 

1.12 

OLWI 18 

Stratos-Para 25/1-8 

internal 

2.64 

44.00 

200 

2.04 

Table 5:  Nominal flow rate 


18.3  Pump characteristics Yonos Para/ Stratos Para 


Stratos Para 25/ 1-8 , 30/1-8                                                        Yonos Para 15/ 7.5, 25/ 7.5, 30/ 7.5


∆p-constant                                                                                   ∆p-constant 


Fig.34:  Stratos Para 25/ 1-8 , 30/1-8 

1)


Fig.35:  Yonos Para 15/7.5, 25/7.5, 30/7.5 

1)

1) 

Source http://wilo.e-catalogues.info/


Содержание OLWI 13

Страница 1: ...BA_OLW I OTE3_SW5x_EN_20160815_V2 1 48 Operating Instructions Installation Instructions OLWI Air Water Heat pump Heating hot water ...

Страница 2: ...BA_OLW I OTE3_SW5x_EN_20160815_V2 2 48 ...

Страница 3: ...mats 16 8 2 2 Insulation 17 8 3 Mounting the cladding 17 8 4 Installing the air hoses 17 8 4 1 General 17 8 4 2 Installing the air hoses 17 8 4 3 Insulating the wall 17 9 Commissioning 18 9 1 Required on site personnel 18 9 2 Non self resetting safety thermostat 18 9 3 Appliance function 18 10 Operation 19 10 1 Safety functions 19 10 2 Running costs 19 10 2 1 Flow temperatures 19 10 2 2 Ventilatio...

Страница 4: ...ted to the control heat gen erator pumps safety thermostats etc Contact with the terminal strips wires connected to them or non connected wires by persons or by means of elec trically conductive materials is prohibited as the terminals strips could be live danger of touching power supply The control auxiliary modules terminal strips and wiring of the control can also be supplied with line voltage ...

Страница 5: ...ned between the sea and the place of installation 3 2 Function The heat from the outside air is extracted by means of an air heat exchanger evaporator The refrigerant vaporises and is then compressed by means of the compressor Electrical energy is necessary for this The refrigerant is now at a higher temperature level and transfers the heat from the air via a further heat exchanger condenser to th...

Страница 6: ...ion can however lead to undesired increase in the sound level under unfavourable circumstances NOTE You can find information on the sound power level in the Technical Data Data Table section 4 2 Air ducting Short circuiting between air inlet and outlet must be avoided in all events It is practical to construct the ducting across a cor ner If necessary a separating wall or suitable plants should be...

Страница 7: ...pliance is accessible from all sides Make sure that the foundation is horizontal level firm and permanent Ensure that the appliance frame fits uniformly on the foundation Uneven ground can influence the noise level of the heat pump 4 5 Foundation 1 Concrete base 2 Footfall sound insulation 3 Floating floor screed 4 Floor coating 5 All round cut out Fig 5 Base for inside installation De couple the ...

Страница 8: ... Two screws are provided in the bottom of the heat pump frame one for each side panel Unscrew the 6 fixing screws in the frame and keep them for later use Place the appliance on the prepared foundation Pay attention to the direction of the air outlet By fitting the pressure hoses supplied between the functional unit and the heat pump no further pres sure hoses must be fitted as vibration dampeners...

Страница 9: ... connection Connect the functional module to the heat pump with the pressure hoses supplied 1 Pressure hose flow 2 Pressure hose return Fig 8 Hydraulic connection functional module Check the plug connections on the safety group for firmness and seal ...

Страница 10: ...ystems in conjunction with steel pipework can lead to oxygen diffusion corrosion of the steel pipework The products of such corrosion such as rust silting can be deposited on the heat pump condenser and lead to loss of performance or switching off due to the restriction in the pipe cross section 6 2 Second heat generator In bivalent systems the heat pump must always be installed in the return from...

Страница 11: ...mp must be installed Take the constructional fac tors into consideration When using a condensate pump make sure that its rating is at least 6l min Condensate drain 1 Drain with odour trap 2 Drain hose with continuous gradient 3 Condensate drain connection Fig 11 Condensate drain Condensate drain with a condensate pump 1 Screed and floor covering 2 Footfall sound insulation 3 Condensate drain pipe ...

Страница 12: ...te drain After laying the condensate hose make sure that the condensate is draining freely Proceed as follows Pour water onto the evaporator so that it flows into the de icing sump Ensure the maximum conden sate flow of 6l min Check that the water drains away via the conden sate drain hose 6 6 Flow rate measurement The heat use system flow rate sensor is part of the heat pump and must be installed...

Страница 13: ... heat pump All three phase drives compressor pumps fans MUST be connected to a CLOCKWISE field of rotation 7 1 Cable cross sections Position min cross section Connection cable 230V pumps valve motors Connecting cables are always to be sized according to on site conditions 1 5 mm Sensor cables outside sensors etc must al ways be run separately min 20 cm from 230V 400V cables The maximum cable lengt...

Страница 14: ...nals will be transmitted between the control OTE and the Airstation A 5 pole control cable W5 5x 1 0mm is used for this This is already fitted in the functional module and only has to be connected to the Airstation distribution box 1 Wire OTE Pin 11 DHC1 and DHC2 2 Wire OTE Pin 20 De icing 3 Wire OTE Pin 4 RESET 4 Wire OTE Pin 24 HP ON 5 Wire OTE Pin 19 working Relay K1 A1 7 6 eBus wiring An eBus ...

Страница 15: ...e Ochsner hot water tanks are fitted with corresponding sleeves for the installation The current electromagnetic compatibility guidelines are to be adhered to during laying The sensors are to be checked after wiring up plausible values correct position sensors mixed up 7 8 Pumps drives 230 VAC Pumps heating circuit pumps hot water charge pumps as well as drives mixing valves etc are connected dire...

Страница 16: ...c tape The tape is in the accessory heat insulated air hose Fig 20 Seal the appliance inside 2 Hang the foil with the pre cut holes on the hooks on the appliance Fig 21 Seal the appliance inside 3 Remove the support layer of the tapes on the frame and on the foil Fix the foil by applying it to the basic appliance Seal the openings in the area of the hooks with fabric tape 8 2 Assembling the insula...

Страница 17: ...t and air outlet sides Do not make more than four 90 bends The bend ing radius must be at least 600 mm based on the hose middle Use a sharp knife to cut the hose The wire spirals can be cut with wire cutters Fix the air hose at ca 1 m intervals in order to pre vent the hose from sagging Offer up the ends of the air hoses to the oval form of the connecting sleeves of the cladding and the hose conne...

Страница 18: ... invoiced separate ly 9 2 Non self resetting safety thermostat At outside temperatures below 15 C the non self resetting safety thermostat can trigger the electric emergency auxiliary heater Check whether the safety thermostat has been activated Reset the safety thermostat by pressing the reset button 1 safety thermostat reset button 2 electric emergency auxiliary heater Fig 25 Non self resetting ...

Страница 19: ...ty devices for the compressor High pressure pressostat Start delay to avoid compressor chopping Frost protection function Start up and run down times of the fans 10 2 Running costs During the first heating season higher running costs can generally be expected depending on the residual moisture in the building up to 50 10 2 1 Flow temperatures In order to achieve an optimum heat pump operation the ...

Страница 20: ...fied system service intervals as well as the system checks must be adhered to If during larger reconstruction work or after burst pip ing the majority of the water in the heating system has to be drained off and refilled this must be carried out in the presence of the OCHSNER works customer ser vice OCHSNER authorised partner see Logbook If exceptional refilling work is to be carried out e g recon...

Страница 21: ...nt may only be de commissioned by an authorised specialist firm cool ing air conditioning heating The refrigerant resp brine fluid is to be evacuated removed correctly by the specialist firm and and recycled rsp disposed of Incorrect disposal of the refrigerant can lead to considerable environmental damage 12 3 Disposal of the appliance The disposal of the decommissioned heat pump should be carrie...

Страница 22: ...alked up Contact heating installer clean and decalcify heat exchanger Hot water temperature not reached or no longer reached Hot water heat exchanger too small Increase heat exchanger size Heat exchanger is chalked up Decalcify heat exchanger Wrong sensor positioning Correct positioning Pipework to small Fit larger pipes Hot water sensor defect Replace Hot water charge pump defect Replace Water ch...

Страница 23: ...ace sensor 116 Er 10 Outside sensor defect Replace sensor 117 Er 14 Mixer sensor defect Replace sensor 124 Er 20 TWR sensor defect Replace sensor 120 Er 22 Switch off sensors TWR TPM de fect Replace sensor 136 Er 23 TPV sensor defect Replace sensor 118 Er 24 Buffer sensor defect Replace sensor 114 Er 29 TWV sensor defect Replace sensor 8 8 Er 42 Frost protection in heating system Insufficient heat...

Страница 24: ...g c11 Safety group e22 Hot water Flow External thread G 1 1 4 A e23 Hot water Return External thread G 1 1 4 A E01 Heating flow External thread G 1 1 4 A e02 Heating return External thread G 1 1 4 A g01 air inlet g02 air outlet Please use only one common return e23 or e02 for heating and hot water with the OLWI as the flow meter must be installed on site in the common return pipework ...

Страница 25: ...BA_OLW I OTE3_SW5x_EN_20160815_V2 25 48 14 2 Hydraulic diagram ...

Страница 26: ...BA_OLW I OTE3_SW5x_EN_20160815_V2 26 48 14 3 Electric circuit diagrams OTE ...

Страница 27: ...BA_OLW I OTE3_SW5x_EN_20160815_V2 27 48 ...

Страница 28: ...BA_OLW I OTE3_SW5x_EN_20160815_V2 28 48 ...

Страница 29: ...BA_OLW I OTE3_SW5x_EN_20160815_V2 29 48 14 4 Wiring overview ...

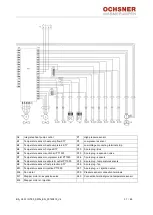
Страница 30: ...tor R3 Start up resistance F5 Non self resetting thermostat DAE X1 Terminal strips K1 Start up resistance relay X3 Power supply terminal strip K2 Compressor start up relay X4 Control terminal strip K5 Relay DAE X23 Earth block power supply K6 Relay DAE X29 12 pole plug control K7 Relay DAE X38 3 pole plug DAE M1 Compressor motor Y1 Diverter valve de icing N2 Differential pressure switch de icing ...

Страница 31: ...nsor suction air PT1000 X33 5 pole plug expansion valve B7 Temperature sensor compressor inlet PT1000 X34 7 pole plug sensors B8 Temperature sensor evaporator outlet PT1000 X35 6 pole plug temperature sensors B9 Temperature sensor frost protection KTY X36 3 pole plug fan B10 Temperature sensor injection PT1000 X37 5 pole plug el injection valve M6 Fan motor X39 Pressure sensor connection terminals...

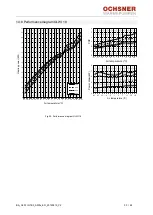
Страница 32: ... 9 5 1 3 7 11 15 19 Air tempearture ºC Power draw kW 6 7 8 9 10 11 12 13 14 15 16 17 21 19 17 15 13 11 9 7 5 3 1 1 3 5 7 9 11 13 15 17 19 21 Heating power kW 35 C 45 C 55 C 60 C Leistungskurven OLWA OLWI 13 Air temperature ºC 0 1 2 3 4 5 6 21 17 13 9 5 1 3 7 11 15 19 Air temperature ºC COP 2 3 4 5 6 21 17 13 9 5 1 3 7 11 15 19 Air temperature ºC Power draw kW 14 6 Performance diagram OLWI 9 Fig 28...

Страница 33: ... 5 7 9 11 13 15 17 19 21 Heating power kW 35 C 45 C 55 C 60 C Leistungskurven OLWA OLWI 18 Air temperature ºC 0 1 2 3 4 5 6 21 17 13 9 5 1 3 7 11 15 19 Air temperature ºC COP 14 8 Performance diagram OLWI 18 Fig 30 Performance diagram OLWI 18 3 4 5 6 7 8 21 17 13 9 5 1 3 7 11 15 19 Air temperature ºC Power draw kW ...

Страница 34: ...ng Capacity kW 8 9 12 9 16 6 8 9 12 9 16 6 Total Power Consumption kW 2 2 9 5 1 2 2 9 5 1 Coefficient of Perfomance EN 14511 EN 255 4 4 4 4 4 0 4 4 4 4 4 0 Drawn Current A 3 5 6 4 9 9 3 5 6 4 9 9 Heating Capacity kW 8 1 11 3 15 7 8 1 11 3 15 7 Total Power Consumption kW 2 1 3 4 3 2 1 3 4 3 Coefficient of Perfomance EN 14511 EN 255 3 8 3 8 3 6 3 8 3 8 3 6 Drawn Current A 3 7 6 5 10 3 7 6 5 10 Heati...

Страница 35: ...tal available external pressure differential hPa 1 0 1 0 1 0 1 0 1 0 1 0 Max available external pressure differential on suction side hPa 0 8 0 8 0 8 0 8 0 8 0 8 Construction Type Fin package material Number 1 1 1 1 1 1 Heat carrier Water Water Water Water Water Water Max Operating Pressure Antifreeze bar 30 30 30 30 30 30 Max Operating Pressure Heat carrier bar 6 6 6 6 6 6 Internal Pressure Diffe...

Страница 36: ...mum portion 2 2 0 3 5 0 4 1 0 5 6 0 6 0 5 7 5 0 8 0 5 9 1 5 10 0 5 11 3 5 12 0 5 13 3 0 14 0 5 15 0 5 16 0 5 17 2 0 18 0 5 19 1 5 20 0 5 21 0 5 22 0 5 23 1 5 25 1 5 25 0 5 Table 5 Voltage quality in the stand alone operation Total Harmonic Distortion THD 8 Frequency 49 5 to 50 5 Hz Slow voltage changes 230 V 10 Integration interval 10 min Rapid voltage changes 230 V 5 Integration interval 10 ms Vo...

Страница 37: ...BA_OLW A I OTE3_SW5x_DE_20160510_V2 37 48 15 Declaration of Conformity ...

Страница 38: ...BA_OLW I OTE3_SW5x_EN_20160815_V2 38 48 ...

Страница 39: ...BA_OLW A I OTE3_SW5x_DE_20160510_V2 39 48 16 ERP Data ...

Страница 40: ...BA_OLW I OTE3_SW5x_EN_20160815_V2 40 48 ...

Страница 41: ...pumps CO d 1 5 T 15 C if TO 20 C T 15 C if TO 20 C Bivalent temperature Tbiv 5 C or air to water heat pumps TO 10 C Operation limit temperature ower input compressor off 0 Heating water operating limit temperature TO 60 C ower consumption in modes other than active mode Supplementary heater Off mode O 20 k Rated heat output sup 4 4 k Thermostat off mode TO 20 k Type of energy input electricity Sta...

Страница 42: ...on as otherwise any war ranty claims and or claims for damages and or claims for avoidance on account of an error shall be excluded Deviations of the ordered products from the deliv ered products such as incorrect dimensions or wrong product aliud delivery must be notified within 3 days from delivery and prior to any for warding and or work on or processing of the goods Otherwise the object shall ...

Страница 43: ...ternal control interference with the control soiling during construction phase insuffi cient water quality lack of hydraulic separation non specified valves viii if dimensioning is incorrect or if the heat source system is installed incorrectly ix if evaporators are not connected in accordance with the installation and connection guidelines We shall only assume warranty for the functioning of our ...

Страница 44: ... Fig 32 Switch on heat generator pump 2 The measured flow rate is displayed this must correspond to the nominal flow Fig 33 Reading flow rate Setting p c Set the flow rate by turning the red adjustment screw Mi 20 02 2009 15 41 Betriebsbereit OCHSNER OTE MENU WAERMEPUMPE ESC ENTER WARMWASSERKREIS Betriebswahl Betriebsdaten Einstellungen Relaistest ESC ENTER Hauptmenü HEIZKREIS 1 HEIZKREIS 2 WARMWA...

Страница 45: ...a RS 25 7 5 922523 2 12 35 33 110 1 12 OLWA 18 Yonos Para RS 25 7 5 922523 2 64 44 00 200 2 04 OLWI 9 Stratos Para 25 1 8 internal 1 55 25 83 70 0 71 OLWI 13 Stratos Para 25 1 8 internal 2 12 35 33 110 1 12 OLWI 18 Stratos Para 25 1 8 internal 2 64 44 00 200 2 04 Table 5 Nominal flow rate 18 3 Pump characteristics Yonos Para Stratos Para Stratos Para 25 1 8 30 1 8 Yonos Para 15 7 5 25 7 5 30 7 5 p...

Страница 46: ... Power supply to the heat pump 13 Fig 17 OLWI distribution box 14 Fig 18 Heating buffer 14 Fig 19 Seal the appliance inside 1 16 Fig 20 Seal the appliance inside 2 16 Fig 21 Seal the appliance inside 3 16 Fig 22 Insulation mats 16 Fig 23 Insulation 17 Fig 24 Mounting the internal cladding 17 Fig 25 Non self resetting safety thermostat 18 Fig 26 Basic control panel 19 Fig 27 Dimension drawing insid...

Страница 47: ...BA_OLW I OTE3_SW5x_EN_20160815_V2 47 48 ...

Страница 48: ...Linz kontakt ochsner at www ochsner com Zentrale Werk Ochsner Straße 1 A 3350 Haag Tel 43 0 5 042458 Fax 43 0 5 04245 349 kontakt ochsner at www ochsner com Partner Hotline 0820 201020 Ochsner Wärmepumpen GmbH Deutschland Riederhofstraße 27 D 60314 Frankfurt am Main kontakt ochsner de www ochsner com Partner Hotline 01805 832840 Ochsner EAST Pl 30 198 Kraków Zakliki z Mydlnik 16 Tel 48 0 12 421452...

Отзывы: