background image


                                                                     Launch Box User Guide                                   

 July 2022

             P.4 

Ocean Sonics Launch Box Instructions  

OSL Tip


For a quick setup install 

Ocean Sonics

’ Software Programs


Marco


and


Lucy


on your PC prior to setting up your 

Launch Box


Assemble Launch Box Configuration  

1.


Turn Wi-Fi switch to ON position and wait 2 minutes to allow Wi-Fi to stabilize.  

2.


Turn remaining switches to ON position.  

3.


Attach cable(s) and hydrophone(s) in configuration for deployment. 

Connect to Launch Box Wi-Fi 

4.


Use a PC to connect to the Launch Box Wi-Fi  
(for troubleshooting Wi-Fi se

Appendix A

)

a.


Go to Wi-Fi settings on computer. 

b.


Ensure Wi-Fi is turned on. 

c.


Show available networks. 

d.


Select 

Launch_Box_[SerialNumber] 

to connect. 


Type in the


Password:


oceansonics


For Launch Box Wi-Fi settings se

Appendix B.   


      Setup Hydrophone  

5.


Open 

Marco

 on PC 

[Ocean Sonics’ Software Program found on icListen USB drive]

.  

a.


Click Refresh to view hydrophone(s) connected to the Launch Box. 

b.


All units on 

Marco

 should be set to DHCP (See 

Appendix C

 for 

Marco

 Help). 

c.


Using Marco open the icListen in a Web Browser (double click on serial #). 

6.


Configure the hydrophone for deployment. 

a.


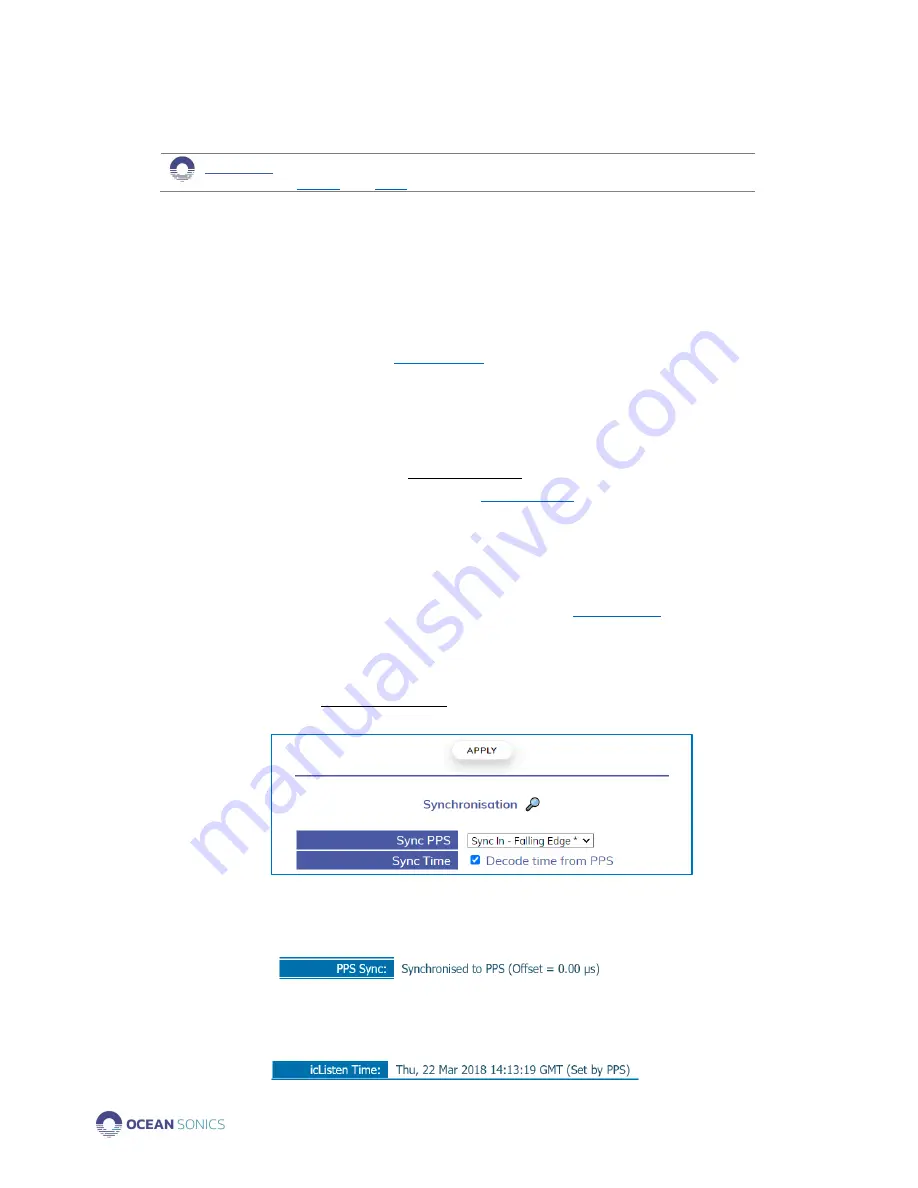
Set the icListen to Synchronise to the GPS. 

i.


Under Special Features ensure 

Sync In 

 Falling Edge

 is selected  

and 

Decode Time from PPS

 is checked.  

ii.


iii.


If the Launch Box is in a location where it can receive a GPS signal,  
the Home Page should indicate the hydrophone is synchronising or is 
Synchronised to PPS (see below).  


iv.


When it has a GPS sync, the time will indicate it was set by PPS.   
(This can take up to 5 minutes for a hydrophone to obtain GPS 
synchronisation. Ensure the correct date and time are displayed.)  


Содержание BL-B4-GPS-B

Страница 1: ...Launch Box User Guide BL B4 GPS B July 2022 Version 2022 1...

Страница 2: ...ployment 6 Recovery 6 Charging the Battery 6 Contact Ocean Sonics Ltd 7 Appendix A Troubleshooting the Wi Fi Connection 8 Appendix B Wi fi Network Settings 9 Checking Wi Fi Network Configuration 9 Che...

Страница 3: ...ported and stowed with ease Never let your hydrophone die after 8 hours again with the ability to keep a hydrophone charged for 48 hours This all in one solution combines power Wi Fi GPS positioning a...

Страница 4: ...when not in use and recharge battery after each deployment Ensure the Launch Box is fully charged and in the OFF position before each use Specifications WEIGHT 2 3 kg DIMENSIONS 259 mm x 201 mm x 114...

Страница 5: ...s For Launch Box Wi Fi settings see Appendix B Setup Hydrophone 5 Open Marco on PC Ocean Sonics Software Program found on icListen USB drive a Click Refresh to view hydrophone s connected to the Launc...

Страница 6: ...les 1 To start GPS logging turn the GPS switch on the Launch Box to the ON position 2 To see and access the logged GPS data go to the IP address of the Launch Box and type log at the end of the addres...

Страница 7: ...s power 2 Connect to Wi Fi on Launch Box 3 Turn off hydrophone recording 4 Place Hydrophones into Standby Mode 5 Turn off Power to hydrophones 6 Toggle icListen Power switch to STOP position 7 Turn of...

Страница 8: ...n com users software Service To request an RMA or technical support Email support oceansonics com Phone 1 902 655 3000 Sales For general sales inquiries Email sales oceansonics com Phone 1 902 655 300...

Страница 9: ...may be necessary to turn on Automatic DHCP Windows 10 1 Go to Network Connections Control Panel Network and Sharing Centre and click on the Launch Box Wi Fi 2 Choose Properties 3 Click on Internet Pr...

Страница 10: ...n should be set to Connect Automatically If this is not checked the settings will not be configured and will roll back after 90 seconds Alternatively you can re connect manually within the 90 seconds...

Страница 11: ...connecting you can use this setting Useful if there are objects blocking the signal to the laptop 5 GHz provides a faster speed o Useful if you are closer and require higher sampling rates or faster...

Страница 12: ...password must be 8 or more characters into Password bar a The default password is root 4 Click SAVE Configuring Network Settings Note We do not suggest changing the Network Settings unless required Ma...

Страница 13: ...Click SAVE 5 Click SAVE APPLY Note The Wi Fi must be reconnected once the settings are applied The new IP address will be required to view the web browser the address can be found by viewing the Netw...

Страница 14: ...lick Backup Flash Firmware b Restore c PERFORM RESET Resetting Wi Fi A Wi Fi reset can be done to recover the Wi Fi network settings to the original configuration that was provided for the Launch Box...

Страница 15: ...he hydrophone serial number 2 Click Configure 3 Choose Automatic DHCP 4 Click Send to Device and wait for settings to be successfully sent to the unit 5 Continue this for each unit so they are all set...

Страница 16: ...on device 3 Open the Fing App to find the IP address of the hydrophone s connected 4 Type the hydrophone IP Address of your hydrophone s found into a web browser 5 Use the web browser to configure se...

Страница 17: ...Launch Box User Guide July 2022 P 16 Appendix E Technical Drawing...

Страница 18: ...54 00 Fix taken at 12 36 54 UTC A Status A active or V Void 4520 72561 Latitude DDmm mm N Latitude direction N North S South 06318 54342 Longitude DDmm mm W Longitude direction E East W West 3 246 Spe...

Отзывы: