background image

4-5

4. Printer Driver for WindowsNT

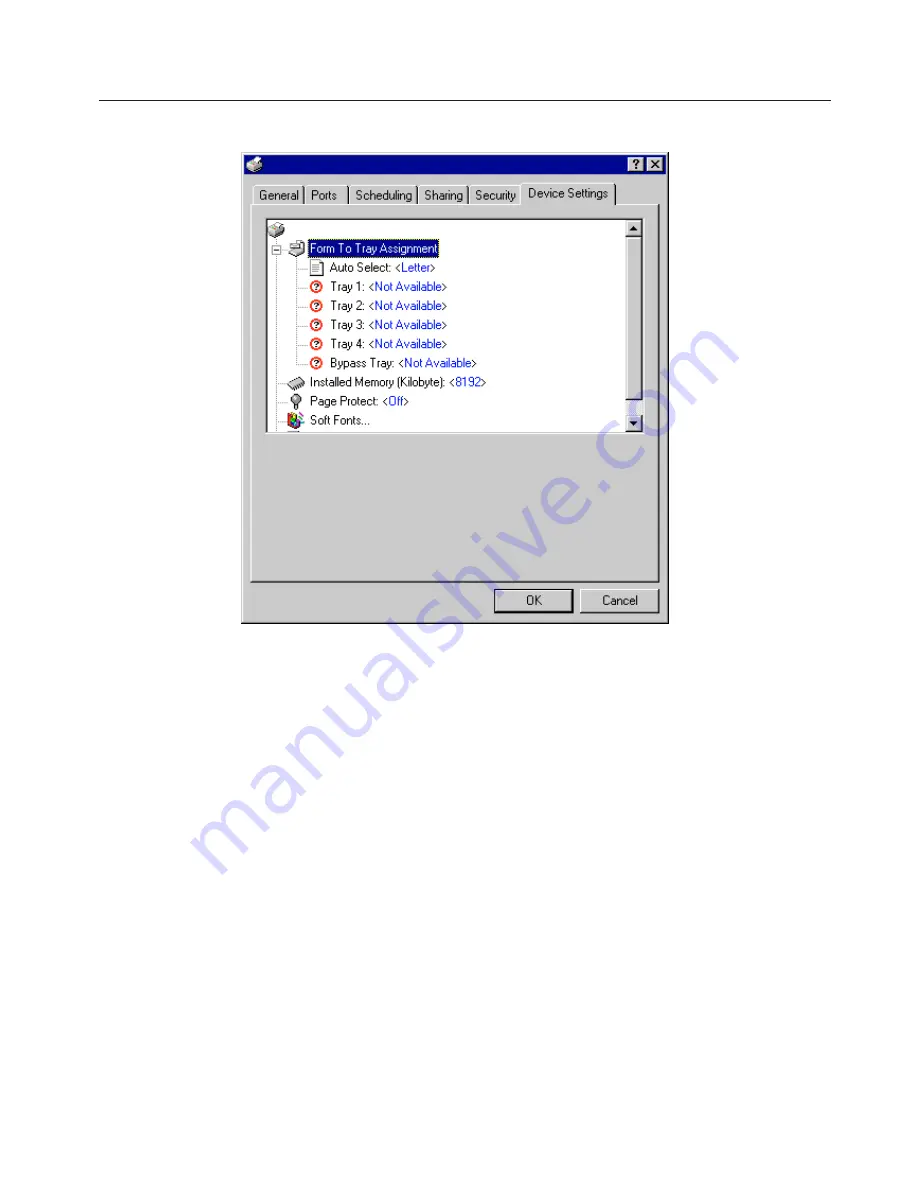
4-5 Device Settings Tab (Universal Driver)

In order to view this window and make settings for optional equipment, select “Properties” in step 4 on page 4-1 and then click on the “Device
Settings” Tab.

Installed Memory (Kilobyte)
Perform this setting according to the amount of memory in your printer. If a mistake is made in this setting, there is a possibility that printing
will not be accomplished properly.

Содержание Oce Printing System

Страница 1: ...1 1 1 Oc OP15 Printing System Functions Operations Guide Education Services Oc Operations Guide English version...

Страница 2: ...copier 2 Printer Settings 20 ppm copier 3 Memory Card RAM Disk Chapter 2 Software related operation 1 Procedure for Installing and Printing with a Printer Driver 2 Windows XL Driver 3 Printer Driver f...

Страница 3: ...ess Group Redondo Beach CA 90278 U S A Contains UFSTTM and MicroType from Agfa Corporation All other company and product names contained in this Instruction Handbook are trademarks or registered trade...

Страница 4: ...SS FOR A PARTICULAR PURPOSE Some jurisdictions do not allow the exclusion of implied warranties so the above exclusion may not apply to you SUPPLEMENT TO AGREEMENT FOR SOFTWARE BUNDLING AND DISTRIBUTI...

Страница 5: ...n or destroy all copies of the Software and Typefaces and documentation as requested 6 You agree that you will not modify alter disassemble decrypt reverse engineer or decompile the Software 7 Agfa Ja...

Страница 6: ...irectly such as with a network address or the time etc use the numeric keys to enter the desired information and then press the Enter key When you enter a network address it necessary to press the Ent...

Страница 7: ...m copier Metric version Printer Key Copy quality magnification display Enter Manual key Numeric keys Zoom key Zoom key Stop Clear CANCEL key Start GO key Printer Key Copy quality magnification display...

Страница 8: ...the Service Rep Status Page print out setting menu P76 Emulation protocol parallel interface Sets the emulation protocol that will be used Available settings 1 Auto 2 Normal 3 High Speed 4 Nibble high...

Страница 9: ...re the machine will monitor the data and if necessary will automati cally turn Page Protect ON If a Print overrun error error code E80 does happen to occur even then the machine will automatically cha...

Страница 10: ...at can be selected is the total amount of memory installed minus the amount used by the system 9 MB A4 Letter usage ON OFF Allows both A4 and letter size paper to be utilized as though they are the sa...

Страница 11: ...f however Permanent Tempo rary setting 3 is selected temporary resources will also be saved Permanent Temporary Auto Continue ON OFF If one of the following error messages appears and On has been sele...

Страница 12: ...then pressing the Enter key When it is necessary to type in a value or number directly such as with a network address or the time etc use the numeric keys to enter the desired information and the cur...

Страница 13: ...ion Printer Key Message display Numeric keys Cursor right key Stop Clear key Cursor key GO command CANCEL command MENU command Cursor left key Cursor right key GO command CANCEL command MENU command M...

Страница 14: ...Card option settings NetWare ON OFF NetWare frame type TCP IP ON OFF DHCP ON OFF IP address Subnet Mask Gateway address EtherTalk ON OFF Network Card Status Page print out ON OFF Emulation protocol Li...

Страница 15: ...out Option Font selection Font List print out Printing environment settings Number of copies Printing orientation Page Protect Line Feed LF handling Carriage Return CR handling Wide A4 ON OFF Printin...

Страница 16: ...ing program data Deleting macro data Partition List print out Memory Card settings Reading fonts Reading macro data Reading data Reading program data Writing data Deleting data Deleting font data Dele...

Страница 17: ...Duplex mode A4 Letter usage ON OFF Bypass mode Other settings Form feed time out Receive dump mode Printer reset Resource protect mode Auto Continue ON OFF Recovery time for Auto Continue Service Ser...

Страница 18: ...ith the Service Rep Status Page print out setting item No 1 Emulation protocol Sets the emulation protocol that will be used Display message Print Status Page Interface Parallel NetWare NetWare Frame...

Страница 19: ...ont Allows you to select between Regular and Dark Letter Gothic font Allows you to select between Regular and Dark Font List print out Prints out a list of KPDL fonts when the emulation protocol has b...

Страница 20: ...ting for data state until data is sent from the host computer To exit this state select the GO command in the printer mode and then press the Enter key Display message Page Protect LF Action CR Action...

Страница 21: ...Available settings Select the name of the partition which holds the data from among those displayed Select the name of the font from among those displayed Select the name of the partition which holds...

Страница 22: ...until they are manually force printed by selecting the GO command in the printer mode and then pressing the Enter key Display message Delete Font Delete Program Delete Macro Format List of Partitions...

Страница 23: ...s will not be saved If however Per Temp is selected temporary resources will also be saved Auto Continue ON OFF If one of the following error messages appears and On has been selected here the error s...

Страница 24: ...ortens the overall time required for printing as well as to save data to and retrieve data from that disk very quickly Additional memory option must be installed before a RAM Disk can be created IMPOR...

Страница 25: ...mand operation start C Command RWER D is the command to delete data D Parameters A refers to the Memory Card 2 refers to the type of data in this case print data and SAMPLE txt is the name of the corr...

Страница 26: ...isk from your computer In 20 ppm copiers print data commands are entered from the operation panel on the copier itself Refer to 2 Printer Settings 20 ppm copier on page 2 1 for information on the appr...

Страница 27: ...2 3 4 5 NOTES The parameters contained within the command line are as follows 1 A refers to the Memory Card and 0 refers to the RAM Disk 2 0 refers to a TrueType font 1 refers to a Japanese TrueType f...

Страница 28: ...he corresponding data will begin 3 3 6 Deleting print data or font data Perform the following procedure when you want to delete print data or font data that has been saved on a Memory Card or RAM Disk...

Страница 29: ...emory Card To print out the Partition List for a RAM Disk simply change the A parameter to 0 If you do not include this parameter both Partition Lists will be printed out C WINDOWS ECHO R RWER L A EXI...

Страница 30: ...their fullest This driver is compatible with Adobe PostScript 2 A PPD PostScript Printer Description file is included for use with this product Use LaserWriter 8 as the printer driver for your Mac OS...

Страница 31: ...ore Recomended requirements 32 MB or more 10 MB or more CD ROM drive 1 drive Parallel interface port IEEE 1284 CPU RAM HDD CPU RAM HDD 1 2 System Conditions IBM PC AT or compatible i486SX 25 MHz or mo...

Страница 32: ...py disk Use of this floppy disk allows you to install the printer driver without the need of the installer CD ROM Driver for Macintosh cannot be made Documentation Click to display the manual PDF supp...

Страница 33: ...Windows 95 98 Start Windows If any applications are currently running exit them Insert the CD ROM supplied with the printer into the CD ROM drive A start window will appear 1 2 Click Install Driver i...

Страница 34: ...step 12 If Network is selected proceed to step 11 9 10 Enter the network queue name or the path for the network queue in the box To select another network queue name press Browse If you are going to...

Страница 35: ...o your printer Specify a new name or select the desired name from the list then click Next 12 13 Specify whether this printer is to be used as the default printer Click Yes if so or click No if not Th...

Страница 36: ...ler CD ROM into the CD ROM drive on your computer The window shown on the right will appear 1 2 Click on Driver Tools and then on Remove Drivers from the subsequent menu The Remove Printer Drivers dia...

Страница 37: ...Select Finisher as the Output Device setting 2 Set the VM Option setting to more than 24 MB It is necessary to increase the memory capacity of your printer 3 Select RAM Disk under Optional Disk Once...

Страница 38: ...make and which pages are to be printed Select this printer in the Name field Click on Properties The Properties window will appear 8 Perform the following settings in order to staple your printed sets...

Страница 39: ...copier there may be functions that are not supported or that require optional equipment to be installed Even if the settings for such functions are performed they will not be effective Refer to the In...

Страница 40: ...s possible from among the following items If you select Auto Source Selection the printer will automatically choose the tray that contains the most appropriate paper for the job The factory default se...

Страница 41: ...ck and the desired dimen sions of the paper in the Size block Available settings Units Inches or Millimeters Height 5 83 17 00 Inches 148 1 431 8 Millimeters Width 3 88 11 69 Inches 98 4 297 0 Millime...

Страница 42: ...ed on the original settings and the image may be even further enlarged or reduced Print on Both Sides Duplex Select this checkbox by clicking on it and putting a check mark in the box in order to perf...

Страница 43: ...of the slider bar Conversely when you want to print the image darker than the actual original drag the slider towards the minus sign or type in a negative number directly into that field Contrast Adju...

Страница 44: ...between 1 and 999 copies by clicking on the arrows at the right of the field or by typing the desired number directly into the field The factory default setting is 1 Collate When you are printing mor...

Страница 45: ...parator is installed RAM Disk Perform this setting when you want to create a RAM disk Refer to Chapter 1 3 2 RAM Disk on page 3 1 for more detailed information on creating a RAM disk In order to creat...

Страница 46: ...agement Code field here and that registered in the printer itself do not match printing will not be possible If Copy Management is turned ON and this setting does not match the setting made in the pri...

Страница 47: ...r such functions are performed they will not be effective Refer to the Instruction Manual for Windows or to On Line Help for information regarding items that are not explained in this Instruction Hand...

Страница 48: ...etting is Auto Select 20 ppm copier Tray 3 and Tray 4 are available only when the Option Cassette is installed 15 ppm copier Tray 2 Tray 3 and Tray 4 are available only when the Option Cassette is ins...

Страница 49: ...ray Copies will be ejected onto the Inner tray Job Separator Copies will be ejected into the optional Job Separator Finisher Staple Off Copies will be ejected into the optional Finisher Only available...

Страница 50: ...dots per inch Dithering Specifies the method of Dithering Refer to On Line Help for more detailed information Intensity Allows you to adjust the printing contrast Drag the slider towards Darkest or Li...

Страница 51: ...is setting does not match the setting made in the printer itself it will not be possible to make test prints Thus when you install the printer driver you will need to check the Copy Management setting...

Страница 52: ...you want to select the source of paper feed according to the tray make sure that Cassette Base is selected there In addition if you select AutoSelect Tray here be sure that the Page Policy setting is...

Страница 53: ...er edge 20 ppm copier Available only when the optional Duplex Unit is installed 15 ppm copier Duplex printing is NOT available Paper sizes types and source of paper feed that are acceptable for duplex...

Страница 54: ...or detailed images you may want to adjust these settings However the default printer settings should work in most cases Do not change these settings unless you have experience using halftones To retur...

Страница 55: ...ejected onto the Inner tray Job Separator Copies will be ejected into the optional Job Separator Finisher Copies will be ejected into the optional Finisher Only available with 20 ppm copiers In order...

Страница 56: ...ding to the type of paper you are going to select AutoSelect Tray under Paper source Cassette Base Select this setting when you want to select the source of paper feed according to the tray under Pape...

Страница 57: ...3 11 3 Printer Driver for Windows 95 98 3 8 PostScript Tab KPDL2 Driver Allows you to make PostScript related settings Refer to On Line Help for more detailed information...

Страница 58: ...the message display of the 20 ppm copier for purposes of explanation but the actual basic operation procedure is the same for 15 ppm copiers as well Depending upon version upgrades of the printer driv...

Страница 59: ...r will automatically choose the tray that contains the most appropriate paper for the job The factory default setting is Automatically Select 20 ppm copier Tray 3 and Tray 4 are available only when th...

Страница 60: ...the optional Duplex Unit is installed 15 ppm copier Duplex printing is NOT available Paper sizes and source of paper feed that are acceptable for duplex printing are as follows Paper sizes Letter 8 1...

Страница 61: ...0 mm JIS B4 and JIS B5 Source of paper feed Any tray EXCEPT the Bypass Tray Paper sizes and source of paper feed that are acceptable for stapling are as follows Paper sizes Letter 8 1 2 x 11 Legal 8 1...

Страница 62: ...ttings for optional equipment select Properties in step 4 on page 4 1 and then click on the Device Settings Tab Installed Memory Kilobyte Perform this setting according to the amount of memory in your...

Страница 63: ...e Policy on page 4 10 BEFORE making settings here If you want to select the source of paper feed according to the type of paper select Auto Size Select there If you want to select the source of paper...

Страница 64: ...hort Side Prints on both sides and binds along the shorter edge 20 ppm copier Available only when the optional Duplex Unit is installed 15 ppm copier Duplex printing is NOT available Paper sizes types...

Страница 65: ...4 8 4 Printer Driver for WindowsNT Allows you to make PostScript related settings Refer to On Line Help for more detailed information 4 8 Document Options KPDL2 Driver 4 8 1 PostScript Options...

Страница 66: ...ers In order to set the location of ejection for the Job Separator or Finisher it is necessary to first perform the setting for that optional equipment under Installable options on page 4 11 Paper siz...

Страница 67: ...not match the setting made in the printer itself it will not be possible to make test prints Thus when you install the printer driver you will need to check the Copy Management settings and make a tes...

Страница 68: ...this setting according to the installed Option Cassette Output Device Perform this setting when the optional Job Separator or Finisher only available with 20 ppm copiers are installed Duplex Unit Perf...

Страница 69: ...the KPDL2 driver for those who use Windows 2000 as their operating system This Instruction Handbook uses illustrations from the message display of the 20 ppm copier for purposes of explanation but th...

Страница 70: ...Plain Recycled and Color Source of paper feed Any tray EXCEPT the Bypass Tray Page Order The Printer has the ability to print from the 1st page or from the last page It is necessary to enable Advanced...

Страница 71: ...matically Select the printer will automatically select the tray that contains the most appropriate paper for the job The factory default setting is Automatically Select It is necessary to perform the...

Страница 72: ...be made in the drop down list The following standard size paper sheets and envelopes can be used with this printer Copy Count Set the number of copies to be made The allowable range is from 1 to 999...

Страница 73: ...r for Windows2000 5 4 3 Document Options Advanced Printing Features Be sure to select Enable for this setting if you want to use the Pages Per Sheet N Up function or the Back to Front option under the...

Страница 74: ...arator or Finisher it is necessary to first perform the setting for that optional equipment under Installable options on page 5 9 Paper sizes and types that are acceptable for use with the Job Separat...

Страница 75: ...lation procedure is complete When Copy Management is turned ON even if you send a print command with a DOS COPY command printing will not be possible if you do not use a printer driver Edge Smoothing...

Страница 76: ...Printer Driver for Windows2000 5 4 5 PostScript Options This option can only be used with a KPDL2 Driver Allows you to make PostScript related settings Refer to On Line Help for more detailed informa...

Страница 77: ...eparator or Finisher only available with 20 ppm copiers are installed Duplex Unit Perform this setting when the optional Duplex Unit only available with 20 ppm copiers is installed Optional Disk only...

Страница 78: ...nd a screen may be different by a version of utilized software to some extent A Install Drivers Click to start installation of the printer driver Follow the instructions displayed on the screen to ins...

Страница 79: ...of use dialog box will appear 2 Double Click on the copy machine product name of use Installer icon The window shown on the right will appear Click on Continue 3 A dialog box will appear Click on Ins...

Страница 80: ...tScript Printer list and close the Chooser Once installation is complete a Readme file will appear on the desktop Be sure to read this file as it contains important information in regard to this produ...

Страница 81: ...ect the tray that contains the most appropriate paper for the job The factory default setting is Auto Select It is necessary to perform the settings under Page Policy on page 6 6 BEFORE making setting...

Страница 82: ...on both sides of the paper Binding Enable selection of the desired the binding orientation If left button is selected the binding orientation is along the side of the paper 20 ppm copier Available onl...

Страница 83: ...ize Select here or there is a possibility that printing will be accomplished onto paper that is difference the expected Output Bin Specifies the location of ejection Depending upon which option you ha...

Страница 84: ...Bin setting and On under Sort Paper sizes types and source of paper feed that are acceptable for stapling are as follows Paper sizes Letter 8 1 2 x 11 Legal 8 1 2 x 14 Tabloid 11 x 17 A3 A4 JIS B4 an...

Страница 85: ...rWriter that you are using For the user using Mac OS 7 6 1 we strongly recommend that you update the LaserWriter8 3 2 to Laser Writer 8 5 1 Format for Use this pop up menu to select the Printer that y...

Страница 86: ...upon the application and the version of LaserWriter that you are using Visual Effects Visual effects such as horizontal and vertical flip and image inverting can be selected here Place a check in the...

Страница 87: ...fer somewhat depending upon the application and the version of LaserWriter that you are using New button To create a new custom page size click this button The acceptable paper width is between 9 81 2...

Отзывы: