background image

5-2

USING AN EXTENSION PHONE

You can connect a telephone to the machine and use it as an extension phone to place and receive calls like any
normal phone. You can also activate fax reception from the phone (remote operation).

USING AN EXTENSION PHONE TO RECEIVE A FAX

The machine normally receives faxes automatically after ringing (page 2-10); however, when an extension phone is
connected, you can set the reception mode to "MANUAL RECEPTION". This will allow you to talk to the other party
first and then receive a fax.
This is convenient when you only have one telephone line and receive more voice calls than faxes. You must answer
all calls on the extension phone, and activate fax reception after you verify that a call is a fax transmission.

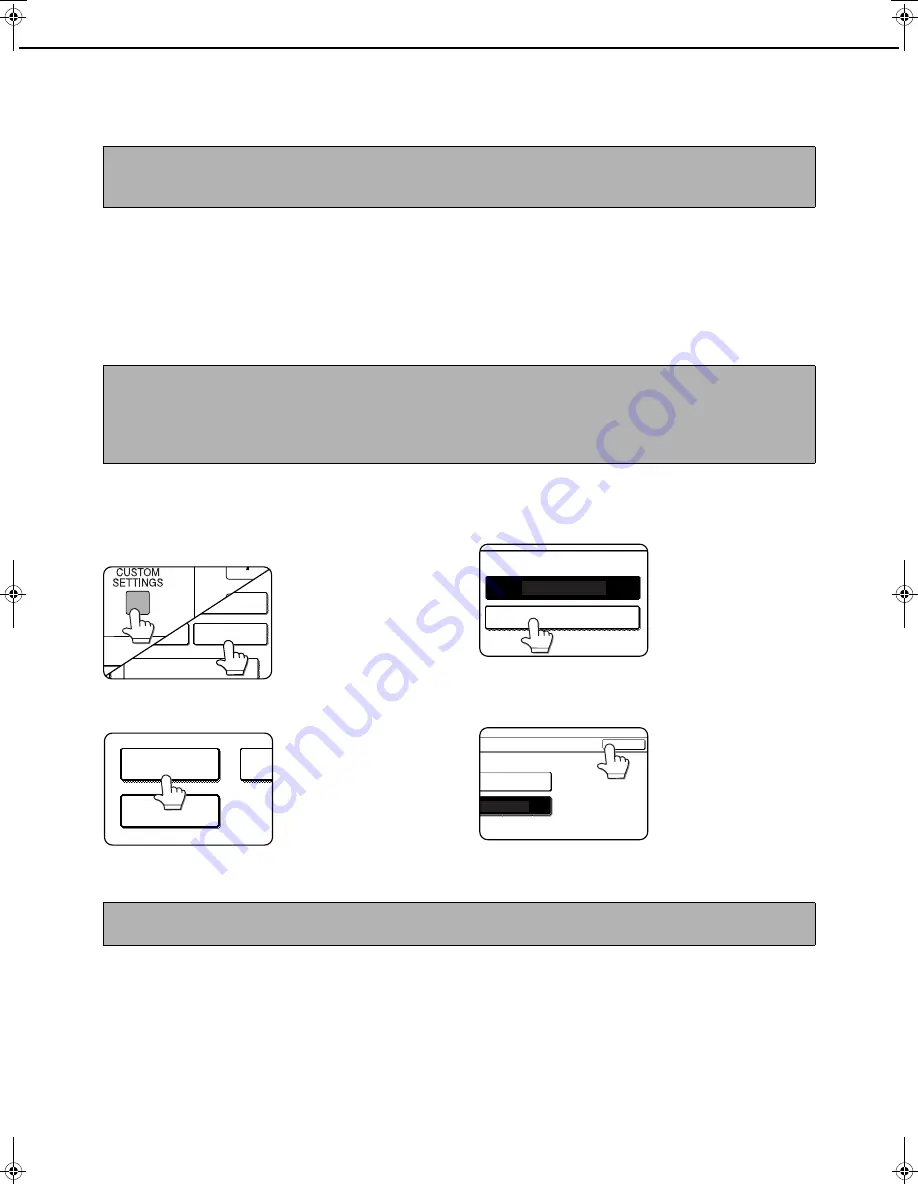
Changing the reception mode to "MANUAL RECEPTION"

1

Press the [CUSTOM SETTINGS] key. Then
touch the [FAX DATA RECEIVE/
FORWARD] key .

2

Touch the [RECEIVE MODE] key.

3

Touch the [MANUAL RECEPTION] key.

The [MANUAL
RECEPTION] key is
highlighted.

4

Touch the [OK] key.

The reception mode is
set to "MANUAL
RECEPTION".

You will return to the
screen of step 2.

Touch the [OK] key in
the screen of step 2, and

then touch the [EXIT] key in the [CUSTOM
SETTINGS] screen to return to the main screen.

NOTE

If you connect a combination telephone/answering machine to the machine, you will not be able to use the
answering machine function.

NOTES

The reception mode is initially set to "AUTO RECEPTION". If you have not connected an extension phone, keep
the reception mode set to "AUTO RECEPTION".

If you hear beeps during reception or at the end of reception and an error message appears in the display, refer
to page 7-3.

FAX DATA

RECEIVE/FORWARD

SENDER CONTROL

KEY OPERATOR PROGRAMS

LIST PRINT

RECEIVE MODE

FAX

FO

I-FAX DATA

FORWARD

AUTO RECEPTION

MANUAL RECEPTION 

RECEPTION

RECEPTION 

OK

NOTE

To return the reception mode to AUTO RECEPTION, touch the [AUTO RECEPTION] key in step 3 above.

Tiger2_fax_sec.book  2 

ページ


2004年12月15日 水曜日 午前11時4分

Содержание im4512

Страница 1: ...For Oc and Imagistics Models Oc Facsimile Operations Manual im4512 im3512 im4511 im3511...

Страница 2: ...from the panel described in the Facsimile Operation Manual When reading explanations that use an illustration of the operation panel refer to the illustration below For the names and functions of the...

Страница 3: ...3 on pages 8 3 and 8 11 are as follows 1 Press the SYSTEM SETTINGS key 2 Touch the ADMINISTRATOR SETTINGS key 3 Enter the administrator password 5 digit number with the numeric keys The factory defau...

Страница 4: ...inistration Settings 2 Enable Inbound Routing This enables the inbound routing settings 3 Click Submit Store sender numbers Create a list of sender fax numbers The list created here will be selected i...

Страница 5: ...ttings screen Sender Number Address Setting If you wish to have received faxes from all senders forwarded select Forward All Received Data If you wish to forward the faxes of specified senders select...

Страница 6: ...ation Settings in Inbound Routing Settings in the menu frame Administrator rights are required to access the Administration Settings 15Configuring administrator settings Administration Settings Inboun...

Страница 7: ...y when the network scanner option is installed to switch between the E MAIL FTP and INTERNET FAX screens Use this key when the network scanner option is installed to switch between the SCAN and INTERN...

Страница 8: ......

Страница 9: ...This manual has been printed using a vegetable based soy oil ink to help protect the environment Printed on 100 post consumer recycled paper PRINTED IN CHINA 2007J KS1 TINSE3942FCZZ...

Страница 10: ...d and found to comply with the limits for a Class A digital device pursuant to part 15 of the FCC Rules These limits are designed to provide reasonable protection against harmful interference when the...

Страница 11: ...operation manual For other functions see the following manuals as appropriate Copier function See Copying operation manual General and copier related key operator programs See the key operator s guid...

Страница 12: ...MULTIPLE DESTINATIONS IN A SINGLE OPERATION BROADCAST TRANSMISSION 3 2 USING BROADCAST TRANSMISSION 3 3 ERASING EDGE SHADOWS EDGE ERASE 3 4 USING EDGE ERASE 3 4 FAXING A DIVIDED ORIGINAL DUAL PAGE SC...

Страница 13: ...G F CODE MEMORY BOXES 6 10 PROGRAMMING AN F CODE MEMORY BOX 6 10 SETTING FOR F CODE POLLING MEMORY BOXES POLLING TIMES 6 11 SETTING FOR F CODE CONFIDENTIAL TRANSMISSION MEMORY BOXES PRINT PIN 6 12 SET...

Страница 14: ...m your sender s name and number in the machine This procedure is explained in POINTS TO CHECK AND PROGRAM AFTER INSTALLATION on page 1 2 of this manual Lithium battery A lithium battery inside the mac...

Страница 15: ...y are the REN without a decimal point e g 03 is a REN of 0 3 For earlier products the REN is separately shown on the label If this equipment causes harm to the telephone network your telephone company...

Страница 16: ...ould complete the following steps See CHAPTER 8 of this operation manual IMPORTANT SAFETY INFORMATION If any of your telephone equipment is not operating properly you should immediately remove it from...

Страница 17: ...RS AU CANADA AVIS Le pr sent mat riel est conforme aux sp cifications techniques applicables d Industrie Canada Remarque L indice d quivalence de la sonnerie IES sert indiquer le nombre maximal de ter...

Страница 18: ......

Страница 19: ...HE OPERATION PANEL 1 3 FAX MODE CONDITION SETTINGS SCREEN 1 4 ORIGINALS 1 6 ORIGINALS THAT CAN BE FAXED 1 6 LOADING A DOCUMENT 1 7 USING THE AUTOMATIC DOCUMENT FEEDER 1 7 USING THE DOCUMENT GLASS 1 7...

Страница 20: ...user of the machine is programmed in Fax own number and name set page 8 5 in the key operator programs The programmed name and number are printed at the top of each transmitted fax page The sender s...

Страница 21: ...key clear key Use to clear a mistake when entering fax numbers sub addresses passcodes and numerical settings One digit is cleared each time you press the key When an original is being scanned this k...

Страница 22: ...this manual This key and the Speed Dial number can be used to abbreviate the transmission procedure see Speed Dialing on page 2 4 SPEAKER key page 1 12 Touch the SPEAKER key to dial and transmit a fax...

Страница 23: ...isplay is initially set to show 6 keys This can be changed to 8 or 12 using the key operator program See The number of direct address sender keys displayed setting on page 8 4 Display illustrations in...

Страница 24: ...riginal size Using the automatic document feeder 8 1 2 width x 5 1 2 length A5 210 mm width x 148 mm length 5 1 2 width x 8 1 2 length A5R 148 mm width x 210 mm length 11 width x 31 1 2 length 297 mm...

Страница 25: ...stops The stack should not be higher than the indicator line maximum 50 pages or 30 pages for 8 1 2 x14 or larger documents USING THE DOCUMENT GLASS 1 Open the document glass cover and place the docum...

Страница 26: ...size original on the document holder or on the document glass touch the SIZE INPUT tab and then enter the width X and length Y of the original with the keys X width is initially selected Enter X and...

Страница 27: ...of the original with the keys X width is initially selected Enter X and then touch the key to enter Y A width of 2 1 2 to 17 inch 64 to 432 mm can be entered in X and a length of 2 1 2 to 11 5 8 inch...

Страница 28: ...document feeder the resolution setting cannot be changed once scanning has begun When a fax is sent at ULTRA FINE SUPER FINE or FINE resolution a lower resolution will be used if the receiving machin...

Страница 29: ...AUTO ORIGINAL STANDARD RESOLUTION AUTO EXPOSURE AUTO MANUAL MANUAL AUTO OK NOTES When using the document glass to scan pages an original the exposure setting can be changed each time you change pages...

Страница 30: ...edialing The machine keeps the last fax number dialed with the numeric keys in memory You can redial the last number dialed by simply touching the RESEND key If numeric keys were pressed during a phon...

Страница 31: ...AUTO DIALING ONE TOUCH DIALING AND GROUP DIALING 2 4 SENDING A FAX BY SPEED DIALING 2 4 FAX NUMBER ENTRY WITH GLOBAL ADDRESS SEARCH 2 5 ENLARGING REDUCING THE IMAGE BEFORE TRANSMISSION 2 6 FAXING A T...

Страница 32: ...ed adjust the exposure setting Refer to page 1 11 6 If desired touch the FILE key or the QUICK FILE key Can only be used when the document filing function has been added These keys are used to store t...

Страница 33: ...AD END key appears in the touch panel 9 If you have another page to scan change pages and then press the START key Repeat this sequence until all pages have been scanned You can change the resolution...

Страница 34: ...n also send a fax by touching the key Speed Dial key and entering a 3 digit Speed Dial number Follow the steps below to send a fax by Speed Dialing The 3 digit Speed Dial number is automatically assig...

Страница 35: ...appear as destination keys If matching addresses are not found a message indicating the result is displayed In this case touch the OK key and touch the SEARCH AGAIN key to return to step 4 6 Touch the...

Страница 36: ...Touch the key under SEND SIZE If the key under SEND SIZE is grayed out specify a standard original size in step 4 6 Touch the key of the desired enlargement or reduction size The AUTO key is no longe...

Страница 37: ...ginal size that appears in the key If the size was not detected correctly specify the correct size See MANUALLY SETTING THE SCANNING SIZE on page 1 8 4 Touch the 2 SIDED BOOKLET key or the 2 SIDED TAB...

Страница 38: ...y pressing the JOB STATUS key and canceling as explained on the following page This machine also supports error correction mode ECM and is set to resend any part of a fax that is distorted due to nois...

Страница 39: ...d 4 Touch the STOP DELETE key A message appears to confirm the cancellation Touch the YES key to delete the selected job key and cancel the transmission CANCELING ON HOOK DIALING To cancel on hooking...

Страница 40: ...Storing transmission jobs memory transmission on page 2 8 To receive faxes sufficient paper must be loaded in the paper tray Refer to pages 2 2 to 2 11 of Copying operation manual to load appropriate...

Страница 41: ...A TIMER TRANSMISSION 3 6 TRANSMITTING TWO ORIGINAL PAGES AS A SINGLE PAGE 2in1 3 7 USING 2in1 3 7 FAXING THE FRONT AND BACK SIDES OF A CARD ON ONE SHEET OF PAPER CARD SHOT 3 8 USING CARD SHOT 3 8 FAXI...

Страница 42: ...ations it is convenient to program those destinations into a group key A group key is a one touch key in which multiple destinations are programmed The procedure for programming group keys is explaine...

Страница 43: ...ination was not successful the document image can be resent without scanning the document again To call the destination and resend the image switch to the FAILED or ALL DESTINATIONS tab B FAILED tab T...

Страница 44: ...the outer OK key You will return to the screen of step 1 and an edge erase icon will appear next to the EXPOSURE key To cancel the erase touch the CANCEL key 6 Send the fax as explained in BASIC PROCE...

Страница 45: ...tep 1 4 Place the original on the document glass page 1 7 and perform the transmission operation If you have more originals to scan after pressing the START key and scanning the first original change...

Страница 46: ...ing page 4 5 F code confidential transmission page 4 6 F code relay request transmission page 4 8 NOTES To perform a timer transmission the document must be scanned into memory It is not possible to l...

Страница 47: ...ending on how the original is placed in the transmitting machine Landscape original 1st page 2nd page 3rd page 4th page 1st page 2nd page 3rd page 4th page 1st page 2nd page 3rd page 4th page 1st page...

Страница 48: ...e 15 of key operator s guide To have the images enlarged or reduced by a suitable ratio based on the entered original size and transmission size so that the front and back sides fit into the transmiss...

Страница 49: ...down and close the document cover 6 Follow steps 4 through 7 of BASIC PROCEDURE FOR SENDING FAXES pages 2 2 to 2 3 7 Press the START key The front side of the card is scanned 8 Place the back side of...

Страница 50: ...he selection touch the key once again so that it is not highlighted 3 Touch the OK key You will return to the screen of step 1 4 Place the original in the automatic document feeder See page 1 7 5 Foll...

Страница 51: ...age number See Printing page number at receiver on page 8 7 Position of sender s information The key operator program can be used to select whether the sender s information is added outside the origin...

Страница 52: ...regardless of whether the transmission succeeds or fails touch the ALWAYS PRINT key If you want the report to print only if the transmission is not successful touch the PRINT AT ERROR key If Transacti...

Страница 53: ...at night or another specified time refer to 3 6 page Serial Polling Group keys and the broadcast transmission function page 3 2 can be used to successively poll multiple fax machines in a single oper...

Страница 54: ...n the following operation is performed Manual polling is begun on the signal of the other party 1 Touch the SPEAKER key in fax mode and dial the number of the other machine A one touch key or the RESE...

Страница 55: ...d then touch the DATA STORE key To cancel the operation touch the CA key 5 Touch the PUBLIC BOX key This specifies that the document will be scanned into the Public Box 6 Setting the number of times t...

Страница 56: ...ll data in the Public Box is deleted and you return to the screen of step 2 If you touch the NO key you will return to the screen of step 2 without deleting the data Restricting polling access polling...

Страница 57: ...ocument on the document glass 2 Touch the SPECIAL MODES key and then the PROGRAM key If the address book screen appears touch the CONDITION SETTINGS key to display the condition settings screen page 1...

Страница 58: ...ine automatically dials the transfer destination programmed with the key operator program and begins transfer If you do not wish to transfer the data touch the NO key Printing not possible because of...

Страница 59: ...FAX driver in the same way as for the PCL5e or PCL6 printer driver Using the PC FAX function To fax a document using the PC FAX function select the PC FAX driver as the printer driver on your computer...

Страница 60: ......

Страница 61: ...nterest to you Page TRANSMISSION BETWEEN MACHINES SUPPORTING F CODES 4 2 MEMORY BOXES AND SUB ADDRESSES PASSCODES REQUIRED FOR F CODE TRANSMISSION 4 2 ENTERING DIALING A FAX NUMBER WITH A SUB ADDRESS...

Страница 62: ...sscode can also be programmed to control access to the box The Public Box is used for normal serial polling See USING POLLING MEMORY on page 3 15 When communication occurs involving a memory box the c...

Страница 63: ...of the other machine s memory box max 20 digits If a passcode has not been established for the other box this step is not necessary CREATING A MEMORY BOX FOR F CODE TRANSMISSION Operations that use F...

Страница 64: ...ment into memory Public Box for polling memory on page 3 15 touch the key of the memory box that you wish to use If document data has already been stored in that box a new document data will be added...

Страница 65: ...ey and then touch the OK key The POLLING key is highlighted and the polling icon appears To cancel polling touch the POLLING key once again to cancel the selection You will return to the initial scree...

Страница 66: ...FAX NUMBER WITH A SUB ADDRESS AND PASSCODE on page 4 3 F code confidential reception is performed in the same way as normal reception see chapter 2 however you must inform the other party of the sub...

Страница 67: ...essage PRESS START TO PRINT DATA appears If the passcode is not correct the message PIN IS NOT VERIFIED appears and you return to the entry screen To return to the screen of step 3 touch the CANCEL ke...

Страница 68: ...verall phone charges will be lower than if the Seattle office uses the normal broadcast transmission function page 3 2 This function can also be combined with a timer setting page 3 6 to take advantag...

Страница 69: ...s automatically cleared after transmission to all end receiving machines is completed USING THE F CODE RELAY REQUEST FUNCTION your machine requests a relay broadcast Ask the operator of the other F Co...

Страница 70: ......

Страница 71: ...nctions that widen the scope of use of the fax machine Please read those sections that are of interest to you Page USING AN EXTENSION PHONE 5 2 USING AN EXTENSION PHONE TO RECEIVE A FAX 5 2 RECEIVING...

Страница 72: ...ATA RECEIVE FORWARD key 2 Touch the RECEIVE MODE key 3 Touch the MANUAL RECEPTION key The MANUAL RECEPTION key is highlighted 4 Touch the OK key The reception mode is set to MANUAL RECEPTION You will...

Страница 73: ...ll is made by the other party 1 If you are on a pulse dial line set your phone to issue tone signals Refer to your phone s manual to set the phone to issue tone signals If your phone is already set to...

Страница 74: ...s needed MANUALLY SETTING THE SCANNING SIZE see page 1 8 SELECTING THE RESOLUTION see page 1 10 SELECTING THE EXPOSURE see page 1 11 4 Lift the extension phone 5 Dial the number of the other party or...

Страница 75: ...ONE TOUCH KEYS 6 5 STORING A GROUP KEY 6 6 EDITING AND DELETING GROUP KEYS 6 7 STORING A PROGRAM 6 8 EDITING AND DELETING PROGRAMS 6 8 STORING A GROUP INDEX 6 9 PROGRAMMING EDITING AND DELETING F CODE...

Страница 76: ...uto dial key or program To store edit or delete an auto dial key one touch key or group key or program first follow steps 1 through 4 below In the screen of step 4 touch the appropriate key for storin...

Страница 77: ...y Select one of the upper row of keys USER 1 through USER 6 to determine the location of the one touch key when the GROUP index is displayed instead of the ABC index refer to page 1 5 The lower keys a...

Страница 78: ...sh to change the settings this step is not necessary After touching the MODE key you can change either of the two settings When finished touch the OK key Transmission speed Speed selections are 33 6 k...

Страница 79: ...2 5 and 6 AMEND DELETE DIRECT ADDRESS AMEND DELETE SELECT ADDRESS TO AMEND DELETE EXIT 1 2 ABCD CORPORATION FREQUENT USE ABCD EFGHI JKLMN OPQRST UVWXYZ ABC GROUP CORPO TPS ABCD GROUP D E F G H PROGRA...

Страница 80: ...eps 10 to 13 and 15 of STORING ONE TOUCH DIAL KEYS on pages 6 3 to 6 4 and then touch the OK key twice to return to the screen of step 3 To check the destinations that you have stored in the group tou...

Страница 81: ...Deleting a group key 5 Touch the DELETE key in the screen of step 3 6 Touch the YES key If you wish to delete another group key repeat steps 2 5 and 6 AMEND DELETE DIRECT ADDRESS AMEND DELETE SELECT...

Страница 82: ...urns you to the screen of step 1 EDITING AND DELETING PROGRAMS To edit or delete a previously stored program follow steps 1 to 3 on page 6 2 touch the AMEND DELETE key in the screen of step 4 and then...

Страница 83: ...and then touch the ADDRESS CONTROL key refer to steps 1 and 2 on page 6 2 2 Touch the CUSTOM INDEX key 3 Touch an index key USER 1 to USER 6 You can enter a name for the selected index When touched th...

Страница 84: ...numeric keys 0 through 9 to enter a sub address max 20 digits The characters and cannot be used in a sub address If you enter an incorrect digit press the C key and re enter the correct digit If you...

Страница 85: ...unlimited number of transmissions when polled The initial setting is ONCE Change the setting as needed 1 Touch the POLLING MEMORY key in step 3 of PROGRAMMING AN F CODE MEMORY BOX on the previous page...

Страница 86: ...first digit To cancel entry of the print PIN touch the CANCEL key You will return to the screen of step 2 without programming a print PIN 4 Touch the OK key You will return to screen of step 2 and th...

Страница 87: ...TRY key and then the FAX key and enter the fax number Enter the fax number and then a sub address and transmission settings if desired as explained in steps 10 to 13 and 15 of STORING ONE TOUCH DIAL K...

Страница 88: ...edit or delete a confidential memory box A memory box cannot be edited or cleared while it is being used for transmission PRINTING PROGRAMMED INFORMATION You can print out lists of the One touch keys...

Страница 89: ...u make efficient use of the fax features of the machine including solutions to common problems Page WHEN A TRANSACTION REPORT IS PRINTED 7 2 VIEWING THE COMMUNICATION ACTIVITY REPORT 7 3 WHEN AN ALARM...

Страница 90: ...OR Manual transmission was not successful because a jam occurred PASS NG The connection was broken because the polling passcode was not correct NO RX POLL The machine that was polled does not have a p...

Страница 91: ...2 The machine is out of toner and the received document cannot be printed Replace the toner cartridge Copying operation manual page 2 15 An original misfeed occurred in the automatic document feeder d...

Страница 92: ...paper Check with the operator of the receiving machine _ Does the receiving machine support G3 transmission Are the sub address and passcode correct Is the receiving machine ready to receive Was the o...

Страница 93: ...faint Is the original faint Ask the other party to re send the document using a suitable exposure setting _ The received image is distorted Were line conditions poor due to thunder or another reason...

Страница 94: ......

Страница 95: ...that are used by the administrator of the machine to customize certain functions and settings Page KEY OPERATOR PROGRAMS 8 2 KEY OPERATOR PROGRAM LIST 8 2 USING THE KEY OPERATOR PROGRAMS 8 3 KEY OPERA...

Страница 96: ...Auto wake up print 8 5 Pause time setting 8 6 Speaker volume settings 8 6 Original print on transaction report 8 6 Remote reception number setting only when extension phone is connected 8 6 Transacti...

Страница 97: ...k mark boxes are touch keys that show the status of selections A box with a check mark means the function is on enabled and an unchecked box means the function is off disabled The on off status change...

Страница 98: ...ADDRESS key must be pressed before entering the next destination when performing a broadcast transmission page 3 2 Normally the machine is set so that touching the NEXT ADDRESS key can be omitted exce...

Страница 99: ...op of each fax page you send The number is also used as a passcode when performing polling reception see USING THE POLLING FUNCTION on page 3 14 1 Touch the NAME key and enter the name The name entry...

Страница 100: ...ext two settings Select the print conditions for receptions and confidential receptions The normal settings are indicated by shading above Activity report print select setting This program is used to...

Страница 101: ...ry box Fax send settings The fax transmission settings allow you to adjust certain parameters for sending faxes to better suit your needs The fax send settings are as follows Auto reduction sending se...

Страница 102: ...s setting is turned on If you turn the setting off transmission will not begin until all pages of the document have been scanned Note that this setting does not apply to manual transmission See Storin...

Страница 103: ...conditions below AUTO SIZE SELECT is normally selected PRINT ACTUAL SIZE CUT OFF DISABLED The received fax image is printed at its actual size without dividing it onto multiple sheets of paper If the...

Страница 104: ...lling security on page 3 16 this setting is used to select whether any machine will be allowed to poll your machine or only machines that have been programmed in your machine Polling security setting...

Страница 105: ...MS key 3 Use the numeric keys to enter the five digit key operator code number For the factory default setting for the key operator code number see page 2 of the key operator s guide 4 Touch the LIST...

Страница 106: ......

Страница 107: ...9 1 CHAPTER 9 APPENDIX This chapter contains reference information regarding the fax features of the machine Page SPECIFICATIONS 9 2 INDEX 9 3...

Страница 108: ...e Fine Halftone 8 x 15 4 lines mm Super Fine Super Fine Halftone 16 x 15 4 lines mm Ultra Fine Ultra Fine Halftone Printing method Electrophotographic system laser Transmission speed 33 6 kbps 2 4 kbp...

Страница 109: ...ctive ring detection 8 7 Document glass 1 7 Dual page scan 3 5 Duplex reception setting 8 9 E ECM 8 7 Edge erase 3 4 Editing and deleting F code memory box 6 14 Group index 6 9 Group keys 6 7 One touc...

Страница 110: ...One touch dial key 6 3 to 6 4 Original sizes 1 9 Program 6 8 Programming frequently used operations 3 17 Public box 3 15 to 3 16 4 2 Q Quick file 1 4 2 2 Quick on line 2 8 Quick on line sending 8 8 R...

Страница 111: ...Speed dialing 1 12 2 4 Storing transmission jobs 2 8 Sub address 1 5 Sub address 4 2 to 4 3 T The number of direct address sender keys displayed setting 8 4 The number of file name subject keys displ...

Страница 112: ......

Страница 113: ......

Страница 114: ......

Страница 115: ...y and machine malfunction To order supplies call the Imagistics Supply Line at 1 800 462 6797 For faster service please have your machine model and serial number available before calling Should your s...

Страница 116: ......

Отзывы: