background image

Registering Scan Template    79

3

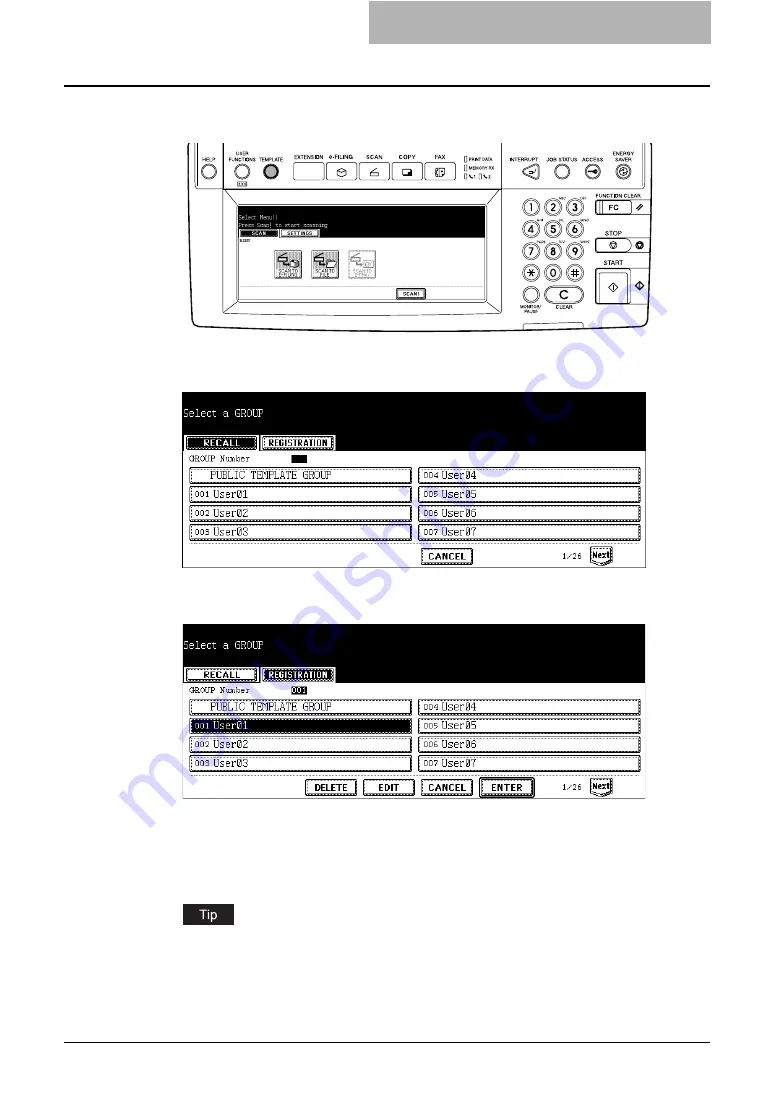
Press the [TEMPLATE] button on the control panel to enter the tem-
plate menu.

y

The screen to select a template group is displayed.

4

Press the [REGISTRATION] button.

5

Select a user template group name where you want to register a 
new template, and press the [ENTER] button.

y

When you press the user template group button that the password is not set, the 
screen to select a template is displayed.  If the screen to select a template is dis-
played, skip to Step 7.

y

If the password has been set to the selected user template group, the password input 
screen is displayed.  If the password input screen is displayed, continue to next step.

If you cannot find the desired user template group button in the screen, press the [Next] 
button to switch the screen to find the desired user template group button.

Содержание im2330

Страница 1: ...For Oc and Imagistics Models Oc Scanning Guide im2330 im2830...

Страница 2: ...ION 4O ORDER SUPPLIES CALL THE C 3UPPLY INE 53 5 3HOULD YOUR SYSTEM DEVELOP A PROBLEM THAT CANNOT BE REMEDIED BY USING THE MAINTENANCE OR TROUBLESHOOTING PROCEDURES OUTLINED IN THIS MANUAL PLEASE CONT...

Страница 3: ...d on a single System and may not copy the Software for any reason except as neces sary to use the Software on a single System Any copies of the Software shall be subject to the conditions of this Agre...

Страница 4: ...ent assign or transfer this license or the Software Any attempt to sublicense lease rent assign or transfer any of the rights duties or obligations hereunder is void You agree that you do not intend t...

Страница 5: ...the US and other countries y Apple AppleTalk Macintosh Mac TrueType and LaserWriter are trademarks of Apple Computer Inc in the US and other countries y Postscript is a trademark of Adobe Systems Inco...

Страница 6: ...ur Manuals Thank you for purchasing the Oc multifunctional digital systems im4530 or im2830 Series We have provided you with these manuals for the operation of this equipment Select and read the manua...

Страница 7: ...on Guide explains the guidelines for setting up network servers to provide various network services and troubleshoot ing for network administrators Printing Guide This Printing Guide explains how to i...

Страница 8: ...ur PC download and install it from the website of Adobe Systems Incorporated Network Fax Guide This Network Fax Guide explains how to use the network fax function that enable users to operate fax and...

Страница 9: ...cates a potentially hazardous situation which if not avoided could result in death serious injury or serious damage or fire in the equipment or sur rounding assets Indicates a potentially hazardous si...

Страница 10: ...8 Preface...

Страница 11: ...form Scan Operations 16 Confirming the Scan Job Status 22 Confirming the Scan Log 23 Chapter 2 Scan to e Filing How to Perform Scan to e Filing 26 How to Use Scanned Data Stored in e Filing 33 Using S...

Страница 12: ...pter 8 Remote Scan Installing Remote Scan Driver 114 Planning for Installation 114 Installing the Remote Scan Driver 114 Installing from Client Utilities CD ROM 114 Installing from Printer Utility 117...

Страница 13: ...TABLE OF CONTENTS 11...

Страница 14: ...12 TABLE OF CONTENTS...

Страница 15: ...verview This section describes the overview of the scan functions About Scan Features 14 About Scan Mode 14 How to Perform Scan Operations 16 Confirming the Scan Job Status 22 Confirming the Scan Log...

Страница 16: ...eating boxes and folders Users can work with e Filing documents such as print ing them merging them to create a new document and so on using the e Filing web utility The e Filing documents also can be...

Страница 17: ...ion which enables users to copy and store as file at the same time also will be available For instruction on how to perform Copy File see the following section P 83 Copy File Scan to E mail Mode Scan...

Страница 18: ...Users can use a template to perform a scan operation as well For more information about a template see the following section P 65 Using Template y Users can perform Copy File which enables users to c...

Страница 19: ...IL Press this to send the scanned images to specified E mail addresses 4 Set the scanning conditions using the buttons on the touch panel and digital keys and press the ENTER button to save the settin...

Страница 20: ...he SCAN button y When you scan more than 1000 pages the message The number of originals exceeds the limits Will you save stored originals is displayed When you want to perform the scan operation with...

Страница 21: ...twork folder as files SCAN TO E MAIL Press this to send the scanned images to specified E mail addresses 4 Set the scanning conditions using the buttons on the touch panel and digital keys and press t...

Страница 22: ...single operation You cannot set all three scan modes at a same time If you want to cancel a scan mode that you set press the button the scan mode that you want to cancel and press the CANCEL button i...

Страница 23: ...t ton y You can change the setting of the original type and scanning conditions using the EDIT button before pressing the SCAN button y When you scan more than 1000 pages the message The number of ori...

Страница 24: ...ge To display the scan job status screen press the JOB STATUS button on the control panel and press the SCAN button y Items of table To Display the name of the file created or the e mail address of th...

Страница 25: ...ng y Storing status in Share folder SAVE AS FILE by faxing y Storing status in e Filing or Share folder by Fax Received Forward y Storing status in e Filing or Share folder by Internet Fax Received Fo...

Страница 26: ...1 Overview 24 Confirming the Scan Log...

Страница 27: ...perform Scan to e Filing and how to use the stored data in e Filing How to Perform Scan to e Filing 26 How to Use Scanned Data Stored in e Filing 33 Using Scanned Data in e Filing from Touch Panel Di...

Страница 28: ...ling web utility For setting up the user boxes and printing the stored documents from the touch panel or e Filing web utility see e Filing Guide The instruction on how to set up the user boxes using t...

Страница 29: ...s the SCAN button on the control panel to enter the scan menu y The basic scan menu is displayed 3 Press the SCAN TO E FILING button y The SCAN TO E FILING screen is displayed 4 Press the BOX FOLDER b...

Страница 30: ...number using the digital key If the user box that you want to store the data has not been registered you must register the user box first For setting up the user boxes see e Filing Guide The instructi...

Страница 31: ...original s in the selected box press the ENTER button y The screen returns to the SCAN TO E FILING screen 8 Press the DOCUMENT NAME button if you want rename the docu ment name of the scanned data y T...

Страница 32: ...image 90 degrees on the left y ORIGINAL MODE TEXT Press this when scanning the originals that contain texts TEXT PHOTO Press this when scanning originals that contain texts and photos PHOTO Press this...

Страница 33: ...elect auto mode for the exposure mode for scanning 12 Press the ENTER button y The screen returns to the basic scan menu 13 Press the SCAN button You can also set another scan agent by pressing either...

Страница 34: ...SH button to finish scanning y When the original is set on the Automatic Document Feeder this screen is not dis played However this screen is displayed when you press the CONTINUE button during scanni...

Страница 35: ...or deleted from the touch panel For instructions on how to print or delete scanned data in e Filing from the touch panel see Opera tor s Manual for Basic Function or e Filing Guide Using Scanned Data...

Страница 36: ...2 Scan to e Filing 34 How to Use Scanned Data Stored in e Filing...

Страница 37: ...instructions on how to perform Scan to File and how to use the stored files How to Perform Scan to File 36 How to Use Scanned Data Stored as Files 44 When Scanned Data Is Stored in MFP LOCAL 44 When S...

Страница 38: ...rator has to make settings for storing the original data to the PCs For details see Network Administration Guide y It is recommended to back up the data stored in the Share folder of the hard disk wit...

Страница 39: ...MFP LOCAL but ton you can specify only one more remote destination If you want to specify the two remote destinations press the MFP LOCAL button to disable it displayed as normal button 6 If you want...

Страница 40: ...older path to the folder where you want to store the data in the FTP server For example if you want to store the data into ftp 10 10 70 101 user01 scan enter user01 scan here Make sure to use instead...

Страница 41: ...h button the letter entry screen is displayed Enter the value using the keyboard and digital keys and press the ENTER button to set the entry SERVER NAME and COMMAND PORT are not required to set when...

Страница 42: ...MMAND PORT is not required to set when selecting the Netware IPX or Netware IP button for protocol 8 Select the following items and press the EDIT button y FILE FORMAT PDF MULTI Press this to attach t...

Страница 43: ...rees on the left y ORIGINAL MODE TEXT Press this when scanning the originals that contain texts TEXT PHOTO Press this when scanning originals that contain texts and photos PHOTO Press this when scanni...

Страница 44: ...select auto mode for the exposure mode for scanning 11 Press the ENTER button y The screen returns to the basic scan menu 12 Press the SCAN button You can also set another scan agent by pressing eith...

Страница 45: ...finish scanning y When the original is set on the Automatic Document Feeder this screen is not dis played However this screen is displayed when you press the CONTINUE button during scanning the origi...

Страница 46: ...l Storage Path is set to send scanned data to a sub folder in the storage path the equipment creates a sub folder The name of the sub folders varies depending on how you operate Scan to File The sub f...

Страница 47: ...4 Scan to E mail This section describes the instructions on how to perform Scan to E mail How to Perform Scan to E mail 46 Specifying Destinations 51...

Страница 48: ...asic Func tion 2 Press the SCAN button on the control panel to enter the scan menu y The basic scan menu is displayed 3 Press the SCAN TO E MAIL button y When the User Authentication for Scan to E mai...

Страница 49: ...nabled When this screen is displayed you must enter your user name and password to login the SCAN TO E MAIL screen For user name and password ask your network administra tor 5 Specify the E mail addre...

Страница 50: ...and time will be automatically added to the subject 7 Select the following items and press the Next button y FILE FORMAT PDF MULTI Press this to attach the scanned data as a multiple page PDF file Wh...

Страница 51: ...OM ADDRESS or FROM NAME button the letter entry screen is displayed Enter the value using the keyboard and digital keys and press the ENTER button to set the entry 9 Specify the following items as you...

Страница 52: ...pi 150 Press this when scanning originals in 150 dpi 10 Specify the following items as you require and press the Enter button y ORIGINAL SIZE Select the button of the original size or select the AUTO...

Страница 53: ...However this screen is displayed when you press the CONTINUE button during scanning the originals y If you want to cancel the storage of the scanned data press the JOB CANCEL but ton y You can change...

Страница 54: ...to send using the keyboard and digital keys and press the ENTER button to set the entry 3 Press the SETTINGS button y The screen returns to the SCAN TO E MAIL screen y Before pressing the SETTINGS but...

Страница 55: ...GS button y The screen returns to the SCAN TO E MAIL screen y Before pressing the SETTINGS button you can specify other E mail addresses as you require y You can confirm or remove the E mail addresses...

Страница 56: ...the SETTINGS button y The screen returns to the SCAN TO E MAIL screen y Before pressing the SETTINGS button you can specify other E mail addresses as you require y You can confirm or remove the E mail...

Страница 57: ...search for the contacts that contain the search text in the specified items If the DIR SERVICE button is displayed as a selected button this equipment will search for contacts in the LDAP server In th...

Страница 58: ...move the E mail addresses that you specified in the DESTINA TION screen which can be displayed by pressing the DESTINATION button P 62 Confirming or removing E mail addresses from destination Searchin...

Страница 59: ...y service name that you want to search from and press the ENTER button y The screen returns to the ADDRESS SEARCH screen 4 Press the buttons to enter the search strings that you want to spec ify and t...

Страница 60: ...to the SCAN TO E MAIL screen y Before pressing the SETTINGS button you can specify other E mail addresses as you require y You can confirm or remove the E mail addresses that you specified in the DES...

Страница 61: ...TS button y Before pressing the SETTINGS button you can specify other E mail addresses as you require y You can confirm or remove the E mail addresses that you specified in the DESTINA TION screen whi...

Страница 62: ...tination and press the SETTINGS button y The screen returns to the SCAN TO E MAIL screen y You can confirm the E mail addresses that registered in the group by pressing the CONTENTS button y Before pr...

Страница 63: ...s displayed 3 Press the GROUP NAME button to enter the group name that you want to search and then press the SEARCH button y When pressing the GROUP NAME button the letter entry screen is displayed En...

Страница 64: ...up by pressing the CONTENTS button y Before pressing the SETTINGS button you can specify other E mail addresses as you require y You can confirm or remove the E mail addresses that you specified in th...

Страница 65: ...button y The DESTINATION screen is displayed 2 You can confirm the destinations that are currently specified To remove E mail addresses contacts or groups that you selected for destination select the...

Страница 66: ...4 Scan to E mail 64 How to Perform Scan to E mail...

Страница 67: ...5 Using Template This section describes the instructions on how to use scan templates Scanning Using Template 66 Registering Scan Template 74...

Страница 68: ...see the following section P 74 Registering Scan Template The templates that the Scan to E mail agent is set will be available after user authenticates the access rights for the Scan to E mail operatio...

Страница 69: ...p 5 y If the password has been set to the selected user template group the password input screen is displayed If the password input screen is displayed continue to next step If you cannot find the des...

Страница 70: ...ntinue to the next step y If you select a template that the automatic start function is disabled the basic scan menu is displayed In that case continue the operation 6 If the password is set to the se...

Страница 71: ...the storage of the scanned data press the JOB CANCEL but ton y You can change the setting of the original type and scanning conditions using the EDIT button before pressing the SCAN button Using Scan...

Страница 72: ...essing the USER NAME and PASSWORD buttons and press the ENTER button y When pressing each button the letter entry screen is displayed Enter the value using the keyboard and digital keys and press the...

Страница 73: ...p 8 y If the password has been set to the selected user template group the password input screen is displayed If the password input screen is displayed continue to next step If you cannot find the des...

Страница 74: ...yed in the lower left corner of the button the scanning operation is auto matically started In that case finish the operation y If you select a template that the automatic start function is disabled t...

Страница 75: ...inish scanning y When the original is set on the Automatic Document Feeder this screen is not dis played However this screen is displayed when you press the CONTINUE button during scanning the origina...

Страница 76: ...ombi nations templates are available in this group According to the purpose of use you can restrict the use by entering the password P 74 Registering a scan template in public template group y USER GR...

Страница 77: ...the instructions for each scan mode P 26 How to Perform Scan to e Filing P 36 How to Perform Scan to File P 46 How to Perform Scan to E mail Do not press the SCAN button at this time 3 Press the TEMP...

Страница 78: ...d press the ENTER button y The ADMINISTRATOR PASSWORD screen is displayed 6 Press the PASSWORD button y The letter entry screen is displayed 7 Enter the administrator password using the keyboard and t...

Страница 79: ...at appears in the second line on the button y USER NAME Press this to enter the user name of the template y PASSWORD Press this to enter the 5 digit password of the template If the password is set use...

Страница 80: ...ss the SCAN button on the control panel to enter the scan menu y The basic scan menu is displayed 2 Press the buttons of the agent and set the scanning conditions y For instructions on how to set each...

Страница 81: ...press the user template group button that the password is not set the screen to select a template is displayed If the screen to select a template is dis played skip to Step 7 y If the password has bee...

Страница 82: ...lect the blank template button and press the SAVE button You can also select the existing template button to overwrite the template settings 8 Specify the following items as you require and press the...

Страница 83: ...START Select whether the automatic start function is enabled or disabled If the automatic start function is enabled the operation will be automatically start when user select the template button The...

Страница 84: ...5 Using Template 82 Registering Scan Template...

Страница 85: ...6 Copy File This section describes the instructions on how to perform Copy File How to Perform Copy File 84...

Страница 86: ...cli ent PC via network y The Copy File operation does not allow you to select the resolutions and JPEG file format A document that is stored by Copy File is proper for output and not for importing as...

Страница 87: ...u select the MFP LOCAL but ton you can specify only one more remote destination If you want to specify the two remote destinations press the MFP LOCAL button to disable it displayed as normal button 6...

Страница 88: ...er path to the folder where you want to store the data in the FTP server For example if you want to store the data into ftp 10 10 70 101 user01 scan enter user01 scan here Make sure to use instead of...

Страница 89: ...button the letter entry screen is displayed Enter the value using the keyboard and digital keys and press the ENTER button to set the entry SERVER NAME and COMMAND PORT are not required to set when s...

Страница 90: ...COMMAND PORT is not required to set when selecting the IPX SPX button for proto col 8 Select the file format in FILE FORMAT option and press the ENTER button PDF MULTI Press this to attach the scanne...

Страница 91: ...the NEXT ORIGINAL message is displayed place another orig inal on glass and press the YES button to copy another original or press the FINISHED button to finish copying y When the original is set on t...

Страница 92: ...6 Copy File 90 How to Perform Copy File...

Страница 93: ...bout the Internet Fax functions About Internet Fax 92 Precaution for Internet Transmission 92 Internet Fax Transmission Overview 92 How to Perform Internet Fax 94 Specifying Destinations 97 Advanced F...

Страница 94: ...the E mail server of Internet and it does not send via the PSTN alike regular facsimile transmissions y Internet transmission has low security It is recommended that you use regular facsimile transmi...

Страница 95: ...s well y The client computer receives TIFF FX Profile S images when the equipment sends a docu ment using the Internet Fax function y The equipment can only print out text files and TIFF images When s...

Страница 96: ...originals as TIFF FX Profile S file so that any Internet Fax compatible devices To use Internet Fax the configuration of the equipment needs to be set by the network adminis trator Sending Procedure...

Страница 97: ...case the PHOTO TEXT or the PHOTO mode is selected y EXPOSURE Set the image density according to the contrast of the original to be sent In the automatic exposure mode the copier automatically judges...

Страница 98: ...al keys and press the ENTER button to set the entry Other items such as ECM QUALITY TX LINE SELECT SUB SEP SID PWD are only applied to the fax transmission When you only perform the Internet Fax trans...

Страница 99: ...e the setting of the transmission conditions using the OPTION button before pressing the START button Specifying Destinations You can specify E mail addresses for Internet Fax by following methods P 9...

Страница 100: ...press the MULTI button the entered E mail address is saved as the destina tion and you can enter another E mail address using the E MAIL ADDRESS button y If you press the E MAIL ADDRESS button without...

Страница 101: ...t again then the button will be a normal button y You can specify other E mail addresses as you require y You can confirm or remove the E mail addresses that you specified in the DESTINA TION screen w...

Страница 102: ...the E MIAL button of the contact that you want to send y You can specify other E mail addresses as you require y You can confirm or remove the E mail addresses that you specified in the DESTINA TION...

Страница 103: ...this equipment will search for contacts in the LDAP server In that case press the DIR SERVICE button to display the Directory Service Name screen and clear the selection of a directory service Then pr...

Страница 104: ...s the SEARCH ADDRESS button y The ADDRESS SEARCH screen is displayed 2 Press the DIR SERVICE button y The Directory Search Name screen is displayed When the DIR SERVICE button is displayed as a select...

Страница 105: ...try It will search for the contacts that contain the search text in the specified items 5 Press the E MAIL button of the contact that you want to send and press the ENTER button y The screen returns t...

Страница 106: ...ses that registered in the group by pressing the CONTENTS button y You can specify other E mail addresses as you require y You can confirm or remove the E mail addresses that you specified in the DEST...

Страница 107: ...ied ID is displayed 4 Press the group buttons that you want to select as the destination y You can confirm the E mail addresses that registered in the group by pressing the CONTENTS button y You can s...

Страница 108: ...creen is displayed 3 Press the GROUP NAME button to enter the group name that you want to search and then press the SEARCH button y When pressing the GROUP NAME button the letter entry screen is displ...

Страница 109: ...move the E mail addresses that you specified in the DESTINATION screen which can be displayed by pressing the DESTINATION button P 107 Confirming or removing E mail addresses from destination Confirmi...

Страница 110: ...atic Document Feeder y Priority TX You can send originals prior to the reserved transmissions Sending 2 sided Originals You can scan and send 2 sided originals using the Automatic Document Feeder When...

Страница 111: ...mission Priority TX allows you to execute a transmission prior to the other reserved transmissions y You can use Direct Entry and Address Dialing to specify the recipients y Priority TX can be perform...

Страница 112: ...7 Internet Fax 110 How to Perform Internet Fax 3 Press the ADDRESS button to return to the address menu...

Страница 113: ...pi If the received E mail contains files that are not the ones described above an error message will be displayed in the receive log To avoid such a case you can print the report when an error occurs...

Страница 114: ...mail has been delivered starts 3 Checking completes y If the Internet Fax is received RECEIVING E mail appears on the screen upper right Next NEW E mail RECEIVED appears for 2 seconds Then printing th...

Страница 115: ...Scan driver Installing Remote Scan Driver 114 Planning for Installation 114 Installing the Remote Scan Driver 114 Scanning Remotely Using Remote Scan Driver 119 When You Are Running the First Time 12...

Страница 116: ...e TWAIN compliant application Microsoft Internet Explorer 5 5 SP2 or later must be installed Installing the Remote Scan Driver You can install the Remote Scan driver from the Client Utilities CD ROM o...

Страница 117: ...appears When the installer does not automatically start double click Setup exe in the Client Utilities CD ROM 2 Select your language and click OK y The License Agreement screen is displayed 3 Select...

Страница 118: ...ax Guide and e Filing Guide 6 Click Next y The Choose Destination Location screen is displayed When you select the printer drivers or N W Fax driver the Select Port dialog box appears In that case see...

Страница 119: ...he Installer may ask you to restart your computer If it does select Yes I want to restart my computer now and click Finish to restart your computer Installing from Printer Utility If the system admini...

Страница 120: ...ns 2 Click the Install Client1 link to download the installer file 3 Download the installer file on your desktop by following the prompts 4 Double click the InstallClient1 exe file that you downloaded...

Страница 121: ...om the TWAIN compliant application Scanning using remote scan driver 1 Run the TWAIN compliant application 2 Click Select Device or the same functional command in the File menu y The Select Source dia...

Страница 122: ...hile scanning the originals When You Are Running the First Time When you access the Remote Scan driver the first time the Document Monitor Local Discovery dialog box appears In this case search the eq...

Страница 123: ...are on the network In that case you can configure the discovery using the Advanced button P 123 Configuring Discovery Settings 3 Select the equipment that you want to connect from the list and click...

Страница 124: ...e printer IPX Address This is disabled because the Remote Scan driver does not support the IPX SPX connection Name Enter the printer name Location Enter the location of the printer You must enter Name...

Страница 125: ...s to search for devices connected to the TCP IP network This is available only when the TCP IP protocol is installed When this is enabled select how it searches devices in the TCP IP network Search lo...

Страница 126: ...ect Oc Click this menu to change the target device when retrieving e Filing docu ments P 126 Changing the Target Device Help Help Click this menu to display Online Help About Click this menu to displa...

Страница 127: ...on angle when you want to rotate the scanned images 4 Color Mode Select the color mode for scanning 5 Original Mode Select the original mode for scanning Text Select this when scanning the originals t...

Страница 128: ...equipment by searching the equipment in your network This enables you to add several devices that you can connect using the Remote Scan driver To add a new connection click the Devices menu and select...

Страница 129: ...lecting the target device 1 Click the Devices menu and select Select Oc y The Select Device dialog box appears 2 Select the name of the equipment that you want to connect to and click OK y The target...

Страница 130: ...ocal Discovery or Network Discovery feature Corrective Action Confirm the following statements y The equipment and your computer is correctly connected to the TCP IP network y The default gateway sett...

Страница 131: ...quipment When the equipment shows the following status the Remote Scan operation cannot be performed y When the paper jam occurs in the equipment y When the serviceman call occurs in the equipment y W...

Страница 132: ...8 Remote Scan 130 Remote Scan Driver Errors...

Страница 133: ...4 Help menu 124 I Image Settings 124 125 Internet Fax 91 Internet Fax Transmission Overview 92 IP Address 122 IPX Address 122 K KNOWN ID 53 59 99 105 L Location 122 LOGIN USER NAME 38 39 40 86 87 88 M...

Страница 134: ...ADDRESS 54 56 100 102 SEARCH GROUP 61 106 Search local subnet 123 Select Oc 124 127 Sending 2 sided Originals 108 SERVER NAME 38 39 86 87 Sharpness 125 Single Agent 16 SINGLE 2 SIDED SCAN 30 41 49 Si...

Страница 135: ...im2330 2830...

Страница 136: ......

Отзывы: