Oce cm6520 Скачать руководство пользователя страница 60

cm6520

2-31

Using copy functions

2

Usin

g co

py fu

nctions

Chapter 2

2

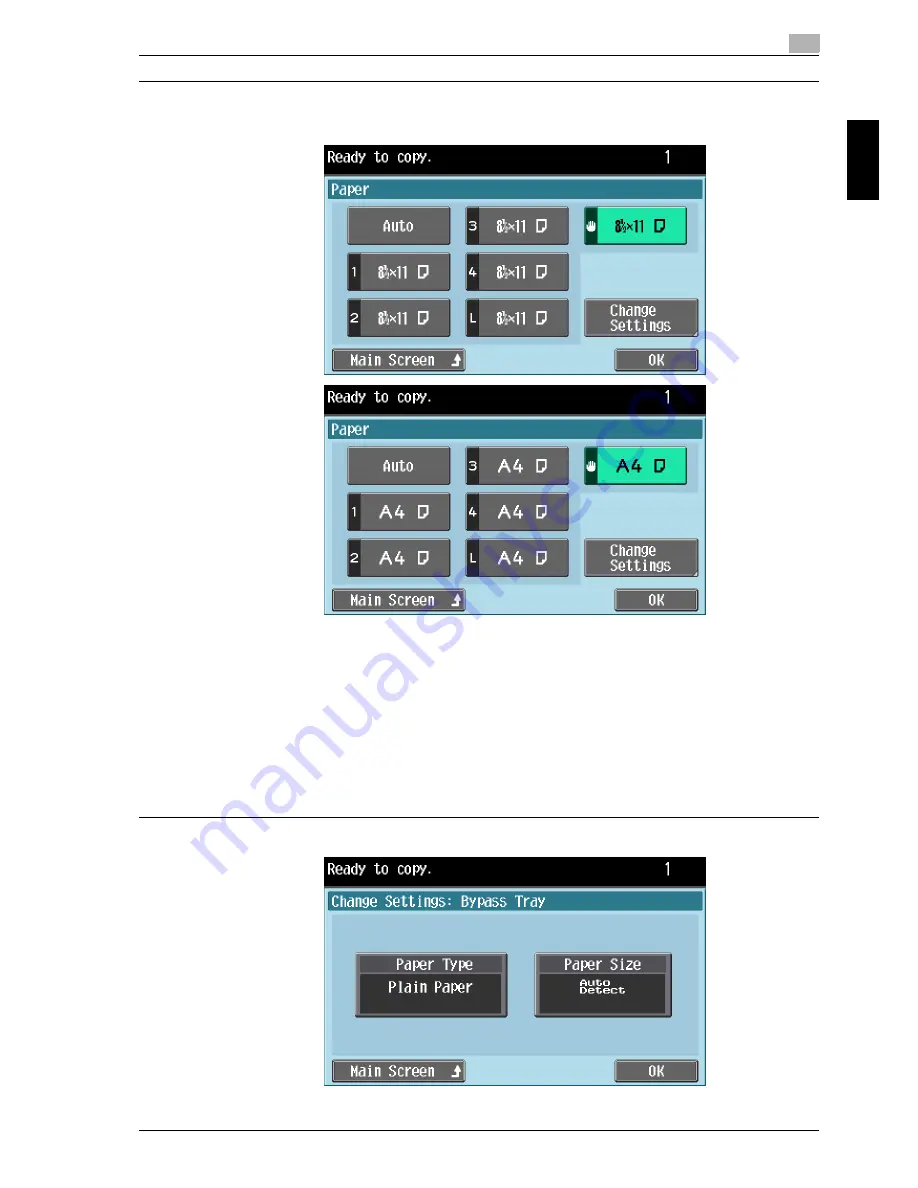
Touch the button for the bypass tray, and then touch [Change 
Settings].

– To return to the main screen, touch [Main Screen].
– To specify a setting for special paper for tray 1, tray 2, tray 3, tray 4 or 

LCT touch the button for the corresponding paper tray.

– If a setting for special paper is selected for a paper tray, that tray is not 

selected automatically with the “Auto” Paper setting. However, if the 
“Single Side Only” setting is selected for the paper tray, that tray is given 
priority with single-sided printing.

3

Touch [Paper Type].

Содержание cm6520

Страница 1: ...Oc cm6520 Enlarge Display Operations User s Guide Printing for Professionals...

Страница 2: ...problems arise during operation Views of the actual equipment may be slightly different from the illustrations used in this Enlarge Display Mode Operations volume of the User s Guide Explanation of m...

Страница 3: ...x 2 cm6520 Names highlighted as shown above indicate keys on the control panel and buttons in the touch panel...

Страница 4: ...settings 1 13 Copying documents of mixed sizes Mixed Original setting 1 13 Loading folded documents Z Folded Original setting 1 15 Selecting the document orientation Original Direction settings 1 17...

Страница 5: ...12Scanning the next document to be copied while a copy job is being printed next job reservation 2 38 2 13Pausing scanning printing 2 39 2 14Printing a proof to check the settings Proof Copy 2 40 3 Us...

Страница 6: ...cm6520 x 5 4 Logging on and logging off 4 1 When a logon screen appears 4 2 When the screen to enter the user name appears 4 2 When the screen to enter the account name and password appears 4 5...

Страница 7: ...x 6 cm6520...

Страница 8: ...1 Before use Chapter 1 Before use...

Страница 9: ...ous screens and messages Specify the various settings by directly touching the panel 2 Main Power indicator Lights up in green when the machine is turned on with the main power switch 3 Power auxiliar...

Страница 10: ...s to be produced Use to type in the zoom ratio Use to type in the various settings 13 Enlarge Display key Press to enter or exit Enlarge Display mode 14 Accessibility key Press to display the screen f...

Страница 11: ...ion the control panel can be tilted to the left Adjust the control panel to the angle that allows for easy operation To adjust the angle of the control panel 1 Pull the control panel release lever tow...

Страница 12: ...se 1 Before use Chapter 1 2 To tilt the control panel to the left hold the bottom of the control panel and then tilt the panel to the left Do not grab the touch panel when turning the control panel to...

Страница 13: ...de a message appears requesting confirmation to cancel the settings that cannot be specified in Enlarge Display mode For details on specifying settings in the Accessibility screen refer to the User s...

Страница 14: ...ar in the screen Icon Description This button appears when there is a message indicating that a print error occurred Touch this button to display the message and then perform the necessary steps Touch...

Страница 15: ...r type icons 2 Note For details refer to the User s Guide Copy Operations If paper other than plain paper is specified for the selected paper tray when using a copy function the icon indicating the pa...

Страница 16: ...ear Thick 1 Thick 1 Thick 2 Thick 3 Thick 4 Single Side Only Transparency Envelope Letterhead Special Paper Colored Paper Duplex 2nd Side Plain Paper Duplex 2nd Side Thick 1 Duplex 2nd Side Thick 1 Du...

Страница 17: ...creen where the paper size is selected For details about the screen for selecting the paper size refer to Selecting the Paper settings on page 2 6 Paper supply icons that appear Icon Description This...

Страница 18: ...sure to position the document correctly according to the type of document being scanned Using the ADF Using the original glass Loading the document into the ADF 1 Position the document so that the si...

Страница 19: ...lifted at least 20 the correct document size will not be detected 2 Place the document so that the side to be scanned faces down and then place the page on the original glass Load the document pages s...

Страница 20: ...ls on selecting the document type when using fax scanning functions refer to Original Settings on page 3 28 Copying documents of mixed sizes Mixed Original setting Documents of different sizes can be...

Страница 21: ...feed tray Slide the lateral guides against the edges of the document Load the document pages into the ADF so that the top of the pages is toward the back or the left side of the machine 4 In the main...

Страница 22: ...ments are loaded into the ADF to be copied the document size is correctly detected 2 Note Load the document into the ADF The length of the first page of the document is detected and all pages of the d...

Страница 23: ...20 Before use Chapter 1 2 In the main screen touch the Original Density tab The Original Density screen appears 3 Touch Z Folded Original To cancel the Z Folded Original setting touch Z Folded Origina...

Страница 24: ...Original Density tab Setting Description Select this setting for a document loaded with the top toward the back of this machine Select this setting for a document loaded with the top toward the front...

Страница 25: ...ch Original Direction From the Duplex Combine screen From the Original Density screen The Original Direction screen appears 4 Touch the button for the orientation of the loaded document and then touch...

Страница 26: ...Original Density tab Setting Description Left Select this setting if the document is loaded with the binding margin at the left Top Select this setting if the document that is loaded has a binding ma...

Страница 27: ...n touch Original Binding Pos Otherwise touch Binding Position in the Original Density screen From the Duplex Combine screen From the Original Density screen 4 Touch the button for the desired binding...

Страница 28: ...cm6520 1 21 Before use 1 Before use Chapter 1 From the Binding Position screen To return to the main screen touch Main Screen...

Страница 29: ...1 Before use 1 22 cm6520 Before use Chapter 1...

Страница 30: ...2 Using copy functions Chapter 2 Using copy functions...

Страница 31: ...de 2 Position the document to be copied For details on positioning the document refer to Feeding the document on page 1 11 3 Specify the desired copy settings For details on specifying document settin...

Страница 32: ...ent image quality refer to page 2 24 For details on selecting a copy density setting refer to page 2 27 To cancel the setting and select the default press the Reset key 4 Using the keypad type in the...

Страница 33: ...or in black and white then select the appropriate Color setting Full Color or Black Full Color Select this setting to print the copy in full color regardless of whether the scanned document is in col...

Страница 34: ...opy functions Chapter 2 2 Select the desired Color setting To return to the main screen touch Main Screen If the 2 Color setting was selected touch the button for the desired color and then touch OK 3...

Страница 35: ...of the loaded document is detected and copies are produced using paper of the same size If the Full Size Zoom setting was specified paper of the same size as the document is selected If the zoom rati...

Страница 36: ...cm6520 2 7 Using copy functions 2 Using copy functions Chapter 2 2 Touch Auto To return to the main screen touch Main Screen 3 Touch OK The Basic screen appears again...

Страница 37: ...er size The paper tray loaded with paper of the desired size can be selected manually By also selecting the Auto Zoom setting the most appropriate zoom ratio is selected based on the size of the loade...

Страница 38: ...9 Using copy functions 2 Using copy functions Chapter 2 2 Select the paper tray loaded with paper of the desired size To return to the main screen touch Main Screen 3 Touch OK The Basic screen appear...

Страница 39: ...ed between 90 0 and 99 9 For details refer to the User s Guide Copy Operations 3 The programmed zoom ratios can be changed For details refer to the User s Guide Copy Operations Follow the procedure de...

Страница 40: ...sired zoom ratio To return to the main screen touch Main Screen If Enlarge Reduce or Set Zoom Ratio was selected select the desired zoom ratio and then touch OK If Zoom was selected use the keypad to...

Страница 41: ...ecifying the document orientation refer to Selecting the document orientation Original Direction settings on page 1 17 For details on specifying the binding margin position of the document refer to Se...

Страница 42: ...functions Chapter 2 Selecting single sided or double sided copies 1 In the Basic screen touch Duplex Combine The Duplex Combine screen appears 2 Touch Original Copy To return to the main screen touch...

Страница 43: ...the copy is set to Auto the binding position is set at the top or on the left side The binding position is automatically determined according to the orientation of the loaded document If the document...

Страница 44: ...ng a combined copy setting Two document images can be combined and printed on a single page reducing paper use 1 In the Basic screen touch Duplex Combine The Duplex Combine screen appears 2 Touch Comb...

Страница 45: ...2 Using copy functions 2 16 cm6520 Using copy functions Chapter 2 3 Touch 2in1 and then touch OK 4 Touch Close The Basic screen appears again...

Страница 46: ...f punch kit is installed on finisher 5 The number of punched holes differ depending on the country region where the unit is installed For details consult your technical representative Setting Descript...

Страница 47: ...post inserter has been installed on the finisher the finisher can be operated manually For details refer to the User s Guide Copy Operations Follow the procedures described below to select Finishing...

Страница 48: ...g copy functions Chapter 2 3 Touch OK The Basic screen appears again Selecting Staple Punch settings 1 In the Basic screen touch Finishing 2 Touch Staple Punch To return to the main screen touch Main...

Страница 49: ...holes are punched along the long side of the paper if the document length is 11 11 16 inch 297 mm or less or along the short side of the paper if the document length is more than 11 11 16 inch 297 mm...

Страница 50: ...2 Using copy functions Chapter 2 Selecting a folding or binding setting 1 In the Basic screen touch Finishing 2 Touch Fold Bind To return to the main screen touch Main Screen The Fold Bind screen appe...

Страница 51: ...copy functions 2 22 cm6520 Using copy functions Chapter 2 To cancel the setting touch No 4 Touch OK and then touch OK in the next screen that appears Otherwise touch Main Screen The Basic screen appea...

Страница 52: ...not to rotate the image The copy can be printed without the image rotated to fit in the paper Follow the procedure described below to select the setting to not rotate the image 1 Touch Auto Rotate OF...

Страница 53: ...is setting when copying documents containing only text Map Select this setting when copying documents containing pencil markings or fine colored lines or documents with a background color such as maps...

Страница 54: ...ing copy functions Chapter 2 2 Touch the Original Density tab The Original Density screen appears 3 Touch Original Type The Original Type screen appears 4 Touch the button for the quality setting most...

Страница 55: ...ns 2 26 cm6520 Using copy functions Chapter 2 If Text Photo or Photo is selected select the photo type and then touch OK To return to the main screen touch Main Screen 5 Touch OK The Original Density...

Страница 56: ...e available Follow the procedures described below to select the density settings Adjusting the print density Density settings 1 Touch the Original Density tab The Original Density screen appears 2 Tou...

Страница 57: ...he density is lightened or darkened by one level To select the center setting default setting touch Standard To return to the main screen touch Main Screen 4 Touch OK The Original Density screen appea...

Страница 58: ...ting Each time Light or Dark is touched the density is lightened or darkened by one level To select the third setting from the right default setting touch Standard Touch Auto to automatically adjust t...

Страница 59: ...following procedure describes how to specify the setting for special paper loaded into the bypass tray 2 Note There are limits on the types of paper that can be loaded in a paper tray For details on...

Страница 60: ...y a setting for special paper for tray 1 tray 2 tray 3 tray 4 or LCT touch the button for the corresponding paper tray If a setting for special paper is selected for a paper tray that tray is not sele...

Страница 61: ...hen touch OK in the next two screens that appear Otherwise touch Main Screen The Basic screen appears again Printing double sided copies manually The Duplex 2nd Side setting is used to print double si...

Страница 62: ...y functions 2 Using copy functions Chapter 2 1 In the Basic screen touch Paper The Paper screen appears 2 Touch the button for the bypass tray and then touch Change Settings To return to the main scre...

Страница 63: ...ing copy functions Chapter 2 3 Touch Paper Type 4 Select the type of paper to be loaded and touch Duplex 2nd Side 5 Touch OK and then touch OK in the next two screens that appear Otherwise touch Main...

Страница 64: ...printed allowing the entire area of an 11 17 size A3 size document to be printed The following procedure describes how to specify the size of the paper loaded into the bypass tray Setting Description...

Страница 65: ...1 In the Basic screen touch Paper The Paper screen appears 2 Touch the button for the bypass tray and then touch Change Settings To return to the main screen touch Main Screen To set the paper size f...

Страница 66: ...ze 4 Touch either Auto Detect or select the desired paper size If a button other than Auto Detect was touched select the desired paper size and then touch OK 5 Touch OK and then touch OK in the next t...

Страница 67: ...opy job can be reserved after scanning of the loaded document is finished The next job cannot be reserved while a document is being scanned 1 If the message Ready to accept another job appears while p...

Страница 68: ...y while a document is being scanned or a job is being printed Scanning printing temporarily stops If a document is being scanned for a job pressing the Stop key temporarily stops scanning The message...

Страница 69: ...ecify multiple copies This feature cannot be used if the Group setting is selected 1 Position the document to be copied For details on positioning the document refer to Feeding the document on page 1...

Страница 70: ...cm6520 2 41 Using copy functions 2 Using copy functions Chapter 2 5 Touch Print The remaining copies are queued as a copy job...

Страница 71: ...2 Using copy functions 2 42 cm6520 Using copy functions Chapter 2...

Страница 72: ...3 Using fax scanning functions Chapter 3 Using fax scanning functions...

Страница 73: ...For details refer to the User s Guide Network Scanner Operations the User s Guide Fax Operations and the User s Guide Network Fax Operations For details on specifying settings and setting up the envir...

Страница 74: ...etails on specifying scanning settings refer to page 3 14 To cancel the setting and select the default press the Reset key 5 Press the Start key If the machine is set to display the transmission resul...

Страница 75: ...he Destination Check Display Function parameter was set to ON the Destination Settings screen appears Check the destinations and then touch Send If the machine is set to print the transmission result...

Страница 76: ...ta Transmission may not be possible if limitations have been placed on the document name according to the destination server conditions Since the scanning settings are used consult your network admini...

Страница 77: ...is not available with Internet faxing or IP faxing The procedure for specifying the destination where scan data is to be sent is described below Selecting a destination from the address book Follow t...

Страница 78: ...on type To select the index characters touch Next To select a destination from registered group touch Group To select all destinations registered with the selected group touch Select All in the Group...

Страница 79: ...Selecting a destination from the job log Follow the procedure described below to select a destination from the job log 2 Note This feature is not available with Internet faxing or IP address faxing 1...

Страница 80: ...e enabled and an LDAP server must be registered For details on specifying LDAP settings refer to the User s Guide Network Scanner Operations If Manual Destination Input in Administrator mode is set to...

Страница 81: ...a search word touch Search To specify multiple search conditions touch Advanced Search When there is only one LDAP server When there are multiple LDAP servers Authentication may be necessary dependin...

Страница 82: ...gain Directly typing in the number Follow the procedure described below to directly type in the fax number or the registration number for an address book destination during a fax transmission 2 Note I...

Страница 83: ...fax information service is being used T appears in the screen If pulse dialing is being used use to switch to a push button tone Pause Touch this button to insert a pause when dialing Touch Pause onc...

Страница 84: ...cm6520 3 13 Using fax scanning functions 3 Using fax scanning functions Chapter 3 3 Touch OK If a destination registration number is entered touch OK and then touch OK in the next screen that appears...

Страница 85: ...ropriate ADF scanning method according to your document The following scanning methods are available 1 Touch Scan Settings in the Fax Scan mode screen The Scan Settings screen appears Setting Descript...

Страница 86: ...nning functions Chapter 3 2 Touch Simplex Duplex To return to the Address Book screen touch Main Screen The Simplex Duplex screen appears 3 Select the scanning method 4 Touch OK and then touch OK in t...

Страница 87: ...lftones of the photo will not be reproduced and the entire photo will appear black Dot Matrix Original Select this setting when scanning documents with faint text such as that written in pencil Copied...

Страница 88: ...pter 3 2 Touch Original Type To return to the Address Book screen touch Main Screen The Original Type screen appears 3 Touch the button for the quality setting most appropriate for the loaded document...

Страница 89: ...creen The Scan Settings screen appears Setting Description 200 100 Standard Select this setting to reduce the transmission time 200 200 Fine Select this setting when scanning regular documents 300 300...

Страница 90: ...the resolution A more finely scanned document has more information to be sent therefore the transmission time increases If 600 600 Ultra Fine or 400 400 Super Fine is selected the fax is sent with a r...

Страница 91: ...ect the appropriate Density setting according to your document The density can be adjusted to one of nine levels 1 Touch Scan Settings in the Fax Scan mode screen The Scan Settings screen appears 2 To...

Страница 92: ...format for saving the scan data The following file formats are available Some format settings for the file to be saved may not be available depending on the selected Color setting and fax destination...

Страница 93: ...nning functions Chapter 3 1 Touch Scan Settings in the Fax Scan mode screen The Scan Settings screen appears 2 Touch File Type To return to the Address Book screen touch Main Screen The File Type scre...

Страница 94: ...nt will be scanned in color or black and white The following Color settings are available Some Color settings may not be available depending on the selected File Type setting 2 Note These settings are...

Страница 95: ...ons Chapter 3 The Scan Settings screen appears 2 Touch Image Adjust To return to the Address Book screen touch Main Screen The Image Adjust screen appears 3 Select the color type 4 Touch OK and then t...

Страница 96: ...d can be adjusted When documents printed on colored paper are scanned in color the background may become black In that case the density of the background can be adjusted 1 Touch Scan Settings in the F...

Страница 97: ...desired Each time Light or Dark is touched the density is lightened or darkened by one level To select the third setting from the right default setting touch Standard Touch Auto to automatically adju...

Страница 98: ...ings screen appears 2 Touch Scan Size To return to the Address Book screen touch Main Screen The Scan Size screen appears Settings Description Auto Select this setting to detect the size of the first...

Страница 99: ...correctly oriented For details on selecting the document orientation refer to Selecting the document orientation Original Direction settings on page 1 17 Binding Position Select the binding position f...

Страница 100: ...Chapter 3 2 Note Original Direction is not available with fax function 1 Touch Scan Settings in the Fax Scan mode screen The Scan Settings screen appears 2 Touch Original Settings To return to the Add...

Страница 101: ...ion displays the Original Direction screen Touch the button for the desired orientation and then touch OK Touching Binding Position displays the Binding Position screen Touch the button for the desire...

Страница 102: ...ered in advance 2 Note If no destinations are registered with programs destinations cannot be selected For details on registering programs refer to the User s Guide Network Scanner Operations the User...

Страница 103: ...tons can be displayed in a single page To scroll through the page touch or To cancel the setting touch the button again to deselect it Only one program can be selected 3 Touch OK or Main Screen To spe...

Страница 104: ...be checked In addition destinations can be removed or their information can be checked 1 In the Fax Scan mode screen touch Dest Settings The Destination Settings screen appears and the specified dest...

Страница 105: ...sing fax scanning functions Chapter 3 3 Touch Details and then check the destination details To delete a destination select a destination and then touch Delete to display a message requesting confirma...

Страница 106: ...4 Logging on and logging off Chapter 4 Logging on and logging off...

Страница 107: ...be used by users who enter their user name and password When the following screen appears type in the user name and password For a user name and password contact the machine s administrator 1 Touch Us...

Страница 108: ...to select it and then touch OK Continue with step 3 If Public User Access on the General Settings screen is set to Allow users with no access to a user name and password can touch Public User Access t...

Страница 109: ...turn to the main screen without changing the settings touch Cancel 5 Touch Login or press the Access key If account track settings have been applied in Administrator mode the account track screen appe...

Страница 110: ...ssword and then touch Login or press the Access key appears account track settings have been specified on this machine If account track settings have been applied this machine can only be used by user...

Страница 111: ...panel keypad or the keyboard that appears in the touch panel type in the account name and then touch OK Touch Shift to change the characters that are displayed To change a character in the entered tex...

Страница 112: ...4 3 Touch Password 4 Using the control panel keypad or the keyboard that appears in the touch panel type in the password and then touch OK To return to the main screen without changing the settings t...

Страница 113: ...are finished performing the desired operations press the Access key A message appears requesting confirmation to log off 7 Touch Yes and then touch OK The original screen appears again The screen tha...

Страница 114: ...Printing for Professionals Beyond the Ordinary Oc 100 Oakview Drive Trumbull CT 06611 www oceusa com Oc 2007 All Rights Reserved...

Отзывы: