3
•
Using the
USB cable
:
—
Plug the USB cable into the USB port on the Camera/DVR unit, then into a USB jack on a running computer.
—
When power is applied, the Camera/DVR unit open
USB
mode (see below) will charge the internal LI-ion battery. To stop
charging, disconnect the USB cable.
When the internal battery is charging, the LED indicator on the underside of the Camera/DVR unit will be red. When the battery is fully
charged, the red LED will be off. When fully charged, the Camera/DVR unit can operate without a charging cable for about 1 hour on its
internal battery.
Step 2. Mounting the Camera/DVR
unit
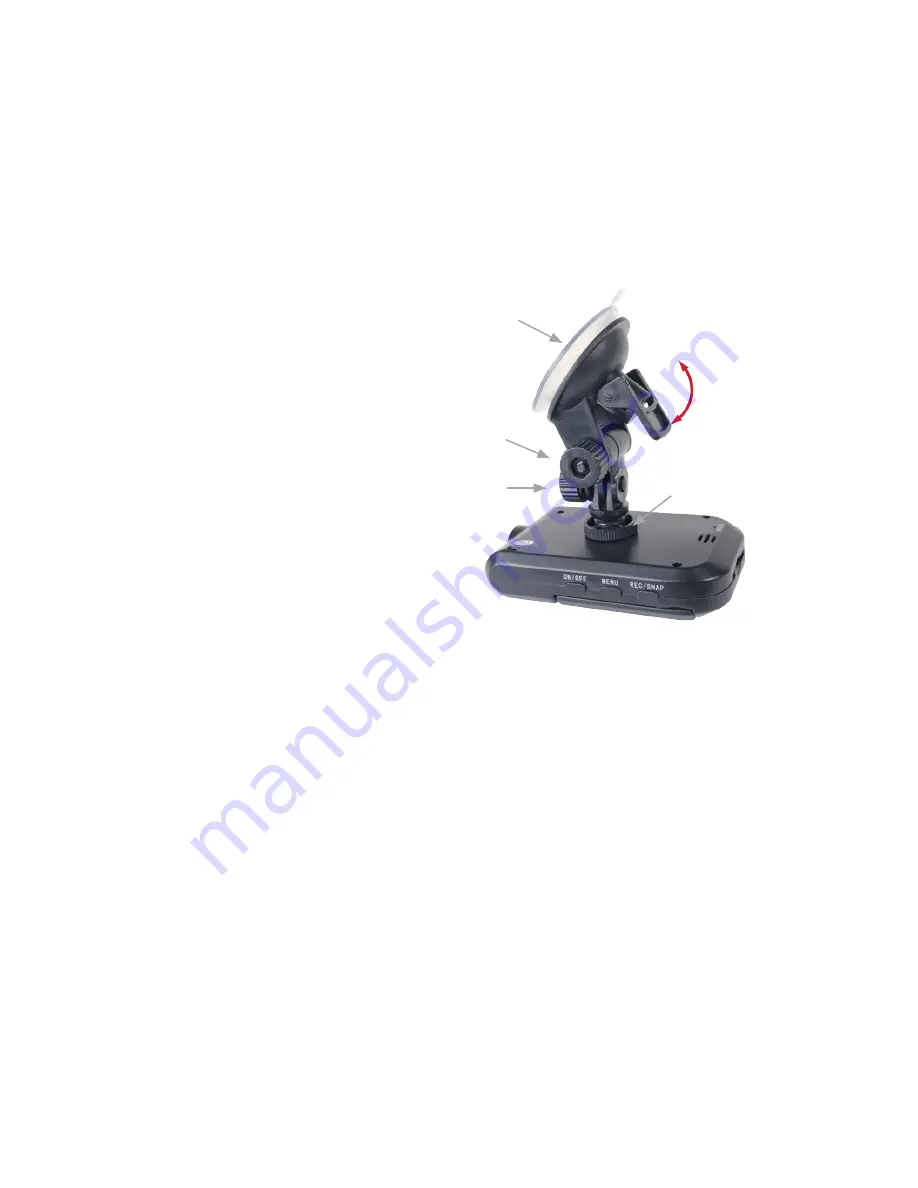
The Camera/DVR unit is designed to be attached to the inside
of a window (windshield) when using the mounting adapter
provided. To use the mounting adapter:
1.
Screw the mounting adapter onto the top of the Camera/
DVR unit as shown in the picture to the right.
2.
Remove the protective film from the suction cup, then
push the suction cup onto the inside of a clean window
(-shield). Make sure the mounting adapter is vertical.
3.
Flip up the suction lever to secure the adapter with the
Camera/DVR unit to the window.
4.
Flip open LCD display and power on the unit.
Suction relief tab
Pan lock nut
Suction lever -
flip up to apply
suction
Elevation
lock knob
Horizon
lock knob
Suction cup
5.
Loosen the Elevation lock knob, Horizon lock knob, and Pan lock nut.
6.
Orient the Camera/DVR unit for the best alignment.
7.
Tighten the Elevation lock knob, Horizon lock knob, and Pan lock nut to hold the Camera/DVR unit in place.
8.
Connect the car charging cable to a power outlet in the car, and to the USB connector on the right side of the unit. With the car
charging cable connected to the Camera/DVR, the unit will begin recording video when the car starts, and stop recording after
the car is off, unless the
REC/SNAP
button is pressed.
9.
Push the
ON/OFF
button to power off the unit, if necessary.
10. Inert an SD or MMC (1GB to 32GB, not provided) face down into the card into the card slot until it locks into place. (To remove
the card, press the card in slightly and release to unseat the card
NOTE
: Before using the Camera/DVR, you should format the SD/MMC card to ensure it is compatible with both the DVR
and
operating
systems. See “
Setting up the Camera and DVR configuration
” below.
Step 3. Setting up the Camera and DVR configuration menus
Your Camera/DVR can operate in one of three configurable modes: Video (output), Capture, and Play. Each of these modes has its own
configuration menu. Also, there is a general configuration menu called Settings. Examples of these screens are shown below.
Содержание MC104DVR
Страница 8: ...8...


