


4
www.observint.com
© 2019 Observint Technologies. All rights reserved.
OSD menu navigation
For the ALIBI Recorder
: Navigation and settings in the OSD are made through direction keys and the
Iris
+
and
Iris -
buttons in the recorder PTZ Control panel. See below.
Direction keys
Click to open OSD menu
Iris+ Iris–
Iris+ Iris–
Direction keys
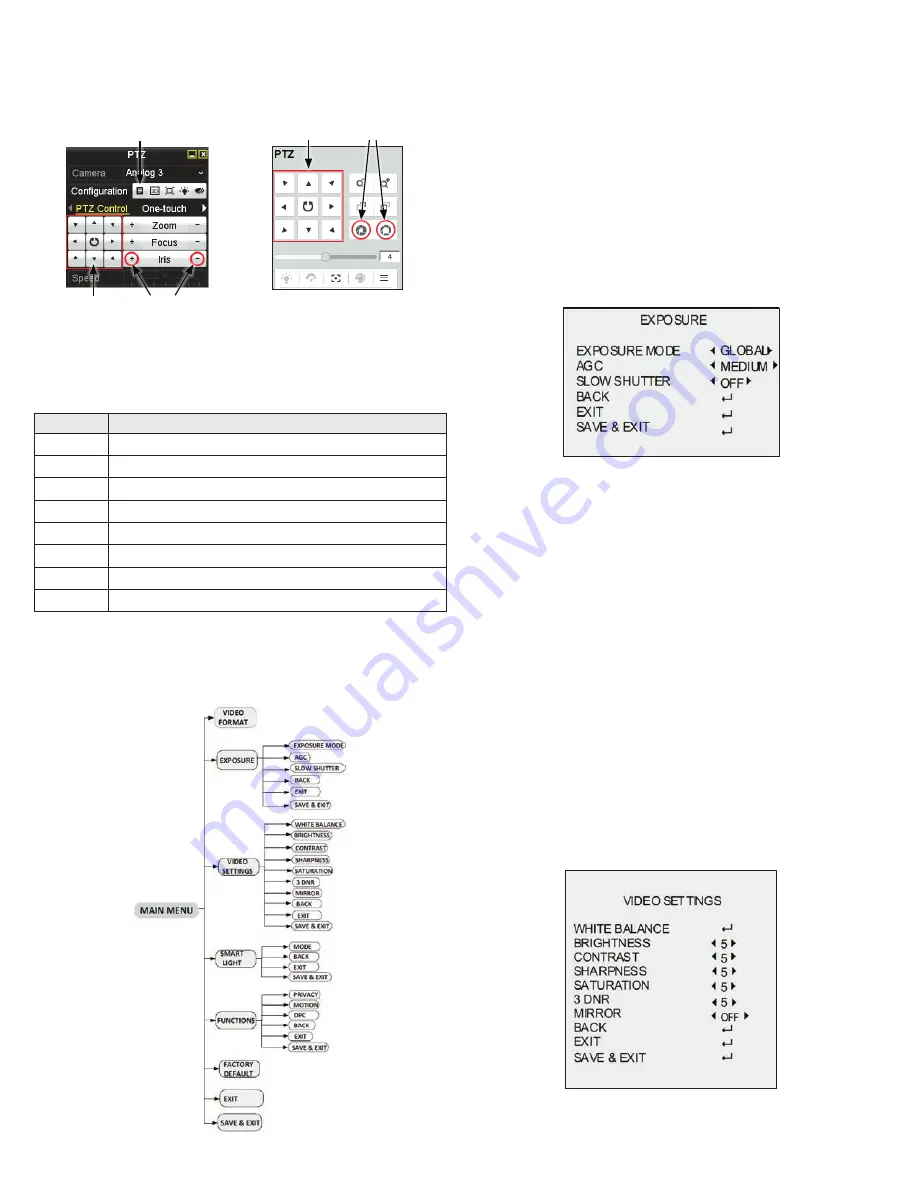
ALIBI recorder PTZ Control panel
ALIBI recorder remote access PTZ control panel
For remote access to the
recorder
: Navigation and settings in the OSD are made through direction keys
and the
Iris +
and
Iris -
buttons in the recorder PTZ control panel. See above.
The function of the directional keys and Iris buttons are defined in the table below.
Keys
Function
p
Move up in the parameter list
q
Move down in the parameter list.
t
Move to previous page, field
u
Move to next page, field
Zoom +
Zoom in
Zoom –
Zoom out
Iris+
(OPEN)
Set parameter value, or open sub-menu
Iris–
(CLOSE)
Cancel change of parameter.
OSD Definitions: On-screen Display (OSD) menus
After the camera is installed on a compatible recorder, you can open the OSD menu by clicking the PTZ
Control icon on the Quick Setting Toolbar.
To navigate the OSD menu and select options:
•
Click the up/down (
p
/
q
) direction buttons to select the menu item.
•
Click the left/right (
t
/
u
) direction buttons to adjust the value of the selected item.
•
Click the
Iris+
key to confirm a selection.
VIDEO FORMAT
You can set the video format as 2MP @ 25 fps, or 2 MP @ 30 fps.
Note
:
—
When switching the video output to CVBS, you can set the video format to either PAL or NTSC.
EXPOSURE
Exposure describes the brightness-related parameters, which can be adjusted by EXPOSURE MODE, and
AGC.
EXPOSURE menu
EXPOSURE MODE: You can set the EXPOSURE MODE as GLOBAL, BLC, and DWDR.
GLOBAL: Refers to the normal exposure mode which performs exposure according to the brightness of the
entire image.
BLC (Backlight Compensation): BLC adjusts the brightness for the front objects when the background is
bright. This may cause the overexposure of the background.
WDR (Wide Dynamic Range): DWDR helps the camera provide clear images even under backlight
circumstances. When both very bright and very dark areas simultaneously exist in the image, WDR
balances the brightness level of the whole image and provides clear images with details.
AGC (Automatic Gain Control): Optimizes the clarity of the image in poor light conditions. The AGC level can
be set to HIGH, MEDIUM or LOW.
Note
: Noise is amplified when increasing the AGC level. The higher the level is, the more obvious
the noise is.
SLOW SHUTTER: SLOW SHUTTER increases the exposure time on a single frame, which makes a camera
more sensitive to the light so it can produce images even in low lux conditions.
You can set the SLOW SHUTTER function as OFF, x2, x4, x6, x8, x10, x12, x14, or x16 for different light
conditions.
VIDEO SETTINGS
Move the cursor to VIDEO SETTINGS and click Iris+ to enter the submenu. In this menu you can set the
WHITE BALANCE, BRIGHTNESS, CONTRAST, SHARPNESS, SATURATION, 3 DNR, and MIRROR configuration.
VIDEO SETTINGS menu


