background image

17 


USE


GB


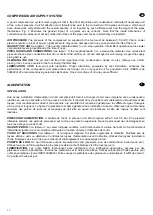
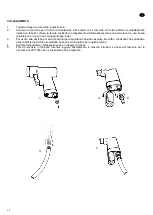
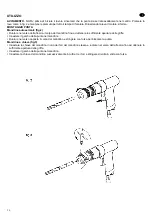
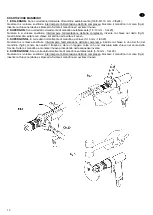
STARTING. N.B.: before starting your work, make sure the drill is properly fixed at the centre of the chuck. Press the lever 
as shown in fig.2 and hold it down to enable drilling. As soon as you release the lever, the motor will stop. 
MOUNTING A DRILL 
Self-locking chuck (fig.2) 


Turn the chuck in the direction indicated by the arrow until the jaws are sufficiently open. 


Insert the stem of the drill in the chuck. 


Turn the chuck in the opposite direction and tighten firmly to lock the drill in place. 

Chuck with key (fig.3) 


Insert  the  key  in  one  of  the  bores  on  the  chuck  and  turn  in  the  direction  indicated  by  the  arrow  until  the  jaws  are 
sufficiently open. 


Insert the stem of the drill in the chuck. 


Now insert the key of the chuck in each of three bores and tighten equally. 


UTILISATION


F


DEMARRAGE. REMARQUE: Avant de commencer à travailler, vérifier si le foret est serré et exactement centré. Appuyez 
sur le bouton (voir fig.2) et ne le relâchez que quand le perçage sera terminé. Le moteur s'arrête quand vous relâchez le 
bouton. 
MONTAGE DU FORET 
Mandrin auto-serreur (fig.2)


Tourner le corps du mandrin dans le sens de la flèche jusqu'à ce que les pinces soient suffisamment ouvertes. 


Mettre la queue du foret dans le mandrin. 


Tourner le corps du mandrin dans le sens inverse et serrer fort pour bloquer le foret. 

Mandrin à clé (fig.3) 


Encastrer    la  clé  du  mandrin  dans  l'un  des  trou  du  mandrin  et  tourner  dans  le  sens  de  la  flèche  jusqu'à  ce  que  les 
pinces soient suffisamment ouvertes. 


Mettre la queue du foret dans le mandrin. 


Insérer la clé dans le mandrin puis dans les trois trous et serrer bien fort à chaque fois. 


ANWENDUNG


D


EINSCHALTEN.  ANMERKUNG:  Vor  Arbeitsbeginn  sollte  darauf  geachtet  werden,  dass  der  Bohrer  genau  in  der  Mitte 
positioniert ist. Den Hebel wie in Abb.  drücken und während des gesamten Bohrvorgangs gedrückt halten. Wird der Hebel 
losgelassen, hält der Motor an. 
ANBRINGEN DES BOHRERS 
Selbstspannendes Bohrfutter (Abb.2) 


Den Bohrfutterkörper in Pfeilrichtung drehen, bis sich die Spannbacken ausreichend geöffnet haben.  


Den Bohrerschaft in das Bohrfutter stecken. 


Den Bohrfutterkörper in die entgegengesetze Richtung drehen und kraftvoll festziehen, um den Bohrer zu blockieren. 

Bohrfutter mit Schlüssel (Abb.3) 


Den Bohrfutterschlüssel in eine der Bohrungen stecken und in Pfeilrichtung drehen, bis die Spannbacken ausreichend 
geöffnet sind. 


Den Bohrerschaft in das Bohrfutter stecken. 


Den Bohrfutterschlüssel dann nacheinander in alle drei Bohrungen stecken und kraftvoll anziehen. 


USO


E


ARRANQUE.  NOTA:  antes  de  comenzar  el  trabajo,  asegurarse  que  la  punta  esté  ajustada  exactamente  en  el  centro. 
Apretar  la  palanca  como  se  muestra  en  fig.2  y  mantenerla  apretada  durante toda  la perforación. Soltando la palanca el 
motor se detiene. 
MONTAJE DE LA PUNTA 
Mandril autoajustante (fig.2)


Girar en el sentido de la flecha el cuerpo del mandril, hasta obtener la suficiente apertura de las mordazas. 


Acoplar el vástago de la punta en el mandril. 


Girar en el sentido opuesto el cuerpo del mandril y apretar con fuerza para bloquear la punta. 

Mandril a llave (fig.3) 


Acoplar  la  llave  del  mandril  en  uno  de  los  agujeros  del  mandril  y  girar  en  el  sentido  de  la  flecha  hasta  obtener  la 
apertura suficiente de las mordazas. 


Acoplar el vástago de la punta en el mandril. 


Acoplar la llave del mandril sucesivamente en los tres agujeros y apretar de vez en cuando con fuerza. 

Содержание ERGON Series

Страница 1: ...NG INSTRUCTIONS MODE D EMPLOI BETRIEBSANLEITUNG INSTRUCCIONES DE USO I Trapani ERG ERGON SUPERGON GB Drills ERG ERGON SUPERGON F Perceuses ERG ERGON SUPERGON D Bohrer ERG ERGON SUPERGON E Taladros ERG...

Страница 2: ...ompagn d un document fiscal attestant la date d achat ticket de caisse facture ou bulletin de livraison La garantie ne comprend pas les produits d j r par s par des personnes non autoris es alt r s ou...

Страница 3: ...nce pg 25 Accessories pg 28 INDEX F Parties principales page 3 Caract ristiques techniques page 7 Alimentation page 12 Utilisation page 17 Entretien page 25 Accessoires page 28 INHALTSVERZEICHNIS D Ha...

Страница 4: ...RG88 L 237 mm M 34 mm ERG100 L 250 mm M 35 mm ERGON66 L 192 mm M 34 mm ERGON88 L 192 mm M 34 mm ERGON8C L 183 mm M 38 mm ERGON100V L 192 mm M 34 mm ERGON100 L 215 mm M 34 mm ERGON130 L 245 mm N 40 mm...

Страница 5: ...mise en toute D Corps ext rieur de l outil E Silencieux F Orifice alimentation air comprim HAUPTTEILE D A Bohrfutter B Untersetzungsgetriebe C Anlasshebel D Werkzeuggeh use E Schalld mpfer F Druckluf...

Страница 6: ...pour le but express ment indiqu Toute modification apport e la machine et ses accessoires doit tre express ment autoris e par le bureau technique du fabricant Avant d effectuer toutes op rations d ent...

Страница 7: ...ivello di pressione sonora e di potenza acustica nel caso in cui questo superi gli 85 db A Le protezioni per l udito devono essere utilizzate qualora il livello di pressione sonora in posizione operat...

Страница 8: ...ns indicates the noise level where the noise level exceeds 85 dB A the noise power is also indicated Ear protectors must be worn where the noise level exceeds 85 dB A at the operator position We recom...

Страница 9: ...aract ristiques techniques indique le niveau de pression sonore et de puissance acoustique si celle ci d passe les 85 db A Les protections pour l appareil auditif doivent tre utilis es lorsque le nive...

Страница 10: ...erschreiten von 85 dB A auch der Schalleistungspegel angegeben Das Tragen eines Geh rschutzes ist vorgeschrieben wenn der Schalldruckpegel am Bedienerstand 85 dB A berschreitet und wird bei Werten unt...

Страница 11: ...e presi n sonora y de potencia ac stica en el caso en que la misma supere los 85 dB A Las protecciones para el o do se deben utilizar cada vez que el nivel de presi n sonora en la posici n del operado...

Страница 12: ...plastique et ne contiennent pas de substances nocives pour l environnement et les personnes Il est toutefois n cesessaire de pr voir une mise la d charge diff renci e des mat riaux et de respecter les...

Страница 13: ...al passaggio dell aria non utilizzare tubi danneggiati usurati o deteriorati Ispezionare i tubi di alimentazione prima dell utilizzo PULIZIA DELL ARIA L aria deve essere esente da impurit polvere acq...

Страница 14: ...e bonne installation d alimentation de l air comprim doit fournir l usager de l air sans impuret sans condensation lubrifi e en cas de n cessit et d une pression correcte Il convient donc de veiller p...

Страница 15: ...zeuge verwenden Kode OBER 5989902 Vorzugsweise automatische Schmierger te verwenden Es gen gen 1 2 Tropfen l pro Tag ALIMENTACI N E INSTALACI N Una buena instalaci n de aire comprimido tiene que sumin...

Страница 16: ...na guarnizione e non con un serraggio troppo forte 3 Far uscire aria dal tubo per alcuni secondi per assicurarsi che siano espulse impurit e condensa che potrebbero essere all interno del tubo sopratt...

Страница 17: ...uftzufuhr abnehmen 2 Ein Anschlussst ck f r den Zufuhrschlauch anschrauben Kontrollieren ob das Anschlussst ck und der Schlauch den in Tabelle 1 angegebenen Eigenschaften entsprechen Anmerkung Die Bef...

Страница 18: ...rino fino ad ottenere la sufficiente apertura delle griffe Innestare il gambo della punta nel mandrino Ruotare nel verso opposto il corpo del mandrino e stringere con forza per bloccare la punta Mandr...

Страница 19: ...serrer bien fort chaque fois ANWENDUNG D EINSCHALTEN ANMERKUNG Vor Arbeitsbeginn sollte darauf geachtet werden dass der Bohrer genau in der Mitte positioniert ist Den Hebel wie in Abb dr cken und w h...

Страница 20: ...iale scegliere il trapano con la potenza adatta conoscendo la velocit ideale di lavoro usare refrigeranti o lubrificanti indicati al tipo di lavoro Per forare grossi diametri in materiali duri general...

Страница 21: ...pr cision BOHREN D Die Bohrmaschinen ERG ERGON SUPERGON deren Leistungen in Tabelle 1 aufgef hrt sind sind f r die Bohrung aller Materialtypen geeignet Um ein gutes Arbeitsergebnis zu erzielen muss Fo...

Страница 22: ...ata svitare con chiave il mandrino ed avvitare il nuovo 3 SUPERGON13L corredato normalmente di mandrino a chiave 0 13 mm 1 2X20 Qualora lo si volesse sostituire interrompere l alimentazione dell aria...

Страница 23: ...lerweise mit selbstsperrendem Bohrfutter ausgestattet 0 6 0 8 1 10 mm 3 8x24 Sollte das Bohrfutter ausgewechselt werden die Druckluftzufuhr unterbrechen das Bohrfutter im Schraubstock blockieren Abb 4...

Страница 24: ...ortuni dispositivi di protezione individuali mascherine guanti occhiali Se il motore non girasse ancora staccare l alimentazione e tentare di sbloccarlo nuovamente facendo ruotare il mandrino manualme...

Страница 25: ...RIME AVANT TOUTE INTERVENTION QUELLE QU ELLE SOIT SUR L OUTIL A L EXCEPTION DU PER AGE D ANLAUFSCHWIERIGKEITEN Sollte das Werkzeug obwohl es an das Druckluftnetz angeschlossen ist nicht anlaufen sind...

Страница 26: ...ni dispositivi di protezione individuali mascherine guanti occhiali Ogni 500 ore di lavoro circa consigliabile smontare l utensile verificare la condizione dei cuscinetti e del motore pulire tutto e l...

Страница 27: ...may give rise to allergic reaction ENTRETIEN F Lavez r guli rement le moteur en versant du gas oil dans la prise d air faites le fonctionner quelques secondes apr s quoi graissez le Il suffit bien so...

Страница 28: ...Teilchen Rauch entwickeln k nnen der eine allergische Reaktion verursachen kann MANTENIMIENTO E Lavar peri dicamente el motor introduciendo gas leo en la toma del aire dejarlo en marcha durante unos s...

Страница 29: ...ig 1 IMPUGNATURA AUSILIARIA cod 5051407 Si applica sulla corona del gruppo riduttore e si fissa mediante vite apposita fig 2 Per utensili ERVIT ERGOVIT occorre applicare anche l apposito anello di rid...

Страница 30: ...e ses extr mit s l endroit pr vu cet effet sur le corps ext rieur de l outil fig 4 ZUBEH R D RING ERVIT ERGOVIT Kode Nr 5051734 SUPERGOVIT Kode Nr 5051740 Er wird auf dem Kranz des Untersetzungsgetrie...

Страница 31: ...risce conforme a quanto previsto dalla Direttiva 2006 42 EC e agli standard applicabili sotto elencati Il relativo Fascicolo Tecnico conservato presso la scrivente to which this declaration relates is...

Отзывы: