OM-E0538E 002
OPERATION MANUAL
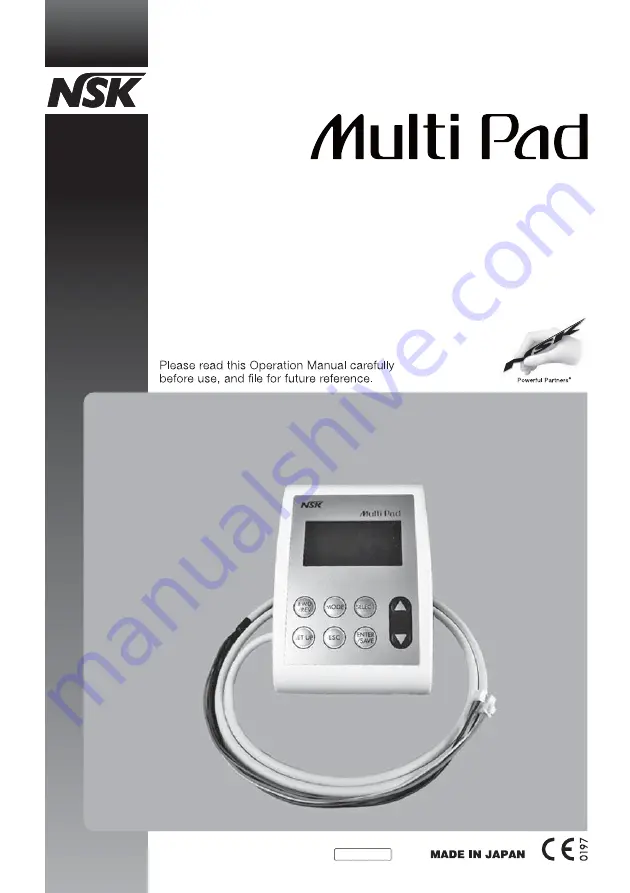
Multi-Control Panel for built-in system
Multi Pad for NLX / iMD
Страница 1: ...OM E0538E 002 OPERATION MANUAL Multi Control Panel for built in system Multi Pad for NLX iMD ...
Страница 2: ...IONS FOR HANDLING AND OPERATION 2 1 FEATURES 6 2 SPECIFICATIONS 6 3 NAME OF EACH PART 6 4 START UP 6 5 DESCRIPTION FOR DISPLAY 7 5 1 MOTOR 7 5 2 SCALER 8 5 3 SELECT THE INSTRUMENT 8 6 SETTINGS 9 6 1 MOTOR 9 6 2 SCALER 9 7 USEFUL FUNCTIONS 9 7 1 MOTOR 9 8 ERROR CODES 10 8 1 NLX nano MOTOR 10 8 2 NBX MOTOR 11 8 3 SCALER 11 9 OTHER SETTINGS 12 9 1 MOTOR SETTINGS 12 9 2 SCALER SETTINGS 15 10 DISPOSING...
Страница 3: ... only NLX BF NLX nano motor iMD NBX motor and Varios 170 OPTION Ř When operating this product always consider the safety of the patient Ř Prior to use always check for vibration noise and overheating If any abnormalities are detected stop using immediately and contact your Authorized NSK Dealer Ř Should the Product function abnormally cease operation immediately and return the Product to your Auth...
Страница 4: ...dpiece or handpiece cord after autoclaving wipe them off Staining may result if left Ř Users are responsible for applying this product to a patient Ř Multi Pad needs special precautions regarding EMC and needs to be installed and put into service according to the EMC information Ř Portable and mobile RF communications equipment can affect Electrical Medical equipment Do not use RF equipment in clo...
Страница 5: ... Gear ratio 3 Lamp On Off On Off In case of iMD 4 Endo mode Intensity Ŏ 9 1 9 L0 5 Air Delay timer Ŏ VHF 6 Endo alert GMXVWDEOH UDQJH 7 Others 8 Version 1 Language 2 Gear ratio 3 Lamp 4 Endo mode Display setting psi 5 Air bar 6 Endo alert MPa 7 Others Motor MIN pressure Ŏ 03D 8 Version Motor MAX pressure Ŏ 03D GMXVWDEOH UDQJH 1 Language 2 Gear ratio 3 Lamp 4 Endo mode Display setting Ncm 5 Air Nmm...
Страница 6: ...GHŔ VHWWLQJ LV QRW UHƃHFWHG LQ WKH FDVH RI WKH 1 QDQR PRWRU 1 Version LCD XXXX VA170 XXXX In case of iMD NLX XXXX iMD XXXX 1 Language 2 Gear ratio 3 Lamp 4 Endo mode 5 Air 6 Endo alert 7 Others LCD contrast 2 1 0 1 2 8 Version Backlight timer Ŏ PLQ RU ū In case of iMD Acceleration time NLX Ŏ VHF Cable length iMD P 1 Language Default setting No Yes 2 Gear ratio GMXVWDEOH UDQJH 3 Lamp 4 Endo mode 5 ...
Страница 7: ... 2 W Dimensions W95 x D138 x H31 mm Weight 286 g including cable and bracket Use Environment 7HPSHUDWXUH Ŏ r XPLGLW Ŏ Transportation and Store Environment 7HPSHUDWXUH Ŏ Ŏ r XPLGLW Ŏ WPRVSKHULF SUHVVXUH Ŏ K3D 4 START UP When turning the Power On the name of connecting instruments will be displayed for about 3 seconds along with a beep tone Then the LCD display will switch to operation screen automa...
Страница 8: ...shows Rotation Speed you selected While the Motor is rotating the actual rotation speed will be shown on the display SET VALUE display Fig 1 The pre programmed Maximum Rotation Speed is indicated on the display Program Number display Fig 1 The Program Number you selected will be displayed For detailed Program setting refer to 7 USEFUL FUNCTIONS Gear ratio display Fig 1 The preset Gear ratio is dis...
Страница 9: ...Vibration Power Level is displayed POWER 0 10 5 3 SELECT THE INSTRUMENT If 2 instruments motor and scaler are connected in a system you can select the instrument with the following steps 1 Ensure the Motor and Scaler have completely stopped 2 Press ESC key at the normal display The display will go to instrument selection mode when using Motor A or Scaler The screen shown in Fig 3 is displayed 3 Us...
Страница 10: ...r Level at the normal display key for increase press key for decrease Power 0 to 10 Gear ratio setting A maximum of 10 different Gear ratios can be set 8 are fixed default settings 2 for free settings 1 Press SELECT key until Gear ratio on the display blinks at the normal display 2 Press key to choose an appropriate Gear ratio 3 Press and hold ENTER SAVE key for 3 seconds or longer to save the set ...
Страница 11: ...ive current is applied for a given time Release the foot control E 03 Fault error Overcurrent in the motor driver Contact your Authorized NSK Dealer E 04 Over heat Motor is overused Leave the motor is until it cools down E 05 Input over voltage Over voltage Contact your Authorized NSK Dealer E 06 Lamp over voltage Lamp circuit over voltage Contact your Authorized NSK Dealer E 07 Residual voltage O...
Страница 12: ... error Input voltage has exceeded the upper and lower limit values Check input voltage E 06 Over LED voltage Detected over voltage of LED lamp Contact your Authorized NSK Dealer E 07 LED diff failure Over difference voltage of LED lamp control Contact your Authorized NSK Dealer E 08 Over load Motor is overused Leave the motor until it cools down E 09 Motor start failure Handpiece motor cord discon...
Страница 13: ...e setting mode when you move back to the previous screen use the ESC key If you press ESC key without setting the menu below will appear Follow the instruction on the display 9 1 MOTOR SETTINGS 9 1 1 1 Language Setting the display language 9 1 2 2 Gear ratio 2 of 10 Gear ratio settings can be set for customized settings To move the cursor press the SELECT key 7KH HDU UDWLR FDQ EH VHW WR RU WR The ...
Страница 14: ... GLVSOD SVL EDU 03D 6HOHFW WKH XQLW WKDW RX ZDQW WR XVH Ř 0RWRU 0 1 SUHVVXUH 6HWWLQJ WKH DLU SUHVVXUH IRU WKH PRWRU VWDUWŎXS 4 3 14 5 psi or 0 30 1 00 bar 0 030 0 100MPa Ř 0RWRU 0 SUHVVXUH 6HWWLQJ WKH DLU SUHVVXUH IRU UHDFKLQJ WKH PD 0RWRU 5RWDWLRQ 29 0 58 0 psi or 2 00 4 00 bar 0 200 0 400MPa 9 1 4 4 Endo mode Endo endodontics mode setting This setting is not applicable to the NLX nano motor 1 La...
Страница 15: ...HWWLQJ When you select Default setting by pressing ENTER SAVE key you will see the menu of Reconfirmation screen Use key to move to Yes then ENTER SAVE key for 3 seconds Then the all settings are initialized Ř DEOH OHQJWK 6HWWLQJ WKH FDEOH OHQJWK RI 1 PRWRU FRUG Select cable length from 1 2m to 2 6m Default is 2 2m 9 1 8 8 Version Display product information 6RIWZDUH 9HUVLRQ 1 L0 6RIWZDUH 9HUVLRQ 9...
Страница 16: ...the user of the Multi Pad should assure that is used in such an environment Emissions test Compliance Electromagnetic environment guidance RF emissions EN 55011 CISPR 11 Group 1 The Multi Pad uses RF energy only for its internal function Therefore its RF emissions are very low and are not likely to cause any interference in nearby electronic equipment RF emissions EN 55011 CISPR 11 Class B The Mul...
Страница 17: ...I ƃRRUV DUH FRYHUHG ZLWK V QWKHWLF material the relative humidity should be at least 30 Electrical fast transient burst EN 61000 4 4 IEC 61000 4 4 2 kV for power supply lines 1 kV for input output lines 2 kV for power supply lines 1 kV for input output lines Mains power quality should be that of a typical commercial or hospital environment Surge EN 61000 4 5 IEC 61000 4 5 1 kV line s to line s 2 k...
Страница 18: ...vironment guidance Portable and mobile RF communications equipment should be used no closer to any part of the Multi Pad including cables than the recommended separation distance calculated from the equation applicable to the frequency of the transmitter Recommended separation distance Where is the maximum output power rating of the transmitter in watts W according to the transmitter manufacturer ...
Страница 19: ......
Страница 20: ...N BEI HANDHABUNG UND BEDIENUNG 20 1 MERKMALE 24 2 TECHNISCHE DATEN 24 3 BEZEICHNUNGEN DER TEILE 24 4 INBETRIEBNAHME 24 5 BESCHREIBUNG DER ANZEIGE 25 5 1 MOTOR 25 5 2 SCALER 26 5 3 AUSWAHL DES INSTRUMENTS 26 6 EINSTELLUNGEN 27 6 1 MOTOR 27 6 2 SCALER 28 7 NÜTZLICHE FUNKTIONEN 28 7 1 MOTOR 28 8 FEHLERCODES 28 8 1 NLX nano MOTOR 28 8 2 NBX MOTOR 29 8 3 SCALER 30 9 SONSTIGE EINSTELLUNGEN 30 9 1 MOTORE...
Страница 21: ...nischen Gebrauch durch qualifiziertes Personal vorgesehen VORSICHT Ř Das Multi Pad Bedienfeld ist nicht wasserdicht und darf nicht mit Wasser in Berührung kommen Ř Verwenden Sie das Multi Pad nicht als Griff wenn Sie die Dentaleinheit bewegen möchten Ř Ziehen Sie nicht gewaltsam am Motorkabel Ř Betätigen Sie die Tasten unbedingt mit einem Finger Ř Schließen Sie dieses Produkt ausschließlich an den...
Страница 22: ...TÖRFESTIGKEIT dieses Produkts führen Ř Dieses Produkt sollte nicht direkt an oder auf anderen Geräten benutzt werden Sollte dies jedoch erforderlich sein muss genau beobachtet werden ob dieses Produkt in der Anordnung in der es benutzt werden soll normal funktioniert Ř Sollten nach der Autoklavierung Wassertropfen auf dem Handstück oder Handstückkabel zurückbleiben wischen Sie diese bitte ab Werde...
Страница 23: ...Ein Aus Ein Aus Bei iMD 4 Endo Modus Helligkeit 1 6 3 6 V NLX 3 0 3 6V iMD 5 Luftdruck Nachleuchtzeit 1 0 5 0 sec 6 Endo Alarm Einstellbereich 7 Weitere 8 Version 1 Sprache 2 Übersetzung 3 Lampe 4 Endo Modus Displayeinstellung psi 5 Luftdruck bar 6 Endo Alarm MPa 7 Weitere Motor MIN Druck 0 03 0 10 MPa 8 Version Motor MAX Druck 0 20 0 40 MPa Einstellbereich 1 Sprache 2 Übersetzung 3 Lampe 4 Endo M...
Страница 24: ...den die Einstellungen für den Endo Modus nicht berücksichtigt 1 Version LCD XXXX VA170 XXXX Bei iMD NLX XXXX iMD XXXX 1 Sprache 2 Übersetzung 3 Lampe 4 Endo Modus 5 Luftdruck 6 Endo Alarm 7 Weitere LCD Kontrast 2 1 0 1 2 8 Version Displaylicht Timer 1 30 min oder Bei iMD Anlaufzeit Motor NLX 0 5 3 0 sec Kabellänge iMD 1 2 2 6m 1 Sprache Werkseinstellung Nein Ja 2 Übersetzung Einstellbereich 3 Lamp...
Страница 25: ...erstützt 5 Sprachen English Español Italiano Français und Deutsch Modell Multi Pad Nenneingang Gleichstrom 12 V 100 mA 1 2 W Abmessungen B 95 x T 138 x H 31 mm Gewicht 286 g mit Kabel und Halterung Benutzungsumgebung 7HPSHUDWXU Ŏ r XIWIHXFKWLJNHLW Ŏ Transport und Lagerungsumgebung 7HPSHUDWXU Ŏ r XIWIHXFKWLJNHLW Ŏ WPRVSK ULVFKHU UXFN Ŏ K3D 4 INBETRIEBNAHME Beim Einschalten wird für etwa 3 Sekunden ...
Страница 26: ...Drehzahl angezeigt Wenn der Motor rotiert wird die aktuelle Drehzahl angezeigt Wenn der Motor angehalten wird wird 0 angezeigt und die Anzeige wechselt anschließend zur anfänglich ausgewählten maximalen Drehzahl 9RUZ UWV 0RGXV HZHJW VLFK LP 8KU HLJHUVLQQ 5 FNZ UWVPRGXV HZHJW VLFK JHJHQ GHQ 8KU HLJHUVLQQ Drehzahlanzeige Abb 1 Das Display zeigt die von Ihnen ausgewählte Drehzahl an Während der Motor...
Страница 27: ...stillstehen 2 Betätigen Sie die ESC Taste auf der normalen Anzeige Wenn Motor A oder Scaler verwendet wird wechselt die Anzeige zum Instrumentenauswahlmodus Es wird der in Abb 3 dargestellte Bildschirm angezeigt 3 Verwenden Sie die Taste um das Instrument auszuwählen das Sie verwenden möchten 4 Drücken Sie die Taste ENTER SAVE wenn das Instrument ausgewählt wurde Programmnummeranzeige Abb 1 Es wir...
Страница 28: ... auf der normalen Anzeige blinkt 2 Drücken Sie die Taste um ein geeignetes Übersetzungsverhältnis auszuwählen 3 Drücken und halten Sie Taste ENTER SAVE für mindestens 3 Sekunden um das eingestellte Übersetzungsverhältnis zu speichern Einstellung der Rotationsrichtung Drücken Sie die Taste FWD REV bis F auf der normalen Anzeige erscheint um den Motor vorwärts im Uhrzeigersinn laufen zu lassen Drück...
Страница 29: ...ssen Sie die Fußsteuerung los E 02 Over current Soft2 Zu hoher Stromverbauch über einen bestimmenten Zeitraum Lassen Sie die Fußsteuerung los E 03 Fault error Überstrom am Motor Setzen Sie sich mit Ihrem NSK Fachhändler in Verbindung E 04 Over heat Der Motor ist überlastet Lassen Sie den Motor abkühlen E 05 Input over voltage Überspannung Setzen Sie sich mit Ihrem NSK Fachhändler in Verbindung E 0...
Страница 30: ...rprüfen Sie die Eingangsspannung E 06 Over LED voltage Überspannung an der LED Lampe festgestellt Setzen Sie sich mit Ihrem NSK Fachhändler in Verbindung E 07 LED diff failure Überschreitung der Differenzspannung der LED Lampensteuerung Setzen Sie sich mit Ihrem NSK Fachhändler in Verbindung E 08 Over load Der Motor ist überlastet Lassen Sie den Motor abkühlen E 09 Motor start failure Das Handstüc...
Страница 31: ...ückgehen Wenn Sie die Taste ESC drücken ohne eine Einstellung vorzunehmen erscheint das folgende Menü Befolgen Sie die Anleitungen auf der Anzeige 8 3 SCALER Fehler Code Fehlermeldung Ursache Lösung E 09 poorTool Das Handstückkabel ist nicht angeschlossen Überprüfen Sie ob das Handstückkabel korrekt an das Handstück angeschlossen ist E 14 Fatal Programmfehler Setzen Sie sich mit Ihrem NSK Fachhänd...
Страница 32: ...eich 5 Luftdruck 6 Endo Alarm 7 Weitere 8 Version 9 1 3 3 Lampe Für die Einstellung der Funktion der LED Wählen Sie im Setup Menü auf dem Bildschirm Lampe aus Sie sehen anschließend die nächste Auswahl im Diagramm unten Ř LQ XV LH 0RWRUODPSH HLQ DXVVFKDOWHQ Ř HOOLJNHLW LQVWHOOHQ GHU HOOLJNHLW GHU 0RWRUODPSH 9 1 9 L0 LH Vorgabewerte sind 3 5V NLX 3 3V iMD Ř 1DFKOHXFKW HLW LQVWHOOXQJ GHU DXHU GHU HO...
Страница 33: ...niedrig Wenn die Meldung Über erscheint ist der Luftdruck zu hoch Ř LVSOD HLQVWHOOXQJ LH Q HLJH GHU XIWGUXFNHLQKHLW QGHUQ SVL EDU 03D KOHQ 6LH GLH LQKHLW DXV GLH Sie verwenden möchten Ř 0RWRU 0 1 UXFN HQ XIWGUXFN I U GHQ 6WDUW GHV 0RWRUV HLQVWHOOHQ 4 3 14 5 psi oder 0 30 1 00 bar 0 030 0 100 MPa Ř 0RWRU 0 UXFN HQ XIWGUXFN HLQVWHOOHQ XP GLH PD 0RWRUURWDWLRQ X HUUHLFKHQ 29 0 58 0 psi oder 2 00 4 00 ...
Страница 34: ...Q 6WDQGDUGHLQVWHOOXQJHQ XU FNVHW HQ Wenn Sie Werkseinstellung auswählen indem Sie die Taste ENTER SAVE betätigen sehen Sie das Menü des Bestätigungsbildschirms Drücken Sie die Taste um zu Ja zu gehen halten Sie die Taste ENTER SAVE anschließend für 3 Sekunden gedrückt Anschließend werden alle Einstellungen initialisiert Ř DEHOO QJH LQVWHOOHQ GHU DEHOO QJH GHV 1 GHV 0RWRUVFKODXFKHV Wenn Sie eine Ka...
Страница 35: ...romagnetische Emissionen Das Multi Pad ist für den Einsatz in den nachfolgend spezifizierten elektromagnetischen Umgebungen vorgesehen Der Kunde oder der Benutzer des Multi Pad sollte den Einsatz in einer solchen Umgebung sicherstellen Strahlungstest Konformität Elektromagnetische Umgebung Leitlinien HF Emissionen EN 55011 CISPR 11 Gruppe 1 Das Multi Pad verwendet HF Energie nur für die interne Fu...
Страница 36: ...sen bestehen Wenn die Fußböden mit synthetischem Material versehen sind sollte die relative Luftfeuchtigkeit mindestens 30 betragen Elektrischer schneller Einschaltstoß Burst EN 61000 4 4 IEC 61000 4 4 2 kV für Stromversorgungsleitungen 1 kV für Eingangs Ausgangsleitungen 2 kV für Stromversorgungsleitungen 1kV für Eingangs Ausgangsleitungen Die Qualität der Hauptstromversorgungs spannung sollte de...
Страница 37: ...um Multi Pad einschließlich der Leitungen verwendet werden als dem empfohlenen Schutzabstand der nach der für die Sendefrequenz zutreffenden Formel berechnet wird Empfohlener Schutzabstand Wobei die Nennleistung des Senders in Watt W gemäß den Angaben des Senderherstellers und d der empfohlene Schutzabstand in Metern m ist Die Feldstärken stationärer HF Sender die durch eine Untersuchung zur Ermit...
Страница 38: ...D UTILISATION 38 1 CARACTERISTIQUES 42 2 CARACTÈRISTIQUES TECHNIQUES 42 3 NOM DE CHAQUE PIECE 42 4 DEMARRAGE 42 5 DESCRIPTION DE L AFFICHAGE 43 5 1 MOTEUR 43 5 2 DETARTREUR 44 5 3 SELECTION DE L INSTRUMENT 44 6 PARAMÉTRAGES 45 6 1 MOTEUR 45 6 2 DETARTREUR 46 7 FONCTIONS UTILES 46 7 1 MOTEUR 46 8 CODES D ERREUR 46 8 1 MOTEUR NLX nano 46 8 2 MOTEUR NBX 47 8 3 DETARTREUR 48 9 AUTRES PARAMETRAGES 48 9...
Страница 39: ...onnectez cet appareil qu au NLX BF moteur NLX nano à l iMD moteur NBX et au Varios 170 OPTION Ř Lorsque vous utilisez l appareil veillez toujours à la sécurité du patient Ř Avant toute utilisation vérifiez la présence de vibrations de bruit et de surchauffe Si vous constatez une quelconque anomalie arrêtez immédiatement d utiliser l appareil et contactez votre revendeur NSK agréé Ř Si l appareil n...
Страница 40: ... des gouttes d eau restent sur la pièce à main ou le cordon de la pièce à main après l autoclave essuyez les Elles pourraient causer des taches si vous les laissez Ř Les utilisateurs sont responsables de l utilisation de cet appareil sur un patient Ř Le Multi Pad requiert une attention particulière en ce qui concerne la compatibilité électromagnétique et doit être installé et mis en service confor...
Страница 41: ... 3 Lampe On Off On Off Cas de l iMD 4 Mode endo Luminosité Ŏ 9 1 9 L0 5 Air Retard extinction Ŏ VHF 6 Alarme endo DPPH DMXVWDEOH 7 Autres 8 Version 1 Langue 2 Rapport 3 Lampe 4 Mode endo Unité affichée psi 5 Air bar 6 Alarme endo MPa 7 Autres Pression MINI mot Ŏ 03D 8 Version Pression MAXI mot Ŏ 03D DPPH DMXVWDEOH 1 Langue 2 Rapport 3 Lampe 4 Mode endo Unité affichée Ncm 5 Air Nmm 6 Alarme endo 7 ...
Страница 42: ...ge mode Endo n est pas illustré dans le cas du moteur NLX nano 1 Version LCD XXXX VA170 XXXX Cas de l iMD NLX XXXX iMD XXXX 1 Langue 2 Rapport 3 Lampe 4 Mode endo 5 Air 6 Alarme endo 7 Autres Contraste LCD 2 1 0 1 2 8 Version Extinction affich Ŏ PLQ RX ū Cas de l iMD Durée Accélération NLX Ŏ VHF Longueur de câble iMD P 1 Langue Réglage par défaut Non Oui 2 Rapport DPPH DMXVWDEOH 3 Lampe 4 Mode end...
Страница 43: ...dre à vos besoins moteur uniquement Ř Le Multi Pad propose cinq langues English Español Italiano Français et Deutsch Modèle Multi Pad Puissance d entrée nominale CD 12 V 100 mA 1 2 W Dimensions l95 x P38 x H31 mm Poids 286 g avec câble et support Environnement d utilisation 7HPS UDWXUH Ŏ r XPLGLW Ŏ Transport et Environnement de stockage 7HPS UDWXUH Ŏ Ŏ r XPLGLW Ŏ 3UHVVLRQ DWPRVSK ULTXH Ŏ K3D 4 DEM...
Страница 44: ...fichage présente la vitesse de rotation réelle Lorsque le moteur s arrête l écran affiche 0 et passe ensuite à la vitesse de rotation maximale sélectionnée à l origine 0RGH YDQW ERXJH GDQV OH VHQV GHV DLJXLOOHV G XQH PRQWUH 0RGH UULªUH ERXJH GDQV OH VHQV FRQWUDLUH GHV DLJXLOOHV G XQH PRQWUH Affichage de la vitesse de rotation Fig 1 L écran affiche la vitesse de rotation que vous avez sélectionnée ...
Страница 45: ...Veillez à ce que le moteur et le détartreur soient complètement arrêtés 2 Appuyez sur le bouton ESC à l affichage normal L écran passera au mode sélection instrument si vous utilisez le Moteur A ou le détartreur L écran illustré dans la Fig 3 est affiché 3 Utilisez le bouton pour sélectionner l instrument que vous souhaitez utiliser 4 Appuyez sur le bouton ENTER SAVE pour sélectionner l instrument...
Страница 46: ...ratio clignote sur l écran à l affichage normal 2 Appuyez sur le bouton pour choisir le rapport qui vous convient 3 Appuyez sur le bouton ENTER SAVE et maintenez le enfoncé pendant trois secondes au moins pour enregistrer le rapport Définition du sens de rotation Appuyez sur le bouton FWD REV jusqu à ce que F apparaisse sur l affichage normal pour la rotation horaire du moteur Appuyez sur le bouto...
Страница 47: ... pédale de contrôle E 02 Over current Soft2 Trop de courant est appliqué pendant un délai donné Relâchez la pédale de contrôle E 03 Fault error Surtension au niveau du driver du moteur Contactez votre distributeur NSK agréé E 04 Over heat Utilisation excessive du moteur Laissez le moteur refroidir E 05 Input over voltage Surtension Contactez votre distributeur NSK agréé E 06 Lamp over voltage Surt...
Страница 48: ...eur NSK agréé E 08 Over load Utilisation excessive du moteur Laissez le moteur refroidir E 09 Motor start failure Déconnexion de la pièce à main du cordon moteur Vérifiez si le cordon de la pièce à main est bien connecté à la pièce à main E 11 Air FS failure La pression d air est supérieure à 0 45 MPa Vérifiez la pression d air de l utilisateur E 12 Comm error Déconnexion ou contact défectueux du ...
Страница 49: ... le bouton ENTER SAVE et maintenez le enfoncé pendant trois secondes au moins pour enregistrer le programme REMARQUE Ř Au mode de paramétrage lorsque vous revenez à l écran précédent utilisez le bouton ESC Si vous appuyez sur le bouton ESC sans paramétrage le menu suivant apparaîtra Suivez les instructions affichées 9 1 PARAMETRAGES DU MOTEUR 9 1 1 1 Langue Définition de la langue d affichage 1 La...
Страница 50: ...X PRWHXU Ř XPLQRVLW 3DUDP WUDJH GH OD OXPLQRVLW GH OD ODPSH GX PRWHXU 9 1 9 L0 Par défaut 3 5V NLX 3 3V iMD Ř 5HWDUG H WLQFWLRQ ILQLWLRQ GH OD GXU H G FODLUDJH DSUªV O XWLOLVDWLRQ GX PRWHXU Ŏ VHFRQGHV 3DUDP WUDJH SDU G IDXW VHF 1 Langue 2 Rapport 3 Lampe On Off On Off Cas de l iMD 4 Mode endo Luminosité Ŏ 9 1 9 L0 5 Air Retard extinction Ŏ VHF 6 Alarme endo DPPH DMXVWDEOH 7 Autres 8 Version REMARQ...
Страница 51: ...ne gamme indiquée ci dessous en ajustant la pédale de contrôle Lorsqu un message Inf à est affiché la pression de l air est trop faible Lorsqu un message Sup à est affiché la pression de l air est trop élevée Ř 8QLW DIILFK H 0RGLILHU O DIILFKDJH GH O XQLW SRXU OD SUHVVLRQ G DLU SVL EDU 03D 6 OHFWLRQQH O XQLW TXH vous souhaitez utiliser Ř 3UHVVLRQ 0 1 PRW ILQLWLRQ GH OD SUHVVLRQ G DLU SRXU OH G PDU...
Страница 52: ... par défaut à 0 5 sec Ř 5 JODJH SDU G IDXW UHWRXU GX 1 L0 DX SDUDPªWUHV SDU G IDXW Lorsque vous sélectionnez Réglage par défaut en sélectionnant le bouton ENTER SAVE vous verrez apparaître le menu de reconfirmation Utilisez le bouton pour passer à Oui et gardez le bouton ENTER SAVE enfoncé pendant 3 secondes Tous les paramètres seront alors initialisés Ř RQJXHXU GH F EOH 3DUDP WUDJH GH OD ORQJXHXU...
Страница 53: ...ulti Pad est destiné à une utilisation dans l environnement électromagnétique précisé ci dessous Le client ou l utilisateur du Multi Pad doit veiller à utiliser cet appareil dans un tel environnement Tests d émission Conformité Environnement électromagnétique directives Émissions Rf EN 55011 CISPR 11 Groupe 1 Le Multi Pad n utilise de l énergie RF que pour ses fonctions internes Par conséquent ses...
Страница 54: ...le niveau d humidité relative doit être d au moins 30 Explosion courant transitoire rapide EN 61000 4 4 IEC 61000 4 4 2 kV pour les lignes d alimentation 1 kV pour les lignes d entrée sortie 2 kV pour les lignes d alimentation 1kV pour les lignes d entrée sortie La qualité de l alimentation principale doit être équivalente à celle d un environnement commercial ou hospitalier typique Surtension EN ...
Страница 55: ... mobiles et portables et les pièces du Multi Pad câbles compris ne doit pas être inférieure à la distance de séparation recommandée et calculée à partir de l équation applicable pour la fréquence du transmetteur Distance de séparation recommandée Si est le niveau de puissance maximal du transmetteur en watts W selon le fabricant du transmetteur et que d est la distance de séparation en mètres m Le...
Страница 56: ...56 1 CARACTERÍSTICAS 60 2 CARACTERÍSTICAS TÉCNICAS 60 3 NOMBRE DE CADA PIEZA 60 4 PUESTA EN MARCHA 60 5 DESCRIPCIÓN DE PANTALLA 61 5 1 MOTOR 61 5 2 ESCARIADOR 62 5 3 SELECCIONAR EL INSTRUMENTO 62 6 CONFIGURACIÓN 63 6 1 MOTOR 63 6 2 ESCARIADOR 64 7 FUNCIONES ÚTILES 64 7 1 MOTOR 64 8 CÓDIGOS DE ERROR 64 8 1 MOTOR NLX nano 64 8 2 MOTOR NBX 65 8 3 ESCARIADOR 66 9 OTRAS CONFIGURACIONES 66 9 1 CONFIGURA...
Страница 57: ...es con un dedo Ř Conecte este producto únicamente a NLX BF motor NLX nano iMD motor NBX y Varios 170 OPCIONAL Ř Cuando utilice este producto piense siempre en la seguridad del paciente Ř Antes de su uso compruebe siempre si se produce vibración ruido y sobrecalentamiento Si se detectara alguna anormalidad pare inmediatamente y póngase en contacto con su distribuidor NSK autorizado Ř En caso de que...
Страница 58: ...alguna gota de agua en la pieza de mano o en el cable de la pieza de mano después de esterilizar con autoclave séquela Si se deja podría quedar una mancha Ř Los usuarios son los responsables del uso de este producto en sus pacientes Ř Multi Pad requiere unas precauciones especiales en relación a CEM y necesita ser instalado y puesto en servicio de acuerdo con la información CEM Ř Los equipos de co...
Страница 59: ...ma 2 Transmisión 3 Lámpara On Off On Off Caso de iMD 4 Modo endo Intensidad Ŏ 9 1 9 L0 5 Aire Tiempo remanencia Ŏ VHJ 6 Alertas endo 5DQJR FRQILJXUDEOH 7 Otros 8 Versión 1 Idioma 2 Transmisión 3 Lámpara 4 Modo endo Ajuste display psi 5 Aire bar 6 Alertas endo MPa 7 Otros Presión aire giro Ŏ 03D 8 Versión Presión aire max Ŏ 03D 5DQJR FRQILJXUDEOH 1 Idioma 2 Transmisión 3 Lámpara 4 Modo endo Ajuste ...
Страница 60: ...ión Modo endo no está reflejada en el caso del motor NLX nano 1 Versión LCD XXXX VA170 XXXX Caso de iMD NLX XXXX iMD XXXX 1 Idioma 2 Transmisión 3 Lámpara 4 Modo endo 5 Aire 6 Alertas endo 7 Otros Contraste LCD 2 1 0 1 2 8 Versión Ajuste brillo Ŏ PLQ R ū Caso de iMD Ajuste aceleración NLX Ŏ VHJ Longitud del cable iMD P 1 Idioma Reset No Sí 2 Transmisión 5DQJR FRQILJXUDEOH 3 Lámpara 4 Modo endo 5 A...
Страница 61: ... a sus necesidades exactas sólo motor Ř Multi Pad soporta 5 idiomas English Español Italiano Français y Deutsch Modelo Multi Pad Entrada nominal 12 V CC 100 mA 1 2 W Dimensiones W95 x H31 x D138 mm Peso 286 g incluye cable y soporte Entorno de uso 7HPSHUDWXUD Ŏ r XPHGDG Ŏ Entorno de transporte y almacenamiento 7HPSHUDWXUD Ŏ Ŏ r XPHGDG Ŏ 3UHVLµQ DWPRVI ULFD Ŏ K3D 4 PUESTA EN MARCHA Al encender la a...
Страница 62: ...muestra la velocidad de rotación real Cuando el motor se detiene la pantalla muestra 0 y luego pasa a la velocidad máxima de rotación seleccionada originalmente 0RGR KDFLD GHODQWH 6H PXHYH HQ HO VHQWLGR GH ODV DJXMDV GHO UHORM 0RGR LQYHUVR 6H PXHYH HQ HO VHQWLGR FRQWUDULR D ODV DJXMDV GHO UHORM Pantalla de velocidad de rotación Fig 1 El pantalla muestra la velocidad de rotación que usted ha selecc...
Страница 63: ...pasos 1 Asegúrese de que el motor y el escariador se hayan detenido completamente 2 Presione el botón ESC en la pantalla normal La pantalla pasará al modo de selección de instrumento cuando se utiliza un motor A o escariador Aparece la pantalla que se muestra en la figura 3 3 Utilice el botón para seleccionar el instrumento que desea utilizar 4 Presione el botón ENTER SAVE y seleccione el instrume...
Страница 64: ...a que Transmisión parpadee en la pantalla normal 2 Pulse el botón para seleccionar una transmisión adecuada 3 Mantenga presionado el botón ENTER SAVE durante 3 o más segundos para guardar la transmisión Configuración de dirección de rotación Para hacer que el motor rote hacia adelante pulse el botón FWD REV hasta que aparezca F en la pantalla normal Para hacer que el motor rote hacia atrás pulse e...
Страница 65: ...ft1 Corriente eléctrica anormal aplicada al motor y el circuito Suelte el pedal de control E 02 Over current Soft2 Se aplica demasiada corriente durante un tiempo determinado Suelte el pedal de control E 03 Fault error Exceso de corriente del driver del motor Póngase en contacto con su distribuidor NSK autorizado E 04 Over heat El motor está sobrecargado Permita que el motor se enfríe E 05 Input o...
Страница 66: ...ase en contacto con su distribuidor NSK autorizado E 07 LED diff failure Diferencia de voltaje excesiva del control de la lámpara LED Póngase en contacto con su distribuidor NSK autorizado E 08 Over load El motor está sobrecargado Permita que el motor se enfríe E 09 Motor start failure Desconexión de cable de motor pieza de mano Compruebe que el cable de la pieza de mano esté conectado a la pieza ...
Страница 67: ... ESC sin configuración aparecerá el menú de abajo Siga las instrucciones que aparecen en la pantalla 8 3 ESCARIADOR Código de error Mensaje de error Causa Solución E 09 poorTool Desconexión de cable de pieza de mano Compruebe que el cable de la pieza de mano esté conectado a la pieza de mano correctamente E 14 Fatal Error de programa Póngase en contacto con su distribuidor NSK autorizado E 11 Air ...
Страница 68: ...a la configuración de la función del LED En el menú de configuración seleccione Lámpara en la pantalla A continuación verá la siguiente selección mostrada en el siguiente diagrama Ř 2Q 2II RQILJXUDFLµQ GH HQFHQGLGR DSDJDGR GH O PSDUD GH PRWRU Ř QWHQVLGDG MXVWH GH OD LQWHQVLGDG GH OD O PSDUD GH PRWRU 9 1 9 L0 Los ajustes predeterminados son 3 5V NLX 3 3V iMD Ř 7LHPSR UHPDQHQFLD RQILJXUDFLµQ GH OD G...
Страница 69: ... el mensaje de over la presión del aire es demasiado alta Ř MXVWH GLVSOD DPELR GH XQLGDG HQ SDQWDOOD GH SUHVLµQ GHO DLUH SVL EDU 03D 6HOHFFLRQH OD XQLGDG TXH desea utilizar Ř 3UHVLµQ DLUH JLUR RQILJXUDFLµQ GH OD SUHVLµQ GHO DLUH SDUD HO DUUDQTXH GH PRWRU 4 3 14 5 psi o 0 30 1 00 bar 0 030 0 100 MPa Ř 3UHVLµQ DLUH PD RQILJXUDFLµQ GH OD SUHVLµQ GHO DLUH SDUD OOHJDU D OD URWDFLµQ GHO PRWRU P 29 0 58 ...
Страница 70: ... segundos Ř 5HVHW 5HVWDEOHFH OD FRQILJXUDFLµQ SUHGHWHUPLQDGD GH I EULFD GH 1 L0 Al seleccionar Reset con el botón ENTER SAVE verá el menú de la pantalla de reconfirmación Utilice el botón para pasar a Sí y luego pulse el botón ENTER SAVE durante 3 segundos A continuación se inician todas las configuraciones Ř RQJLWXG GHO FDEOH VWDEOHFH OD ORQJLWXG GHO FDEOH GH PRWRU 1 Seleccione la longitud del ca...
Страница 71: ... emisiones electromagnéticas Multi Pad ha sido diseñado para su uso en el entorno electromagnético definido a continuación El cliente o el usuario de Multi Pad debe asegurarse de que se use en este tipo de entorno Prueba de emisiones Cumplimiento Entorno electromagnético guía Emisiones de RF EN 55011 CISPR 11 Grupo 1 Multi Pad utiliza energía RF sólo para su función interna Por lo tanto sus emisio...
Страница 72: ...se cubren con material sintético la humedad relativa debería ser al menos de un 30 Ráfaga de impulsos transiente rápido eléctrico EN 61000 4 4 IEC 61000 4 4 2 kV para las líneas de suministro eléctrico 1 kV para las líneas de entrada salida 2 kV para las líneas de suministro eléctrico 1kV para las líneas de entrada salida La calidad de la potencia eléctrica debería ser aquella de un entorno comerc...
Страница 73: ...nicaciones portátil y móvil RF debería utilizarse a una distancia de cualquier pieza del Multi Pad incluidos cables superior a la distancia de separación recomendada por la ecuación aplicable para la frecuencia del transmisor Distancia de separación recomendada Donde es el índice máximo de potencia de salida del transmisor en vatios W según el fabricante del transmisor y d es la distancia de separ...
Страница 74: ...UZIONI DI UTILIZZO E FUNZIONAMENTO 74 1 CARATTERISTICHE 78 2 SPECIFICHE 78 3 COMPONENTI 78 4 AVVIAMENTO 78 5 DESCRIZIONE DEL DISPLAY 79 5 1 MOTORE 79 5 2 ABLATORE 80 5 3 SELEZIONE DEL DISPOSITIVO 80 6 IMPOSTAZIONI 81 6 1 MOTORE 81 6 2 ABLATORE 82 7 FUNZIONI UTILI 82 7 1 MOTORE 82 8 CODICI ERRORE 82 8 1 Micromotore NLX nano 82 8 2 MOTORE NBX 83 8 3 ABLATORE 84 9 ALTRE IMPOSTAZIONI 84 9 1 IMPOSTAZIO...
Страница 75: ... esclusivamente a NLX BF micromotore NLX nano iMD motore NBX e Varios 170 OPZIONALE Ř Quando si utilizza questo apparecchio considerare sempre la sicurezza del paziente Ř Prima dell uso controllare sempre vibrazioni rumorosità e surriscaldamento Se riscontrate qualche anomalia sospendete immediatamente l uso e contattate il vostro Distributore Autorizzato NSK Ř Qualora il prodotto dovesse funziona...
Страница 76: ... utilizzato Ř Rimuovere le eventuali gocce d acqua rimaste sul manipolo o sul cavo del manipolo dopo la sterilizzazione in autoclave In caso contrario potrebbero formarsi macchie Ř Gli operatore sono responsabili dell utilizzo di questo prodotto sul paziente Ř Multi Pad richiede speciali precauzioni riguardo alla compatibilità elettromagnetica EMC e deve essere installato e messo in servizio in co...
Страница 77: ...uce On Off On Off Scatola dell iMD 4 Modo endo Intensità Ŏ 9 1 9 L0 5 Aria Delay timer Ŏ VHF 6 Allarmi endo 9DORUH UHJRODELOH 7 Altro 8 Versione 1 Lingua 2 Rapporto 3 Luce 4 Modo endo Settaggio display kPa 5 Aria bar 6 Allarmi endo MPa 7 Altro Motor MIN pressure Ŏ 03D 8 Versione Motor MAX pressure Ŏ 03D 9DORUH UHJRODELOH 1 Lingua 2 Rapporto 3 Luce 4 Modo endo Settaggio display Ncm 5 Aria Nmm 6 All...
Страница 78: ...stazione Modo endo non viene visualizzata in caso di utilizzo del micromotore NLX nano 1 Versione LCD XXXX VA170 XXXX Scatola dell iMD NLX XXXX iMD XXXX 1 Lingua 2 Rapporto 3 Luce 4 Modo endo 5 Aria 6 Allarmi endo 7 Altro Contrasto LCD 2 1 0 1 2 8 Versione Luce LCD Ŏ PLQ R ū Scatola dell iMD Sett Acceleraz NLX Ŏ VHF Lunghezza del cavo iMD P 1 Lingua Ripr val fabbrica No Sì 2 Rapporto 9DORUH UHJROD...
Страница 79: ...e dell utente solo per il motore Ř Multi Pad può essere impostato in 5 lingue diverse English Español Italiano Français Deutsch Modello Multi Pad Potenza nominale DC 12 V 100 mA 1 2 W Dimensioni L95 x P138 x H31 mm Peso 286 g compresi cavo e supporto PELHQWH GL XWLOL R 7HPSHUDWXUD Ŏ r 8PLGLW Ŏ Trasporto e PELHQWH GL VWRFFDJJLR 7HPSHUDWXUD Ŏ Ŏ r 8PLGLW Ŏ 3UHVVLRQH DWPRVIHULFD Ŏ K3D 4 AVVIAMENTO All...
Страница 80: ... viene visualizzata la velocità di rotazione effettiva Quando il motore è spento sul display appare 0 e successivamente il valore di rotazione massima originariamente impostato 0RGDOLW GL DYDQ DPHQWR PRYLPHQWR LQ VHQVR RUDULR 0RGDOLW LQYHUVD PRYLPHQWR LQ VHQVR DQWLRUDULR Display velocità di rotazione Fig 1 Sul display viene visualizzata la velocità di rotazione selezionata Mentre il motore è in fu...
Страница 81: ...re e ablatore siano arrivati all arresto completo 2 Sul display standard premere il tasto ESC Il display passerà alla modalità di selezione del dispositivo utilizzando il motore A oppure l ablatore Viene visualizzata la schermata della Fig 3 3 Premere il tasto per selezionare il dispositivo che si desidera utilizzare 4 Premere il tasto ENTER SAVE ora il dispositivo è stato selezionato LVSOD FRQ QX...
Страница 82: ...asto SELECT finché sul display standard non lampeggia la scritta Rapporto 2 Premere il tasto per scegliere un rapporto adeguato 3 Premere e mantenere premuto il tasto ENTER SAVE per almeno 3 secondi per salvare il rapporto impostato Impostazione direzione rotazione Per impostare la rotazione del motore in senso orario premere il tasto FWD REV finché sul display standard non appare F Per impostare ...
Страница 83: ...ere il carico dal motore E 01 Over current Soft1 Corrente elettrica anomala fornita a motore e circuito Rilasciare il pedale E 02 Over current Soft2 Eccessiva corrente fornita in un determinato momento Rilasciare il pedale E 03 Fault error Sovratensione del comando del motore Contattare il Distributore Autorizzato NSK E 04 Over heat Utilizzo eccessivo del motore Far raffreddare il motore E 05 Inpu...
Страница 84: ...e della luce a LED Contattare il Distributore Autorizzato NSK E 07 LED diff failure Superamento della tensione del controllo della luce a LED Contattare il Distributore Autorizzato NSK E 08 Over load Utilizzo eccessivo del motore Far raffreddare il motore E 09 Motor start failure Disconnessione cavo del manipolo o del motore Controllare il corretto collegamento del cavo al manipolo E 11 Air FS fai...
Страница 85: ... modalità impostazioni utilizzare il tasto ESC per tornare allo schermo precedente Premendo il tasto ESC senza inserire nessuna impostazione apparirà il menu indicato di seguito Seguire le istruzioni sul display 8 3 ABLATORE Codice di errore 0HVVDJJLR HUURUH Causa Soluzione E 09 poorTool Disconnessione cavo manipolo Controllare il corretto collegamento del cavo al manipolo E 14 Fatal Errore nel pr...
Страница 86: ...Versione Ŏ Ŏ XFH 3HU LPSRVWDUH LO IXQ LRQDPHQWR GHO Nella modalità set up selezionare Luce sul display Successivamente comparirà un ulteriore selezione come mostrato nel diagramma seguente Ř 2Q 2II LPSRVWD LRQH RQ RII GHOOD OXFH GHO PRWRUH Ř QWHQVLW LPSRVWD LRQH LQWHQVLW GHOOD OXFH GHO PRWRUH 9 1 9 L0 H impostazioni predefinite sono 3 5V NLX 3 3V iMD Ř HOD WLPHU PSRVWDUH OD GXUDWD GHOOőLOOXPLQD LR...
Страница 87: ... il messaggio Over la pressione dell aria è troppo elevata Ř 6HWWDJJLR GLVSOD 0RGLILFD VFKHUPDWD XQLW GL PLVXUD SUHVVLRQH GHOOőDULD N3D EDU 0SD 6HOH LRQDUH OőXQLW desiderata Ř 0RWRU 0 1 SUHVVXUH PSRVWD LRQH GHOOD SUHVVLRQH GHOOőDULD SHU OőDYYLDPHQWR GHO PRWRUH 4 3 14 5 kPa o 0 30 1 00 bar 0 030 0 100MPa Ř 0RWRU 0 SUHVVXUH PSRVWD LRQH GHOOD SUHVVLRQH GHOOőDULD SHU UDJJLXQJHUH OD PDVVLPD URWD LRQH G...
Страница 88: ...EEULFD 5LSULVWLQR LPSRVWD LRQL GL IDEEULFD GHOOőXQLW 1 L0 Selezionando Ripr val fabbrica tramite il tasto ENTER SAVE verrà visualizzato il menu dello schermo di ripristino delle impostazioni iniziali Premere il tasto per selezionare Sì quindi premere ENTER SAVE per 3 secondi Ora tutte le impostazioni sono tornate ai valori predefiniti Ř XQJKH D GHO FDYR RGLFH SHU OőLPSRVWD LRQH GHOOD OXQJKH D GHO ...
Страница 89: ... Ŏ HPLVVLRQL HOHWWURPDJQHWLFKH Multi Pad è destinato all utilizzo negli ambienti elettromagnetici specificati di seguito L acquirente o l utente di Multi Pad dovranno assicurarsi che esso venga utilizzato in tale ambiente Test delle emissioni Conformità PELHQWL HOHWWURPDJQHWLFL Ŏ OLQHH JXLGD Emissioni RF EN 55011 CISPR 11 Gruppo 1 Multi Pad utilizza energia RF esclusivamente per il suo funzionamen...
Страница 90: ...ntatto 6 kV Aria 8 kV Contatto 6 kV Aria 8 kV Le pavimentazioni devono essere in legno calcestruzzo o piastrelle di ceramica In caso di pavimenti rivestiti di materiale sintetico l umidità relativa minima deve essere pari almeno al 30 Fusibili elettrici Transitorio scoppio EN 61000 4 4 IEC 61000 4 4 2kV per linee di alimentazione 1 per linee di ingresso uscita 2kV per linee di alimentazione 1kV pe...
Страница 91: ...frequenza RF portatili e mobili a nessun componente di Multi Pad cavi compresi e mantenerle a una distanza mai inferiore a quella raccomandata calcolata sulla base dell equazione applicabile alla frequenza del trasmettitore Distanza di separazione raccomandata In cui P è la potenza d uscita massima espressa in watt W indicata dal produttore del trasmettitore e d è la distanza di separazione raccom...
Страница 92: ...Specifications are subject to change without notice 2015 03 20 003 S The EU directive 93 42 EEC was applied in the design and production of this medical device ...