background image

EN

Operation

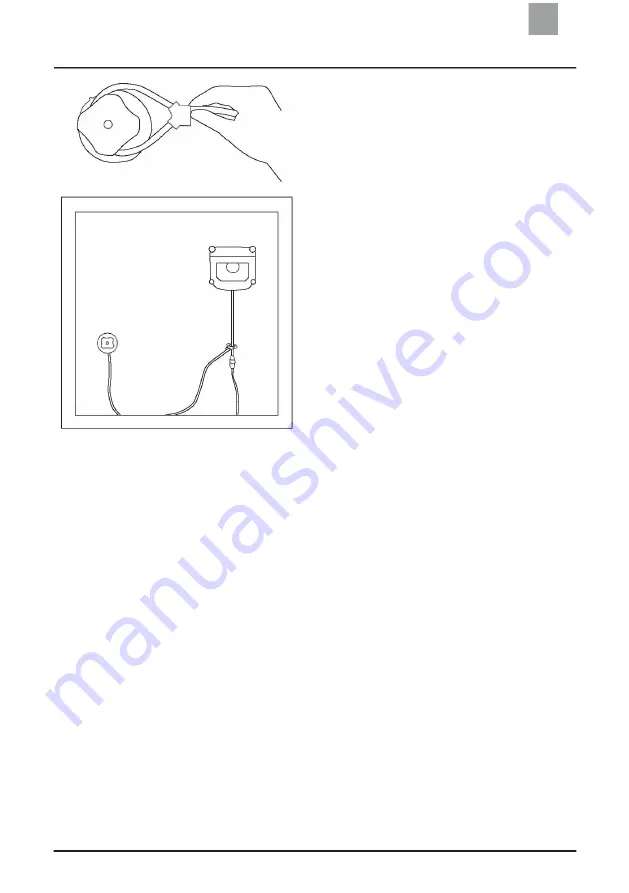
Loop the other end of the safety tether

(2) around the safety suction cup

(3) and tighten.

Before attaching the safety suction cup,

wipe the surface clean and dry.

If

ENERGY RWC-1

is used to clean an

inside window surface, press the safety

suction cup firmly on the upper corner of

the inside window surface.

If ENERGY RWC-1

is used to clean an

outside window surface, attach the

safety suction cup firmly to the lower part

of the window for cleaning.

PLEASE NOTE: If the robot’s movement is restricted by the length of the power or adapter

cable, you may use an

ENERGY RWC-1

extension cord. Disconnect ends A and B, connect

them to the respective ends of the extension cord and screw them tight.

Using the Extension Cord

If

ENERGY RWC-1

’s movement is restricted by the length of the power or

adapter cable, you may use an extension cord.

PLEASE NOTE: You may only use one (1) extension cord in combination with

ENERGY RWC-1

.

7

Содержание RWC-1

Страница 1: ...EN Robotic Window Cleaner RWC 1 Instruction Manual RWC 1 Manual V1 1 19 05 12 2018 ...

Страница 2: ...questions For more information please visit our website at www limex ch We continuously strive to enhance our products in order to meet our customers expectations We therefore reserve the right to implement technological colour or design changes to the device without any prior notice Please read the instructions in this user manual carefully before using the device NRG ENERGY HOME the supplier or ...

Страница 3: ...aring and Using the Cleaning Pads 8 Start 9 Pause 11 Stop 12 Maintenance and Service 13 Cleaning Pads 13 Suction Fan Sensors Rubber Blade and Drive Tracks 13 Acoustic and Visual Signals 15 Troubleshooting 16 Table Malfunctions and Possible Causes 16 Guarantee and Customer Service 18 Specifications 19 Operating and Safety Notes 20 Conditions of Use 20 Instructions for Disposal 22 1 ...

Страница 4: ...peration Make sure that the distance between the surface that requires cleaning and surrounding obstacles curtains furniture is at least 10 cm ENERGY RWC 1 can be used to clean slanted surfaces using the included remote control However the device might not function properly depending on the inclination of the surface In this case the device must be operated under supervision to ensure that someone...

Страница 5: ...Product Overview Box Contents 1 NRG ENERGY RWC 1 2 Power supply unit and adapter cable 3 Instruction manual 4 Safety system 5 Remote control incl 2 AAA 1 5 V batteries 6 Cleaning pads 2x 7 Extension cord 3 ...

Страница 6: ... sensors 7 Front cleaning pad 8 Rubber blade 9 Rear cleaning pad 10 Suction fan 11 Drive tracks 12 Power switch 13 Speaker 14 Bottom indicator light 15 Edge sensor 16 Rear bumper Remote Control 1 No preset functions 2 Control buttons 3 Start Stop button 4 Drive track maintenance 5 Intensive cleaning 6 Precise cleaning 7 Z cleaning mode 8 N cleaning mode 4 ...

Страница 7: ... 2 Power supply unit 3 Indicator light 4 Power supply adapter Connecting the adapter cable to the robot Connect the robot s rotating joint to the power supply unit s connector and twist clockwise The power supply unit s indicator light turns green and the robot is ready for use 5 ...

Страница 8: ...the window before use PLEASE NOTE If there is a power cut lasting more than 30 minutes the device may fall down the emergency battery has a battery life of approx 30 minutes 1 Power cable 2 Safety tether 3 Safety suction cup Preparation Loop one end of the safety tether 2 around the end of the power cable 1 and tighten Connect end A and end B twist clockwise and tighten 6 ...

Страница 9: ...indow surface attach the safety suction cup firmly to the lower part of the window for cleaning PLEASE NOTE If the robot s movement is restricted by the length of the power or adapter cable you may use an ENERGY RWC 1 extension cord Disconnect ends A and B connect them to the respective ends of the extension cord and screw them tight Using the Extension Cord If ENERGY RWC 1 s movement is restricte...

Страница 10: ...htly spray the pad with the cleaning solution Please ensure that the pad is properly attached PLEASE NOTE The pads can be used with all standard cleaning solutions for glass surfaces Rear cleaning pad This pad dries the window surface after it has been cleaned by the front cleaning pad Flip the device and attach the cleaning pad to the bottom of the robot using the hook and loop strip PLEASE NOTE ...

Страница 11: ...ly connected to the mains when the top indicator light flashes blue PLEASE NOTE Do not disconnect the device from the mains during this time as it might fall to the ground Switching on the robot Push down the power switch 1 The robot s top indicator light 2 should flash blue ENERGY RWC 1 s suction fan is activated The device can now be placed on the surface that requires cleaning 9 ...

Страница 12: ...turns permanently blue The device is now ready to start the cleaning cycle You can start a cleaning cycle as follows Press the Start Stop button on the handle of the robot 2 Press the Start Stop button on the remote control 3 Selecting the cleaning mode Automatic Before the cleaning cycle starts the robot registers all surface bounds to analyse the shape of the glass surface and adapt its cleaning...

Страница 13: ...ive times in a row back and forth over a length of approx 30 cm D Precise cleaning The robot cleans the entire length of a window surface over a width of 35 cm PLEASE NOTE See the remote control section for more information on how to activate cleaning modes Pause In order to halt the device press the Start Stop button on the robot 2 or the remote control 3 11 ...

Страница 14: ... the glass surface Hold the device by the handle and press the Start Stop button on the robot until the vacuum fan is deactivated Once the fan is deactivated you can safely remove the device Switching off Flip the robot and put the power switch on the bottom of the robot in the 0 position Removing the safety system Disconnecting the device from the mains 12 ...

Страница 15: ...tumble dry the cleaning pads Let the cleaning pads dry before using them with the device again Replace the pads once they are significantly worn or dirty Suction Fan Sensors Rubber Blade and Drive Tracks Suction fan Flip the robot and wipe down the suction fan with a dry cloth in order to remove any residual dirt This ensures that the suction power of the robot is maintained Edge sensors Flip the ...

Страница 16: ...tton on the robot and then press the button for track cleaning on the remote control The drive tracks will start to rotate That way you can clean each portion of the drive tracks with a dry cloth and check for damage Edge detection sensors Flip the robot and clean the four edge detection sensors with a dry cloth in order to maintain their proper functioning 14 ...

Страница 17: ... a permanent BLUE The robot is properly attached to the window surface has completed its analysis of the surface that requires cleaning and is ready to start the cleaning cycle Indicator light flashes RED The robot is not connected to the mains please check the power connections Acoustic signals The robot will emit acoustic signals in the following situations The device is live The cleaning cycle ...

Страница 18: ...function Possible causes Corrective actions The indicator light flashes BLUE when the robot is attached to the window surface 1 The pads are not properly attached 2 Edge detection sensor error 3 The glass surface is too dirty 1 Remove and re attach pads 2 Ensure that the pad is properly placed and does not cover the edge detection sensors Clean the sensors with a soft cloth 3 Clean part of the win...

Страница 19: ... a different part of the glass surface 3 Clean the edge detection sensors with a soft cloth Please contact customer service if the problem persists The robot does not move properly it is sliding across the glass surface 1 The window surface is too dirty or too wet 2 The robot s pad is too dirty or too wet 1 Replace pad 2 Clean the drive tracks 3 Switch on the robot again using the remote control T...

Страница 20: ...0 08 per minute from 6th minute CHF 1 40 per minute Mo Fr 8 00 am 12 00 noon 1 30 pm 5 00 pm GUARANTEE NOTICE Any and all defects caused by oxidation impact or shock due to dropping the device and improper handling are excluded from this guarantee The guarantee does not cover accessories or wear parts such as pads cloths or batteries The declaration of conformity may be provided upon request 18 ...

Страница 21: ... kg Operating voltage 24 V DC Rated turbine power 75 W Emergency battery 650 mAh Emergency battery charging time approx 1 hour Cleaning speed 4 5 m min Operating voltage of remote control batteries 3 V DC Power supply unit Input 100 V 240 V 50 60 Hz 2 0 A Output 24 V DC 3 75 A 19 ...

Страница 22: ...d to allow children to operate the device The device must be kept out of the reach of children whenever it is connected to the mains The device must not be used in extremely warm cold or wet conditions below 10 C above 40 C and above 65 humidity Never leave the device unattended when it is connected to the mains The device is intended for private use at home only Only use accessories and equipment...

Страница 23: ...d any risk of electric shock Do not touch the power supply adapter or the device if your hands are wet Do not pull on the power or adapter cable this might damage the device Keep the adapter cable away from hot surfaces Do not use the device if the adapter cable or the socket is damaged PLEASE NOTE Only charge the battery using the adapter cable supplied with the device The remote control requires...

Страница 24: ...inable way Return the used device using the appropriate return and collection systems or contact the supplier who sold you the device This ensures that the device can be recycled properly This procedure is free of charge For EU countries Robot Do not burn the device even if it is severely damaged Batteries Used batteries must be removed from the device and disposed of in the appropriate way Packag...

Страница 25: ...e used device using the appropriate return and collection systems or contact the supplier who sold you the device This ensures that the device can be recycled properly Emergency battery The emergency battery must be disposed of in accordance with the applicable country specific legal provisions and regulations You may dispose of the packaging after the guarantee period of ENERGY RWC 1 has expired ...

Страница 26: ...DE Fensterputzroboter RWC 1 Bedienungsanleitung RWC 1 Manual V1 1 19 05 12 2018 ...

Страница 27: ...die Anweisungen dieses Benutzerhandbuchs aufmerksam durch NRG ENERGY HOME der Lieferant oder der Hersteller ist nicht verantwortlich für sämtliche Schäden die durch eine unsachgemässe Verwendung entstehen Diesbezüglich gestellte weitere Vermögenansprüche werden in jedem Fall ausbedungen Inhaltsverzeichnis Hinweise 2 Produktübersicht 3 Packungsinhalt 3 Produktbestandteile 4 Betrieb 5 Anschliessen d...

Страница 28: ... reinigenden Fläche und den umliegenden Hindernissen Vorhänge Möbel mindestens 10 cm beträgt ENERGY RWC 1 kann schräge Flächen mithilfe der dazugehörigen Fernbedienung reinigen Je nach Neigungsgrad der Fläche ist es jedoch möglich dass das Gerät nicht richtig funktioniert In diesem Fall muss eine Person in der Nähe sein um bei Problemen eingreifen zu können Gerät immer sichern ENERGY RWC 1 darf ni...

Страница 29: ...10 Ansauglüfter 11 Antriebsraupen 12 Einschaltknopf 13 Lautsprecher 14 Untere Kontrollleuchte 15 Randsensor 16 Stossdämpfer hinten 1 Keine Funktionen 2 Steuerungstasten 3 Taste Start Stopp 4 Pflege der Antriebsraupen 5 Intensivreinigung 6 Präzise Reinigung 7 Reinigungsmodus Z 8 Reinigungsmodus N Verbinden des Netzkabels mit dem Roboter Die Drehkupplung des Roboters mit der des Netzteils verbinden ...

Страница 30: ...de des Halteseils 2 durch das Ende des Netzteilkabels 1 stecken und festziehen Das Ende A mit dem Ende B verbinden im Uhrzeigersinn drehen und festziehen 3 Sicherheitssaugnapf 3 oberen Ecke der Fensterinnenseite andrücken Wird der ENERGY RWC 1 zum Reinigen einer Fensteraussenseite verwendet Den Sicherheitssaugnapf bei der Reinigung fest im unteren Bereich des Fensters anbringen HINWEIS Wenn die Be...

Страница 31: ...nigt wurde Den Roboter umdrehen und das Reinigungspad mitdemKlettstreifen unter dem Roboter befestigen HINWEIS Darauf achten dass die Reinigungspads weder den Abstreifgummi noch die Randsensoren des Roboters bedecken Start Produktbestandteile 1 Einschaltknopf 2 Taste Start Stopp des Roboters 3 Taste Start Stopp auf der Fernbedienung Den Roboter an das Stromnetz anschliessen Der Roboter wird korrek...

Страница 32: ...es Reinigungsmodus Automatik Vor Beginn des Reinigungszyklus erfasst der Roboter sämtliche Abgrenzungen um die Form der Glasfläche zu analysieren und um seinen Reinigungsweg daran anzupassen Wählbare Modi Mit der Fernbedienung können 4 Reinigungsmodi ausgewählt werden C 5x D A Modus N Für besonders breite Flächen geeignet B Modus Z Für besonders hohe Flächen geeignet C Intensivreinigung Der Robote...

Страница 33: ...nd weichen Sie diese in frischem Wasser ein Die Reinigungspads ausreiben gut ausspülen und trocknen lassen Die Reinigungspads können auch in der Waschmaschine bei maximal 30 C gewaschen werden Bitte benutzen Sie keinen Weichspüler und die Pads nicht in den Trockner Tumbler geben Die Reinigungspads vor der Verwendung mit dem Roboter trocknen lassen Bei starker Abnutzung Verschmutzung sind diese Pad...

Страница 34: ...n mit einem trockenen Tuch reinigen um deren Funktionstüchtigkeit zu erhalten Anzeige Beschreibung Kontrollleuchte blinkt BLAU Der Roboter ist am Netz angeschlossen sein Ansaugsystem wird in Betrieb gesetzt und der Roboter kann auf die zu reinigenden Fläche gesetzt werden Kontrollleuchte leuchtet BLAU Der Roboter ist korrekt auf der Fensterscheibe befestigt er hat die Analyse der zu reinigenden Fl...

Страница 35: ... Netzteil ist nicht richtig angeschlossen 2 Die Ansaugleistung des Roboters ist nichtausreichend 3 Probleme mit den Abgrundsensoren beim Betrieb des Roboters 1 Überprüfen Sie ob das Netzteilkabel oder die Verbindung des Verlängerungskabels richtig an den Roboter angeschlossensind 2 Überprüfen Sie ob die Fensterscheibe Beschädigungen aufweist Bewegen Sie den Roboter mit der Fernbedienung in einen a...

Страница 36: ...e durch fallen lassen und unsachgemässe Behandlung sind von der Garantie ausgeschlossen Die Garantie gilt nicht für das Zubehör oder für Verschleissteile wie Pads Tücher oder Batterien Die Konformitätserklärung kann auf Verlangen vorgelegt werden Modell NRG ENERGY RWC 1 Masse 25 x 25 x 8 cm Gewicht 1 35 kg Betriebsspannung 24 V DC Nennleistung Turbine 75 W Akku 650 mAh Ladezeit des Not Akkus ca 1 ...

Страница 37: ...zspannung der auf dem Netzadapter angegebenen Netzspannung entspricht Lagern Sie das Gerät an einem trockenen Ort vor Hitze geschützt ist und in sicherem Abstand zu brennbaren Materialien ENERGY RWC 1 verfügt über einen Not Akku der sich während des Gebrauchs auflädt So wird der Roboter mit Strom versorgt wenn dieser vom Stromnetz getrennt wird oder der Strom ausfällt Inbetriebnahme des Akkus Vor ...

Страница 38: ...plodieren Entsorgen Sie das Produkt nicht mit dem normalen Hausmüll um Umweltschäden oder Gesundheitsgefahren zu vermeiden Ein verantwortungsbewusstes Recycling des Geräts sichert eine dauerhafte Wiederverwendung der Rohstoffe Nutzen Sie für die Rückführung des gebrauchten Gerätes die entsprechenden Rückgabe und Sammelsysteme oder wenden Sie sich an den Händler bei dem Sie das Produkt gekauft habe...

Страница 39: ...FR Robot lave vitre RWC 1 Mode d emploi RWC 1 Manual V1 1 19 05 12 2018 ...

Страница 40: ...ez plus d informations sur le site internet www limex ch Comme nous faisons sans cesse évoluer nos produits afin de répondre aux attentes de nos clients nous nous réservons le droit de procéder sans préavis à des changements techniques de couleur et de design de l appareil Veuillez lire attentivement les instructions de ce guide avant d utiliser l appareil NRG ENERGY HOME le fournisseur ou le fabr...

Страница 41: ... du pad de nettoyage 8 Marche 9 Pause 11 Arrêt 12 Maintenance service 13 Pads de nettoyage 13 Ventilateur d aspiration détecteurs raclette et chenilles d entraînement 13 Alarmes sonores et visuelles 15 Traitement des problèmes 16 Tableau Dysfonctionnements et causes possibles 16 Garantie et service client 18 Données techniques 19 Consignes de fonctionnement et de sécurité 20 Conditions d utilisati...

Страница 42: ...u réseau électrique pour fonctionner Assurez vous que la distance entre la surface à nettoyer et les obstacles environnants rideaux meubles soit d au moins 10 cm ENERGY RWC 1 peut nettoyer des surfaces obliques à l aide de la télécommande associée Selon le degré d inclinaison il est toutefois possible que l appareil ne fonctionne pas correctement Dans ce cas il faut rester à proximité pour pouvoir...

Страница 43: ...it Contenu de l emballage 1 NRG ENERGY RWC 1 2 Alimentation secteur et câble d alimentation secteur 3 Mode d emploi 4 Système de sécurité 5 Télécommande y compris 2 batteries AAA 1 5 V 6 Pads de nettoyage 2x 7 Rallonge 3 ...

Страница 44: ...aclette d essuyage 9 Pad de nettoyage arrière 10 Ventilateur d aspiration 11 Chenilles d entraînement 12 Bouton marche 13 Haut parleur 14 Témoin lumineux inférieur 15 Détecteur de bordure 16 Amortisseur arrière Télécommande 1 Aucune fonction 2 Touches de commande 3 Touche Marche Arrêt 4 Entretien des chenilles d entraînement 5 Nettoyage intense 6 Nettoyage précis 7 Mode de nettoyage Z 8 Mode de ne...

Страница 45: ...tation secteur 3 Témoin lumineux 4 Adaptateur secteur Raccordement du câble réseau avec le robot Raccorder le joint rotatif du robot avec celui de l alimentation secteur et tourner dans le sens des aiguilles d une montre Le témoin lumineux de l alimentation secteur s allume maintenant vert et le robot peut être utilisé 5 ...

Страница 46: ...e panne d électricité de plus de 30 minutes peut provoquer une chute la batterie de sécurité a une durée de fonctionnement d env 30 minutes 1 Câble d alimentation secteur 2 Cordon de sécurité 3 Ventouse de sécurité Préparation Passer une extrémité du cordon de sécurité 2 par l extrémité du câble d alimentation secteur 1 et tirer solidement Raccorder l extrémité A avec l extrémité B tourner dans le...

Страница 47: ...eure d une fenêtre Fixer la ventouse de sécurité solidement dans la partie inférieure de la fenêtre lors du nettoyage REMARQUE Si la liberté de mouvement du robot est limitée par la longueur du câble d alimentation secteur il est possible d utiliser une rallonge ENERGY RWC 1 Séparez les extrémités A et B raccordez les avec les extrémités respectives du câble de rallonge et vissez solidement Utilis...

Страница 48: ...ide de la bande Velcro et asperger légèrement de solution de nettoyage Assurez un positionnement correct du pad REMARQUE Les pads s utilisent avec toutes les solutions de nettoyage pour vitres disponibles dans le commerce Pad de nettoyage arrière Celui ci sèche la vitre une fois que le pad avant l a nettoyée Tourner le robot et fixer le pad de nettoyage sous le robot avec la bande Velcro REMARQUE ...

Страница 49: ...limenté en électricité lorsque le témoin lumineux clignote bleu REMARQUE Dans cette phase ne pas isoler l appareil du secteur car il pourrait sinon tomber Mettre le robot en marche Presser le commutateur de mise en marche vers le bas 1 le témoin lumineux supérieur 2 du robot clignote alors bleu La ventouse du ENERGY RWC 1 se met en marche et le robot peut être posé sur la surface à nettoyer 9 ...

Страница 50: ...est maintenant prêt à démarrer le cycle de nettoyage Un cycle de nettoyage peut se démarrer de la façon suivante En appuyant sur la touche Marche Arrêt sur la poignée du robot 2 En appuyant sur la touche Marche Arrêt sur la télécommande 3 Sélection du mode de nettoyage Automatique Avant le début du cycle de nettoyage le robot recense toutes les limites pour analyser la forme de la surface vitrée e...

Страница 51: ...toie 5 fois de suite aller et retour une surface sur une longueur d env 30 cm D Nettoyage précis le robot nettoie la vitre sur toute la longueur sur une largeur de 35 cm REMARQUE Pour l activation des modes de nettoyage voir le paragraphe sur la télécommande Pause Pour stopper l appareil presser la touche Marche Arrêt sur le robot 2 ou sur la télécommande 3 11 ...

Страница 52: ...entit Retirer le robot de la surface vitrée Tenir le robot par la poignée et appuyer sur la touche Marche Arrêt jusqu à ce que le ventilateur s éteigne Le robot peut ensuite être retiré en toute sécurité Eteindre Tourner le robot et placer le bouton marche au dos du robot sur 0 Retirer le système de sécurité Isoler le robot du secteur 12 ...

Страница 53: ...inge Laisser sécher les pads de nettoyage avant de les utiliser avec le robot En cas de forte usure salissure il faut remplacer les pads Ventilateur d aspiration détecteurs raclette et chenilles d entraînement Ventilateur d aspiration Retourner le robot et essuyer le ventilateur d aspiration avec un chiffon sec pour retirer tous les restes de saleté Cela préserve la puissance d aspiration du robot...

Страница 54: ...la touche Pause sur le robot et ensuite sur la touche pour le nettoyage des chenilles sur la télécommande Les chenilles se mettent alors à tourner Les chenilles d entraînement peuvent ainsi être entièrement nettoyées avec un chiffon sec et leur état vérifié Détecteurs de vide Retourner le robot et nettoyer les 4 détecteurs de vide avec un chiffon sec pour préserver leur bon fonctionnement 14 ...

Страница 55: ...moin s allume BLEU Le robot est correctement fixé sur la vitre il a terminé l analyse de la surface à nettoyer et peut commencer son cycle de nettoyage Le témoin clignote ROUGE Le robot n est pas raccordé au secteur vérifiez le raccordement électrique Alarmes sonores Dans les situations suivantes le robot émet des signaux sonores Il est sous tension Le cycle de nettoyage est terminé Un problème es...

Страница 56: ...ssibles Dysfonctionnement Causes possibles Résolution des problèmes Le témoin clignote BLEU lorsque le robot est fixé sur la vitre 1 Les pads ne sont pas correctement fixés 2 Dysfonctionnement des détecteurs de vide 3 La surface vitrée est trop sale 1 Retirer les pads et fixer à nouveau 2 Vérifiez que le pad est correctement placé et ne recouvre pas les détecteurs de vide Nettoyez les détecteurs a...

Страница 57: ...autre zone de la vitre 3 Nettoyez les détecteurs de vide avec un chiffon doux Si le problème persiste veuillez contacter le service client Le robot ne se déplace pas correctement il glisse sur la surface vitrée 1 La vitre est trop sale ou trop humide 2 Le pad du robot est trop sale ou trop humide 1 Remplacer le pad 2 Nettoyer les chenilles d entraînement 3 Rallumer le robot avec la télécommande La...

Страница 58: ... 0 08 min à partir de la 6ème min CHF 1 40 Min Lu Ve 08h00 12h00 13h30 17h00 REMARQUE SUR LA GARANTIE Toutes les pannes par oxydation chocs ou coups dus à des chutes ou un maniement impropre sont exclues de la garantie La garantie n est pas valable pour les accessoires ou les pièces d usure tels que les pads chiffons ou batteries La déclaration de conformité est remise sur demande 18 ...

Страница 59: ...tionnement 24 V DC Puissance nominale de la turbine 75 W Batterie 650 mAh Temps de charge de la batterie de secours env 1 heure Vitesse de nettoyage 4 5 m min Tension de fonctionnement de la batterie de la télécommande 3V DC Alimentation secteur Entrée 100V 240V 50 60 Hz 2 0 A Sortie 24 V DC 3 75 A 19 ...

Страница 60: ...erdit de faire travailler les enfants avec cet appareil L appareil doit toujours se trouver hors de portée des enfants lorsqu il est raccordé au secteur L appareil ne doit pas être utilisé dans un environnement très chaud froid ou humide moins de 10 C plus de 40 C et de 65 d humidité de l air Ne jamais laisser l appareil sans surveillance lorsqu il est raccordé au secteur L appareil est destiné un...

Страница 61: ...e électrique Ne touchez pas l adaptateur secteur ou l appareil les mains humides Ne tirez pas sur le câble d alimentation secteur vous pourriez endommager l appareil Tenez le câble d alimentation secteur éloigné des surfaces chaudes N utilisez pas l appareil si le câble d alimentation ou la prise sont abîmés ATTENTION Utilisez uniquement le câble d alimentation secteur fourni avec l appareil pour ...

Страница 62: ...e recyclage de l appareil usagé utilisez les systèmes appropriés de restitution et de collecte ou adressez vous au vendeur chez lequel vous avez acheté le produit Le produit peut ainsi être recyclé en toute sécurité Il n y a aucun frais supplémentaire pour cela Pour les pays de l UE Robot Ne pas incinérer l appareil même s il est très endommagé Batteries Les batteries usagées doivent être retirées...

Страница 63: ...ières premières Pour le recyclage de l appareil usagé utilisez les systèmes appropriés de restitution et de collecte ou adressez vous au vendeur chez lequel vous avez acheté le produit Le produit peut ainsi être recyclé en toute sécurité Batterie La batterie de secours doit être éliminée selon les lois et réglementations propres à chaque pays Vous pouvez évidemment éliminer l emballage du ENERGY R...

Страница 64: ...IT Robot lavavetri RWC 1 Istruzioni d uso RWC 1 Manual V1 1 19 05 12 2018 ...

Страница 65: ...teriori informazioni può trovarle sul nostro sito web www limex ch Dato che i nostri prodotti vengono costantemente perfezionati per soddisfare al meglio le aspettative dei nostri clienti ci riserviamo il diritto di apportare modifiche tecniche cromatiche e di design all apparecchio senza necessità di preavviso Si prega di leggere attentamente le istruzioni di questo manuale per l utente prima di ...

Страница 66: ...o dei pad di pulizia 8 Avvio 9 Pausa 11 Stop 12 Manutenzione servizio assistenza 13 Pad di pulizia 13 Ventola di aspirazione sensori tergivetro in gomma e cingoli di trazione 13 Indicazioni ottiche e acustiche 15 Trattamento degli errori 16 Tabella Malfunzionamenti e possibili cause 16 Garanzia e servizio assistenza clienti 18 Dati tecnici 19 Indicazioni per azionamento e sicurezza 20 Condizioni d...

Страница 67: ...orrente elettrica Assicurarsi sempre che la distanza fra la superficie da pulire e gli impedimenti circostanti tende mobili sia di almeno 10 cm ENERGY RWC 1 è in grado di pulire superfici oblique con l aiuto dell annesso telecomando A seconda del grado d inclinazione della superficie è tuttavia possibile un non corretto funzionamento dell apparecchio In questo caso una persona deve stare nella vic...

Страница 68: ...rodotto Contenuto della confezione 1 NRG ENERGY RWC 1 2 Alimentatore e cavo dell alimentatore 3 Istruzioni d uso 4 Sistema di sicurezza 5 Telecomando incl 2 batterie AAA da 1 5 V 6 Pad di pulizia 2 pz 7 Cavo di prolunga 3 ...

Страница 69: ... anteriore 8 Tergivetro 9 Pad di pulizia posteriore 10 Ventola di aspirazione 11 Cingoli di trazione 12 Pulsante di accensione 13 Altoparlante 14 Spia di controllo inferiore 15 Sensore di rilevamento bordi 16 Paraurti dietro Telecomando 1 Nessuna funzione 2 Tasti di comando 3 Tasto Avvio Stop 4 Cura dei cingoli di trazione 5 Pulizia intensiva 6 Pulizia precisa 7 Modalità di pulizia Z 8 Modalità di...

Страница 70: ...ore 2 Alimentatore 3 Spia di controllo 4 Adattatore dell alimentatore Collegare il cavo di rete con il robot Collegare l innesto girevole del robot con quello dell alimentatore e ruotare in senso orario La spia di controllo dell alimentatore s illumina ora con luce verde e il robot può essere utilizzato 5 ...

Страница 71: ...canza di corrente con una durata superiore a 30 minuti può causare una caduta dell apparecchio la batteria ricaricabile di sicurezza offre un autonomia di funzionamento di ca 30 minuti 1 Cavo dell alimentatore 2 Cavo di sicurezza 3 Ventosa di sicurezza Preparazione Far passare l estremità del cavo dell alimentatore 1 attraverso un estremità del cavo di sicurezza 2 e stringere Collegare l estremità...

Страница 72: ...r pulire il lato esterno di una finestra per la pulizia applicare la ventosa di sicurezza nella parte inferiore della finestra AVVERTENZA Se la libertà di movimento del robot viene limitata dalla lunghezza del cavo dell alimentatore si può utilizzare un cavo di prolunga ENERGY RWC 1 Staccare le estremità A e B collegarle con le rispettive estremità della prolunga e avvitarle saldamente Utilizzo de...

Страница 73: ...la soluzione detergente Assicurarsi del corretto fissaggio in posizione del pad di pulizia AVVERTENZA I pad di pulizia possono essere utilizzati con tutte le soluzioni detergenti per vetri di finestre comunemente in commercio Pad di pulizia posteriore Questo asciuga la lastra della finestra dopo che questa sia stata pulita con il pad di pulizia anteriore Capovolgere il robot e fissare il pad di pu...

Страница 74: ...di controllo superiore lampeggia con luce blu AVVERTENZA In questa fase non staccare l apparecchio dalla rete poiché altrimenti potrebbe cadere dall altezza in cui si trova Accendere il robot Per attivare l apparecchio premere l interruttore 1 verso il basso la spia di controllo superiore 2 del robot lampeggia poi con luce blu La ventola di aspirazione dell ENERGY RWC 1 viene messa in funzione e i...

Страница 75: ...ermanente blu L apparecchio è ora pronto per avviare il ciclo di pulizia È possibile avviare un ciclo di pulizia come segue Premendo il tasto Avvio Stop sull impugnatura del robot 2 Premendo il tasto Avvio Stop sul telecomando 3 Selezione della modalità di pulizia Automatica Prima di iniziare il ciclo di pulizia il robot rileva tutte le delimitazioni per analizzare e delineare la forma della super...

Страница 76: ... superficie percorrendola 5 volte una dietro l altra avanti e indietro su una lunghezza di ca 30 cm D Pulizia precisa Il robot pulisce la lastra della finestra sull intera lunghezza per una larghezza di 35 cm AVVERTENZA Per l attivazione delle modalità di pulizia consultare la sezione dedicata al telecomando Pausa Per fermare l apparecchio premere il tasto Avvio Stop sul robot 2 o sul telecomando ...

Страница 77: ...a superficie in vetro Tenere saldamente il robot per l impugnatura e tenere premuto il tasto Avvio Stop sul robot sino a che non si spenga la ventola del vuoto Successivamente è possibile prelevare con sicurezza il robot Spegnere Capovolgere il robot e posizionare su 0 il pulsante di accensione che si trova sul retro del robot Rimozione del sistema di sicurezza Staccare il robot dalla rete 12 ...

Страница 78: ...r asciugare i pad di pulizia prima dell utilizzo con il robot In caso di usura sporco intensi questi pad devono essere sostituiti Ventola di aspirazione sensori tergivetro e cingoli di trazione Ventola di aspirazione Capovolgere il robot e passare con un panno asciutto la ventola di aspirazione per rimuovere tutti i possibili residui di sporco In questo modo viene mantenuta la forza di aspirazione...

Страница 79: ...Pausa sul robot e poi il tasto per la pulizia dei cingoli sul telecomando I cingoli iniziano così a ruotare In questo modo è possibile con un panno asciutto pulire completamente i cingoli di trazione e controllare che non presentino danni Sensori di dislivello Capovolgere il robot e pulire i quattro sensori di dislivello con un panno asciutto per mantenerne la buona funzionalità 14 ...

Страница 80: ...illuminata con luce BLU Il robot è correttamente fissato sulla lastra della finestra ha terminato l analisi della superficie da pulire e può iniziare il suo ciclo di pulizia La spia di controllo lampeggia con luce ROSSA Il robot non è collegato alla rete Controllare il collegamento elettrico Segnalazioni acustiche Nelle seguenti situazioni il robot emette segnalazioni acustiche L apparecchio si tr...

Страница 81: ...e Eliminazione dell errore guasto La spia di controllo lampeggia con luce BLU quando il robot è fissato alla lastra della finestra 1 I pad non sono correttamente fissati 2 Errore anomalia dei sensori di dislivello 3 La superficie in vetro è troppo intensamente sporca 1 Rimuovere i pad e fissarli nuovamente 2 Verificare se il pad di pulizia è disposto correttamente e che non copra i sensori di disl...

Страница 82: ...robot in un altro settore della superficie in vetro 3 Pulire i sensori di dislivello con un panno morbido Se il problema continua a persistere contattare il servizio assistenza clienti Il robot non si muove correttamente scivola sulla superficie in vetro 1 La lastra della finestra è troppo sporca o troppo bagnata 2 Il pad di pulizia del robot è troppo sporco o troppo bagnato 1 Sostituire il pad 2 ...

Страница 83: ... min a partire dal 6 minuto CHF 1 40 min Lun Ven ore 08 00 12 00 ore 13 30 17 00 INDICAZIONE DI GARANZIA Qualsiasi difetto dovuto a ossidazione urto o impatto alla caduta e ad un trattamento improprio non a regola d arte è escluso dalla copertura di garanzia La garanzia non vale per gli accessori o per parti soggette ad usura come pad panni o batterie La dichiarazione di conformità può essere prod...

Страница 84: ...zio 24 V DC Potenza nominale turbina 75 W Batteria ricaricabile 650 mAh Tempo di carica della batteria ricaricabile di emergenza ca 1 ora Velocità di pulizia 4 5 m min Tensione di esercizio della batteria del telecomando 3V DC Alimentatore Ingresso 100V 240V 50 60 Hz 2 0 A Uscita 24 V DC 3 75 A 19 ...

Страница 85: ... lasciare che bambini operino con questo apparecchio L apparecchio deve sempre trovarsi lontano dalla portata dei bambini quando è collegato alla rete elettrica L apparecchio non può essere utilizzato in un ambiente molto caldo freddo o umido sotto i 10 C sopra i 40 C e con il 65 di umidità atmosferica Non lasciare mai l apparecchio incustodito quando questo è collegato alla rete della corrente L ...

Страница 86: ...lia pericolo di scossa elettrica Non toccare l adattatore dell alimentatore o l apparecchio con mani bagnate Non tirare mai il cavo dell alimentatore altrimenti si corre il rischio di danneggiare l apparecchio Mantenere il cavo dell alimentatore lontano da superfici molto calde Non utilizzare l apparecchio se il cavo dell alimentatore o la presa sono danneggiati ATTENZIONE Per la carica della batt...

Страница 87: ... usato usufruire dei rispettivi sistemi di resa e raccolta o rivolgersi al rivenditore presso il quale si è acquistato il prodotto Il prodotto potrà così essere riciclato in modo sicuro Senza alcun ulteriore costo aggiunto per il proprietario dell apparecchio Per i Paesi dell UE Robot Non avviare all incenerimento l apparecchio anche se questo è fortemente danneggiato Batterie Batterie usate devon...

Страница 88: ...o dell apparecchio usato usufruire dei rispettivi sistemi di resa e raccolta o rivolgersi al rivenditore presso il quale si è acquistato il prodotto Il prodotto potrà così essere riciclato in modo sicuro Batteria ricaricabile La batteria ricaricabile di emergenza deve essere smaltita secondo le leggi e le norme nazionali L imballo dell ENERGY RWC 1 può essere ovviamente avviato allo smaltimento un...

Отзывы: