NovaWheel Instruction Manual
5
Document#: IM NW400-2000_10-07-08
NW Series NovaWheel Dryer
INSTRUCTION MANUAL
Страница 1: ...ephone 410 789 4811 Fax 410 789 3051 Parts Email parts novatec com Website www novatec com Service Email service novatec com NovaWheel DESICCANT WHEEL DEHUMIDIFYING DRYER INSTRUCTION MANUAL NW Series...
Страница 2: ...TIVATION TEMPERATURE CONTROL 5 3 PROCESS FILTER AIR PRESSURE SWITCH PPS1 5 4 PRESSURE AND REACT AIR PRESSURE TRANSMITTER 6 OPERATING INSTRUCTION 10 7 NOVATOUCH CONTROLLER INSTRUCTIONS 11 8 MAINTENANCE...
Страница 3: ...rmation This should save valuable installation and operation time later and will help insure safe operation and long life 1 SALES AND SERVICE NOVATEC maintains qualified sales engineering and service...
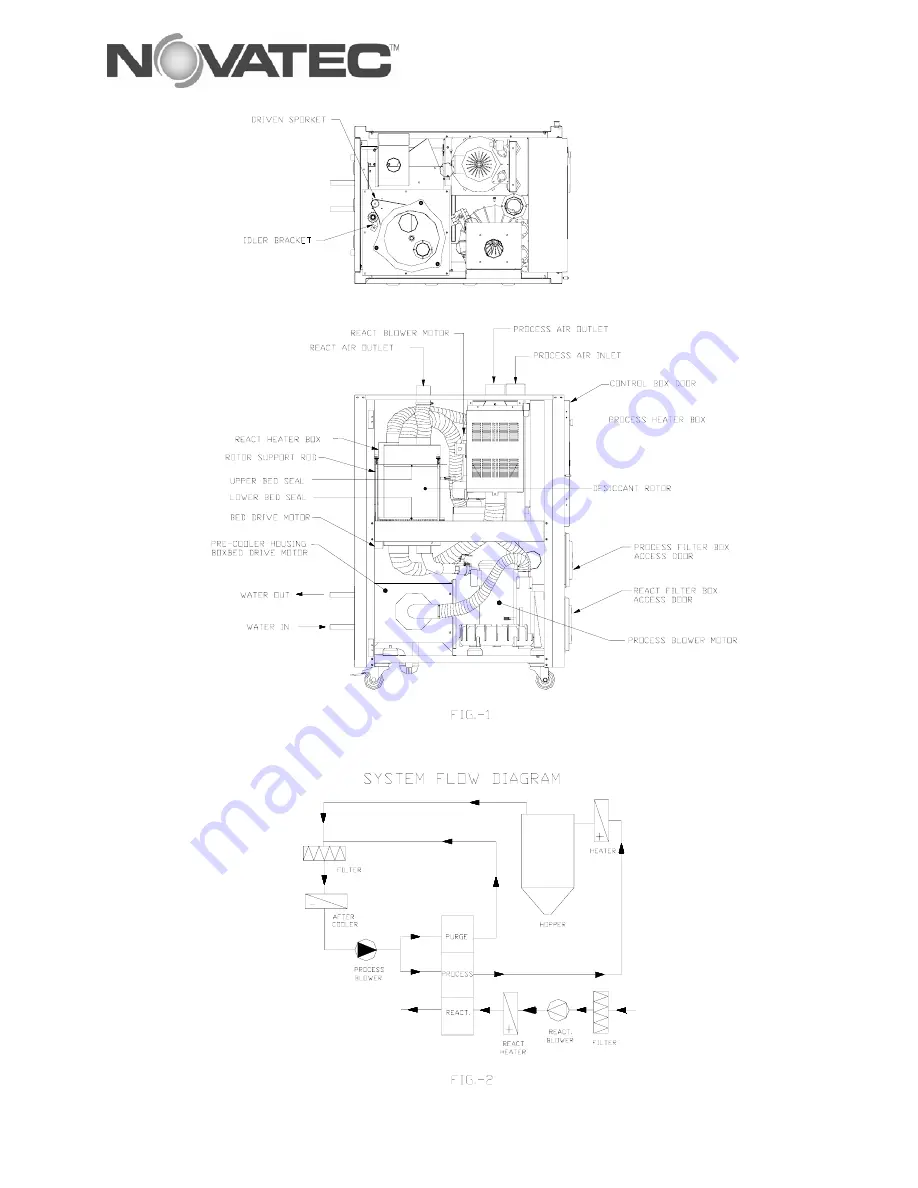
Страница 4: ...ough third air stream called purge air stream Here the desiccant media is cooled down by some of the process air before entering back into the process to provide for better performance The three air s...
Страница 5: ...NovaWheel Instruction Manual 5 Document IM NW400 2000_10 07 08 NW Series NovaWheel Dryer INSTRUCTION MANUAL...
Страница 6: ...ALIFIED AND TRAINED PERSONNEL SHOULD INSTALL AND OPERATE THIS EQUIPMENT 4 1 LOCATION Locate your NW Series dryer in a low traffic area this will avoid disturbance of the hoses connecting your dryer to...
Страница 7: ...ctory with all control circuits wired and the dryer needs to be connected to the proper power source CAUTION All electrical connections must be made by qualified electricians per national and local el...
Страница 8: ...lower the hopper return temperature and this increases the efficiency of dryer Tower city or chilled water is required at between 40 to 85 F Connect the cooling water supply and return using flexible...
Страница 9: ...e heater and the controls were supplied loose for installation on the hopper On central drying systems the process heaters are located on the hoppers 5 2 REACTIVATION TEMPERATURE CONTROL The reactivat...
Страница 10: ...qualified electrician familiar with three phase electrical wiring Once the hose and electrical connections are made the NW Series dryer is now ready for operation To start the dryer 1 0 Turn the main...
Страница 11: ...r their own purposes could violate the rights of the owner System Specifications All information on the TP177M touch screen and the S7 200 series PLC can be obtained from the Siemens websites shown be...
Страница 12: ...d or disabled The following options for entering values are available The current value is deleted when you enter the first character Enter the value again Use the and keys to move the cursor within t...
Страница 13: ...information available By pressing the symbol an information page will appear on the screen The information page will be removed by pressing the X in the upper right hand corner of the page Each time...
Страница 14: ...map defines all of the screens provided for all engineering functions The Quick Op is the starting page for the dryer It will display the current time and date once the Real Time Clock is properly se...
Страница 15: ...he actual touch function of the screen so that it may be cleaned From here the dryer can be started and all other operational functions accessed From the Operation Screen all of the system responses c...
Страница 16: ...f the dryer From Operation Screen 3 the current status of drying hopper 2 can be viewed The graphics on this screen will change appearance in accordance with the mode of operation On the Status Screen...
Страница 17: ...g to the selected screen The Real Time Clock menu allows the operator to set the clock in the PLC To Program Set the clock to program mode via the touch pad Enter the year month day hours minutes and...
Страница 18: ...r blower and temperature control will shut down Here the Process values for hopper 2 can be set or adjusted The high and low deviation range for the alarm second set point and active set point values...
Страница 19: ...and the protection will become active after leaving this screen On this screen the alarm value for the system dew point is set It also has the settings for the Moisture Manager If the Moisture Manager...
Страница 20: ...ng the associated drop down menus the size of the dryer and dew point sensor can be set Set the Temperature Display for C or F as required This will re calculate the set points to either C or F and pl...
Страница 21: ...t is also used to turn the icons and functionality for the material control systems on or off The Reactivation Menu screen will allow you to adjust the values for the reactivation heater This only app...
Страница 22: ...nus from set point that the PV process variable is allowed to make without causing the relay controller to change the output This value is used to minimize the effect of noise in the PV signal to more...
Страница 23: ...hat the process be in a stable state prior to initiating an auto tune sequence This will yield a better result for the hysteresis value and it will ensure that the process does not go out of control d...
Страница 24: ...A program should be established to insure the filters are cleaned 8 3 PROCESS REGENERATION FILTERS TURN THE MAIN DISCONNECT SWITCH OFF Unscrew the black knob remove the filter access cover open wing...
Страница 25: ...causing poor performance the seal should be replaced If there is any question about adjusting the seals please contact our service department 8 6 CHAIN AND SPROCKETS Chain and sprockets also require...
Страница 26: ...ng items should be checked on following basis 9 1 BI WEEKLY BASIS 9 1 1 REGENERATION PROCESS FILTERS Check for excessive dirt or debris built up on your process and regeneration filters 9 1 2 PROCESS...
Страница 27: ...dversely affect the performance of the machine Also check that all hose clamps are tight and in the proper position 10 ROTOR REPLACEMENT Desiccant rotor removal is accomplished by the following 1 Remo...
Страница 28: ...ction does not get offset 6 After joining the seal let it dry for 24 hrs NOTE The smooth Teflon coated side of the seal should always on the top and there should not be any silicon sealant remaining o...
Страница 29: ...tating in wrong direction Temperature sensor connection loose or reversed Check set temperature for proper drying process temperature Ensure temperature probe is installed in the dryer outlet or in th...
Страница 30: ...ture levels in plastic resin being dried in hopper reducing the drying performance Reduce process airflow using a damper valve Check the cooling water is flowing to the cooling coil and make sure the...
Страница 31: ...er INSTRUCTION MANUAL TROUBLE PROBABLE REASON CORRECTIVE ACTION 9 Wheel rotor turning but not indexing or showing a RPH speed Rotor limit switch not aligned properly Rotor drive motor defective Align...
Страница 32: ...he expiration of said warranty periods Novatec shall not in any event be held liable for any special indirect or consequential damages Commodities not manufactured by Novatec are warranted and guarant...