background image

20

F

R

A

N

Ç

A

IS

20

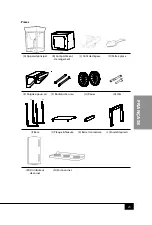
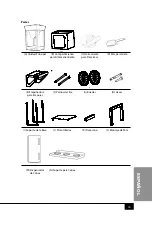
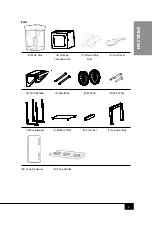
Pièces


(A) Appareil principal

(B) Compartiment 

de rangement

(C) Outil de dépose

(D) Pelle à glace

(E) Poignée-poussoir

(F) Boulons d'essieu

(G) Roues

(H) Clés

(I) Base

(J) Plaque inférieure

(K) Barre transversale

(L) Ensemble pieds

(M) Distributeur 

de cornet

(N) Porte-cornet

A

C

D

E

F

G

I

J

E - Push handle

1

F - Axle bolt

2

G - Wheel

2

I - Base support

1

J - Bottom Plate

1

L - Leg assembly

1

C - Storage compartent 1

A - Main unit

1

H - Wrench

2

M

N - Plastic Scoop 

1

- Leg assembly bolt

4

B

B - Spoon

1

K

H

D - Oil spoon

2

M

K - Cross bar

1

L

N
A

C

D

E

F

G

I

J

E - Push handle

1

F - Axle bolt

2

G - Wheel

2

I - Base support

1

J - Bottom Plate

1

L - Leg assembly

1

C - Storage compartent

1

A - Main unit

1

H - Wrench

2

M

N - Plastic Scoop 

1

- Leg assembly bolt

4

B

B - Spoon

1

K

H

D - Oil spoon

2

M

K - Cross bar

1

L

N
A

C

D

E

F

G

I

J

E - Push handle

1

F - Axle bolt

2

G - Wheel

2

I - Base support

1

J - Bottom Plate

1

L - Leg assembly

1

C - Storage compartent 1

A - Main unit

1

H - Wrench

2

M

N - Plastic Scoop 

1

- Leg assembly bolt

4

B

B - Spoon

1

K

H

D - Oil spoon

2

M

K - Cross bar

1

L

N
Содержание SCC200

Страница 1: ...All products are trademarks of Nostalgia Products LLC Worldwide design utility patented or patents pending 2016 Nostalgia Products LLC www nostalgiaproducts com rev 05 05 16 DJ ...

Страница 2: ...ollection Old Fashioned Snow Cone Cart Vintage CollectionMC Chariot à cornet glacé à l ancienne Vintage Collection Carrito de Conos Estilo Antiguo Instructions and Recipes Consignes et recettes Instrucciones y Recetas ...

Страница 3: ......

Страница 4: ...ety and the safety of others are very important We have provided many important safety messages in this manual and on your appliance Always read and obey all safety messages This is the safety alert symbol This symbol alerts you to potential hazards that can kill or hurt you and others All safety messages will follow the safety alert symbol All safety messages will tell you what the potential haza...

Страница 5: ...ng 1 Read all instructions before operating this appliance 2 Keep hands away from blade mechanism Use handles or knobs 3 Avoid contact with moving parts NEVER put fingers or utensils into feed or discharge areas 4 To protect against electrical shock do not immerse cord plug or any part of this appliance in water or other liquids 5 Close supervision is necessary when any appliance is used near chil...

Страница 6: ...plug does not fit fully into the outlet reverse the plug If it still does not fit contact a qualified electrician Do not attempt to modify the plug in any way SAVE THESE INSTRUCTIONS INTRODUCTION The VINTAGE COLLECTION OLD FASHIONED SNOW CONE CART marries the best of both worlds vintage appeal with the convenience of a modern appliance Use ice cubes from your own freezer to shave and craft refresh...

Страница 7: ... discarding packaging In our efforts to reduce packaging we maximize the packing material to protect your new purchase As a result small parts may not be readily visible Hardware 1 Screw 8mm Qty 4 2 Screw 8mm Qty 6 3 Bolt 25mm Qty 4 4 Bolt 60mm Qty 4 5 Flat Washer Qty 6 6 Flat Washer Qty 4 7 Nut Cap Qty 6 ...

Страница 8: ...rt 1 J Bottom Plate 1 L Leg assembly 1 C Storage compartent 1 H Wrench 2 M N Plastic Scoop 1 Leg assembly bolt 4 B K H D Oil spoon 2 M K Cross bar 1 L N D E F G J I Base support 1 J Bottom Plate 1 L Leg assembly 1 M N Plastic Scoop 1 Leg assembly bolt 4 B K H M K Cross bar 1 L N A C D E F G I J F Axle bolt 2 G Wheel 2 I Base support 1 J Bottom Plate 1 L Leg assembly 1 H Wrench 2 M N Plastic Scoop ...
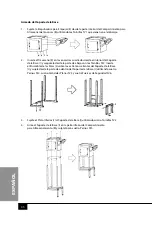
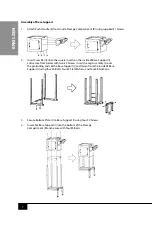
Страница 9: ...pport I and secure from below with two 2 Screws Insert the Leg Assembly L over the protruding ends of the Base Support I and fasten from the inside of Base Support I using four 4 Bolts four 5 Flat Washers and four 6 Nut Caps 3 Secure Bottom Plate J to Base Support I using four 2 Screws 4 Assemble Base Support I into the bottom of the Storage Compartment B and secure with four 3 Bolts ...

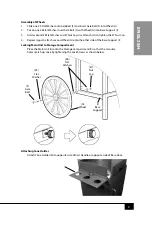
Страница 10: ... the 7 Nut Cap 4 Repeat steps to attach second Wheel G onto the other side of the Base Support I Locking Main Unit to Storage Compartment Place the Main Unit A onto the Storage Compartment B so that the two side holes match up Lock by tightening the Lock Screws as shown below Attaching Cone Holder Attach Cone Holder N to opposite side of Cart Handle or opposite side of Base Door 7 Nut Cap 5 Flat W...

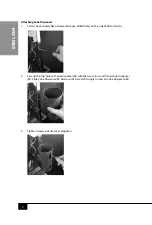
Страница 11: ...ewed into pre drilled holes on the side of Main Unit A 2 Line up the two holes of Cone Dispenser M with the two screws and hang Cone Dispenser M Slide Cone Dispenser M down so that screws fit snugly in slots on Cone Dispenser M 3 Tighten screws but do not overtighten ...

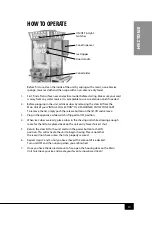
Страница 12: ...move 3 Plug in the appliance while switch is flipped to OFF position 4 When ice cubes are ready place cubes in the shaving unit while allowing enough room for the lid to be placed back on the unit easily Never force it shut 5 Return the clear lid to the unit and turn the power button to the ON position This will activate the unit to begin shaving Please note that the ice will not shave unless the ...

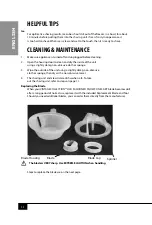
Страница 13: ...on abrasive cloth or sponge 3 Wipe the outside of the unit using a slightly damp non abrasive cloth or sponge then dry with a non abrasive towel 4 The shaving unit and clear lid are dishwasher safe To take out the shaving unit refer to steps on page 11 Replacing the Blade When your VINTAGE COLLECTION OLD FASHIONED SNOW CONE CART blade becomes dull after a long period of normal use replace it with ...

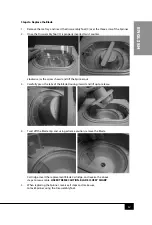
Страница 14: ...ow shows and lift the Spinner out 3 Carefully press the tabs of the Blade Housing inward and lift up to release 4 Twist off the Blade Cap and using extreme caution remove the Blade Cartridge Insert the replacement Blade Cartridge and reverse the above steps to reassemble USE EXTREME CAUTION BLADE IS VERY SHARP 5 When replacing the Spinner reverse all steps and make sure to lock Spinner using the D...

Страница 15: ...bsitite sugar for your choice of powdered sugar substitute SOUR SYRUP 1 Quart Simple Syrup 1 Ounce Liquid Citric Acid 1 Ounce Flavor Concentrate 1 Ounce Food Coloring Put 1 ounce of liquid citric acid and 1 ounce of flavor concentrate grape cherry strawberry watermelon apple or lemon work well into a one quart or larger bottle Fill the rest of the bottle with simple syrup you can use the recipe ab...

Страница 16: ...this recipe with other ice cream and syrup flavors for fun ROOTBEER FLOAT SLUSH Shaved Ice Rootbeer 2 Scoops Vanilla Ice Cream Chilled Beer Mug Freeze a beer mug until it it is cold and frosty Put 2 round scoops of vanilla ice cream into beer mug Scoop shaved ice into mug leaving three fingers of space at the top Pour root beer into mug until full Serves one FROZEN MARGARITA 1 Cup Shaved Ice 3 Oun...

Страница 17: ...thin the warranty period and no later than 30 days of the failure to perform This warranty does not cover normal wear or damage caused by shipping mishandling misuse accident alteration improper replacement parts or other than ordinary household use You may be required to return the product with shipping prepaid by you for inspection and evaluation Return shipping costs are not refundable The Comp...

Страница 18: ... autres est primordiale Ce manuel renferme plusieurs avis importants sur la sécurité lors de l utilisation de votre appareil Lire le manuel et conformez vous aux avis contre indiqués Ceci représente le symbole d avertissement pour votre sécurité Ce symbole vous alerte des dangers potentiels pouvant vous être fatals à vous ou envers d autres utilisateurs Ce symbole d alerte à la sécurité suivra tou...

Страница 19: ...evraient toujours être suivies au moment de l utilisation d un appareil électrique y compris 1 Lisez toutes les instructions avant d utiliser cet appareil 2 Tenir les mains éloignées du mécanisme de la lame Utiliser les poignées ou les boutons 3 Éviter tout contact avec les pièces mobiles NE JAMAIS mettre les doigts ou les ustensiles dans les zones d alimentation ou de sortie 4 Pour se protéger co...

Страница 20: ...d une façon seulement Si la fiche ne s insère pas entièrement dans la prise inverser la fiche Si elle ne rentre toujours pas communiquer avec un électricien qualifié Ne pas tenter de modifier la fiche de quelque façon que ce soit CONSERVEZ CES INSTRUCTIONS INTRODUCTION Le CHARIOT À CORNET GLACÉ À L ANCIENNE marie le meilleur des deux mondes l attrait pour une époque passée avec la commodité d un a...

Страница 21: ...ans nos efforts pour réduire l emballage nous le maximisons pour protéger votre nouvel achat En conséquence les petites pièces pourraient ne pas être facilement visibles Quincaillerie No 1 Vis 8 mm Qté 4 No 2 Vis 8 mm Qté 6 No 3 Boulon 25 mm Qté 4 No 4 Boulon 60 mm Qté 4 No 5 Rondelle plate Qté 6 No 6 Rondelle plate Qté 4 No 7 Chapeau d écrou Qté 6 ...

Страница 22: ...bolt 2 G Wheel 2 I Base support 1 J Bottom Plate 1 L Leg assembly 1 C Storage compartent 1 H Wrench 2 M N Plastic Scoop 1 Leg assembly bolt 4 B K H D Oil spoon 2 M K Cross bar 1 L N D E F G J I Base support 1 J Bottom Plate 1 L Leg assembly 1 M N Plastic Scoop 1 Leg assembly bolt 4 B K H M K Cross bar 1 L N A C D E F G I J E Push handle 1 F Axle bolt 2 G Wheel 2 I Base support 1 J Bottom Plate 1 L...
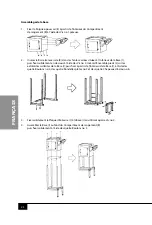
Страница 23: ...lidement en dessous à l aide des Vis no 2 Insérer l Ensemble pieds L sur les extrémités saillantes de la Base I puis fixer à partir de l intérieur de la Base I à l aide des quatre Boulons no 4 des quatre Rondelles plates no 5 et des quatre Chapeaux d écrou no 6 3 Fixer solidement la Plaque inférieure J à la Base I en utilisant quatre Vis no 2 4 Assembler la Base I au fond du Compartiment de rangem...

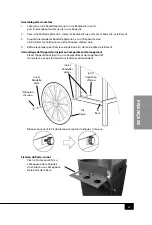
Страница 24: ... 6 4 Refaire les étapes pour fixer la seconde Roue G de l autre côté de la Base I Verrouillage de l Appareil principal au Compartiment de rangement Placer l Appareil principal A sur le Compartiment de rangement B de manière à ce que les deux trous latéraux correspondent Bloquer en serrant la Vis de blocage tel qu il est indiqué ci dessous Fixation du Porte cornet Fixer le Porte cornet N au côté op...

Страница 25: ...Appareil principal A 2 Aligner les deux trous du Distributeur de cornet M avec les deux vis puis suspendre le Distributeur de cornet M Faire glisser le Distributeur de cornet M vers le bas pour que les vis de s ajustent parfaitement dans les fentes sur le Distributeur de cornet M 3 Serrer les vis mais ne pas trop serrer ...

Страница 26: ...r est à la position OFF arrêt 4 Lorsque les cubes de glace sont prêts les placer dans l appareil de râpage tout en prévoyant suffisamment de place pour que le couvercle puisse être remis facilement sur l appareil Ne jamais forcer la fermeture 5 Remettre le couvercle transparent sur l appareil puis tourner le bouton d alimentation à la position ON marche Ceci activera le râpage de la glace Veuillez...

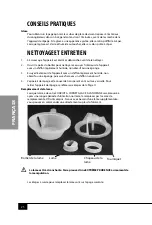
Страница 27: ...Essuyer l extérieur de l appareil avec un chiffon légèrement humide non abrasif ou une éponge puis assécher avec un chiffon non abrasif 4 L appareil de râpage et le couvercle transparent vont au lave vaisselle Pour retirer l appareil de râpage se référer aux étapes de la Page 11 Remplacement de la lame Lorsque la lame de votre CHARIOT À CORNET GLACÉ À L ANCIENNE sera émoussée après une longue péri...

Страница 28: ...uyer avec soin sur les onglets du Boîtier de la lame vers l intérieur puis soulever pour le dégager 4 Dévisser le Chapeau de la lame et avec une extrême prudence retirer la Cartouche de la lame Insérer la Cartouche de la lame de remplacement puis inverser les étapes susmentionnées pour la Repose FAIRE PREUVE D UNE EXTRÊME PRUDENCE LA LAME EST TRÈS TRANCHANTE 5 Au moment du remplacement du Tourniqu...

Страница 29: ...tituer le sucre par un succédané de sucre en poudre au choix SIROP AMER 1 litre de simple sirop 1 once d acide citrique liquide 1 once de concentré aromatique 1 once de colorant alimentaire Mettre 1 once d acide citrique liquide et 1 once de concentré aromatique les raisins cerises fraises melons pommes ou citrons donnent d excellents résultats dans une bouteille d un litre ou plus Remplir le rest...

Страница 30: ...ette recette avec de la crème glacée et d autres arômes de sirop pour le plaisir FLOTTEUR À LA RACINETTE Glace râpée Racinette 2 cuillères de crème glacée à la vanille Choppe de bière givrée Congeler une chope de bière jusqu à ce qu elle soit froide et givrée Mettre 2 boules de crème glacée à la vanille dans une choppe de bière Verser une cuillère de la glace râpée dans une choppe laissant un espa...

Страница 31: ...ie ne couvre pas l usure normale ou dommage cause par l expédition la mauvaise manipulation la mauvaise utilisation les accidents les modifications les mauvaises pièces de remplacement voire toute autre utilisation anormale du produit à domicile Il est possible que vous ayez à retourner le produit avec les frais de retour prépayés par vous pour une inspection et une évaluation Les frais des coûts ...

Страница 32: ...e otras personas es muy importante Hemos proporcionado numerosos mensajes de seguridad importantes en este manual y en su electrodoméstico Siempre lea y obedezca todos los mensajes de seguridad Este es el símbolo de alerta de seguridad Este símbolo le previene de peligros potenciales que pueden causar la muerte o lesiones a usted y a otras personas Todos los mensajes de seguridad estarán antecedid...

Страница 33: ...an aparatos eléctricos que incluyen las siguientes 1 Lea todas las instrucciones antes de manejar este equipo 2 Mantenga las manos fuera del mecanismo de cuchillas Use las agarraderas o tiradores 3 Evite el contacto con las partes móviles NUNCA ponga los dedos ni utensilios en las zonas de alimentación o descarga 4 Para protegerlo de una descarga eléctrica no sumerja el cable el enchufe ni ninguna...

Страница 34: ...única forma Si el enchufe no entra completamente delo vuelta Si aún no entra comuníquese con un electricista calificado No intente modificar el enchufe de ninguna manera GUARDE ESTAS INSTRUCCIONES INTRODUCCIÓN El CARRITO DE CONOS DE NIEVE ESTILO ANTIGUO reúne lo mejor de los dos mundos una apariencia Vintage un objeto antiguo de diseño artístico y gran calidad con la practicidad de un aparato mode...

Страница 35: ...mbalaje hemos maximizado los materiales para proteger su nueva compra y como resultado las partes pequeñas podrían no verse a simple vista Piezas Pieza Nº1 Tornillo 8mm Cantidad 4 Pieza Nº5 Arandela Plana Cantidad 6 Pieza Nº2 Tornillo 8mm Cantidad 6 Pieza Nº6 Arandela Plana Cantidad 4 Pieza Nº3 Perno 25mm Cantidad 4 Pieza Nº7 Tuerca de Seguridad Cantidad 6 Pieza Nº4 Perno 60mm Cantidad 4 ...

Страница 36: ...e 1 F Axle bolt 2 G Wheel 2 I Base support 1 J Bottom Plate 1 L Leg assembly 1 C Storage compartent 1 H Wrench 2 M N Plastic Scoop 1 Leg assembly bolt 4 B K H D Oil spoon 2 M K Cross bar 1 L N D E F G J I Base support 1 J Bottom Plate 1 L Leg assembly 1 M N Plastic Scoop 1 Leg assembly bolt 4 B K H M K Cross bar 1 L N A C D E F G I J F Axle bolt 2 G Wheel 2 I Base support 1 J Bottom Plate 1 L Leg ...
Страница 37: ...asegúrelo desde la parte de abajo con los Tornillos Nº2 Inserte el Ensamble de las Patas L sobre los extremos salientes del Soporte de la Base I y sujete desde la parte de adentro del Soporte de la Base I utilizando cuatro Pernos Nº4 cuatro Arandelas Planas Nº5 y cuatro Tuercas de Seguridad Nº6 3 Sujete el Plato Inferior J al Soporte de la Base I utilizando cuatro Tornillos Nº2 4 Arme el Soporte d...

Страница 38: ...asos para sujetar la segunda Rueda G en el otro lado del Soporte de la Base I Locking Main Unit to Storage Compartment Coloque la Unidad Principal A sobre el Compartimiento para Almacenamiento B de forma que coincidan los dos orificios laterales Ajuste los Tornillos para Sujetar como se muestra a continuación Cómo Sujetar el Soporte para Conos Sujete el Soporte para Conos N en el lado opuesto al d...

Страница 39: ...dos sobre el lateral de la Unidad Principal A 2 Alinee los dos orificios del Dispensador de Conos M con los dos tornillos y cuelgue el Dispensador de Conos M Deslice el Dispensador de Conos M hacia abajo para que los tornillos entren en las ranuras del Dispensador de Conos M 3 Ajuste los tornillos pero no por demás ...

Страница 40: ...uptor se encuentre en la posición OFF APAGADO 4 Cuando los cubos de hielo estén listos coloque los cubos en la unidad para picar dejando suficiente espacio para volver a colocar la tapa en la unidad fácilmente Nunca la fuerce para cerrar 5 Vuelva a poner la tapa transparente en la unidad y ponga el botón de encendido en la posición ON ENCENDIDO Esto activará la unidad para comenzar a picar Tenga e...

Страница 41: ...la unidad utilizando un paño o esponja levemente humedecidos y no abrasivos luego seque con un paño no abrasivo 4 La unidad picadora de hielo y la tapa transparente pueden lavarse en un lavavajillas Para retirar la unidad picadora de hielo diríjase a los pasos de la página 11 Cómo Cambiar la Cuchilla Luego de un largo período de uso normal cuando la cuchilla de su CARRITO DE CONOS DE NIEVE ESTILO ...

Страница 42: ...atorio hacia afuera 3 Presione con cuidado las pestañas del Compartimiento de la Cuchilla hacia adentro y levante para sacarlo 4 Gire la Tapa de la Cuchilla y con mucho cuidado retire el Cartucho de Cuchillas usado Introduzca el nuevo Cartucho de Cuchillas y realice los pasos anteriores de forma inversa para volver a armar TENGA EXTREMO CUIDADO LA CUCHILLA ES MUY FILOSA 5 Cuando cambie el Eje Gira...

Страница 43: ...GRIO 1 cuarto de jarabe simple 1 onza de ácido cítrico líquido 1 onza de saborizante concentrado 1 onza de colorante para alimentos Coloque 1 onza de ácido cítrico líquido y 1 onza de saborizante concentrado uva cereza frutilla fresa sandía manzana o limón son buenas opciones en una botella de un cuarto o más Llene el resto de la botella con jarabe simple puede utilizar la receta anterior para con...

Страница 44: ...con otros sabores de helado y jarabe y diviértase BATIDO DE ZARZAPARRILLA Hielo granizado Zarzaparrilla 2 bolas de helado de vainilla Tarro de cerveza frío Coloque un tarro de cerveza en la nevera hasta que esté bien frío Coloque dos cucharadas de helado de vainilla en un tarro de cerveza Coloque hielo granizado en el tarro y deje tres dedos de espacio en la parte superior Vierta la zarzaparrilla ...

Страница 45: ... más tarde que 30 días desde la imposibilidad de realizarlo Esta garantía no cubre el desgaste normal o daños ocasionados por el embarque malos manejos mal uso accidentes alteración piezas de cambio incorrectas o algo distinto al uso doméstico normal Es posible que deba devolver el producto con los gastos de envío pagados por usted para inspección y evaluación Los costos de envío no son reembolsab...

Страница 46: ......

Отзывы: