background image

Chapter 6 - Creating Waypoints

951/952 Operator’s Manual Rev. B

Page 87

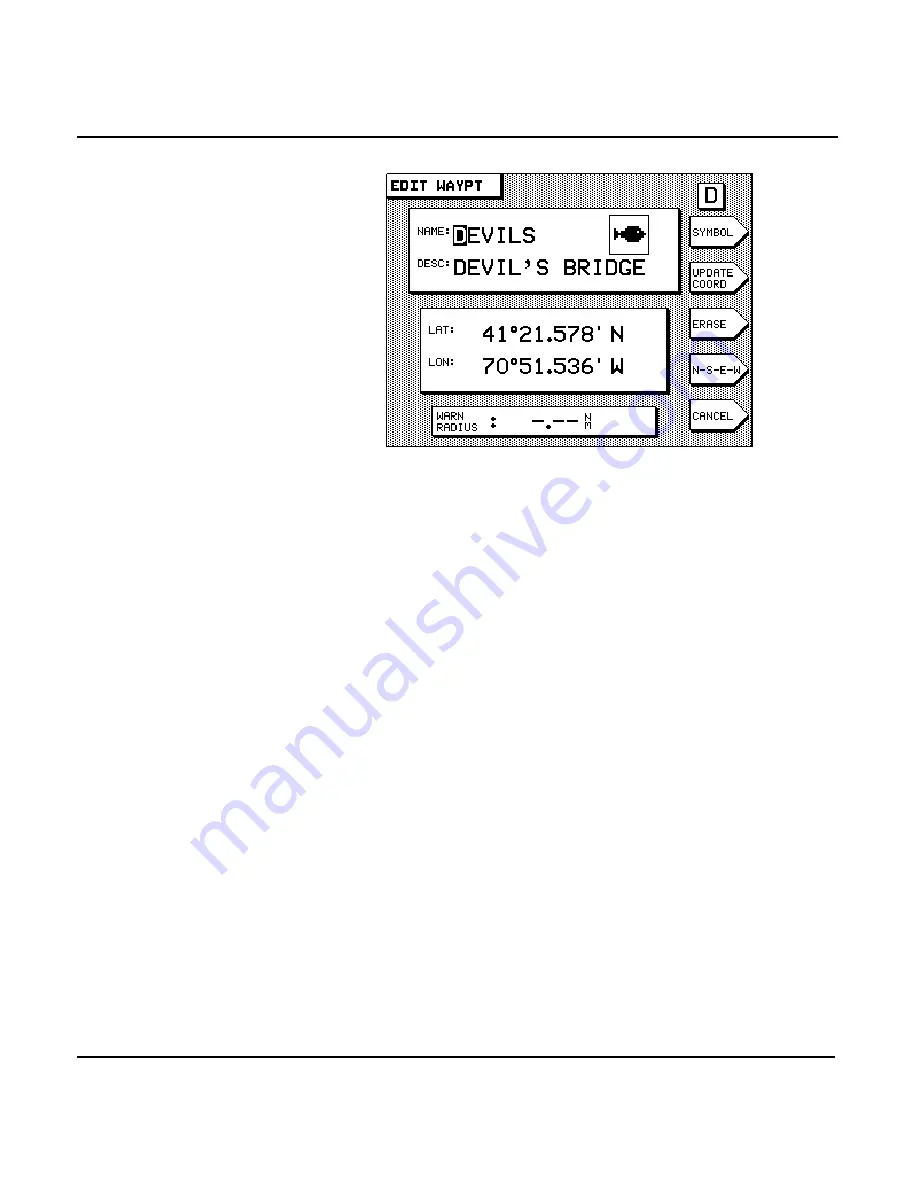
If there’s a warning radius entered, set it to zero if you want to 
remove the avoidance feature from this waypoint.

Erasing waypoints

At the 

EDIT WAYPT

 screen, to permanently erase the waypoint 

from the unit’s memory, press the 


 menu key, then 

press the 

key (or press 

to cancel). 

NOTE:

You can’t erase a waypoint if it’s used in a route—you must first remove it
from the route. For more route editing information, see ”Editing a route”
starting on page 105.

Updating waypoint coordinates

Before the advent


of electronic chart navigators, a waypoint’s 

position was usually taken from a paper chart by measuring 
the approximate coordinates with whatever accuracy the chart 
allowed. When you travelled to the waypoint, however, its 
position was found to be slightly different than expected.

The unit has a special feature that lets you easily recalibrate 
these waypoints by setting their coordinates to your precise 
present position. You can also use this feature to convert 
approximate loran TD coordinates to precise GPS coordinates.

After travelling to the actual spot where the waypoint is to be 
located, you can select a waypoint for updating, either from 

Содержание 951

Страница 1: ...onsibility of the owner To be covered by this warranty the Northstar equipment must have been in normal use This warranty does not apply to units with defects caused by improper installation phys ical damage abuse tampering lightning or other abnormal electrical discharge or to units with defaced or altered serial numbers or to units repaired by unauthorized persons or repaired in a manner that vi...

Страница 2: ... the sole source of navigation guidance Exercise caution and good judgment when underway CAUTION The electronic chart is an aid to navigation designed to facili tate the use of authorized government charts not replace them Only official government charts and notices to mariners contain all information needed for safe navigation and as always the user is responsible for their prudent use ...

Страница 3: ...tanding the function keys 21 Understanding special functions 22 Understanding the display screen 23 Introducing the interfacing function 24 Comparing GPS and loran 25 Using the Controls 31 Using the PWR key 32 Using the ARROW key 32 Using the SAVE MOB key 32 Using the function keys 33 Using the menu keys 35 Using the cursor pad 35 Using the alphanumeric keypad 36 Understanding the special display ...

Страница 4: ...aying waypoints 83 Displaying waypoint coordinates 85 Editing waypoints 85 Updating waypoint coordinates 87 Moving waypoints and routes between units 89 Transferring waypoints to and from a PC 96 Creating Routes 97 Introducing routes 98 Creating routes from the chart 99 Creating routes from a waypoints list 101 Saving a route as you travel 102 Editing a route 105 Understanding Waypoint Route Navig...

Страница 5: ...ther Special Functions 131 Understanding the alarms 132 Adjusting the display screen backlighting 139 Understanding TideTrack 139 Changing the time zone 142 Customizing the Unit 145 Changing display options 146 Changing navigation options 151 Changing receiver options 164 Changing port setup options 169 Displaying service information 170 Appendix A Northstar 951 952 Features 175 Glossary 179 Index...

Страница 6: ...Page iv 951 952 Operator s Manual Rev B ...

Страница 7: ...erator s Manual Rev B Page v List of Figures Figure 1 Proper insertion of a chart cartridge 9 Figure 2 Position accuracy of uncorrected GPS 28 Figure 3 Waypoint symbols 75 Figure 4 Restarting the course line 124 ...

Страница 8: ...Page vi 951 952 Operator s Manual Rev B ...

Страница 9: ... messages 62 Table 3 Definitions of noise levels 66 Table 4 Definitions of DGPS status messages 66 Table 5 Definitions of loran warning indicators 69 Table 6 Alarm types and descriptions 133 Table 7 Beep and honk settings for all alarms 138 Table 8 Datum list 155 Table 9 Options for displaying cross track information 162 ...

Страница 10: ...Page viii 951 952 Operator s Manual Rev B ...

Страница 11: ... 7 Displaying position coordinates 10 Navigating to a waypoint 12 This chapter introduces the Operator s Manual for the North star 951X XD and 952X XD GPS chart navigators The chapter will help familiarize you with their navigation functions and CHART display features and explains how to use basic posi tioning information displayed on a CHART screen ...

Страница 12: ...ator This manual complements that ease of use by illus trating and describing the unit s various functions in a format that s conducive to quick learning and safe operation The sections in this manual are grouped by related functions starting with an overview of the basic control panel layout and function commands and slowly progressing to more advanced waypoint and route navigation operations Sam...

Страница 13: ...ge 15 Technical support After you follow the instructions in this manual if you need technical support or if you have any other questions you can contact Northstar by email fax phone or U S mail as follows Hearing from you Your feedback is important and helps Northstar ensure that this manual is a valuable resource for all 951 952 users Send Table 1 Contacting Northstar Email Service service north...

Страница 14: ... it s critical that you first obtain a Return Materials Authorization RMA number from the Service Department before return ing your unit to Northstar The unit is covered by a two year limited warranty see the Limited Warranty Policy at the beginning of this manual which in summary states that if the unit is returned to North star by the owner or dealer during the warranty period North star will re...

Страница 15: ...and off Turning the unit on After inserting a chart cartridge to activate the unit briefly press the power function key You ll be greeted with a map of the Earth with the words NORTHSTAR 951X at left below or NORTHSTAR 952X at right below then the owner identification message Next the unit performs a series of self tests the 951 and 952 self test screens vary slightly in which critical components ...

Страница 16: ...pecial warning mes sage shown below is displayed as a precautionary reminder that you should not rely on the unit s chart cartography as the sole means of safe navigation Although every effort has been made to ensure that the data used by the unit is as close to paper charts as possible errors and omissions are inevitable ...

Страница 17: ...he unit displays the mes sage OK You don t have to turn power off and on again You re now ready to get underway with your unit Turning the unit off To shut off the unit press and hold the key for three sec onds until the screen goes dark Displaying a chart The unit contains a built in map covering almost the entire world at a fairly low level of detail This world map can give you an approximate id...

Страница 18: ...ify whether a cartridge has already been installed by opening the cartridge access door turn its handle turn counter clockwise and looking inside the slot If the unit is on you can verify whether a cartridge has already been installed by pressing the menu key to the right of the CHART screen the cartridge access door must be fully closed and latched to display this information One of two possible ...

Страница 19: ...tridge Initial position display screen After the unit has completed its start up sequence of self tests and acquired satellite data and you ve acknowledged the warning screen a CHART screen representing your present position such as the following is displayed The Navionics chart cartridge must remain free from debris and moisture at all times To ensure that you do not expose the cartridge to any e...

Страница 20: ...f the chart The scale at which your view is initially displayed is approximately 64 nautical miles nm from edge to edge If you want to display a more detailed view of your position press the menu key located to the upper right of the screen Press the menu key to show more area and less detail For details about zooming see Changing the zoom levels beginning on page 47 Displaying position coordinate...

Страница 21: ...er Ground COG and the displayed zoom level range in nautical miles RNG NM the Distance DIST and Bearing BRG to the current way point if any and the zoom level range your vessel s position in lat lon or TDs and the zoom level range no additional information the INFO BAR disappears which shows more of the area around you ...

Страница 22: ...ain to return to the CHART screen Navigating to a waypoint To navigate to a quick or temporary waypoint using the CHART screen 1 Display your position on the CHART screen If you aren t viewing your position on this screen press the function key once or twice until the CHART screen is dis played 2 Move the cursor to the desired location by pressing the in the upper right corner of the unit To see m...

Страница 23: ...essage START NAVIGATING TO WAYPOINT QUIK press the key Now the unit displays a track line to the new waypoint auto matically named QUIK At the bottom of the screen you can display distance and bearing information to the waypoint by pressing the menu key You ll probably want to return to the vessel centered mode do so by pressing the menu key ...

Страница 24: ...Page 14 951 952 Operator s Manual Rev B Chapter 1 Quick Start ...

Страница 25: ...unction keys 21 Understanding special functions 22 Understanding the display screen 23 Introducing the interfacing function 24 Comparing GPS and loran 25 This chapter introduces you to the various operational func tions modes of display and features of the Northstar 951 952 Use this chapter to get an overview of what the unit is all about and how you can use it to your best advantage ...

Страница 26: ... cartridges supplied by Navionics a major producer of high quality high resolution seamless digital charts The charts you display are contained in these data cartridges The data in the cartridges is the result of countless hours of converting the land mass shapes nav aid names and locations depth contours and other information found on official paper charts into an electronic format that the unit ...

Страница 27: ...f DGPS corrections that meets the SC 104 standard such as the North star 8401 or 8800 differential receiver Maintaining your unit The following basic hints should help you maintain the unit s optimum performance keep the cartridge access door closed at all times unless inserting or removing a chart cartridge to prevent mois ture and dirt from entering the unit don t change the cartridge when the u...

Страница 28: ...screen is cleaned as described above Upon first start up When you turn your unit on you ll see your present position represented by a boat symbol situated at the center of the chart A unit that s been used recently either at or near that same location is usually ready to navigate within one minute If the unit doesn t acquire GPS signals within two minutes you ll see a flashing exclamation point sy...

Страница 29: ...and acknowledged This alarm condition usually occurs in units shipped to customers located more than several hundred miles from Northstar and only the first time the unit is turned on after being installed This sequence is a normal part of using a new unit for the first time as it notifies you that it s in the process of acquiring satel lite information necessary for navigation Normally the unit t...

Страница 30: ... aspects of your trip The unit s features include the following GPS features 12 channel GPS precision and dependability accurate worldwide position data in any weather 24 hours a day optional built in two channel fully automatic DGPS bea con receiver for accuracy as good as 1 3 meters fast signal acquisition fast reacting accurate speed and course Navigation features high resolution high speed CHA...

Страница 31: ...d properly Understanding the function keys Five keys along the bottom of the unit instantly select the most commonly used functions as described below The function key displays your position directly on the CHART screen as GPS lat lon coordinates as loran TDs if you have a loran interfaced to the unit as calculated Phantom Loran TDs if you don t have a loran interfaced to the unit SOG COG distance...

Страница 32: ...modify the current navigation plan In addition to these function keys the key instantly saves your position as a waypoint and provides a Man Overboard MOB function for returning to the saved point Understanding special functions You may want to read about the chart plotter loran TDs and TideTrack functions in detail before using them Chart plotter functions The unit plots your position on an elect...

Страница 33: ...s The accuracy to be expected from this conver sion is generally better than 500 to 1500 feet You can also interface your existing loran receiver to the unit and then dis play and navigate with real time loran TDs These features greatly ease the transition from using loran to using GPS For further details on using loran TDs see Using loran starting on page 67 TideTrack TideTrack displays a 24 hour...

Страница 34: ... of the screen The contrast of the 952 s display screen can t be adjusted NOTE When the display screen is at full brightness if the unit becomes too hot due to external heat conditions the display screen will automatically dim to half of its maximum brightness If you immediately override the auto dim function by pressing the key on the 951 or the dou ble key on the 952 the unit will begin to dim a...

Страница 35: ...an expect to be within 100 feet of your intended position 95 percent of the time and beyond that area approximately five percent of the time Selective availability The Department of Defense developed a system of built in errors called Selective Availability SA which was introduced as a national defense strategy to intentionally degrade the GPS solution The DOD wanted to avoid the possibility that ...

Страница 36: ...are broadcast by marine radiobeacons over a rela tively limited area usually a maximum broadcast radius of 250 miles to differential capable GPS DGPS receivers The precise geographic location of the reference station is used to calculate corrections based on the GPS data received from the satellites These corrections are then broadcast to DGPS receiv ers which then convert this data into extremely...

Страница 37: ...nd money Loran s repeatable accuracy was superior to anything else commercially available at the time In very good coverage areas loran can typically get you within 50 feet or approximately 14 meters of your previously visited target On the other hand uncorrected GPS can only be counted on to get you to within about 100 feet 20 30 meters maximum of your intended destination Obviously then uncorrec...

Страница 38: ...as 200 feet from your expected position This is especially appar ent when using the unit s CHART screen where you can see your boat s plotted position appear to wander around within an area up to 200 feet in diameter see figure below Figure 2 Position accuracy of uncorrected GPS Increasing position accuracy If you need a higher level of repeatable accuracy than what basic GPS provides you have two...

Страница 39: ...r more informa tion Interface your loran receiver to your unit provided the loran has the appropriate NMEA 0183 output capability You ll then keep the repeatable accuracy of your loran and have all of the navigation features of the 951 952 including the excellent worldwide absolute accuracy of GPS For the connector pin wiring guide see the Northstar 951 952 Installation Manual ...

Страница 40: ...Page 30 951 952 Operator s Manual Rev B Chapter 2 Introducing the Northstar 951 952 ...

Страница 41: ... the SAVE MOB key 32 Using the function keys 33 Using the menu keys 35 Using the cursor pad 35 Using the alphanumeric keypad 36 Understanding the special display windows 37 This chapter describes in detail each of the Northstar 951 952 s controls Read this section to learn the various functions of each control ...

Страница 42: ...onditions In the 952 the double key lets you adjust the bright ness pressing the upper arrow brightens the screen pressing the lower arrow darkens it Adjust the screen for the best pic ture for your normal operating location Using the SAVE MOB key The key is used to save your current position as a waypoint It does this in either of two ways depending on whether you press the key briefly or press a...

Страница 43: ...the screen To leave MOB mode and return to normal navigation press the key for five seconds until the unit displays the BACK TO NORMAL MOB TURNED OFF message Note that the waypoint named MOB is stored in addition to the saved waypoint named for example S002 Before you can erase the waypoint MOB you must stop navigating to it by re pressing the key for another five seconds to exit MOB mode Using th...

Страница 44: ...yed along with all the numeric informa tion you need to steer directly to your waypoint Two versions of the steer display are available traditional STEERING and 3D STEER Press the function key once to see the version you last used Press it again to see the alternate version For more information on using the steering screens see Steering to a waypoint starting on page 118 STAR function key The func...

Страница 45: ...keys The five round keys on the right side of the display screen are used for a variety of purposes depending on what screen the unit is displaying at the time The current function of each key is labeled on the particular screen Using the cursor pad The large in the upper right corner of the unit lets you move the cursor across the CHART screen in an up down left right or diagonal direction Press ...

Страница 46: ...h as waypoint coordinates you can use the keys to enter one digit 0 9 with each keypress The flashing cursor moves automatically to the next digit position For entries such as latitude and longitude where the digits must be entered into specific character positions the cursor starts on the left side of the data area and you enter characters left to right into their correct positions For other nume...

Страница 47: ...o the next character posi tion by pressing the right arrow on the CLEAR and ENTER keys The also has and keys for erasing or entering data that has been typed The key removes any data you ve typed setting the field to all blanks or restor ing the original value Pressing the key is always the last step when entering or changing data or acknowledging an action The and keys are also used to reject or ...

Страница 48: ...een on the right the and keys that are present in the 951 are absent this is because the double key located at the left of the dis play is used to adjust the 952 s display screen brightness Messages you haven t seen before contain the word NEW in the upper right of the RECENT ALARMS box You can review old previous alarms by repeated presses of the menu key Information windows Information windows a...

Страница 49: ... appear when the unit needs to know more about what you want to do A question mark always appears in this type of window You must respond to any question window by pressing the key to answer yes or to answer no All other keys including the function keys are inactive when a ques tion window is displayed ...

Страница 50: ...Page 40 951 952 Operator s Manual Rev B Chapter 3 Using the Controls ...

Страница 51: ...ing nav aids 44 Controlling the cursor 46 Changing the zoom levels 47 Using vessel mode 48 Using browse mode 50 Using distance and bearing mode 51 Setting up the chart screen 52 This chapter explains how to show your position on a chart the differences in chart views the various chart symbols and their meanings and how to change the chart display ...

Страница 52: ...ed in brown for nighttime viewing water is displayed in black and land areas are displayed in green You also can display your current route if any your track his tory and any nearby waypoints and avoidance points The image of your boat displayed on the CHART screen points in the direction of your COG if you re moving Remember this direction may be different from your heading The boat image shows y...

Страница 53: ...f navigation accuracy and simplicity Chart boundary lines Each cartridge contains data from a number of paper charts The boundary line for each chart can be displayed on the CHART screen Although the chart identification numbers can t be displayed the experienced mariner with local knowl edge may be able to identify the original chart sources by the size and location of the boundary lines Familiar...

Страница 54: ...ic waterways and channels Buoys In the 951 nav aids are typically illustrated on the CHART screen as black circles with white letters The most common nav aids depicted on the charts are buoys Those illustrated by a letter G represent green channel marker buoys a letter R indicates a red channel marker buoy W indicates white and Y is for yellow Approach buoys are shown as circles with black on the ...

Страница 55: ...escriptive information shown in the INFO BAR at the bottom of the screen When you move the cursor on top of the nav aid to display its descriptive information the word BELL WHIS GONG or HORN is shown indicating the type of buoy displayed Some nav aids have no corresponding chart symbol and are indicated on the CHART screen only as text These nav aids don t have any additional information available...

Страница 56: ...creen Further pressing moves the cur sor across the screen If you move the cursor onto an object such as a displayed waypoint that object becomes selected as indicated by a diamond shaped box see left around the waypoint symbol Information about the selected object then appears at the bot tom of the screen Use the cursor to select a nav aid or waypoint to ...

Страница 57: ... your vessel or the area around the cur sor if it s displayed Press the menu key to zoom out to see a wider area Each press of the or menu key approximately halves or doubles the chart scale respectively You can zoom out as far as the 4 096 nm scale which covers an entire continent and zoom in as far as the 1 8 nm scale which is just 660 feet from one side of the screen to the other Chart scales f...

Страница 58: ...e screen for safety reasons leaving only your boat its track user entered waypoints and the lat lon grid As a reminder that no charted hazards or nav aids are displayed the words NO CHART are shown multiple times across the screen Even without chart data displayed the unit can now be used as a precision track plotter Using vessel mode When the unit displays the word VESSEL in the upper right corne...

Страница 59: ... navigation If you re navigating to a waypoint and you see that you re presently off course you can press the menu key to restart your course line from your present position to your intended waypoint rather than maintain your original course line Setting up the chart detail Press the menu key to change the kinds of information shown on the chart for details see Setting up the chart screen starting...

Страница 60: ...ode described below Using browse mode When the unit displays the word BROWSE in the upper right corner it means that the unit is in BROWSE mode Browse mode lets you view any area on the chart or the world map by moving the cursor there quickly determine distance and bearing to other points on the CHART screen specify points to navigate to directly on the CHART screen Using the VESSEL menu key Pres...

Страница 61: ...you quickly and easily determine the distance and bearing between any two points on the CHART screen you can also use this function to create new waypoints defined by their distance and bearing from another point 1 Press the key to display the WAYPTS AND ROUTES screen 2 Press the menu key The unit dis plays your present position at the center of the CHART screen with the cursor situated directly o...

Страница 62: ...the next cursor location Setting up the chart screen To control the display of data on the CHART screen press the menu key on either the VESSEL or BROWSE screen The CHART SETUP STATUS screen is displayed Here you have the option to set the details on the CHART screen set a chart offset or adjust the unit s track control ...

Страница 63: ...ting displays lat lon lines on the CHART screen Turn lat lon lines to OFF when these lines make your screen appear cluttered or when you don t need them Text info The ON setting displays the names of local cities towns har bors channels bodies of water and so on Waypt names The ON setting displays the name of each waypoint below its symbol The OFF setting displays just the symbol itself Chart edge...

Страница 64: ...ts The ON setting displays user entered waypoints Turn this option to OFF if you don t want to display waypoints on the CHART screen this option is useful for eliminating waypoint clutter when displaying an area containing many waypoints that are grouped close together Nav aids The ON setting displays nav aids from the Nav Chart cartridge The OFF setting hides nav aid symbols to eliminate confusio...

Страница 65: ...n indicated by the chart Before deciding that a chart offset is necessary make sure the datum the unit is using matches the datum shown on the car tridge label Any offset you specify will apply to the entire area of the car tridge but may vary with any other cartridges you use To set a chart offset 1 From the CHART SETUP STATUS screen press the menu key An INFO window advises you that your vessel ...

Страница 66: ...h you ve recently traveled You can choose how often the unit stores a position fix as a point in your track history up to 1 024 position fixes may be stored When this limit is reached the unit starts erasing the oldest points to add your new points to the track line The more frequently you mark your track the quicker you fill up the track memory The maximum length of the track depends on how often...

Страница 67: ...s for 2 hours total every 20 seconds for 5 hours total every 40 seconds for 10 hours total every 1 minute for 15 hours total every 2 minutes for 30 hours total or FREEZE TRACK FREEZE TRACK prevents any more points from being stored keeping the track unchanged Set the TRACK DISPLAY option to OFF to remove the track dis play from the CHART screen while the unit continues to record the track in its m...

Страница 68: ...ld to flash indicating you should press the to select the option you want Press the key when you re done or to restore the field to its original value To clear the track history displayed on the CHART screen press the menu key and the key Press the menu key twice to return to the CHART screen ...

Страница 69: ...ition Coordinates Displaying position heading and speed 60 Using GPS 61 Using DGPS 64 Using loran 67 Using Phantom Loran 70 This chapter describes the most basic yet important naviga tion function available in the Northstar 951 952 determining your position ...

Страница 70: ...necessary The GPS POSITION screen is displayed showing your position coordinates at the top and your COG and SOG at the bottom Position coordinates can also be displayed at the bottom of the CHART screen as described in Displaying your present posi tion on a chart on page 42 GPS position coordinates are displayed as latitude and longi tude or you can choose to display loran coordinates instead Lor...

Страница 71: ...longitude in large digits If GPS data isn t available dashes are displayed in place of the numbers NOTE You can display lat lon as either degrees minutes and seconds or as degrees minutes and thousandths of minutes See Changing display options on page 146 to select one or the other Viewing time of day The time of day and today s day and date are displayed at the bottom of the GPS POSITION screen T...

Страница 72: ... the label of each cartridge Most new charts use the NAD83 or WGS84 datum which are nearly identical Make sure the datum the unit is using matches the datum shown on the cartridge label Specifying the wrong datum can significantly reduce accuracy For more informa tion on selecting the datum for your area see the Northstar 951 952 Installation Manual Viewing GPS status At the top center of the GPS ...

Страница 73: ...ellite map represents the center of the sky and the outer or last ring is the horizon The view is looking down from above with East to your right and West to your left The following GPS data is also displayed ACCURACY The estimated accuracy in feet of the GPS system to be expected at the current time Your position readings should be more accurate than this estimate 95 percent of the time HDOP This...

Страница 74: ...ections remove the errors caused by atmospheric varia tions NOTE When you re using DGPS as your navigation source your position coordi nates as calculated by the unit may actually exceed the accuracy of some charts When the DGPS indicator is displayed it means the unit is using this higher level of accuracy On the GPS POSITION STEERING and 3D STEER screens the DGPS indicator is a large letter D in...

Страница 75: ...data from the tuned beacon the word LOCK appears next to the baud rate The lower part of the DGPS STATUS screen shows three bar graphs SNR The Signal to Noise Ratio is a good measure of over all signal quality and should be as high as possible Val ues of 15 and higher are preferred while anything below 10 could indicate poor reception SIGNAL This represents the actual strength of the received sign...

Страница 76: ...NS Beacon sensor status message is being reviewed but no SC 104 DGPS corrections are present NOT INSTALLED No beacon sensor status message is being received nor has an external DGPS source been chosen SC 104 IN OK An external source has been chosen and the required data is being received SC 104 IN FAIL An external source has been chosen but the required data isn t being received RESULTS UNKNOWN Th...

Страница 77: ...loran To display loran TD coordinates from a loran receiver inter faced to the unit first select loran as the navigation source as described below 1 Press the key until the USER CUSTOMIZATION screen is displayed 2 Press the menu key The NAVIGA TION SOURCE field is designated by the cursor arrow TOO FEW CORRECTIONS DGPS is off because not enough satellites with corrections are available POOR BCN DO...

Страница 78: ... If you want the unit to display loran position coordinates from an exter nally connected loran receiver the loran must support the standard NMEA 0183 RMA output data sentence structure Without this output capability the 951 952 won t receive position data from the loran For best results connect a Northstar 800 series loran to the unit using the 800 s PRINTER 3 output format see the Northstar 951 ...

Страница 79: ... SNR for each loran transmitting station is dis played graphically on the LORAN INFO screen Press to return to the LORAN POSITION screen Checking GPS status To display GPS coordinates and signal status press the menu key The unit continues to navigate using loran and will display loran data the next time you return to the LORAN POSITION screen Returning to GPS navigation To return to GPS signals f...

Страница 80: ...unit were actually receiving loran signals Remember however that these calculated TDs won t exactly match the positions of previously recorded TD coordinates obtained directly from actual loran signals In most areas TD errors shouldn t exceed one microsecond how ever larger errors are possible in areas for which the unit doesn t contain accurate factory programmed ASF correction points Selecting P...

Страница 81: ...e When the GRI is correct press the key Checking GPS status Press the menu key to display the status of the GPS receiver to temporarily display GPS coordinates and signal sta tus see Viewing GPS status starting on page 62 Press to go back to the PHANTOM LORAN screen Checking DGPS status Press the menu key to display the current status of the differential receiver including SNR SIGNAL and NOISE val...

Страница 82: ...n the 3D STEER screen on the 952 this D is green Returning to GPS navigation To return to GPS signals for navigation repeat the steps in Selecting Phantom Loran on page 70 except specify GPS instead of Phantom Loran To learn how to navigate to loran Phantom Loran or GPS coordinates see Steering to a waypoint starting on page 118 ...

Страница 83: ...s 83 Displaying waypoint coordinates 85 Editing waypoints 85 Updating waypoint coordinates 87 Moving waypoints and routes between units 89 Transferring waypoints to and from a PC 96 This chapter explains how to create and change waypoints use them to form routes and move all waypoints and routes between one or more units using the import export function ...

Страница 84: ... s memory for later use navigate to these waypoints string these waypoints together to form routes follow these routes edit or erase waypoints or routes plot waypoints or routes transfer all waypoints and all routes between any two units if connected properly transfer waypoints and routes from the unit to a per sonal computer and back again Creating waypoints New waypoints can be entered in two ea...

Страница 85: ...ng or editing waypoints you can assign a symbol for the waypoint as a means of readily identifying it on the CHART screen You can choose from any one of 16 symbols eight of which are illustrated below ANCHOR FISH FLAG X FUEL WRECK DANGER DOT Figure 3 Waypoint symbols Entering waypoints from the chart screen To enter waypoints graphically 1 Press the key 2 Press the menu key The unit now displays t...

Страница 86: ...s sary to obtain precise placement of your waypoint 4 Press the menu key to display the NEW WAYPT data entry screen The position coordinates displayed in the lat lon box are those that you designated by the cursor location on the screen You can adjust them here if you need to by press ing the to move the cursor to the lat and lon fields Press the menu key to choose ...

Страница 87: ...he new waypoint If you change your mind and want to return to specifying distance and bearing from your present position instead of another waypoint press the menu key on the waypoint list screen NOTE If you ve travelled to a part of the world that s south of the Equator or east of the Prime Meridian running through Greenwich England the unit automatically displays your lat lon coordinates as S or...

Страница 88: ...ART screen NOTE List views will be shown instead if you were displaying lists during a previ ous viewing session In this case press the menu key to go to the WAYPTS CHART screen If you want to see waypoints listed numerically press the menu key to display waypoints listed in order of distance LOCAL list or alphabetically ALPHA list or by avoidance AVOID list The screen shown below is a sample LOCA...

Страница 89: ...ng Waypoints 951 952 Operator s Manual Rev B Page 79 3 From the WAYPTS CHART screen press the menu key to display the NEW WAYPT data entry screen From the list screen press the key to display the new WAYPT ENTRY screen ...

Страница 90: ...e distance and bearing from your present position leave the FROM point set to HERE and enter the bearing and the distance to the desired waypoint To enter distance and bearing from any other waypoint stored in the unit press the menu key to display a list of waypoints Press the to select the desired waypoint and press the key Finally enter the bearing and the distance from the desig nated waypoint...

Страница 91: ...ify a warning radius larger than zero To designate a waypoint as an avoidance area waypoint enter a distance in the WARN RADIUS box at the bottom of either the NEW WAYPT or EDIT WAYPT screen The warning radius may be as large as five nautical miles Be sure to include a little extra distance around the hazard so that you ll have time to respond by turning or stopping after you hear the alarm and to...

Страница 92: ...point as an avoidance area the unit alerts you if you penetrate that area To set the audible avoidance area alarm 1 Press the key once to display the ALARMS screen on the 952 or ALARMS BACKLIGHT screen on the 951 CAUTION The unit s avoidance alarm is intended only as an extra safety feature to help make you aware of possible hazards It doesn t replace local knowledge proper use of charts the perso...

Страница 93: ...ou enter an avoidance area or when you lose GPS or loran navigation signals Displaying waypoints You can display waypoints in any of four ways A graphic chart view of local waypoints A list of up to 30 local waypoints sorted by nearest first A list of all waypoints sorted alphabetically A list of the 30 closest avoidance waypoints sorted by nearest first First press the key then the menu key To vi...

Страница 94: ... Operator s Manual Rev B Chapter 6 Creating Waypoints Chart screen The WAYPTS CHART screen shows you all waypoints in the vicinity of the cursor as you move it around on the chart Press the and menu keys as necessary ...

Страница 95: ...the AVOID screen waypoints are displayed in order of dis tance from your present position The 30 closest are displayed Displaying waypoint coordinates Whenever a waypoint list is displayed you can display the waypoint s coordinates in any of the following ways by press ing the menu key latitude longitude coordinates the coordinates originally used to save the waypoint TDs or lat lon distance and b...

Страница 96: ...Use the to point to the desired waypoint On the WAYPTS CHART screen select the waypoint by moving the cursor onto the waypoint so that it s highlighted with a diamond shaped box around it When selected its name and distance and bear ing from your vessel are displayed in the INFO BAR at the bot tom of the screen To edit on the WAYPTS CHART screen press the menu key To edit any of the list screens p...

Страница 97: ...on page 105 Updating waypoint coordinates Before the advent of electronic chart navigators a waypoint s position was usually taken from a paper chart by measuring the approximate coordinates with whatever accuracy the chart allowed When you travelled to the waypoint however its position was found to be slightly different than expected The unit has a special feature that lets you easily recalibrate...

Страница 98: ... bottom 2 Press the key the menu key then the menu key 3 Press the menu key 4 Press the key The unit updates the waypoint s coordinates to your exact position at the instant you pressed the menu key Updating from a list screen 1 Press the key then the menu key 2 Press the menu key to show the LOCAL screen in order of distance from your position The way point you intend to update should be at or ne...

Страница 99: ...routes that you d now like to have in one or more of these other units you can use the import export function to move all the waypoints and routes from one unit to another from either unit 1 to unit 2 or from unit 2 to unit 1 and so on for as many units as you have NOTE If you want to import or export to from older units these units all must have software version 3 12 or higher to obtain any neces...

Страница 100: ...rthstar dealer also see the Northstar 951 952 Installation Manual part num ber GM1505C Moving waypoints and routes into a unit When you move waypoints and routes into unit 1 the desig nated master from unit 2 the entire contents of unit 2 are imported into unit 1 Also if any waypoint or route name matches exist the waypoints or routes from unit 2 will over write the waypoints or routes already in ...

Страница 101: ...eady in the receiving unit and the ones left to be transferred are re transferred 1 Select the unit you d like to use as the master Remember You can use either of the two units because both units are capable of importing or exporting waypoints and routes 2 At the master unit press the key to display the WAYPTS AND ROUTES screen 3 Press the menu key to display the IMPORT EXPORT screen ...

Страница 102: ...nit from the other unit press the key The status bar dis plays the message TRANSFERRING and updates every sec ond with the number of waypoints and routes already received against the total quantity to be received The progress bar located below the status bar graphically dis plays the percentage completed If there is a problem with the transfer process the follow ing messages may appear If the othe...

Страница 103: ...ny function key on the master unit during the transfer the error message TRANSFER ABORTED BY KEY HIT will be displayed the process will be aborted and the master unit will display the particular screen accessed by that function keypress You can press any key on the other unit without interrupting the transfer process To purposely stop the transfer at any time press the key If you press the key the...

Страница 104: ...press the key to display the WAYPTS AND ROUTES screen 3 Press the menu key to display the IMPORT EXPORT screen 4 Press the menu key to display the EXPORT DATA screen The status bar in the center of the screen displays the message READY TO TRANSFER to show that the transfer is ready to start ...

Страница 105: ... sent The progress bar located below the status bar graphically shows the percentage completed If there is a problem with the transfer process the follow ing messages may appear If the other unit is off line the master unit displays the dialog box message TRANSFER ABORTED BY COMMUNI CATION TIMEOUT and the status bar message COMMUNI CATION ERROR If the master unit doesn t contain any waypoints and ...

Страница 106: ... waypoints are the only record you have of important locations you may want to keep a separate copy of them by transferring them to your personal computer using special transfer software provided by third party vendors and a Northstar loader cable part number 1100 LC With this com bination you can copy edit or plot waypoints and routes and most important if these waypoints and routes are accidenta...

Страница 107: ...02 Editing a route 105 This chapter explains how to create routes from existing way points or new waypoints or by saving the route as you travel along it You ll also learn how to edit the route by inserting removing or modifying the order of its waypoints For details about transferring routes between two different 951 952 units see Moving waypoints and routes between units on page 89 ...

Страница 108: ... unit can follow route legs in a forward or reverse direction You can start following a route in either of two ways go directly to any waypoint in the route cross track dis tance starts at zero because you re on the course line to the waypoint along any leg of the route cross track distance starts at your distance from the leg Route waypoint capacity A route can have a maximum of 35 waypoints Each...

Страница 109: ... screen 1 Press the key and then press the menu key The names of routes already stored are displayed on the ROUTES screen 2 Press the menu key The NEW ROUTE screen is dis played asking you to enter the name of the new route 3 Enter the name of the new route using the and see Section 3 Using the Controls start ing on page 31 and press the key ...

Страница 110: ...ition the cursor at the first waypoint s location The location can be a nav aid an existing waypoint or an unmarked point on the chart If the cursor is positioned on an existing waypoint the menu key reads if not the menu key reads Press the key to add a new waypoint 5 Continue creating the route by moving the cursor to desired waypoint locations and pressing either the or the menu key for each ne...

Страница 111: ... waypoint is automatically given a description consisting of the time and date the waypoint was stored You can change waypoint names at any time by using the edit waypoint func tion see Editing waypoints starting on page 85 Creating routes from a waypoints list To create a route from a list of existing waypoints 1 Press the key then press the menu key 2 At the ROUTES screen press the menu key The ...

Страница 112: ... CHART screen press the menu key once there to return to the NEW ROUTE screen press the menu key Saving a route as you travel Another way to create a route is to travel the length of the desired route pressing the key at each waypoint you want to store in the route The unit s save route function makes this a very simple process In summary you first tell the unit that you want to save a route as yo...

Страница 113: ... a route automatically The SAVE ROUTE screen is displayed asking you to enter the name of the new route to be saved 3 Enter the name of the new route to be saved using the and and press the key The unit displays the message SAVING TO ROUTE NAME at the bottom of the ROUTES screen confirming that your route is now being saved ...

Страница 114: ... saved as a waypoint in the unit s memory and the waypoint is automatically added to the route being saved The waypoint is stored with a name similar to 0001 The parentheses indicate that the waypoint is part of a saved route and the four digit num ber is used to uniquely identify each waypoint Each way point is automatically given a description consisting of the time and date the waypoint was sto...

Страница 115: ...ctly as described above Press the menu key The unit prompts you with a question window ask ing if you want to STOP SAVING TO ROUTE XXX Press the key for YES Editing a route You can edit a route by changing its name from the CHART screen or from a way points list adding waypoints to the beginning from the CHART screen or from a waypoints list adding waypoints to the middle from the CHART screen or ...

Страница 116: ...o change the route s name do so now 4 If you want to use chart based editing there should be a menu key called on the EDIT ROUTE screen If the menu key reads press it once so that it reads then press the key The EDIT ROUTE chart screen is displayed showing the route you selected The direction of the route is indicated by a series of small arrows in each leg and the cursor is situated in the middle...

Страница 117: ...ress the to select the first waypoint in the route its name is displayed in the INFO BAR The menu key is now shown 2 Press the menu key then move the cur sor to the location of the waypoint you want to add to the beginning of the route As you move the cursor the unit displays a new leg represented by a dotted line from the first waypoint to the cursor position ...

Страница 118: ... mode or press the menu key to see the EDIT ROUTE screen again 5 Press the menu key or any function key to leave the EDIT ROUTE screen Adding waypoints to the middle of a route To add waypoints to the middle of a route 1 Move the cursor onto the leg of the route where you want to insert a waypoint The menu key is dis played when you ve placed the cursor on a leg of the route 2 Press and move the c...

Страница 119: ...function key to leave the EDIT ROUTE screen For new waypoints you add to the route the unit automati cally assigns a number such as 0018 and draws new con necting route legs to and from this new waypoint Its name and position relative to your boat s present position are dis played in the INFO BAR at the bottom of the screen Adding waypoints to the end of a route To add waypoints to the end of the ...

Страница 120: ...ypoint you want to add to the end of the route 4 When you ve finished adding waypoints to the end of the route press the menu key to select a differ ent editing mode or to see the EDIT ROUTE screen again 5 Press the menu key or any function key to leave the EDIT ROUTE screen Removing waypoints at the chart screen To remove a waypoint from the route 1 On the CHART screen move the cursor to the wayp...

Страница 121: ...oute see Removing waypoints from a route starting on page 113 3 Press the menu key or any function key to leave the EDIT ROUTE screen Editing from the route list To edit a route from the ROUTE list 1 Press key and then the menu key to display the ROUTES screen 2 Press the to select the route you want to change Press the menu key The name of the route is displayed in the EDIT ROUTE screen ...

Страница 122: ... the list A more detailed EDIT ROUTE screen appears displaying all the waypoints in the route 5 From this point you can either add or remove waypoints as described below Adding waypoints to a route 1 On the EDIT ROUTE screen press the to move the pointer to the spot in between the two existing waypoints where you want to insert another waypoint To add a waypoint to the beginning be sure to positio...

Страница 123: ... route s waypoints see Removing waypoints from a route above Once you remove all the route s waypoints 1 On the ROUTES screen press the to point to the route you want to erase 2 Press the menu key The unit prompts you with the question box confirming that you want to erase that particular route 3 To erase the route press the key or the key to cancel Editing a route you re following If you make cha...

Страница 124: ...Page 114 951 952 Operator s Manual Rev B Chapter 7 Creating Routes ...

Страница 125: ...avigating to quick waypoint coordinates 116 Navigating to a stored waypoint 118 Steering to a waypoint 118 Navigating along routes 123 Restarting the course line 124 This chapter explains how to navigate to specific waypoints and along routes and shows you how to get back on course or follow a new course line to your destination ...

Страница 126: ...igating gives you the maximum flexibility in deciding where to go as you travel Simply move the cursor to the point where you want to go next press menu key and the key and you re navigating The unit automatically creates a waypoint at the cursor loca tion unless you selected an existing waypoint stores it and begins navigating to it A new waypoint is given the name QUIK This waypoint is kept in t...

Страница 127: ... using the different types of coordinates available see Displaying waypoint coordinates starting on page 85 3 Enter the coordinates of the waypoint just as you would normally when adding a waypoint If you like you can specify a waypoint to navigate to and store it permanently in the unit s database in one operation While on the QUICK WAYPT screen move the cursor arrow up to the waypoint s name and...

Страница 128: ...enu key to display the most con venient list often the LOCAL list see note below 3 Press the to point to the waypoint you want to navigate to 4 Press the menu key and then press the key NOTE Since the waypoints you navigate to are usually nearby the LOCAL way point list is often the best list to use for finding the desired waypoint Steering to a waypoint To display information to guide you directl...

Страница 129: ... both screens show numeric navigation information in large digits The STEERING screen uses a traditional graphic display with cross track distance shown as how far the boat is from the cen ter line of the display The 3D STEER screen is a waypoint heading up display showing the waypoints between you and the destination waypoint and your position relative to the course line for precision steering Di...

Страница 130: ...n of the boat on the screen indicates the direction your boat is actually traveling The direction may not be the same as your heading if any current or wind is present When the boat symbol points towards the course line you re moving closer to the line when it points parallel to the course line you re keeping a constant distance from the line when it points away from the course line you re moving ...

Страница 131: ...D STEER screen features a three dimensional view of your boat the current waypoint the course line to the way point and the locations of any other nearby waypoints It s intended to provide a comprehensive picture of your progress toward the waypoint Displaying other information The center of the STEERING screen has a user selectable area that you can set to display any of the information listed be...

Страница 132: ...Page 122 951 952 Operator s Manual Rev B Chapter 8 Understanding Waypoint Route Navigation Speed of Advance SOA and Heading Correction Waypoint s name description and coordinates 1 2 3 ...

Страница 133: ...y a smaller or larger area of the route You can also press the to move around on the route and to select a different waypoint or leg If you change your mind and decide not to follow this route press to go back to the previous screen Reversing the route To follow the route in the opposite direction of the small arrows that are shown on the route legs press the menu key The direction of the route an...

Страница 134: ...d pressing the menu key and then the key In this case your cross track error starts at a number that s your distance from that leg The leg you re currently navigating along is displayed as a black line green in the night palette with arrows indicat ing your direction of travel other legs are displayed in gray Restarting the course line When navigating from one waypoint to another you may find you ...

Страница 135: ...waypoint Course 2 above using the restart function To restart your course line from your present position display either the NAV LOG screen by pressing the key or the VESSEL CHART screen by pressing the key Press the menu key then the key The unit recomputes the course line to extend from your present position directly to the next waypoint resetting your cross track error to zero ...

Страница 136: ...Page 126 951 952 Operator s Manual Rev B Chapter 8 Understanding Waypoint Route Navigation ...

Страница 137: ...og 128 Reversing the trip 129 Adding waypoints to the trip 129 Stopping navigation 129 Restarting navigation 130 This section explains the unit s nav log function which pro vides a quick and easy way to check on your progress along a trip and to make changes to it while you travel ...

Страница 138: ...ant without affecting the original route which remains safely stored in the unit s memory Press the key at any time to display the list of way points you re currently navigating along Press the to scan through the entire list to show any waypoint you want The distance and bearing of each leg is displayed From this screen you can easily read the direc tion of the next leg of your trip Information f...

Страница 139: ... menu key Any waypoints added to the trip in the nav log aren t permanently appended to the route in the unit s mem ory To make permanent changes to the route you must use the edit route functions see Editing a route starting on page 105 NOTE Waypoints are automatically entered and organized in the nav log if you navigate to a waypoint or along a route using the GO TO function A chart view of the ...

Страница 140: ...tarting navigation You can restart navigation along any leg or to any waypoint of the route by moving the cursor arrow to the waypoint or leg and pressing the menu key When a waypoint is selected a black triangle magenta in the night palette points to the waypoint When a leg is selected a black arrow is displayed pointing from the first waypoint to the second ...

Страница 141: ...32 Adjusting the display screen backlighting 139 Understanding TideTrack 139 Changing the time zone 142 This chapter describes the special functions that enable you to change the unit s audible alarms and screen appearance and use the unique TideTrack feature These functions are controlled by the key ...

Страница 142: ...shing exclamation point on the screen The 951 screen is shown on the left and the 952 screen is shown on the right Although most alarm conditions are auto clearing after approximately five seconds and don t require any user action two alarms AVOIDANCE AREA and ANCHOR DRAG must be acknowledged before the exclamation point can be cleared from the screen The most recent alarm of each type waypoint av...

Страница 143: ...thout entering the arrival circle YES after 5 seconds CHANGING switching to next leg of route NOW NAVIGAT ING TO YES after 5 seconds AVOIDANCE AREA you ve entered an avoidance area circle NO potential hazard ahead ANCHOR DRAG anchor is dragging beyond limit set on ALARMS ALARMS BACKLIGHT screen NO requires immedi ate attention NO LORAN FIX no position fix received from external loran YES when cond...

Страница 144: ... Press the to select ALARM AUDIO then press the menu key 2 Press the to display OFF or ON 3 To make your selection press the key or to leave it unchanged Setting the anchor alarm The anchor watch feature of the unit sounds an alarm if the unit detects that the boat has moved a specified distance from an initial position usually where you drop anchor 1 Press the menu key at the spot where the ancho...

Страница 145: ... You can turn the cross track alarm to ON or OFF and specify the alarm distance from the track line 1 Press the to highlight CROSS TRACK then press the menu key 2 Press the to turn the alarm to ON 3 If you want to change the limit at which the cross track alarm alerts you press the to move the cursor right and use the to specify the distance at which you want to be alerted 4 Press the key Setting ...

Страница 146: ...on to beep as long as you ve connected a honker with pin 14 on the interface connector see the Northstar 951 952 Installation Manual for connection infor mation Once you set the anchor watch alarm to honk a continuous honking sequence begins either when your vessel moves outside the specified anchor alarm radius or when the navigation source i e GPS becomes unavailable NOTE For this feature to wor...

Страница 147: ...must clear the anchor alarm in either of the following two ways Option 1 1 Press the key once to display the ALARMS screen 952 or ALARMS BACKLIGHT screen 951 then press the key Option 2 1 Press the key once to display the ALARMS screen 952 or ALARMS BACKLIGHT screen 951 2 Press the to highlight the HONK OUTPUT field then press the key 3 Press the to select either 200 PPNM used to interface to spee...

Страница 148: ...all alarms Sound Type Setting s Description Beep All alarms Set alarm audio field to ON The unit s standard alarm beep Beep Anchor watch Set alarm audio field to ON Set anchor alarm field to ON The unit s standard alarm beep Honk All alarms Set alarm audio field to ON Set honk output field to ALL ALARMS Exclamation point flashes on the ALARMS screen 952 or ALARMS BACKLIGHT SCREEN 951 the unit simu...

Страница 149: ...52 s screen and keys 1 Press the key Pressing the upper bright ens the screen pressing the lower darkens it NOTE When the display screen is at full brightness if the unit becomes too hot the display screen will automatically dim until it reaches half of its maxi mum brightness If you override the auto dim function by pressing the key on the 951 or the double key on the 952 the unit will begin to d...

Страница 150: ...shown as dashed horizontal lines labeled with the height in feet Mean Lower Low Water MLLW is shown as a solid line near the bottom of the picture A solid vertical line and arrow is positioned to show the tide level at the following time the time at the location of the selected tide station see the hours displayed to the left of TID in the sample screen above about 4 00 AM Pacific Daylight Time yo...

Страница 151: ...to your present position and display a list like the following with the closest station at the top 3 Press the to point to the desired station and press the key twice to return to the TIDE TRACK screen and display the tides for that station Choosing a tide station from the chart You can choose a tide station from the CHART screen by posi tioning the cursor at virtually any location along the U S c...

Страница 152: ...ress the menu key The first character of the present tide date flashes 3 If necessary press the to move to the month or digit you want to change To change a digit press that key on the To change the month press the 4 When the date is correct press twice Tide infor mation for the new date is now displayed Changing the time zone Press the key until you display the TIME OF DAY screen The time date lo...

Страница 153: ...nwich England may be different from the day in your local time zone right screen above To change the time zone used for the time display for both this and other time displays press the menu key and use the to select the desired zone and stan dard or daylight time Press the key to use the new time zone ...

Страница 154: ...Page 144 951 952 Operator s Manual Rev B Chapter 10 Using Other Special Functions ...

Страница 155: ...1 Changing receiver options 164 Changing port setup options 169 Displaying service information 170 This chapter explains the various options for customizing how your unit displays information computes navigation data and communicates with other devices Each option can be changed at any time according to your specific needs ...

Страница 156: ... the key until you display the USER CUSTOMIZATION screen Press the menu key to display the follow ing choices To change any of the options as described below select the option by pressing the to move the arrow at the left of the screen then press the menu key The selected option begins to flash waiting for you to change it using the or the ...

Страница 157: ...o travel over great distances than the great circle calculation A rhumb line course might be desired if a great circle route is likely to take you precipitously close to bad weather or an unavoidable land mass Great circle and rhumb line are virtually identical if the start and end points are closer than 100 nm To change this option press the menu key then use the to view the two choices Press the...

Страница 158: ...to leave the option unchanged Setting maximum saved waypoints When you press the key the unit automatically assigns a sequential waypoint number such as S005 for each point stored When this number reaches the designated value set using this function the unit starts over at 1 and overwrites the old saved waypoint previously designated as number 1 You can set the maximum number of saved waypoints th...

Страница 159: ...he key The first character block of the owner s message flashes Enter the message up to two lines that you want displayed each time you power up your unit and press the key Your message can be changed only by entering your specific access code number and repeating the above procedure The unit allows three attempts at entering the correct access code after that all operations freeze requiring the u...

Страница 160: ...ff it returns to the normal palette The hi brite and night color palette selections aren t saved at power off To select a color palette 1 Press the key to display the USER CUSTOMIZATION screen 2 Press the menu key to display the DISPLAY OPTIONS screen 3 Press the menu key to display the COLOR OPTIONS screen ...

Страница 161: ...ee choices NORMAL HI BRITE and NIGHT Press the key to make your selection or clear to leave the option unchanged The unit will immediately display the new palette choice Changing navigation options To access the unit s navigation options press the key until you display the USER CUSTOMIZATION screen Press the menu key to display the fol lowing choices ...

Страница 162: ... TD coordinates EXTERNAL LRN An external loran receiver can be used if a loran receiver is interfaced to the unit and is opera tional DEMO mode DEMO mode is used to simulate a stationary position namely the unit s last position fix if you want to practice using the unit without being on your boat or having an antenna connected You can enter a new way point with the name DEMO including the single q...

Страница 163: ...tomatic the unit calculates variation automatically according to your location Manual from 0º to 180º East or West The factory default setting is automatic to coincide with your compass Your navigation charts indicate the approxi mate magnetic variation for each area Under most conditions you ll want the unit to calculate the variation automatically for your position Usually the automat ically cal...

Страница 164: ...ypoint each time you arrive at the cur rent waypoint To do so press the key select the next leg or waypoint if necessary press the menu key and then press the key To change this option press the menu key Then press the to view the choices Press the key to make your selection or to leave the option unchanged Setting an arrival radius You ve arrived at a waypoint when you enter the circle deter mine...

Страница 165: ...ng to Defense Mapping Agency publications To change the datum reference press the menu key and press the to scan through the alphabetic listing When your choice is displayed press the key NOTE You can set a different datum for positional display than the one you set for the output ports For details see the Northstar 951 952 Installation Manual The following table lists the datums available in your...

Страница 166: ...960 Tanzania CL1880 158 12 299 ASC Ascension Island 1958 INTL 207 107 52 ABE Astro Beacon E Pacific Isl INTL 145 75 272 AB4 Astro B4 Sorol Atoll Hawaiian Islands INTL 114 116 333 AD714 Astro Dos 71 4 Atlantic Isl INTL 320 550 494 AS52 Astronomic Station 1952 INTL 124 234 25 AG66 Australian Geodetic 1966 AUSTR 133 48 148 AG84 Australian Geodetic 1984 AUSTR 134 48 149 BEL Bellevue IGN INTL 127 769 4...

Страница 167: ...950 Egypt INTL 130 117 151 EUR50_GB European 1950 England INTL 86 96 120 EUR50_GR European 1950 Greece INTL 84 95 130 EUR50_IR European 1950 Iran INTL 117 132 164 EUR50_SA European 1950 Sardinia INTL 97 103 120 EUR50_SI European 1950 Sicily INTL 97 88 135 EUR50_NF European 1950 Norway and Finland INTL 87 95 120 EUR50_PS European 1950 Portugal and Spain INTL 88 109 122 EUR79 European 1979 INTL 86 9...

Страница 168: ... 40 88 LUZ_P Luzon Phillipines CL1866 133 77 51 LUZ_M Luzon Mindanao Island CL1866 133 79 72 MAHE Mahe 1971 Indian Ocean CL1880 41 220 134 MASI Marco Astro Salvage Islands INTL 289 124 60 MASS Massawa Africa B1841 639 405 60 MERCH Merchich Africa CL1880 31 146 47 MA61 Midway Astro 1961 INTL 912 58 1227 MINA Minna Africa CL1880 92 93 122 NAH_O Nahrwan Masirah Island Oman CL1880 247 148 369 NAH_UA N...

Страница 169: ...th American 1927 Yukon CL1866 7 139 181 NAD27_CZ North American 1927 Canal Zone CL1866 0 125 201 NAD27_CR North American 1927 Caribbean CL1866 7 152 178 NAD27_CA North American 1927 Central America CL1866 0 125 194 NAD27_CU North American 1927 Cuba CL1866 9 152 178 NAD27_GR North American 1927 Greenland CL1866 11 114 195 NAD27_MX North American 1927 Mexico CL1866 12 130 190 NAD83 North American 19...

Страница 170: ...S American 1956 Bolivia INTL 270 188 388 PSA56_NC Provisional S American 1956 N Chile INTL 270 183 390 PSA56_SC Provisional S American 1956 S Chile INTL 305 243 442 PSA56_CO Provisional S American 1956 Columbia INTL 282 169 371 PSA56_EC Provisional S American 1956 Ecuador INTL 278 171 367 PSA56_GY Provisional S American 1956 Guyana INTL 298 159 369 PSA56_PR Provisional S American 1956 Peru INTL 27...

Страница 171: ... 1969 Paraguay SA1969 61 2 33 SA69_PR South American 1969 Peru SA1969 58 0 44 SA69_TT South American 1969 Trinidad and Tobago SA1969 45 12 33 SA69_VZ South American 1969 Venezuela SA1969 45 8 33 SASIA South Asia FS1960M 7 10 26 SEBAS Southeast Base INTL 499 249 314 SWBAS Southwest Base INTL 104 167 38 TIMB Timbalai 1948 Malaysia EVRST 689 691 46 TOK_MN Tokyo mean value B1841 128 481 664 TOK_JP Tok...

Страница 172: ... selected statute miles nautical miles or kilometers for the DIS TANCE SPEED UNITS on the DISPLAY OPTIONS screen See Table 9 below for the corresponding choices The options represent the entire distance limit on your screen from full left to full right For example a cross track distance setting of 1 000 feet displays 500 feet to either side of your track line To change the setting press the menu k...

Страница 173: ...ortion of the screens the distance to way point is usually displayed in hundredths of miles or kilome ters However if you change the STEER DIST PRECISION settings from NORMAL to HIGH the distance to waypoint and cross track error are displayed in feet or meters whenever you re less than one mile or one kilometer from the destina tion waypoint To change the setting press the menu key and press the ...

Страница 174: ... notice that Speed Over Ground readings obtained from the GPS satellite system are slightly erratic varying by up to several knots The GPS SPEED AVERAGING function can often improve the steadi ness of these readings at the expense of a slightly longer dis play reaction time when the speed changes With this function you can select the time over which your speed is averaged with available values bet...

Страница 175: ...Installation Manual for further details on interfacing to external sources of differential corrections Differential corrections are invaluable when navigating in nar row or congested areas such as ports and waterways or whenever extreme accuracy is required for locating a precise area retrieving lobster pots returning to a diving spot and so on The Northstar differential receiver takes corrections...

Страница 176: ...being received and monitored by Channel 1 degrades for any reason such as bad weather between your vessel and the transmitter the unit tries to select a better fre quency from the directory it has compiled This function allows it to switch to the best differential signal before your GPS accuracy is affected Automatic mode can normally be used for all applications except specialized ones Using manu...

Страница 177: ...y the 951 952 unless it supports the MX50R control protocol Refer to the particular differential receiver manufacturer s instructions to determine if this control protocol is supported Enabling disabling DGPS You can enable or disable the use of differential information To set this option at the RECEIVER OPTIONS screen press the menu key Press the to select enabled or disabled Press the key to mak...

Страница 178: ... at left is turned off and the DGPS lost alarm sounds if enabled see Understanding the alarms starting on page 132 DGPS navigation resumes automatically as soon as valid corrections are received again To change this option press the menu key then press the to display your available choices Press the key to make your selection or to leave the option unchanged NOTE A period of 30 seconds or less is ...

Страница 179: ... sounders computers and so on You also can connect one unit to another for example connect two 952s two 951s a 951 and a 952 or either a 951 or 952 with a Northstar 941 so that two or more units can share all the same waypoints and routes Depending on the device connection is made through any of three data transmission ports located on the back side of the unit two NMEA ports and one RS 232 port E...

Страница 180: ...other equipment and change the port setup options see the Northstar 951 952 Installation Manual or your local Northstar dealer Displaying service information To view your unit s serial number and hardware specifications press the key until the USER CUSTOMIZATION screen is displayed Press the menu key to dis play the following screen ...

Страница 181: ...talled the line is blank Viewing the beacon receiver self test results The unit automatically self tests the internal beacon receiver if installed each time the unit is powered up If all test param eters are met this field says PASSED If the differential receiver fails in any of the test criteria the message FAILED is displayed In many cases the cause of the failure is an open or shorted antenna c...

Страница 182: ...rface cable wiring colors and their correspond ing interface port functions The wires are also numbered according to their respective positions in the interface connec tor They re listed in the Northstar 951 952 Installation Man ual Turning off the ignore door feature To help protect the installed Nav Chart cartridge as well as the unit s internal components from water and salt spray a switch in t...

Страница 183: ...l you disable it or shut the unit off The next time the unit is turned on the IGNORE DOOR command won t be in effect You must re invoke it by pressing the menu key again Using the 952 s LCD test key Pressing the key will display a blank screen This key is used for the internal testing of the 952 s screen the 951 doesn t have an key Press any function key to return to a screen CAUTION Leaving the a...

Страница 184: ...Page 174 951 952 Operator s Manual Rev B Chapter 11 Customizing the Unit ...

Страница 185: ... pointers No Chart indicator Normal hi brite or nighttime display settings 952 only Position data Latitude longitude 158 datums from GPS with one sec ond updates Phantom Loran C TDs calculated from GPS Loran C TDs from your existing loran one second from Northstar 800 series two seconds from other lorans Real time receiver status screens Steering screens Large easy to read graphical presentation W...

Страница 186: ...Update waypoint coordinates to ship s position Edit erase waypoints or routes directly on the chart Plan route function Plot any route with automatic chart scale selection Time To Go Transfer all waypoints and routes between two or more units Waypoint navigation Navigate to coordinates waypoints and along routes Save current position Steer to new point go to any waypoint or coordinates at any time...

Страница 187: ... to end of trip Distance and bearing for all legs Skip forward and back in trip Plotter functions Plotter shows track history nearby waypoints avoidance areas Speed Over Ground Course Over Ground Miscellaneous functions Anchor watch Avoidance area alarm GPS clock TideTrack ...

Страница 188: ...Page 178 951 952 Operator s Manual Rev B ...

Страница 189: ... making maps or charts chain A group of loran transmitters comprised of a master station and at least two secondaries coverage The extent to which a geographical area is encompassed by usable GPS or loran signals cursor The display panel indicator that shows which character or character field is ready to be changed acknowledged or entered by the user It s activated and positioned by the user when ...

Страница 190: ...nning North South and expressed in degrees 0 180 east or west of the Prime Meridian a line running from the North to South Pole passing through Greenwich England Loran C Acronym for LOng RAnge Navigation System of land based radio transmitters emitting precisely timed pulses which are received and translated into position fixes magnetic variation The difference between magnetic North and true Nort...

Страница 191: ...atio Guide number for determining the rela tive quality of GPS DGPS or loran signals as compared to background radio noise TD Time Difference The measured amount of time in millionths of a second between loran signals received from the master and the secondary stations track A desired line of travel waypoint A particular location defined for navigation purposes by its lat lon distance and bearing ...

Страница 192: ...Page 182 951 952 Operator s Manual Rev B ...

Страница 193: ...ver repeatable definition of effect of selective availability on improving with DGPS with GPS with loran with Phantom Loran Aids to navigation See Navigation Alarms anchor arrive radius audible avoidance area cautions clearing cross track DGPS displaying editing settings honking no gps position fix types and descriptions Arrive radius See Alarms ARROW key Avoidance area creating on the chart scree...

Страница 194: ...ard See chart cartridge Chart cartridge access door bypassing safety features cautions accuracy maintenance obtaining Chart plotter functions Chart scale definition of Chart screen changing chart display details choosing tide stations from controlling data display creating routes on displaying chart scale on displaying present position on displaying waypoints on displaying with Navionics Nav Chart...

Страница 195: ...d Cross track alarm customizing display limits distance options for displaying zeroing the cross track error Cursor definition of finding navigating to point designated by symbol for using the Cursor pad pressing to control cursor using the Customizing See Setting up your 951 952 D Database waypoint route sharing See importing and exporting waypoints and routes Date See Time and date Datum changin...

Страница 196: ...from manual control of self test results status of using the SC 104 selecting understanding the DGPS system Differential GPS See DGPS Display screen adjusting adjusting for normal night hi brite viewing Distance and bearing calculating displaying entering on chart screen on quik waypt screen on waypts screen understanding DPGS data time out setting E Entering data using the keypad Ephemeris defini...

Страница 197: ...cy accuracy checking status comparing to loran converting coordinates to Loran TDs to Phantom Loran definition of features of receiver changing options collecting almanac data displaying data from software version number status of viewing status reverting to from DGPS satellite improving accuracy of readings from status selecting as navigation source Great circle definition of Group Repetition Int...

Страница 198: ...1 s 952 s 941 s wiring information K Keypad testing using the L Lat lon See Latitude Longitude Latitude definition of displaying entering using a chart offset Leg definition of Lists displaying waypoints on updating waypoints from using to select waypoints Long Range Navigation System See Loran Longitude definition of displaying entering using a chart offset Loran chain converting from GPS coordin...

Страница 199: ...f selecting as navigation source status transmitter understanding warning messages M Magnetic variation changing definition of Maintaining the 951 952 cleaning the screen protecting the unit Man Overboard MOB See SAVE MOB key Man overboard mode See SAVE MOB key Menu keys overview Messages advisory alarm acknowledging indicator displaying information loran warning owner identification question stat...

Страница 200: ... modifying current plan options restarting returning to original course line reversing trip stopping switching between DGPS and GPS NMEA 0183 Noise levels atmospheric Northstar contacting P Personal computer Phantom Loran definition of displaying understanding Port See Interfacing your 951 952 Position converting coordinates displaying increasing accuracy of maximum number of position fixes types ...

Страница 201: ...of editing from chart screen from route list while navigating erasing entire importing and exporting routes and waypoints maximum number of routes navigating from stored removing waypoints from reversing saving as you travel specifications of starting stop saving S Satellite changing elevation effect of DPGS on GPS system status messages status on first start up SAVE MOB key Serial number of unit ...

Страница 202: ...from a Northstar 800 SNR See Signal to Noise Ratio SOG See Speed over ground Speed averaging Speed over ground STAR function key STEER function key Steering screens adding extra accuracy to choosing type of cross track distance on customizing overview units of measurement for using the Support See Service Symbols arrow for legs arrow for tide level arrow for waypoint pass status arrows for routes ...

Страница 203: ...mation for today s date displaying tide information understanding Time and date actual time of arrival changing time zone displaying Estimated Time En Route Estimated Time of Arrival Time difference TD converting definition of displaying entering Track calculating track line clearing track history definition of definition of track line displaying track history options for point storage and length ...

Страница 204: ...ting GPS coordinates to TDs creating routes from creating with SAVE MOB key definition of designating as avoidance areas displaying displaying coordinates of editing importing and exporting waypoints and routes listing making a new waypoint on the chart screen on the waypts screen maximum number of saved waypoints naming navigating to stored quick restarting course line in vessel mode steering to ...

Страница 205: ...nate warning radius using to display waypoints using to display waypts and routes screen using to edit routes using to enter waypoints on chart screen using to navigate along routes using to navigate to quick waypoints using to navigate to stored waypoints using to save routes using to update waypoint coordinates Z Zoom scale range Zooming in and out on the chart screen ...

Страница 206: ...951 952 Operator s Manual Rev B Page 196 ...

Отзывы: