background image

5

Norsonic Nor848

Instruction Manual

Troubleshooting network connection

If the Mac has been connected to Wifi or other internet 
connection, the IP configurations may change, and the 
Mac will no longer connect to the array, and no arrays will 
be shown in the panel marked “Connected arrays” on the 
upper left-hand side. If this is the case follow the steps listed  
below to change the network configurations back to normal.

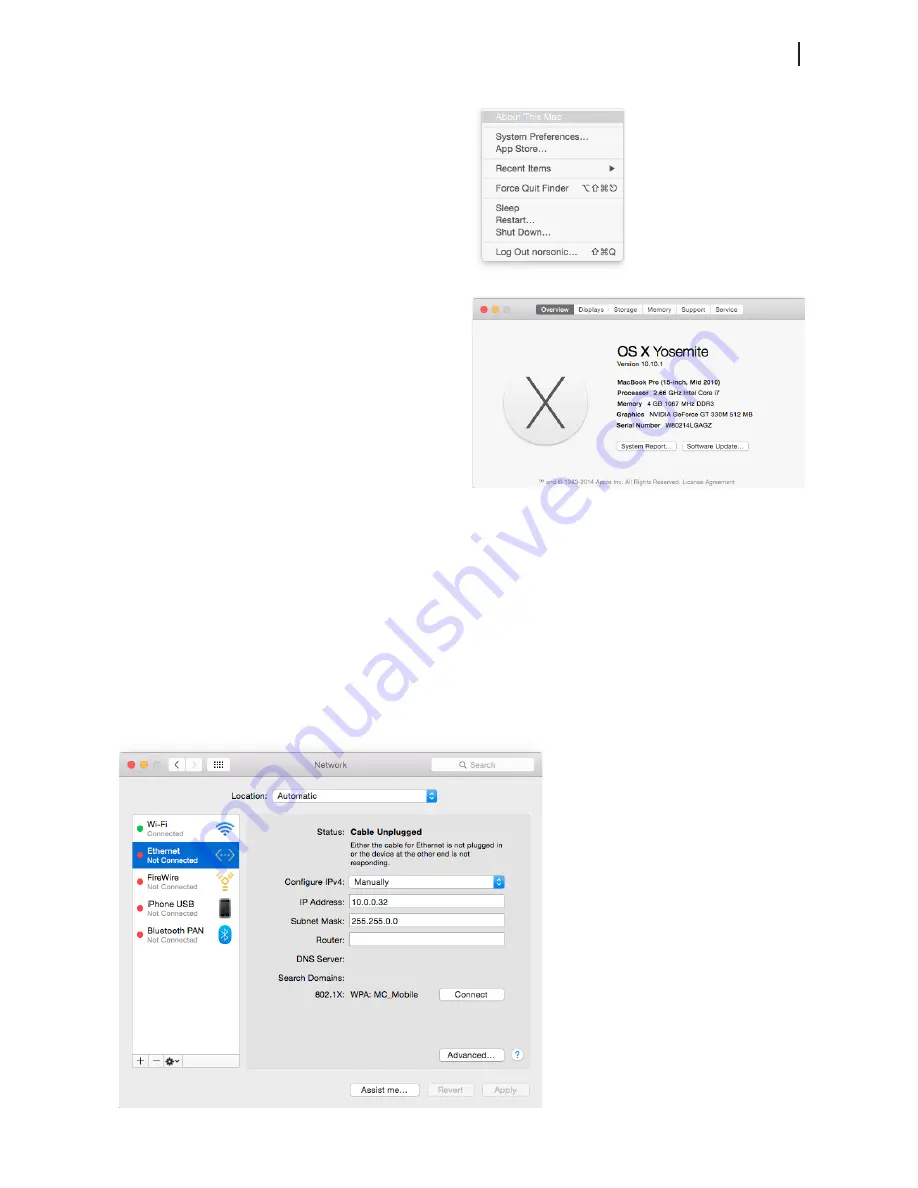
- Run the software “System Preferences”. This can be found 
under the Applications folder in the Finder or via spotlight 
(cmd-space).

- Click the “Network” icon in the icon list, and the network 
settings will be exposed.

- In the menu to the left, select the interface called “Ethernet 
X” or “Thunderbolt Ethernet” (The one that is connected to 
the array). This will be the wired network settings.

- Select Manually in the drop down next to “Configure IPv4”.

- Type 10.0.0.32 in the “IP Address” field

- Type 255.255.0.0 in the “Subnet Mask” field

- Click Apply, and launch the Nor848 software to discover 
arrays.

Operating system

For the Norsonic Acoustic Camera software to function 
properly, make sure you have the latest version of the OS 
X operating system on your Mac by pressing the apple 
symbol on the top left of the screen and “About This Mac”. 
The version should be 10.9.X (OS Mavericks) or higher. The 
newest version of the operating system may be downloaded 
for free by pressing the “Software Update..” button.

Содержание Nor848

Страница 1: ...INSTRUCTION MANUAL nor848 ACOUSTIC CAMERA ...

Страница 2: ... the instrumentation described herein Further more Norsonic AS assumes no responsibility for any infringement of the intellectual property rights of third parties wherever appli cable which would result from such use Norsonic AS reserves the right to amend any of the information given in this manual in order to take account of new develop ments If you wish to communicate with us please feel welcom...

Страница 3: ...nor848 ACOUSTIC CAMERA ...

Страница 4: ...ection is also indicated as a numerical decibel value and represents the sound pressure levels at the receiver much like that indicated on a sound level meter The operator can calculate the strength of the sound source based on the level indicated the distance and the estimated directivity of the source Measurement ranges from 0 5 m to infinity however the situ ation is much like taking a picture ...

Страница 5: ...n Pause button Quick start guide This quick start guide is intended as a reminder for those who have previous experience with the acoustic camera If not please read the full description Connect the microphone dish to the computer using the LAN cable you need a Thunderbolt to Gigabit Eternet adapter for 2012 and later MacBook Pro series Power the microphone dish and the computer Start the applicati...

Страница 6: ...ct the application to the same folder as the zip file When the application is extracted you can also move drag the file to the Applica tions folder located in the Finder Favorites To create a shortcut to this application drag the icon to the dock the menu bar at the bottom of the screen When you hold the icon over the dock an open space for it will be made in which you can let it go This will crea...

Страница 7: ... as the microphone dish One of the legs may optionally be extended Power the camera with DC input from the mains adap tor or from the optional battery pack Place the computer on a suitable table adjacent to the microphone dish Connect the microphone dish to the computer using a LAN cable Switch on the power to the microphone dish You can tell whether the dish has power from the lit LED on the fron...

Страница 8: ...work settings will be exposed In the menu to the left select the interface called Ethernet X or Thunderbolt Ethernet The one that is connected to the array This will be the wired network settings Select Manually in the drop down next to Configure IPv4 Type 10 0 0 32 in the IP Address field Type 255 255 0 0 in the Subnet Mask field Click Apply and launch the Nor848 software to discover arrays Opera...

Страница 9: ...vious recording may be selected and played This is done by closing the live array connection The list of the stored files in the default directory normally Recordings is shown in the panel to the left The default directory may be selected in the File menu in the line at the top of the screen Select the recording by clicking the name of the record A picture from the recording is shown together with...

Страница 10: ...7 Norsonic Nor848 Instruction Manual When the recorded file is played a sequence of pictures from the video is shown along the time scale ...

Страница 11: ...to is obtained by the beamform ing and selected by the cursor Alternatively it is possible to hear how one microphone is sounding instead of the whole beamformed signal This can be reached by using the arrow buttons in the array picture and go to the left This will show an omnidirectional microphone signal and if connect is pressed one single microphone will be se lected The single microphone can ...

Страница 12: ...l also affect the acoustic analysis The colouration is based on listening in a num ber of certain directions For frequency band colouration the number is an array of 15 x 11 directions W x H for single frequency colouration the number is 60 x 45 See the description later for the difference between frequency band and single frequency The example on the pictures to follow illustrate the effect of zo...

Страница 13: ...d is different from the method used when frequency band is selected See the technical description for more detail It is useful to experiment with both modes to obtain the best result If you use the touch pad One finger movement corresponds to moving the mouse pressing with one finger corre sponds to a left click moving two fingers up and down corresponds to scrolling the mouse wheel and pressing a...

Страница 14: ...e is adjusted by moving the volume slider This is a software type gain adjustment computational and the level of the resulting signal is shown Set the volume so the level is always green red colour indicates a clipping of the signal and will reduce the sound quality Indication of sound pressure level filtered and frequency weighted The sensitivities of the microphones are calibrated to dis play th...

Страница 15: ...evel oped to mimic the sensitivity for the human auditory organ for sounds close to the threshold of hearing whereas the C weighting is for mimicking the response to strong sounds The virtual microphone will have a frequency dependent spatial resolution This may be described by the width of the main lobe for the directivity The width will vary with the inverse of the frequency reducing the frequen...

Страница 16: ...he handle This can be done when the Auto range is not selected A histogram adjacent to the handle for level adjustment gives an indication of the levels present in the picture for the selected frequency range The relation between the colours and sound levels are shown in the colour map adjacent to the level scale The time dynamic for the colour plot may be selected by clicking Time weighting One o...

Страница 17: ...oustic eraser is found via the suppress point in plot button This function will add a red circle to the screen that can be dragged to any point and remove the source from that point This is highly effective when several noise sources are present The acoustic eraser is only available when wideband fre quency mode is used and not for single frequency mode As seen on the pictures on the opposite page...

Страница 18: ...15 Norsonic Nor848 Instruction Manual ...

Страница 19: ... slider in the software The default displayed frequency is from 200 Hz to 20 kHz By double clicking on either the lower or the upper frequency limit these limits can be changed to whatever frequency area of interest is desirable The time resolution of the spectrogram is 0 046 seconds The spectrogram is enabled by pressing the spectrogram button Export spectrogram Double click to change lower fre q...

Страница 20: ...layed back the running time from the start of the recording is displayed along with a time indicator in the time line at the bottom of the screen The replay will automatically start over again when the end of recording is reached If you want to halt the replay click the pause button A second click releases the halt operation Alternatively the space bar on the keyboard is a shortcut for the pause b...

Страница 21: ...ormat for the time is Hour minute and seconds with 0 001 second resolution UTC Coordinated Universal Time is the primary time standard by which the world regulates clocks and time It is independent of where in the world the recording is made and is not dependent on the season of the year CET Central European Time is the time is the time set for the computer CEST Central European Summer Time Local ...

Страница 22: ...o halt or start a replay Tip When halted you may step the replay forwards in small sections by pressing the right arrow key on the keyboard This feature may be useful for looking at transient sounds You may step backwards by pressing the left arrow Marker for start of time selection Marker for end of time selection Marker for instant time Zoom to time selection Clear time selection ...

Страница 23: ...ly export the scene at a later time Available formats are Video A movie in MP4 format with sound is exported Sound A WAV file with the sound in the virtual microphone is gener ated The quality of the sound file corresponds to CD quality with 16 bit and a sampling frequency of 44 1 kHz The sound is captured in the position for the cursor and may be used for listening or further analysis RAW file sq...

Страница 24: ...main optical picture with the level colouring is shown on page 1 The second page shows the frequency analysis for the sound in the virtual microphone position Images The main optical picture with the level colouring is exported in png format If FFT Octave bands are marked the graphi cal frequency analysis for the sound in the virtual micro phone position is exported in png format Shortcuts The fol...

Страница 25: ... 5 Volts It is recommended to have a signal conditioner connected between the RPM sensor and the camera Connection and recording The plug for the RPM input is of type Lemo FFA 00 250 NTA you will also need RPM input cable BNC to Lemo Connect the logical pulse signal from RPM to input 1 Additional information such as logical pulse signal from speed may be connected to input 2 The recording must be ...

Страница 26: ... by selecting the part of the video of the bottom of the screen which is desirable The selection should be from the part where the RPM indicator shows a constant increasing or decreasing RPM Note that a selection has to be at least 5 seconds long to conduct further investigations by order analysis A different selection may be made by highlighting a different part of the video The selection may als...

Страница 27: ...f no selection of the video has been made the analysis will be done over the entire recording The order analysis window will pop up with the spectrogram on the top and an RPM indicator on the bottom The grey lines in the RPM indicator are chosen automatically to select a section of constant increasing or decreasing RPM which the analysis is composed of In the spectrogram window frequency as a func...

Страница 28: ...Norsonic Nor848 Instruction Manual There are two adjustments for the spectrogram either the maximum order in the spectrogram or the dynamic range can be adjusted Adjust maximum displayed order Adjust range ...

Страница 29: ...tion Manual By pressing the spectrogram label on the lower left it is possible to see the values for the straight line going through the spectro gram Switch to spectrogram values Values correspond to straight line on spectrogram ...

Страница 30: ...d by the chosen weighting Another category of beamformers are the adaptive beam formers These algorithms automatically adapt the response of the array to the situation at hand The performance of the adaptive algorithms can under certain conditions be much better than that of DAS However these beamformers are developed under certain constraints and can break down if the acoustical conditions are no...

Страница 31: ...ing windows The frequency resolution is thus about 11 Hz The spectrum may be processed to obtained 1 1 or 1 3 octave band levels The octave and fractional octave bands are computed from the FFT analysis Accessories included Microphone dish Tripod with mountable wheels 10 m LAN cable Mains supply Power cord Record and analyser software MacBook Pro dependent on country Noise cancelling headphones Sp...

Страница 32: ...ics from sound calibrators microphones and preamplifiers via small handheld sound level meters to advanced yet portable real time analysers but also spectrum shapers building acoustics analysers and complete community industry and airport noise monitoring systems Contact your local representative or the factory for information on our complete range of instrumentation ...

Отзывы: