www.nordsonefd.com [email protected]
800-556-3484 Sales and service of Nordson EFD dispensing systems are available worldwide.
781Mini Series Spray Valve
12
Cleaning the Wetted Parts (continued)
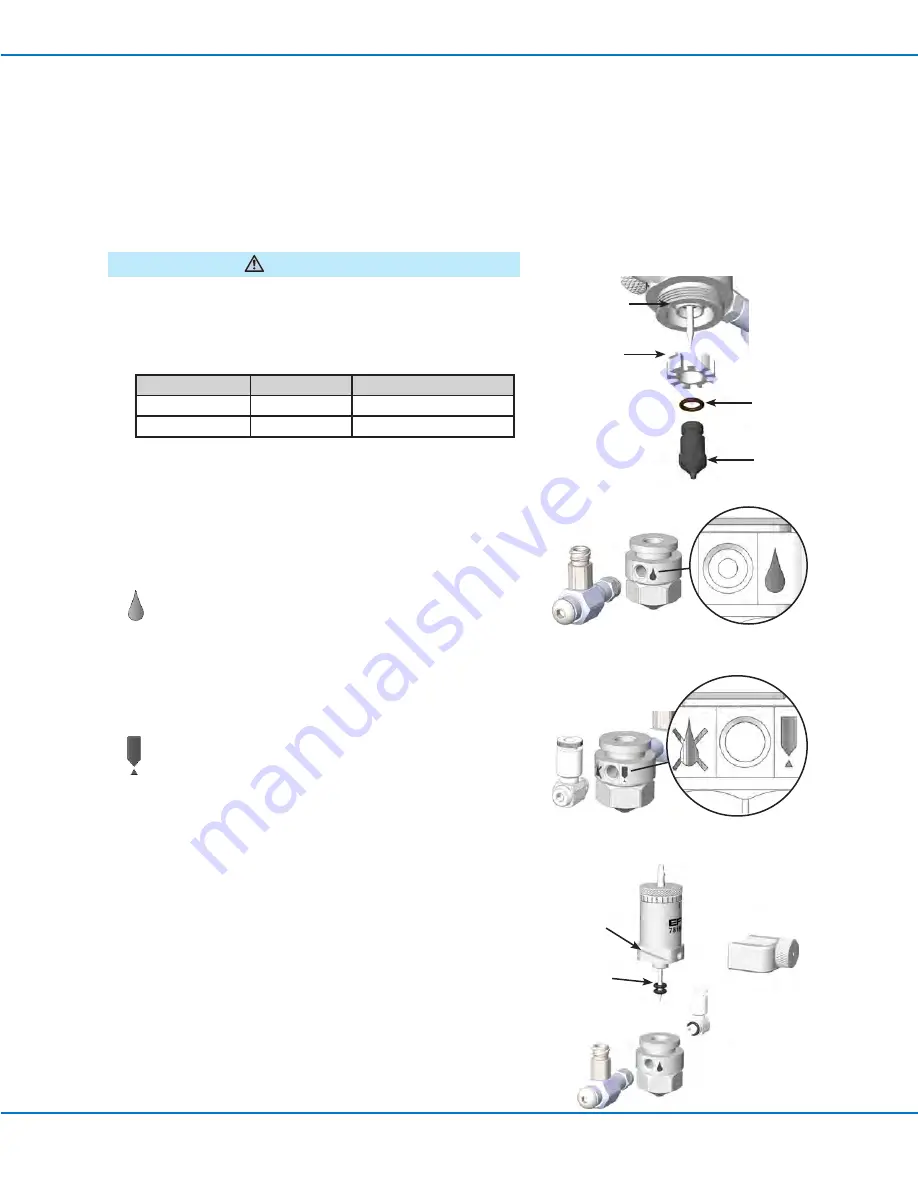
Reassemble the Wetted Parts
1. Lubricate the nozzle O-ring with fluorocarbon grease and
reassemble the nozzle components.
CAUTION
Do not over-tighten the nozzle. Doing so can damage the assembly.
2. Reinstall the nozzle assembly, ensuring that the dispersion
ring tab fits into the notch on the fluid body. Depending on the
nozzle material, tighten the nozzle to the following torque:
Nozzle Size
Material
Torque
0.01" (0.254 mm)
Stainless steel
1.4 N•m (12 in.-lb)
0.03" (0.76 mm)
PEEK
0.1 N•m (1 in.-lb) max.
Service (continued)
Correct installation location for the
fluid inlet fitting
Correct installation location for the
nozzle air fitting
3. Install the fluid inlet fitting in the fluid inlet side of the fluid body.
If installing a 90° fluid inlet fitting, refer to “Installing a 90° Fluid
Inlet Fitting” on page 7 to install the fitting in the desired
orientation. Return here to continue.
NOTE:
Ensure that the fluid inlet fitting is installed on the
fluid inlet side of the fluid body. A fluid symbol indicates the
fluid inlet.
4. Install the nozzle air fitting in the fluid body.
NOTE:
Ensure that the nozzle air fitting is installed on the air
inlet side of the fluid body. An air symbol indicates the air
inlet.
5. Install a replacement double-stacked O-ring set on the needle.
NOTE:
Lubricate double-stacked O-rings before installing.
Use the supplied fluorocarbon grease only if the assembly fluid
being dispensed is compatible with it.
6. Use one hand to position the fluid body on the air cylinder /
needle assembly and then slide the QR clasp into the grooves
on the air cylinder body.
Nozzle (PEEK
nozzle shown)
Nozzle O-ring
Dispersion
ring tab
Notch on
fluid body for
dispersion ring tab
Groove for
QR clasp
Double-
stacked
O-rings


