background image

23

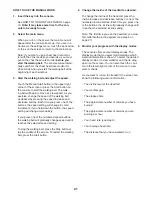
HOW TO USE A MAP WORKOUT

Note: To use a map workout, the console must be con-
nected to a wireless network (see HOW TO USE THE 
WIRELESS NETWORK MODE on page 27). 

1.  Insert the key into the console. 


 See HOW TO TURN ON THE POWER on 
page 19.

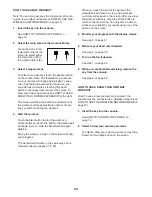
2.  Select the main menu or the workout library. 


 Touch the icons in the 
lower-left corner of the 
screen to select either 
the main menu (D) or 
the workout library (E).

3.  Select a map workout.


 To select a map workout, touch the desired button 
on the screen. Note: The featured map workouts 
on your console will change periodically. To save 
one of the featured workouts for future use, you 
can add it as a favorite by touching the heart 
button in the upper-right corner of the screen. To 
draw your own map workout, see HOW TO USE A 
DRAW YOUR OWN MAP WORKOUT at the right.


 The screen will show the duration and distance of 
the workout and the approximate number of calo-
ries you will burn during the workout. 

4.  Start the workout.


 Touch the Start button to start the workout. A 
moment after you touch the button, the walking belt 
will begin to move. Hold the handrails and begin 
walking. 


 During the workout, a map on the screen will show 
your progress.


 The workout will function in the same way as the 
manual mode (see pages 21 to 22).


 When you reach the end of the workout, the 
walking belt will slow to a stop, and a workout 
summary will appear on the screen. After you view 
the workout summary, touch the Finish button to 
return to the main menu. You may also be able to 
either save or publish your results using one of the 
options on the screen.

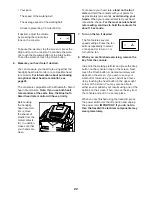
5.  Monitor your progress with the display modes.


See step 5 on page 21.

6.  Measure your heart rate if desired.


See step 6 on page 22.

7.  Turn on the fan if desired.


See step 7 on page 22.

8.  

When you are finished exercising, remove the 
key from the console.


See step 8 on page 22.

 HOW TO USE A DRAW YOUR OWN MAP 
WORKOUT

Note: To use a draw your own map workout, the 
console must be connected to a wireless network (see 
HOW TO USE THE WIRELESS NETWORK MODE on 
page 27). 

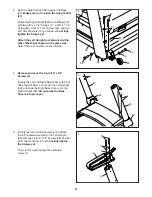
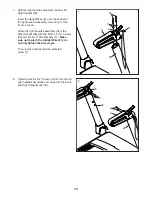
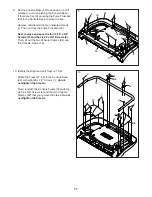
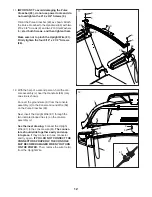
1.  

Insert the key into the console. 


 See HOW TO TURN ON THE POWER on 
page 19.

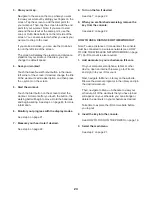
2.  Select a draw your own map workout.


 To select a draw your own map workout, touch the 
Draw Your Own Map button on the screen. 

D

E

Содержание C 990

Страница 1: ...rence Serial Number Decal USER S MANUAL iconeurope com CUSTOMER SERVICE UNITED KINGDOM Call 0330 123 1045 From Ireland 053 92 36102 Website iconsupport eu E mail csuk iconeurope com Write ICON Health...

Страница 2: ...elephone number on the front cover of this manual and request a free replacement decal Apply the decal in the location shown Note The decals may not be shown at actual size WARNING DECAL PLACEMENT TAB...

Страница 3: ...o not wear loose clothes that could become caught in the treadmill Athletic support clothes are recom mended for both men and women Always wear athletic shoes Never use the treadmill with bare feet we...

Страница 4: ...e the treadmill 25 When folding or moving the treadmill make sure that the storage latch is holding the frame securely in the storage position Do not operate the treadmill while it is folded 26 Do not...

Страница 5: ...manual To help us assist you note the product model number and serial number before contacting us The model number and the location of the serial number decal are shown on the front cover of this manu...

Страница 6: ...llowing the key number is the quantity used for assembly Note If a part is not in the hardware kit check to see whether it is preattached Extra parts may be included 8 x 3 4 Screw 2 8 3 8 Star Washer...

Страница 7: ...sembly requires the following tools the included hex keys one Phillips screwdriver one adjustable wrench To avoid damaging parts do not use power tools ASSEMBLY 1 1 To register your product and activa...

Страница 8: ...rew 10 94 90 10 90 A 2 81 77 C B D 2 Make sure that the power cord is unplugged Remove the tie securing the Upright Wire 81 to the front of the Base 94 Next identify the Right Upright 90 Have a sec on...

Страница 9: ...e 81 Attach the Right Upright 90 and a Wheel 25 with two 3 8 x 2 1 4 Screws 7 a 3 8 x 1 1 4 Screw 63 a 3 8 x 1 3 4 Screw 62 and four 3 8 Star Washers 13 as shown do not fully tighten the Screws yet At...

Страница 10: ...handrail assembly G to the Right Upright 90 with two 5 16 x 2 1 2 Screws 28 and two 5 16 Star Washers 11 Make sure not to pinch the Upright Wire 81 do not fully tighten the Screws yet Then remove and...

Страница 11: ...ve and save the four 5 16 x 3 4 Screws 4 and the six 8 x 3 4 Screws 2 Then lift out the two Console Clamps 92 and the Console Frame 18 4 4 2 2 2 2 H H 64 27 36 1 1 1 10 10 Identify the Right and Left...

Страница 12: ...the help of a second person hold the con sole assembly J near the Handrails 86 only one side is shown Connect the ground wire K from the console assembly J to the Console Ground Wire 58 on the Pulse...

Страница 13: ...t against the Upright Wire and cut off the ends of the ties 13 86 4 4 81 86 11 11 J L 14 Attach the Pulse Crossbar 93 to the console assembly J with four 8 x 1 2 Screws 1 start all four Screws and the...

Страница 14: ...ep Remove the two 5 16 x 3 4 Screws 4 from the Latch Crossbar 41 Raise the Frame 56 to the upright position Have a second person hold the Frame until step 19 is completed Orient the Latch Crossbar 41...

Страница 15: ...P 41 3 56 34 53 19 19 Remove the 5 16 Nut 34 and the 5 16 x 2 1 4 Bolt 3 from the bracket on the Latch Crossbar 41 Align the upper end of the Storage Latch 53 with the bracket on the Latch Crossbar 4...

Страница 16: ...re are sheets of plastic on the treadmill decals remove the plastic To protect the floor or carpet place a mat under the treadmill To avoid damage to the console keep the treadmill out of direct sunli...

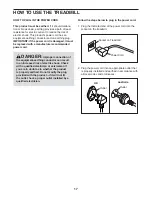
Страница 17: ...indicated end of the power cord into the socket on the treadmill 2 Plug the power cord into an appropriate outlet that is properly installed and earthed in accordance with all local codes and ordinanc...

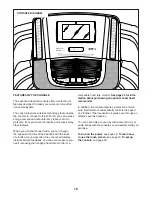
Страница 18: ...of a button As you exercise the console will display instant exercise feedback You can even measure your heart rate using the handgrip heart rate monitor or a compatible heart rate monitor See page 25...

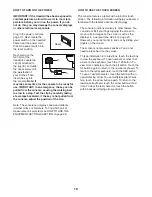
Страница 19: ...lected see HOW TO USE THE EQUIPMENT SETTINGS SECTION on page 26 HOW TO USE THE TOUCH SCREEN The console features a tablet with a full color touch screen The following information will help you become...

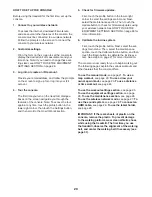
Страница 20: ...ect the maintenance section Then touch the Update button to check for firmware updates using your wireless network See HOW TO USE THE EQUIPMENT SETTINGS SECTION on page 26 for more information 6 Calib...

Страница 21: ...more quickly If you press one of the numbered speed buttons the walking belt will gradually change speed until it reaches the selected speed setting To stop the walking belt press the Stop button or...

Страница 22: ...stand on the foot rails and hold the contacts with your palms for approximately ten seconds avoid moving your hands When your pulse is detected your heart rate will be shown For the most accurate hear...

Страница 23: ...you touch the button the walking belt will begin to move Hold the handrails and begin walking During the workout a map on the screen will show your progress The workout will function in the same way...

Страница 24: ...ils and begin walking See step 4 on page 23 for more information 6 Monitor your progress with the display modes See step 5 on page 21 7 Measure your heart rate if desired See step 6 on page 22 8 Turn...

Страница 25: ...hen you are finished exercising remove the key from the console See step 8 on page 22 For more information about iFit go to iFit com THE OPTIONAL CHEST HEART RATE MONITOR Whether your goal is to burn...

Страница 26: ...O USE THE MAINTENANCE SECTION 1 Select the settings main menu See step 1 on page 25 2 Select the maintenance section In the settings main menu scroll to the Maintenance section 3 Update the console fi...

Страница 27: ...reless networks to appear Note You must have your own wireless network and an 802 11b g n router with SSID broadcast enabled hidden networks are not supported When a list of networks appears touch the...

Страница 28: ...position shown in drawing 1 for a less firm walk ing platform turn the cushion to the position shown in drawing 2 Adjust the other cushions in the same way Note Make sure that the cushions on the lef...

Страница 29: ...s above 85 F 30 C HOW TO MOVE THE TREADMILL Before moving the treadmill fold it as described at the left CAUTION Make sure that the storage latch is in the locked position Moving the treadmill may req...

Страница 30: ...nger than 5 ft 1 5 m b After the power cord has been plugged in make sure that the key is inserted into the console c Check the power switch located on the treadmill frame near the power cord If the s...

Страница 31: ...cord insert the key and walk on the treadmill for a few minutes Repeat until the walking belt is properly tightened c Your treadmill features a walking belt coated with high performance lubricant IMP...

Страница 32: ...Make sure that the settings for your wireless net work are correct c If you still have questions go to support iFit com SYMPTOM The displays of the console do not function properly a If the console do...

Страница 33: ...ic Exercise If your goal is to strengthen your cardiovascular system you must perform aerobic exercise which is activity that requires large amounts of oxygen for prolonged periods of time For aerobic...

Страница 34: ...cal 44 1 Walking Platform 45 1 Walking Belt 46 2 Belt Guide 47 1 Right Rear Foot 48 4 Cable Tie 49 1 Drive Roller Pulley 50 2 1 4 x 1 1 4 Screw 51 2 9 32 Plastic Bushing 52 4 3 8 Plastic Bushing 53 1...

Страница 35: ...1 Reed Switch 105 2 Motor Bushing 106 1 Filter 107 3 8 x 1 2 Machine Screw 108 3 8 Nut 109 1 Motor Isolator User s Manual Note Specifications are subject to change without notice For information about...

Страница 36: ...50 46 19 19 46 39 1 37 34 30 59 34 30 59 37 1 39 1 39 2 57 2 40 40 47 2 2 10 37 37 37 37 102 35 35 35 35 35 35 35 35 15 10 2 54 55 39 1 35 35 35 39 1 35 1 39 35 4 34 3 41 53 34 6 4 11 11 51 50 51 109...

Страница 37: ...37 66 75 65 72 78 68 2 2 2 2 2 2 2 67 67 33 29 69 70 16 71 33 33 52 52 101 101 33 71 32 74 76 68 2 68 2 68 2 68 EXPLODED DRAWING B Model No NETL15818 1 R0918A...

Страница 38: ...62 62 97 10 63 82 91 25 83 90 25 25 91 100 99 13 7 13 63 7 13 13 7 13 2 97 2 4 11 68 86 88 87 79 11 28 14 86 4 11 28 11 81 58 10 93 9 1 1 1 1 5 9 5 14 2 68 95 96 85 14 14 2 14 14 11 4 12 4 11 2 11 4 2...

Страница 39: ...39 8 2 26 64 1 1 36 1 1 1 2 2 2 27 18 80 2 2 2 2 2 2 92 92 38 98 31 58 58 10 EXPLODED DRAWING D Model No NETL15818 1 R0918A...

Страница 40: ...T and the EXPLODED DRAWING near the end of this manual ORDERING REPLACEMENT PARTS This electronic product must not be disposed of in municipal waste To preserve the environment this product must be re...

Отзывы: