background image

I

UK

D

E

F

NL

P

S

DK

FIN

B

GR

CZ

EE

LV

LT

H

M

PL

SK

SLO

I

UK

D

15

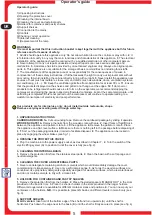
1. PULIZIA DEL CONDENSATORE

1

. Togliere l'alimentazione elettrica, agendo  sull'interruttore a protezione della presa e sfilando poi la spina

dalla presa stessa. . Togliere la griglia di protezione del condensatore posta nella parte posteriore della

2

macchina. . Con un pennello eliminare lo strato di pulviscolo dalle alette del condensatore. . Con

3

4

l'aspira- polvere togliere la polvere residua. . Ripristinare il tutto procedendo in senso inverso

5

(vedi Fig.1).

2. ACCESSO AL VANO MOTORE

Per accedere al vano motore è sufficiente rimuovere le griglie di aerazione.

3. SOSTITUZIONE DEL MOTORE DI SOLLEVAMENTO DELLA CUPOLA

1

2

3.

. Sostenere la cupola. . Togliere l'alimentazione.

Rimuovere le griglie di aerazione.

4

. Allentare le viti

di fissaggio del supporto motore, poste sui lati esterni, sotto la vasca. . Sfilare il motore dal supporto.

5

6

.Nel caso il motore fosse bloccato con la catena di sollevamento all'interno del tubo di guida, occorre

svitare tutte le viti del supporto e sfilare il motore e la catena verso il basso. . Scollegare i fili di

7

alimentazione elettrica del motore stesso. . Sostituire il motore e ripristinare tutto nelle stesse posizioni

8

(vedi Fig.3).

1. CLEANING THE CONDENSER

1

2.

. Switch off the appliance by turning off the power switch and pull the plug out of the socket.

Remove

the condenser's grid, located on the rear side of the machine. . Using a paintbrush, remove any dust from

3

the condenser's fins. . Use a vacuum cleaner to remove the remaining dust.

Refit by following above

4

5.

instructions in reverse order (see fig. 1).

2. ACCESS TO THE MOTOR COMPARTMENT

To access the motor compartment, remove the ventilation grilles.

3. REPLACEMENT OF THE COVER'S LIFTING MOTOR

1

2

3.

4.

. Lower the cover. . Turn the appliance off.

Remove the ventilation grilles.

Loosen the fixing screws

of the motor support, on the outside, under the basin. . Take the motor out of the support.

If the motor

5

6.

is blocked by the lifting chain inside the guide tube, you must remove all screws of the support and
proceed to remove the motor and chain from the bottom.

Disconnect the motor's power supply wires.

7.

8

. Replace the motor and refit all components removed (see fig.3)

1. KONDENSATORREINIGUNG

1.

Schalten Sie den Strom ab, indem Sie den Schutzschalter der Steckdose betätigen und dann den

Stecker aus eben der Steckdose ziehen. . Entfernen Sie das Schutzgitter des Kondensators, das sich

2

auf der Rückseite der Maschine befindet. . Mit einem Pinsel den Staub von den Lamellen des

3

Kondensators entfernen.

Mit einem Staubsauger den verbliebenen Reststaub beseitigen.

Alles in

4.

5.

umgekehrter Reihenfolge wieder zusammensetzen (siehe Abbildung 1).

2. ZUGANG ZUM MOTORRAUM

Um Zugang zum Motorraum zu erhalten, ist es ausreichend, die Lüftungsgitter zu entfernen.

3. AUSTAUSCH  DES HUBMOTORS DER KUPPEL

1.

2.

3.

4

Die Kuppel festhalten.

Strom wie abschalten.

Lüftungsgitter entfernen. . Lösen Sie die

Befestigungsschrauben des Motorlagers, die sich an den Außenseiten unter der Wanne befinden.

5

6.

. Ziehen Sie den Motor aus dem Motorlager.

Sollte der Motor mit der Hubkette innerhalb des

Führungsrohrs blockiert sein, müssen alle Schrauben des Lagers abgeschraubt und der Motor und die
Kette nach unten herausgezogen werden. . Die Stromversorgungskabel vom Motor trennen. . Den

7

8

Motor ersetzen und alles in der ursprünglichen Position wieder montieren (siehe Abb. 3).

Содержание 4554642092

Страница 1: ...Bedienungsanweisung Salatbar ISOLA 4 M UM Art 4554642092 2019 07...

Страница 2: ...Italiano English Deutsch Espa ol Fran ais MANUTENZIONE MAINTENANCE INSTANDHALTUNG MANTENIMIENTO ENTRETIEN I UK D E F NL P S DK FIN B GR CZ EE LV LT H M PL SK SLO 2...

Страница 3: ...ANAMENTE MEDIANTE IL RUBINETTO 1 APERTURA DELL IMBALLAGGIO IMBALLAGGIO IN SCATOLA DI CARTONE 1a Tagliare la reggia sfilare la scatola verso l alto IMBALLO IN CASSA DI LEGNO 1b Schiodare le tavole di l...

Страница 4: ...Tasto 6 UP Tasto 7 DOWN 9 CONTROLLO DI UN REGOLARE FUNZIONAMENTO CONTROLLARE CHE 1 2 La spina sia inserita L interruttore dell impianto refrigerante sia inserito luce verde accesa Il termometro indich...

Страница 5: ...t the compressor will continue to operate leading to a wasteful consumption of electricity and poor performance Our products are for internal use only do not install outside restaurants shops Remove e...

Страница 6: ...t point which can be changed by pressing key 5 SET or P 6 UP 7 DOWN or see fig 6 9 CHECKING CORRECT OPERATION Make sure that 1 2 the plug is connected the refrigeration unit switch is on green light l...

Страница 7: ...ellten Produkte nicht ber die Ablagen oder Gitter hinnausstrecken d rfen Sollte es durch die 12 Luftfeuchtigkeit oder die zu k hlenden Produkte zu au ergew hnlicher Bildung von Eis auf dem Verdampfer...

Страница 8: ...uf der Vorderseite befinden Zum ffnen und Schlie en der Kuppel 1 Schalter zum Anheben der Kuppel Position II Anhub Position O Stillstand Position I Absenkung Zum Einschalten der 2 Lichtschalter Innenb...

Страница 9: ...a humedad del aire o de los productos que se quieren refrigerar les aconsejamos que paren el compresor y que saquen y coloquen los alimentos en espec ficos contenedores refrigerados a la misma tempera...

Страница 10: ...I 2 Interruptor luz 3 Interruptor refrigeraci n 4 Term metro Sirve para encender la instalaci n refrigeradora Indica la temperatura del equipo Regula la temperatura del equipo a Si se pulsa la Termost...

Страница 11: ...roduits r frig rer nous vous conseillons de fermer le compresseur et de disposer la marchandise dans un r cipient r frig r la m me temp rature pour toute la dur e n cessaire au d givrage si vous laiss...

Страница 12: ...ion II pour lever Position O pour arr ter Position I pour abaisser il sert allumer la lumi re interne 2 Int Lumi re 3 Int de r frig ration 4 Thermom tre il sert allumer le syst me de r frig ration il...

Страница 13: ...Manuale del manutentore Manuel du pr pos l entretien Wartungshandbuch Maintenance manual Manual de mantenimiento I UK D E F I UK D E F NL P S DK FIN B GR CZ EE LV LT H M PL SK SLO 13 VT VTL...

Страница 14: ...anuale del manutentore Manuel du pr pos l entretien Wartungshandbuch Maintenance manual Manual de mantenimiento I UK D E F I UK D E F NL P S DK FIN B GR CZ EE LV LT H M PL SK SLO 14 5 FIG 1 FIG 3 VT V...

Страница 15: ...ee fig 1 2 ACCESS TO THE MOTOR COMPARTMENT To access the motor compartment remove the ventilation grilles 3 REPLACEMENT OF THE COVER S LIFTING MOTOR 1 2 3 4 Lower the cover Turn the appliance off Remo...

Страница 16: ...entaci n el ctrica del motor Sustituir el motor y volver a colocar todo en las mismas posiciones V ase figura 3 1 NETTOYAGE DU CONDENSATEUR 1 Couper la tension lectrique en agissant sur l interrupteur...

Страница 17: ...net sein H1 und Sie m chten die Position der Haube ndern H2 so m ssen Sie vorher die Haube mit den Getriebemotoren A einmal komplett herunterfahren H0 oder komplett hochfahren HT Sollten Sie dieses ni...

Отзывы: