background image

Owner’s Manual  2

Table of Contents

For defined warranty terms, please see the one page warranty 

statement included in the product information packet.

Safety Awareness .........................................................................2

Safety Instuctions .........................................................................2

About Your Refrigerator

 ................................................................3


Storage volume

 .....................................................................3


Leveling

 .................................................................................3


Food compartment ................................................................3


Flip-up shelf ...........................................................................3


Door bins ...............................................................................3


Freezer compartment ............................................................3


Operation during travel

 ..........................................................3


Door latch for travel and storage

 ...........................................3


Temperature control system ..................................................4

Operating the Refrigerator Controls

 .............................................4


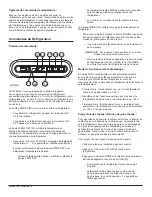
Control Panel.........................................................................4


Automatic mode operation ....................................................4 


Removing the air from the propane gas supply lines

 ............4


Set the controls to automatic mode operation .......................5


Set the controls to manual mode operation...........................5


Cooling unit sensing

 ..............................................................6


Backup operating system

 ......................................................6

DC Operation Precautions (3-way models only) ..........................6

DC Operation Guidelines (3-way models only) ............................7

Effects of High Altitude on Propane Gas Operation

 .....................7

Refrigerator Care Checklist

 ..........................................................7

Defrosting

 .....................................................................................7

Cleaning 

 .......................................................................................8 

Drip tray  .......................................................................................8

Door Sealing

 .................................................................................8

Refrigerator Maintenance Checklist

 .............................................8

Refrigerator Storage

 .....................................................................9

Refrigerator Maintenance

 .............................................................9


Gas flame appearance

 ..........................................................9


Remove and clean the burner orifice

 ....................................9

Remove the Refrigerator

 ............................................................10

Reinstall the Refrigerator

 ............................................................10

Replacement Parts ..................................................................... 11

Wiring Diagram and Pictorial

 ...................................................... 11

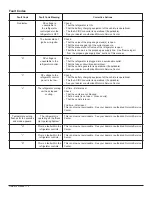
Fault Codes ................................................................................12

WARNING:

-  The storage of flammable materials behind or around 

the refrigerator creates a fire hazard.   Do not use the 

area behind the refrigerator to store anything, especially 

flammable materials (gasoline, cleaning supplies, etc.)

-  Do not remove the round ground prong from the 

refrigerator AC power cord.  Do not use a two prong 

adapter or extension cord on the AC power cord.

-   A circuit overload can result in an electrical fire if the 

wires and/or fuses are not the correct size.  Either use 

the wire and fuse sizes as writtten in the “Installation 

Manual” or refer to your local codes or the applicable 

RVIA Standards for the correct wire and fuse sizes.

-  Incorrect installation, adjustment, change to, or 

maintenance of this refrigerator can cause personal 

injury, property damage, or both.  Have service and 

maintenance work done by your dealer or by an Norcold 

authorized service center.

-  Disconnect both the AC and DC power sources before 

doing any maintenance work on the refrigerator.  All 

service work on this refrigerator must be done by a 

qualified service technician.

-  Do not bypass or change the refrigerator’s electrical 

components or features.

-  When you discard an appliance, remove all doors to 

prevent accidental entrapment and suffocation.

-  Do not spray liquids near electrical outlets, connections, 

or the refrigerator components.  Many liquids are 

electrically conductive and can cause a shock hazard, 

electrical shorts, and in some cases fire.

Safety Instructions

Read this manual carefully and understand the contents before 

you use the refrigerator.

Be aware of possible safety hazards when you see the safety 

alert symbol on the refrigerator and in this manual. A signal word 

follows the safety alert symbol and identifies the danger of the 

hazard.  Carefully read the descriptions of these signal words to 

fully know their meanings.  They are for your safety.

WARNING:

  This signal word means a hazard, which if 

ignored, can cause dangerous personal injury, death, or 

much property damage.

CAUTION:


 This signal word means a hazard, which if 

ignored, can cause small personal injury or much property 

damage.

Safety Awareness

!

!

!

Содержание N41X

Страница 1: ...s 1 Open windows 2 Don t touch electrical switches 3 Extinguish any open flame 4 Immediately call your gas supplier Owner s Manual For N41X models 4 5 cu ft 2 way or 3 way refrigerators For N51X models 5 5 cu ft 2 way or 3 way refrigerators The model numbers of 3 way refrigerators include 3 The model numbers of 2 way models do not The letter X in the model number above stands for a letter or a num...

Страница 2: ...r cord A circuit overload can result in an electrical fire if the wires and or fuses are not the correct size Either use the wire and fuse sizes as writtten in the Installation Manual or refer to your local codes or the applicable RVIA Standards for the correct wire and fuse sizes Incorrect installation adjustment change to or maintenance of this refrigerator can cause personal injury property dam...

Страница 3: ...y effected Food compartment Ignite or start up the refrigerator and let it cool for eight hours before loading with food If the refrigerator does not start to cool down after about two hours contact your dealer or an authorized Norcold Service Center For the best cooling performance Let air move freely inside the entire food compartment Do not cover the shelves with plastic paper etc To decrease t...

Страница 4: ... operation mode of the refrigerator Push and hold the MODE button and a light bar shows in the center display beside each of the four operating modes of the refrigerator one at a time There is one automatic mode of operation and two manual modes of operation NOTE On 3 way models only there are three manual modes of operation When the light bar shows beside the mode of operation that you choose rel...

Страница 5: ...ult Codes section of this manual Push and hold the ON OFF button for one second and then release to turn the refrigerator off Push the On Off button to turn the refrigeratro on The refrigerator will start a 30 second trial for ignition During the 30 second trial for ignition the refrigerator controls open the gas safety valve and the igniter sparks After 30 seconds the refrigerator controls closes...

Страница 6: ...freezer and the fresh food compartment Make sure the temperatures of the freezer and the fresh food compartment are satisfactory NOTE If you open the door s too often the temperatures inside the freezer and fresh food compartment do not become stable Allow the refrigerator to operate for about one hour after each adjustment change before you examine the contents The number 9 is the coldest tempera...

Страница 7: ...gerator Put the drain hose into a half gallon or larger container to capture water Put dry towels etc inside the refrigerator and freezer to absorb melted frost CAUTION High temperatures can cause the inside surfaces of the refrigerator to warp or melt Do not use pans of HOT water a hair dryer or any other high temperature devices to defrost the refrigerator Do not use any hard or sharp objects to...

Страница 8: ...the refrigerator Allow the refrigerator to cool down Return all food to the refrigerator Refrigerator Maintenance Checklist Read and understand the following maintenance sections of this manual NOTE Norcold is not responsible for installation adjustment alteration service or maintenance performed by anyone other than a qualified RV dealer or an authorized Norcold Service center Have a qualified RV...

Страница 9: ... flame Push and hold temperature setting button until the 9 shows and then release Open the lower intake vent CAUTION The burner box cover can be hot Wear gloves to avoid burns Open the burner box door 165 and look at the gas flame 75 See Art00955 and Art00975 The flame should be a darker blue color on the inside of the flame and a lighter blue color on the outside of the flame a constant shape wi...

Страница 10: ...ult in dangerous personal injury or death Do not clean the orifice with a pin or other objects Clean the orifice assembly with air pressure and alcohol only Using a wrench assemble the orifice assembly to the burner Assemble the flare nut to the orifice assembly Tighten the flare nut by hand Hold the orifice assembly securely and using a wrench tighten the flare nut 1 4 revolution only Examine all...

Страница 11: ...VDC 2 Communications 3 Display ground 4 Auxiliary ground optional 5 Auxiliary 12 VDC optional 6 Gas valve 12 VDC 7 5 A Fuse DC F1 8A Fuse AC F2 30 A Fuse DC F3 Replacement Parts You may purchase replacement parts through your local RV dealer or an authorized Norcold Service Center 8 Examine the gas supply line for leaks 9 Connect the DC wiring to the refrigerator Install the DC fuse or connect the...

Страница 12: ... reset Check That the vents are not blocked That a door s is not open Close door s That the vehicle is level 2nd time After reset This is not owner serviceable See your dealer or authorized Norcold Service Center This is not owner serviceable See your dealer or authorized Norcold Service Center This is not owner serviceable See your dealer or authorized Norcold Service Center This is not owner ser...

Страница 13: ...nt le gaz 1 Ouvrir les fenêtres 2 Ne pas toucher à des boutons électriques 3 Éteindre toute flamme nue 4 Appeler tout de suite la compagnie de gaz Manuel de l Utilisateur Propriétaire Réfrigérateurs modèles N41X 4 5 pi3 à double ou triple alimentation Réfrigérateurs modèles N51X 5 5 pi3 à double ou triple alimentation Les numéros de modèle des réfrigérateurs à triple alimentation contiennent 3 mai...

Страница 14: ...un adaptateur à deux lames ou une rallonge sur le cordon d alimentation c a Si les fils et ou fusibles ne sont pas de la taille correcte l installation électrique peut prendre feu sous l effet de la surcharge du circuit Utiliser les fils et fusibles de la taille indiquée dans le Manuel d installation ou consulter les codes locaux ou les normes applicables RVIA pour déterminer les tailles qui convi...

Страница 15: ...ou toute obstruction causée par des animaux AVERTISSEMENT L arrière du réfrigérateur présente des arêtes vives et des coins anguleux Pour éviter de se couper ou de s écorcher lors du travail sur le réfrigérateur faire attention et porter des gants résistant aux coupures Pour obtenir le meilleur refroidissement possible Assurer une bonne circulation de l air dans tout le compartiment de conservatio...

Страница 16: ...t du réfrigérateur Enfoncer et maintenir enfoncé le bouton MODE et une barre lumineuse clignote sur l afficheur central à côté des quatre modes de fonctionnement une à la fois Il y a trois modes de fonctionnement un automatique et deux manuels REMARQUE Sur modèles 3 alim seulement il y a trois modes manuels de fonctionnement Lorsque la barre lumineuse apparaît en regard du mode de fonctionnement c...

Страница 17: ...des de défaillance dans ce manuel Appuyer sur le bouton MODE pour que le réfrigérateur entame un essai d allumage de 30 secondes Enfoncer et maintenir enfoncé le bouton ON OFF pendant une seconde Enfoncer le bouton ON OFF pour mettre le réfrigérateur en route Durant cet essai de 30 secondes les commandes du réfrigérateur ouvrent la valve de sécurité et l allumeur produit une étincelle Au bout de 3...

Страница 18: ...s les deux compartiments sont satisfaisantes REMARQUE Si la ou les portes sont ouvertes trop souvent les températures à l intérieur du congélateur et du compartiment de denrées fraîches perdent leur stabilité Après chaque nouveau réglage laisser le réfrigérateur fonctionner pendant à peu près une heure avant d en examiner le contenu Le chiffre 9 correspond à la température la plus froide Si la tem...

Страница 19: ... que le gaz utilisé est du propane et non du butane ou un mélange de butane Dégivrage Les ailettes de refroidissement du réfrigérateur fonctionnent à des températures de gel et il est normal qu au contact de l humidité de l air elles se couvrent de givre L humidité à l intérieur du réfrigérateur augmente proportionnellement à la température et à l humidité extérieures lorsque des aliments frais no...

Страница 20: ...tions d Entretien Il est important de lire attentivement et de bien comprendre cette partie du manuel qui traite de l entretien REMARQUE Norcold décline toute responsabilité en cas d installation de réglage de modification de réparation ou d entretien effectué e par quiconque autre qu un concessionnaire de véhicules de loisir qualifié ou un centre de service après vente agréé Norcold Les vérificat...

Страница 21: ...de la flamme Appuyer sur le bouton de réglage de la température et le relâcher lorsque 9 apparaisse Ouvrir la prise d air inférieure AVERTISSEMENT Le couvercle du compartiment du brûleur peut être brûlant Porter des gants pour éviter les brûlures Ouvrir la porte du logement du brûleur 165 et examiner la flamme 75 se reporter à Art00955 et Art00975 La flamme doit être d un bleu plus foncé à l intér...

Страница 22: ...e C C du réfrigérateur Débrancher les fils c c de la batterie ou du convertisseur du véhicule Marquer les fils c c pour être sûr de les remettre au bon endroit Enlever les fils C C du réfrigérateur 5 Enlever les vis de fixation du réfrigérateur sur le sol 6 Enlever la porte du réfrigérateur 7 Enlever les vis de fixation du réfrigérateur à la paroi 8 Sortir le réfrigérateur de l ouverture 9 Fixer l...

Страница 23: ...s 3 D affichage la terre 4 Auxiliaire la terre option 5 Auxiliaire 12 V c c option 6 Robinet de gaz 12 V c c 7 Fusible 5 A c c F1 Fusible 8 A c a F2 Fusible 30 A c c F3 Pièces de Rechange Les pièces de rechange peuvent être achetées chez le concessionnaire de véhicules de plaisance local ou dans un Centre d entretien autorisé Norcold 8 Inspecter la conduite d alimentation en gaz et rechercher les ...

Страница 24: ...e véhicule est niveau 2érme fois Apres la réinitialisation Le propriétaire ne peut pas remédier a ce problème Entrer en rapport avec le concessionaire ou un Centre d enttretien autoriseé Norcold Aucune action corrective par l utilsateur propriétaire Entrer en rapport avec le concessionaire ou un Centre d enttretien autoriseé Norcold Aucune action corrective par l utilsateur propriétaire Entrer en ...

Страница 25: ...Manuel de l utilisateur 13 75 76 Art00955 167 Art 00956 77 78 79 80 1 3 2 Art00979 49 91 Art00975 165 Art00980 Art01114 52 ...

Страница 26: ...E TEMPÉRATURE F FAN VENTILATEUR G DC HEATER ÉLÉMENT CHAUFFANT CD H CHASSIS GROUND MASSE DU CHASSIS I DC BOARD PANNEAU CD OPTIONAL FACULTATIF 1 SWITCHED 12VDC COMMUTÉ 12VCD 2 FUSED CONTINUOUS 12VDC CONTINU FONDU 12VCD 3 COMMUNICATIONS COMMUNICATIONS 4 DISPLAY GROUND AFFICHAGE LA TERRE 5 AUXILIARY GROUND MASSE AUXILIAIRE 6 AUXILIARY 12VDC AUXILIAIRE 12VCD 7 GAS VALVE 12VDC ROBINET DE GAZ 12VCD F1 5 ...

Отзывы: