background image

35

EN

18. 

DO NOT 

use this enhanced child restraint system if it has frayed or cut harness straps, or is damaged in any way.


19. 

DO NOT

 use damaged or frayed vehicle seat belts.

20. 

DO NOT

 use this enhanced child restraint system in a vehicle with door-mounted seat belts.

21. 

DO NOT

 use this enhanced child restraint system in a vehicle with seat belts that automatically move along the vehicle frame when 

the door is opened. These seat belts will not hold an enhanced child restraint system properly.

AIR BAG WARNINGS

1. 

WARNING: DO NOT

 place an enhanced child restraint system in the front seat of a vehicle with a passenger air bag unless the air bag 

is turned off. 

DEATH

 or 

SERIOUS INJURY

 can occur. The back seat is the safest.


If your vehicle has an air bag, refer to your vehicle 

owner’s manual for child restraint installation. 

2. 

If the rear seat of your vehicle is equipped with side air bags, refer to your vehicle owner’s manual for child restraint installation. 

3. 

DO NOT

 place any objects between the enhanced child restraint system and the side air bag, as an expanding air bag may cause the 

items to strike the child.

ADDITIONAL WARNINGS

1. 

In hot or sunny weather, 

ALWAYS

 check the seat for hot areas before placing a child into the enhanced child restraint system. The child 

could be burned. Cover the enhanced child restraint system with a light coloured blanket when you leave the vehicle.

2. 

This enhanced child restraint system must be securely fastened to the vehicle, even when unoccupied, using the vehicle seat belts.

3. 

An unsecured enhanced child restraint system may injure someone if a crash occurs. 

4. 

DO NOT

 attach any additional items, like padding, toys, etc., to this enhanced child restraint system.

5. 

Before each use, always confirm enhanced child restraint system is securely installed and the harness is properly adjusted around the 

child. 

REMEMBER:

 The addition or removal of clothing (such as a sweater or coat) will change the fit of the harness.

6. 

Always confirm before each use that enhanced child restraint system is securely locked.

7. 

If the vehicle seat has an adjustable seat-back angle, make sure the seat-back is securely locked open in its most upright position. 

An incorrect seat-back angle or unsecured seat-back will impair the restraint installation and its ability to protect the child occupant. 

8. 

DO NOT

 use this enhanced child restraint system if the child’s ears are above the back of the enhanced child restraint system headrest.

9. 

NEVER

 try to tend to a crying child’s needs while driving. Never take a child out of the enhanced child restraint system for comforting while 

the vehicle is moving.

10. 

DO NOT

 allow a child to have objects such as lollipops or ice cream on a stick. These objects can injure the child if the vehicle swerves 

or hits a bump.

11.  Put sharp or heavy items in the trunk. Anything loose can be deadly in a crash.

12.  In cold weather a child may need an extra blanket for warmth. Put the child in the enhanced child restraint system and cover both the 

belted child and the enhanced child restraint system with a blanket.

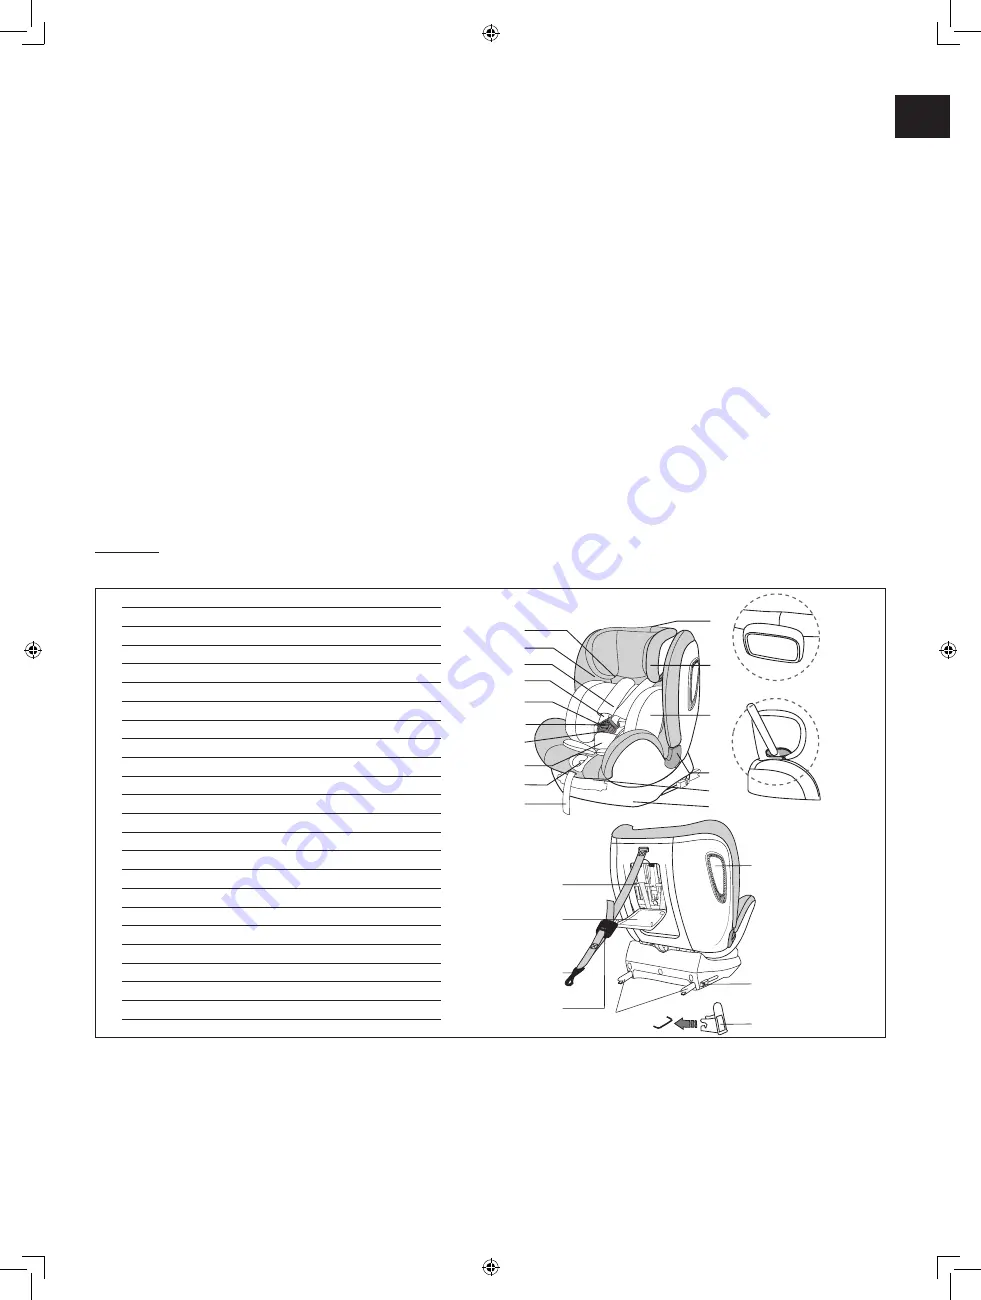
PART LIST

1. 

Belt guidance 1

1

2

3

4

5
6

7
8

10

11

12

13

14

15

16

9

17

18

19

20

21

22

23

24

2. 

Seat cover

3. 

Shoulder pad 

4. 

Shoulder strap 

5. 

Buckle tongue

6. 

Straps release button

7. 

Buckle

8. 

Crotch pad

9. 

Harness release button

10. 

Adjuster strap

11. 

Headrest adjust button

12. 

Headrest

13. 

Sleeping pad 

14. 

Belt guidance 3

15. 

Recline handle

16. 

Base

17. 

Gears fixed axle

18. 

User manual compartment

19. 

Top tether clip

20. 

Top tether adjuster

21. 

ISOFIX locking arms

22. 

SIPS

23. 

ISOFIX release button

24. 

ISOFIX attachment point

Содержание 2274271

Страница 1: ...nça PL Wskazówki bezpieczeństwa SYSTÈME DE RETENUE AMÉLIORÉ POUR ENFANTS VERBETERD KINDERBEVEILIGINGSSYSTEEM VERBESSERTES KINDER RÜCKHALTESYSTEM SISTEMA DE RETENCIÓN INFANTIL AVANZADO ENHANCED CHILD RESTRAINT SYSTEM SISTEMA DI SICUREZZA PER BAMBINI MIGLIORATO SISTEMADE RETENÇÃO PARACRIANÇAS OTIMIZADO ULEPSZONE FOTELIKI SAMOCHODOWE DLA DZIECI UNIVERSAL ECRS ISOFIX 76 105 CM 18 KG BOOSTER SEAT 100 1...

Страница 2: ...RA FUTURAS CONSULTAS LEA DETENIDAMENTE De no observar estas instrucciones la seguridad de un niño podría verse seriamente amenazada EN IMPORTANT KEEP THESE INSTRUCTIONS FOR FUTURE REFERENCE READ CAREFULLY If these instructions are not followed the safety of a child may be severely endangered IT IMPORTANTE CONSERVARE LE PRESENTI ISTRUZIONI COME RIFERIMENTO FUTURO LEGGERE ATTENTAMENTE Il mancato ris...

Страница 3: ...ispositif amélioré de retenue pour enfants est conçu uniquement pour la position face vers l avant Cet appareil est destiné uniquement à un usage privé et ne convient pas pour des utilisations professionnelles Ce dispositif amélioré de retenue pour enfants ne doit pas être utilisé dans les domiciles les avions les bateaux sur les motos ou pour toute autre application ou dans tout autre environneme...

Страница 4: ... amélioré de retenue pour enfants doit être fixé de sorte que le dos du dispositif amélioré de retenue pour enfants repose contre le dossier du siège du véhicule 9 L appui tête du siège situé devant le siège enfant doit être réglé sur la position la plus basse MISES EN GARDE CONCERNANT LA CEINTURE DE SÉCURITÉ 1 MISE EN GARDE l enfant doit impérativement s asseoir convenablement au milieu des sangl...

Страница 5: ...objets sur l enfant MISES EN GARDE SUPPLÉMENTAIRES 1 Par temps chaud vérifiez TOUJOURS les zones chaudes du dispositif amélioré de retenue pour enfants avant d installer l enfant à l intérieur sinon cela peut le brûler Couvrez le dispositif amélioré de retenue pour enfants avec une couverture de couleur claire lorsque vous sortez du véhicule 2 Le dispositif amélioré de retenue pour enfants même vi...

Страница 6: ...ifiez que le harnais est correctement ajusté autour de la taille et des épaules de l enfant Une fois les sangles bien serrées ajustez les couvre bretelles sur la position appropriée sur la poitrine de l enfant Vérifiez que le coussin d entrejambe n est ni plié ni déformé REMARQUES Serrez autant que possible les sangles sans incommoder l enfant Lorsque les harnais sont correctement ajustés ils ne p...

Страница 7: ...de ses oreilles RÉGLAGE D ANGLE Poussez la poignée d inclinaison et réglez le siège dans la position souhaitée Relâchez le levier Un CLIC retentit Le témoin devient vert Ce dispositif amélioré de retenue pour enfants comporte 4 positions d inclinaison L inclinaison peut être réglée pour un confort optimal de l enfant ou une meilleure installation du dispositif amélioré de retenue pour enfants REMA...

Страница 8: ...istributeur du dispositif amélioré de retenue pour enfants IMPORTANT N UTILISEZ PAS L ORIENTATION VERS L AVANT SI L ENFANT MOINS DE 15 MOIS INSTALLATION AVEC ISOFIX ET ANCRAGE SUPÉRIEUR 76 105 cm 1 Installez le dispositifamélioré de retenue pourenfants facevers l avant dans le sens de déplacement dans un emplacement approprié du siège en veillant à ce qu il repose sur l assise et le dossier du siè...

Страница 9: ...avec l enfant 9 Bouclez la ceinture de sécurité Un CLIC retentit Tirez fermement la ceinture de sécurité pour éviter toute déformation MISE EN GARDE la sangle diagonale doit être acheminée d avant en arrière dans le sens de la diagonale Vous pouvez ajuster le trajet de la sangle sur les deux côtés à l aide du déflecteur de réglage de la ceinture de sécurité A B CLIC REMARQUE Testez en tirant sur l...

Страница 10: ...dommager Pour nettoyer la boucle rincez avec de l eau tiède N utilisez JAMAIS de savon de solvant ou de lubrifiant L utilisation d un produit autre que l eau peut causer le dysfonctionnement de la boucle Séchez à l air libre Les housses en tissu et les garnitures amovibles peuvent être nettoyées à l eau tiède avec un savon de ménage ou un détergent doux 30 Laver à 30 C max Ne pas utiliser de sèche...

Страница 11: ...arts gerichte positie Dit apparaat is enkel ontworpen voor privégebruik en is niet geschikt voor professioneel gebruik Dit verbeterde kinderbeveiligingssysteem is niet bedoeld voor gebruik in woningen vliegtuigen boten op een motorfiets of in andere niet gespecificeerde toepassingen of omgevingen De fabrikant kan niet aansprakelijk worden gesteld voor schade als gevolg van een oneigenlijk gebruik ...

Страница 12: ...rden gezet WAARSCHUWINGEN VEILIGHEIDSGORDELS 1 PAS OP Het is belangrijk dat het kind de veiligheidsgordel correct draagt Als de veiligheidsgordel is vastgemaakt moet de heupgordel laag op de heupen zitten en net de dijen raken De schoudergordel moet over het midden van de schouder zitten Als het kind naar voren leunt of de gordel achter de rug beweegt of onder de arm plaatst dan houdt de gordel he...

Страница 13: ...ig verlaat 2 Zelfs als het verbeterde kinderbeveiligingssysteem niet wordt gebruikt moet het goed bevestigd zijn met de veiligheidsgordels in het voertuig 3 Een niet bevestigd verbeterd kinderbeveiligingssysteem kan iemand verwonden bij een aanrijding 4 Bevestig GEEN extra items aan dit verbeterde kinderbeveiligingssysteem zoals bekleding speelgoed enz 5 Controleer voor elk gebruik of het verbeter...

Страница 14: ... de verstelriem Trek eventuele overtollige harnasriemen door de gesp naar de schouders van het kind en trek aan de verstelriem Dit moet u mogelijk enkele keren herhalen om de juiste pasvorm te krijgen 6 Controleer of het gordelharnas strak rond de taille en de schouders van het kind zit Nadat u de riemen strak hebt getrokken verstelt u de schouderkussens zodat ze op de juiste plaats op de borst va...

Страница 15: ...r de stoffen hoes 3 Nadat u ze verwijderd hebt neem de met tandwielen bevestigde as uit de plastic stator en bewaar het 4 Kies de juiste hoogte van de hoofdsteun BELANGRIJK Er moet één vinger vrije ruimte zijn tussen de onderkant van de hoofdsteun en de schouder van het kind PAS OP De schouderriemen mogen niet achter de rug van het kind zitten noch ter hoogte van de oren of boven de oren AFSTELLEN...

Страница 16: ...m in te schakelen trekt u de SIPS houder uit de opbergpositie in de hoek totdat hij vastklikt U hoort een KLIK 2 Om op te bergen drukt u op de knop en duwt u de SIPS houder in de opbergpositie STOELHOES VERWIJDEREN 1 Zet de hoofdsteun in de hoogste stand 2 Verwijder de vijfpuntsgordel 3 Verwijder de hoes van de rugleuning en basis 4 Verwijder de hoes eerst van de onderkant van de hoofdsteun en ver...

Страница 17: ...EL 100 135 CM OPMERKING Wanneer u dit verbeterde kinderbeveiligingssysteem als kinderzitje gebruikt verwijdert u het 5 puntsharnas 1 Plaats het verbeterde kinderbeveiligingssysteem op de juiste plaats naar voren gericht in de rijrichting plat op de onderkant van de autostoel en tegen de rugleuning 2 Drukop de ISOFIX knop om de twee ISOFIX vergrendelingsarmen aan de onderkant naarbuiten te trekken ...

Страница 18: ... de fabrikantvan hetverbeterde kinderbeveiligingssysteem niet op te volgen WAARSCHUWING Probeer het verbeterde kinderbeveiligingssysteem niet verder te demonteren dan volgens deze instructies is toegestaan WAARSCHUWING Alle kinderzitjes hebben een vervaldatum Plastic en metalen onderdelen verslijten na verloop van tijd Neem contact op met de fabrikant als u niet zeker weet wanneer uw kinderzitje v...

Страница 19: ...s Verbessertes Kinder Rückhaltesystem ist geeignet für Kinder mit einer Körpergröße zwischen 76 und 105 cm die nicht mehr als 18 kg wiegen Dieses Verbessertes Kinder Rückhaltesystem m kann als Booster Sitz nur Sitzbasis verwendet werden für Kinder mit einer Körpergröße zwischen 100 und 135 cm Das Verbessertes Kinder Rückhaltesystem darf ausschließlich vorwärtsgerichtet in Fahrtrichtung positionier...

Страница 20: ...ichteten Autositzen 4 Gemäß Statistiken sind Kinder in einem Rückhaltesystem auf dem Rücksitz besser geschützt als auf dem Vordersitz 5 Verwenden Sie dieses Verbessertes Kinder Rückhaltesystem NUR auf Fahrzeugsitzen mit einer einrastenden Rückenlehne 6 Das Verbessertes Kinder Rückhaltesystem darf NICHT mit der Fahrzeugeinrichtung z B Fahrzeugtüre oder Vordersitz in Kontakt kommen wenn es auf einer...

Страница 21: ... Sie in die Bedienungsanleitung Ihres Fahrzeugs um Informationen darüber zu erhalten wie das Rückhaltesystem anzubringen ist 2 Wenn der Rücksitz Ihres Fahrzeugs über Seitenairbags verfügt schauen Sie in die Bedienungsanleitung Ihres Fahrzeugs um Informationen darüber zu erhalten wie das Rückhaltesystem anzubringen ist 3 Platzieren Sie KEINE Gegenstände zwischen dem Verbessertes Kinder Rückhaltesys...

Страница 22: ...ngurte angezogen werden Ziehen Sie dann am Verstellgurt Ziehen Sie überschüssiges Gurtband durch die Schnalle in Richtung der Schultern des Kindes und ziehen Sie dann am Verstellgurt Es kann sein dass Sie diesen Vorgang mehrere Male wiederholen müssen bis das Gurtgeschirr perfekt sitzt 6 Stellen Sie sicher dass das Gurtgeschirr eng an der Hüfte und an den Schultern des Kindes anliegt Nachdem Sie d...

Страница 23: ...Nachdem Sie diese entfernt haben nehmen Sie die zahnradbefestigte Achse aus der Kunststoffhalterung und verstauen Sie sie 4 Wählen Sie die passende Höhe der Kopfstütze WICHTIG Der untere Rand der Kopfstütze sollte sich in einem fingerbreiten Abstand zu der Schulter des Kindes befinden VORSICHT Die Schultergurtbänder dürfen nicht hinter dem Rücken des Kindes auf der Höhe der Ohren oder über den Ohr...

Страница 24: ...eren ziehen Sie ihn aus der Halterung bis er in der Endposition einrastet Sie hören ein gut hörbares KLICKEN 2 Um den Seitenaufprallschutz SIPS zu verstauen drücken Sie die Taste und schieben Sie den Seitenaufprallschutz SIPS zurück in die Halterung SITZBEZUG ENTFERNEN 1 Bringen Sie die Kopfstütze in die höchste Position 2 Entfernen Sie das 5 Punkt Gurtgeschirr 3 Entfernen Sie den Bezug der Rücken...

Страница 25: ...inder Rückhaltesystem als Booster Sitz nur Sitzbasis verwenden entfernen Sie das 5 Punkt Gurtgeschirr 1 Positionieren Sie das Verbessertes Kinder Rückhaltesystem vorwärtsgerichtet in Fahrtrichtung an der gewünschten Stelle Positionieren Sie das Verbessertes Kinder Rückhaltesystem so dass es flach auf dem Autositz aufliegt und die Rücklehne berührt 2 Drücken Sie die ISOFIX Taste am Rückhaltesystem ...

Страница 26: ...ACHTUNG Alle Kindersitze für das Auto haben ein Ablaufdatum Kunststoff und Metallteile werden mit der Zeit abgenutzt Wenden Sie sich an den Hersteller wenn Sie bezüglich des Ablaufdatums Ihres Rückhaltesystems unsicher sind Wenn kein Stoffüberzug mit dem Kindersitz mitgeliefert wurde ist der Kindersitz von direkter Sonneneinstrahlung fernzuhalten da er sonst für die Haut des Kindes zu heiß werden ...

Страница 27: ...el sentido de la marcha Este aparato solo está previsto para uso privado por lo que no es apto para operaciones profesionales Este sistema de retención infantil avanzado no está previsto para su uso en el hogar aviones barcos motocicletas ni en ninguna otra aplicación o entorno no especificados El fabricante no se hace responsable de ningún daño resultante de un uso inadecuado operación incorrecta...

Страница 28: ...ención infantil avanzado de modo que el sistema de retención infantil avanzado descanse contra el respaldo del asiento del vehículo 9 El reposacabezas correspondiente al asiento frente al niño debe colocarse en su posición más baja ADVERTENCIAS EN CUANTO AL CINTURÓN DE SEGURIDAD 1 PRECAUCIÓN Es importante sentar al niño apropiadamente usando el cinturón de seguridad del vehículo Cuando el cinturón...

Страница 29: ... objeto podría golpear al niño ADVERTENCIAS ADICIONALES 1 Si el tiempo es soleado o caluroso compruebe SIEMPRE que las superficies del asiento no estén demasiado calientes antes de sentar al niño en el sistema de retención infantil avanzado De lo contrario el niño podría sufrir quemaduras Cubra el sistema de retención infantil avanzado con una manta de color claro al salir del vehículo 2 Este sist...

Страница 30: ...rreas de regazo se apretarán Entonces tire de la correa de ajuste Tire de cualquier exceso de la cincha del arnés a través de la hebilla en dirección de los hombros del niño y tire de la correa de ajuste Es posible que tenga que hacer esto varias veces hasta conseguir el ajuste adecuado 6 Verifique que el arnés esté bien ceñido alrededor de la cintura y los hombros del niño Tras apretar las correa...

Страница 31: ...s de hombro a través de las ranuras Colóquelas debajo de la cubierta de tela 3 Después de retirarlas saque el eje fijo de los engranajes del estátor de plástico y almacénelo 4 Seleccione la altura adecuada del reposacabezas IMPORTANTE el borde inferior del reposacabezas debe quedar a un dedo de distancia del hombro del niño PRECAUCIÓN Las correas de hombro no deben pasar por detrás de la espalda d...

Страница 32: ...lo retire el receptáculo del sistema de protección contra impactos laterales de la posición de almacenamiento en la esquina hasta que se bloquee en su posición Oirá un clic 2 Para almacenarlo pulse el botón y presione el receptáculo del sistema de protección contra impactos laterales en la ubicación de almacenamiento QUITAR LA FUNDA DEL ASIENTO 1 Ponga el reposacabezas en la posición más elevada 2...

Страница 33: ...ención infantil avanzado como silla de bebé retire el arnés de 5 puntos 1 Coloque el sistema de retención infantil avanzado orientado hacia delante en el sentido de la marcha en una posición adecuada en el asiento de manera que quede derecho sobre la banqueta y bien apoyado contra el respaldo 2 Pulse el botón ISOFIX para extraer los dos brazos de bloqueo ISOFIX de la parte inferior de la base Oirá...

Страница 34: ...fabricante del sistema de retención infantil avanzado ADVERTENCIA No intente desmontarel sistema de retención infantil avanzado de una forma que no esté recogida en estas instrucciones ADVERTENCIA Todos los asientos de coche tienen una vida útil determinada Las piezas de plástico y de metal se desgastan con el tiempo Consulte con el fabricante si tiene alguna duda en cuanto a si la vida útil de un...

Страница 35: ... suitable for professional operation This enhanced child restraint system is not for use in homes airplanes boats on a motorcycle or in any other non specified applications or environments The manufacturer cannot be held liable for damage resulting from improper usage or incorrect operation or non compliance with this manual GENERAL SAFETY WARNINGS 1 Read all instructions before use of this enhanc...

Страница 36: ...lt should be low on the hips just touching the thighs and the shoulder belt should lie across the middle of the shoulder If the child leans out or moves the belt behind the back or places it under the arm it will not provide the intended restraint 2 Make sure that you can fit no more than one finger between the harness and your baby 1 cm 3 IMPORTANT Any straps holding the restraint to the vehicle ...

Страница 37: ...d restraint system 5 Before each use always confirm enhanced child restraint system is securely installed and the harness is properly adjusted around the child REMEMBER The addition or removal of clothing such as a sweater or coat will change the fit of the harness 6 Always confirm before each use that enhanced child restraint system is securely locked 7 If the vehicle seat has an adjustable seat ...

Страница 38: ...ble 1 With loose harness press the headrest adjusts button and move the headrest up or down to the desired position 2 Release adjust button and slide headrest slightly up or down to lock into the appropriate use position NOTE A correctly adjusted headrest ensures optimal protection of the child in the enhanced child restraint system Adjust the headrest so that the shoulder straps are at the same l...

Страница 39: ...se the buckle tongues 5 Pull down the buckle cover 6 Lift the cover in the PE board and hide the buckle SIPS USAGE SIPS Side Impact Protection System SIPS should be deployed whenever the enhanced child restraint system is installed in the vehicle SIPS can effectively improve the safety performance of the enhanced child restraint system 1 To deploy pull out the SIPS pod from the corner stored posit...

Страница 40: ...heck that enhanced child restraint system is securely installed before each use INSTALLATION WITH ISOFIX AND VEHICLE SEAT BELT 100 135 CM NOTE When using this enhanced child restraint system as a booster seat remove the 5 point harness 1 Place enhanced child restraint system forward facing in the direction of travel in proper seating location flat on the vehicle seat bottom and touching vehicle se...
Страница 41: ...ed by the enhanced child restraint system manufacturer WARNING Do not attempt to disassemble the enhanced child restraint system further than these instructions allow WARNING All car seats expire Plastic and metal parts wear out over time Contact the manufacturer if you are unsure when your seat expires When the chair is not provided with a textile cover the chair should be kept away from sunlight...

Страница 42: ...ema di ritenuta migliorato per bambini è progettato solo per l uso nella posizione rivolta in avanti Questo apparecchio è destinato unicamente all uso privato e non è adatto per scopi professionali Questo sistema di ritenuta migliorato per bambini non è pensato per essere utilizzato in casa o su aerei barche motocicli o per altre applicazioni o in ambienti diversi da quelli specificati Il produtto...

Страница 43: ...l sedile sul veicolo 9 Il poggiatesta del sedile di fronte al bambino deve essere abbassato completamente AVVERTENZE PER UN USO CORRETTO DELLE CINTURE DI SICUREZZA 1 ATTENZIONE È importante che il bambino sieda correttamente sul seggiolino in modo da potere fissare le cinture di sicurezza come richiesto Quando la cintura di sicurezza del veicolo è allacciata la cintura addominale deve essere posiz...

Страница 44: ...i zone calde prima di posizionarvi il bambino Il bambino potrebbe scottarsi Coprire il sistema di ritenuta migliorato per bambini con una coperta di colore chiaro quando si esce dal veicolo 2 Il sistema di ritenuta migliorato per bambini deve essere fissato saldamente al veicolo anche quando non viene utilizzato usando le cinture di sicurezza del veicolo 3 Un sistema di ritenuta migliorato per bam...

Страница 45: ...re le cinghie addominali Quindi tirare la fascia di regolazione Tirare le cinghie in eccesso attraverso la fibbia verso le spalle del bambino quindi tirare la fascia di regolazione Ripetere questa operazione più volte fino ad ottenere una perfetta regolazione 6 Verificare che le cinghie siano posizionate correttamente attorno alla vita e alle spalle del bambino Dopo avere stretto le cinghie regola...

Страница 46: ...le attraverso le apposite aperture dalla parte anteriore del sistema di ritenuta migliorato per bambini Posizionarle dietro al rivestimento in tessuto 3 Dopo aver rimosso le tracolle estrarre l asse fissato con gli ingranaggi dallo statore di plastica e metterlo via 4 Selezionare la giusta altezza del poggiatesta IMPORTANTE Il bordo inferiore del poggiatesta deve trovarsi a un dito di distanza dal...

Страница 47: ...rre l involucro del sistema SIPS dalla posizione di chiusura ad angolo finché non scatta nella giusta posizione Si udirà un CLIC 2 Per rimetterlo via premere il pulsante e spingere l involucro del sistema SIPS nella posizione di conservazione RIMOZIONE DELLA COPERTURA DEL SEDILE 1 Sistemare il poggiatesta nella posizione più alta 2 Rimuovere le cinghie a 5 punti 3 Rimuovere il rivestimento dallo s...

Страница 48: ...tenuta migliorato per bambini come rialzo per sedili rimuovere l imbracatura a 5 punti di fissaggio 1 Posizionare il sistema di ritenuta migliorato per bambini rivolto in avanti in direzione di marcia e nella giusta posizione sul sedile cioè ben appoggiato sulla base del sedile del veicolo e a contatto con lo schienale del veicolo 2 Premere il pulsante del sistema ISOFIX per estrarre i due bracci ...

Страница 49: ...produttore del sistema di ritenuta migliorato per bambini AVVERTENZA Non provare a smontare il sistema di ritenuta migliorato per bambini diversamente da quanto descritto nelle presenti istruzioni AVVERTENZA I seggiolini per auto hanno una scadenza Le parti in plastica e in metallo si usurano nel tempo Contattare il produttore in caso di dubbi sullo stato del seggiolino Se il seggiolino non è dota...

Страница 50: ...e apenas a crianças com uma altura entre 76 e 105 cm e um peso não superior a 18 kg Este sistema de retenção para crianças otimizado pode ser utilizado como assento elevatório para crianças com uma altura entre 100 e 135 cm O sistema de retenção para crianças otimizado é concebido apenas para a posição virada para a frente Este aparelho destina se apenas a uso privado e não é adequado para o funci...

Страница 51: ...eja instalado um airbag ativado Utilize este local apenas se estiver equipado com ISOFIX e cinto de segurança de 3 pontos 8 Ajuste ou remova o apoio de cabeça do automóvel no assento onde irá instalar o sistema de retenção para crianças otimizado para que a parte traseira do sistema de retenção para crianças otimizado fique encostado no encosto do assento do automóvel 9 O encosto de cabeça no banc...

Страница 52: ... verifique SEMPRE zonas quentes no banco antes de colocar uma criança no sistema de retenção para crianças otimizado A criança pode queimar se Cubra o sistema de retenção para crianças otimizado com um cobertor de cor clara quando sair do veículo 2 Este sistema de retenção para crianças otimizado deve ser fixado com segurança ao veículo mesmo quando desocupado utilizando os cintos de segurança do ...

Страница 53: ...e as alças subabdominais irão apertar Em seguida puxe a alça de ajuste Puxe qualquer excesso da alça do arnês através do encaixe em direção aos ombros da criança e puxe a alça de ajuste Isto pode precisar de ser repetido várias vezes para um ajuste adequado 6 Verifique se o arnês está perfeitamente ajustado à volta da cintura e dos ombros da criança Depois de apertar as alças ajuste as almofadas d...

Страница 54: ...ças dos ombros através das ranhuras Coloque as por baixo da cobertura têxtil 3 Depois de as retirar retire o eixo fixo do equipamento a partir do estator plástico e guarde o 4 Selecione a altura correta do apoio de cabeça IMPORTANTE A margem inferior do apoio de cabeça deve estar à distância de um dedo em relação ao ombro da criança ATENÇÃO As alças dos ombros não devem passar atrás das costas da ...

Страница 55: ... acionar puxe a cápsula do SIPS a partir da posição armazenada ao canto até esta ficar bloqueada na sua posição Ouvirá um CLIQUE audível 2 Para guardar prima o botão e empurre a cápsula do SIPS para a posição de armazenamento REMOÇÃO DA COBERTURA DO BANCO 1 Coloque o apoio de cabeça na posição mais elevada 2 Remova o arnês de 5 pontos 3 Remova a cobertura do suporte de costas e da base 4 Primeiro ...

Страница 56: ...levatório remova o arnês de 5 pontos 1 Coloque o sistema de retenção para crianças otimizado virado para a frente no sentido da marcha no local adequado do assento plano no fundo do banco do veículo e tocando no encosto do banco do veículo 2 Prima o botão ISOFIX para retirar os dois braços de bloqueio ISOFIX do fundo da base Ouvirá um CLIQUE audível Certifique se de que o indicador fica numa cor v...

Страница 57: ...nte do sistema de retenção para crianças otimizado ATENÇÃO Não tente desmontar o sistema de retenção para crianças otimizado para além do permitido por estas instruções ATENÇÃO Todos os bancos de automóvel têm um prazo de validade As peças plásticas e metálicas desgastam se com o tempo Contacte o fabricante se não tiver a certeza de quando termina o prazo de validade do seu banco Quando a cadeira ...

Страница 58: ...100 do 135 cm Ulepszony fotelik samochodowy jest przeznaczony wyłącznie do montażu przodem do kierunku jazdy To urządzenie jest przeznaczone wyłącznie do użytku prywatnego i nie nadaje się do użytku komercyjnego Ulepszony fotelik samochodowy nie jest przeznaczony do użytku w domach samolotach łodziach na motocyklach ani w żadnych innych nieokreślonych zastosowaniach lub środowiskach Producent nie ...

Страница 59: ... plecy fotelika opierały się o oparcie siedzenia samochodowego 9 Zagłówek na siedzeniu pojazdu przed dzieckiem powinien być ustawiony w najniższej pozycji OSTRZEŻENIA DOTYCZĄCE PASÓW BEZPIECZEŃSTWA 1 OSTRZEŻENIE Ważne jest aby dziecko siedziało prawidłowo w pasach bezpieczeństwa pojazdu Gdy pas samochodowy jest zapięty pas biodrowy powinien znajdować się nisko na biodrach dotykając tylko ud a pas ...

Страница 60: ...NIA 1 W przypadku upału lub wysokiego nasłonecznienia przed umieszczeniem dziecka w ulepszonym foteliku samochodowym należy ZAWSZE sprawdzić czy fotelik nie jest gorący Dziecko może zostać poparzone Po wyjściu z pojazdu należy przykryć ulepszony fotelik samochodowy kocem w jasnym kolorze 2 Ulepszony fotelik samochodowy musi być bezpiecznie zamocowany w pojeździe za pomocą pasów bezpieczeństwa poja...

Страница 61: ...czka a zaciągną się pasy biodrowe Następnie pociągnij za pasek regulacji Przeciągnij nadmiar pasów szelek przez klamrę w kierunku barków dziecka i pociągnij pasek do regulacji Czynność ta może wymagać kilkukrotnego powtórzenia w celu prawidłowego dopasowania 6 Sprawdź czy szelki dobrze przylegają do talii i barków dziecka Po zaciśnięciu pasków dopasuj ochraniacze barków do odpowiedniej pozycji na ...

Страница 62: ...iny 3 Po ich zdemontowaniu zdjąć oś nieruchomą zębatek ze stojana i schować go w bezpiecznym miejscu 4 Wybrać odpowiednią wysokość zagłówka WAŻNE Dolna krawędź zagłówka powinna być ustawiona na odległość palca od ramion dziecka OSTRZEŻENIE Ramiączka nie mogą przebiegać za plecami dziecka na wysokości uszu ani nad uszami REGULACJA KĄTA Nacisnąć uchwyt pochylenia i wyregulować fotelik w żądaną pozyc...

Страница 63: ...IPS z pozycji przechowywania aż zatrzaśnie się na miejscu Będzie słychać KLIKNIĘCIE 2 Aby go schować nacisnąć przycisk i wsunąć system SIPS w pozycję przechowywania ZDEJMOWANIE POKROWCA SIEDZISKA 1 Ustawić zagłówek w najwyższej pozycji 2 Zdejmij szelki 5 punktowe 3 Zdejmij osłonę z oparcia i bazy fotelika 4 Najpierw zdejmij pokrowiec z podstawy zagłówka następnie zdejmij pokrowiec z zagłówka Aby z...

Страница 64: ...ulepszonego fotelika samochodowego jako podkładki dziecięcej należy usunąć pięciopunktowe pasy 1 Ustawić ulepszony fotelik samochodowy przodem do kierunku jazdy w kierunku jazdy we właściwym miejscu płasko na spodzie siedzenia pojazdu tak aby dotykało oparcia siedzenia pojazdu 2 Nacisnąć przycisk ISOFIX aby wyciągnąć dwa ramiona blokujące ISOFIX z dolnej części podstawy Będzie słychać KLIKNIĘCIE N...

Страница 65: ...odowego w sposób wykraczający poza niniejsze instrukcje OSTRZEŻENIE Wszystkie foteliki samochodowe tracą swoją przydatność Części plastikowe i metalowe z czasem ulegają zużyciu W razie braku pewności kiedy upływa termin przydatności fotelika należy skontaktować się z producentem Jeżeli fotel nie jest wyposażony w pokrowiec z tkaniny należy chronić go przed światłem słonecznym ponieważ w przeciwnym...

Страница 66: ...20V0 NORAUTO 511 589 rue des Seringats 59262 Sainghin en Mélantois France www norauto com www atu eu Made in P R C Fabricado en na R P C Fabriqué en R P C ...

Отзывы: