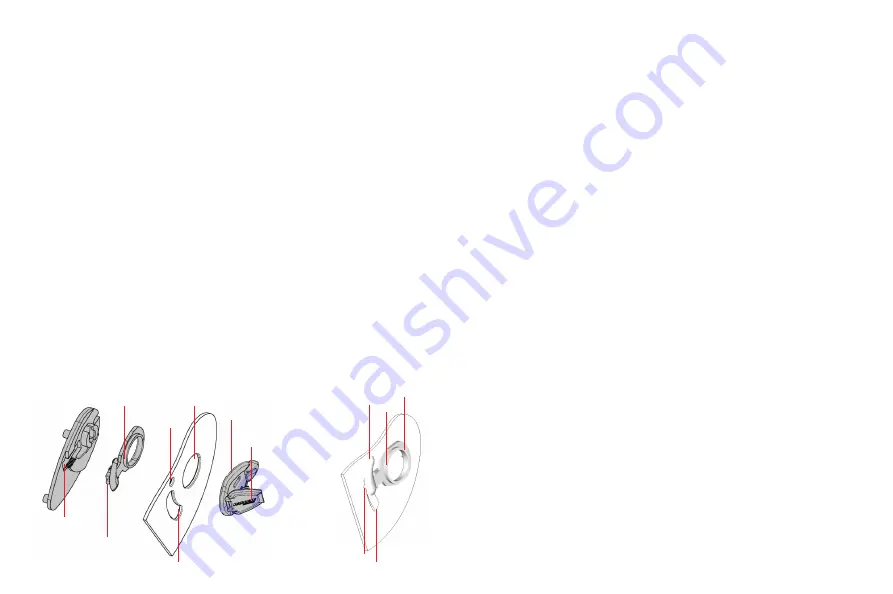
F
C
B
A
A1
B1
E
D
B1
C
B
E
D
Fig. 2
Fig. 1
- 8 -
- 9 -
1. LEXAN® SCRATCH-RESISTANT VISOR
1.1 Pulling up the visor
Rotate the visor upwards using the flap located at the bottom of the visor.
1.2 Pulling down the visor
Pull the visor down by taking hold of the flap located at the bottom of the visor.
VISOR DISASSEMBLY
-
Pull down the visor completely.
-
Pull the (safety) cover A1 (Using an tool), rotate the pawl A upwards and detach it from
its housing. Then repeat the step on the other side of the visor.
-
Detach the visor from the external shell of the helmet.
-
Remove the mechanism C by unthreading it from its seat B, and slide guide D by rotat-
ing it slightly. Then repeat the step on the other side of the visor. (fig. 1)
IMPORTANT!
During disassembly of the mechanism C, take care not to lose the service springs E.
VISOR ASSEMBLY
-
Insert the mechanism C into the slide guide D of the visor, rotating it slightly until it is
securely hooked in its housing B and in the hole B1 on the visor (visor pulled down - fig.
2). Then repeat the step on the other side of the visor, making sure that both mecha-
nisms C are in the same position.
-
Position the visor, complete with the two mechanisms C, on the helmet in the housings F.
-
Apply the pawl A and rotate it downwards until it is tightened completely, pull down the
cover A1. Then repeat the step on the other side of the visor.
IMPORTANT!
Make sure that the visor touches the window trim; otherwise the visor needs further
adjustment by moving the mechanisms C forward (to loosen) and backward (to tighten)
in the housings F.
2. REMOVABLE & WASHABLE COMFORT PADDING
1 - INNER COMFORT PADDING EXTRACTION
1.1 Undo the chin strap (see relevant instructions), then remove the left cheek pads by
pulling end towards the inside of the helmet, to snap open the buttons on the pad rear
end for extract it. Repeat the same operations for the right cheek pad (fig. 1 ).
1.2 Release the rear fixing flap on the left-hand side from its support in the inner shell, by
gently working the shell edge seal and pulling the comfort padding at the nape height
towards the inside (fig. 2). Then do the same for the central flap and the rear right-
hand flap.
1.3 Release the front fixing flap on the left-hand side from its support in the inner shell, by
gently pulling the comfort padding towards the inside of the helmet (fig. 3). Then do the
same for the central flap and the front right-hand flap.
1.4 Extract the comfort padding from the helmet inside.
WARNING!
-
Take out the inner padding only to clean and wash it.
-
Never use your helmet without having correctly and completely replaced the inner com-
fort padding as well as the cheek pads.
-
Never modify the inner parts of the helmet.
-
Never use any tools to carry out the above-described operations.
2 - INNER COMFORT PADDING FITTING
2.1 Correctly insert the inner padding into the helmet.
2.2 Insert the visor fixing front flaps into the shell support, by gently pushing the liner
towards the helmet outside (fig. 3).
2.3 Insert the left- front- and right-hand padding rear flaps in the special support in the nape
area (fig. 2). To do this, gently work the shell edge seal and push until you hear the locks
go click, taking care to spread the liner in such a way that it adheres to the internal poly-
styrene.
2.4 Insert the fixing rigid flap betweenthe bottom trim and the EPS cheek pad press the
cheek pad to snap close the buttons on the pad rear end. Repeat the operations for the
right check pad.(fig.1)
WARNING!
While assemblying the cheek pads, position the “D-Ring” fas-tening system inside the
helmet in the respective seats of the cheek pads.
WARNING!
If your helmet is equipped with the “D-Ring” fas-tening system, fasten it according to the
special instructions (see “D-Ring” leaflet attached).
3 - CLEANING
3.1 Inner padding
-
Wash gently by hand, with mild soap and luke-warm (max 30° C) water only.
-
Rinse in cold water and let dry at room temperature, away from direct sunlight.
WARNING!
Do not machine wash.
3.2 Inner polystyrene:
-
Wipe clean with a damp cloth, then let dry at room temperature, away from direct
sunlight.


