background image

4

  Installing and Replacing Network Interface Cards

40

Nokia IP300 Series Security Platform Installation Guide

6.

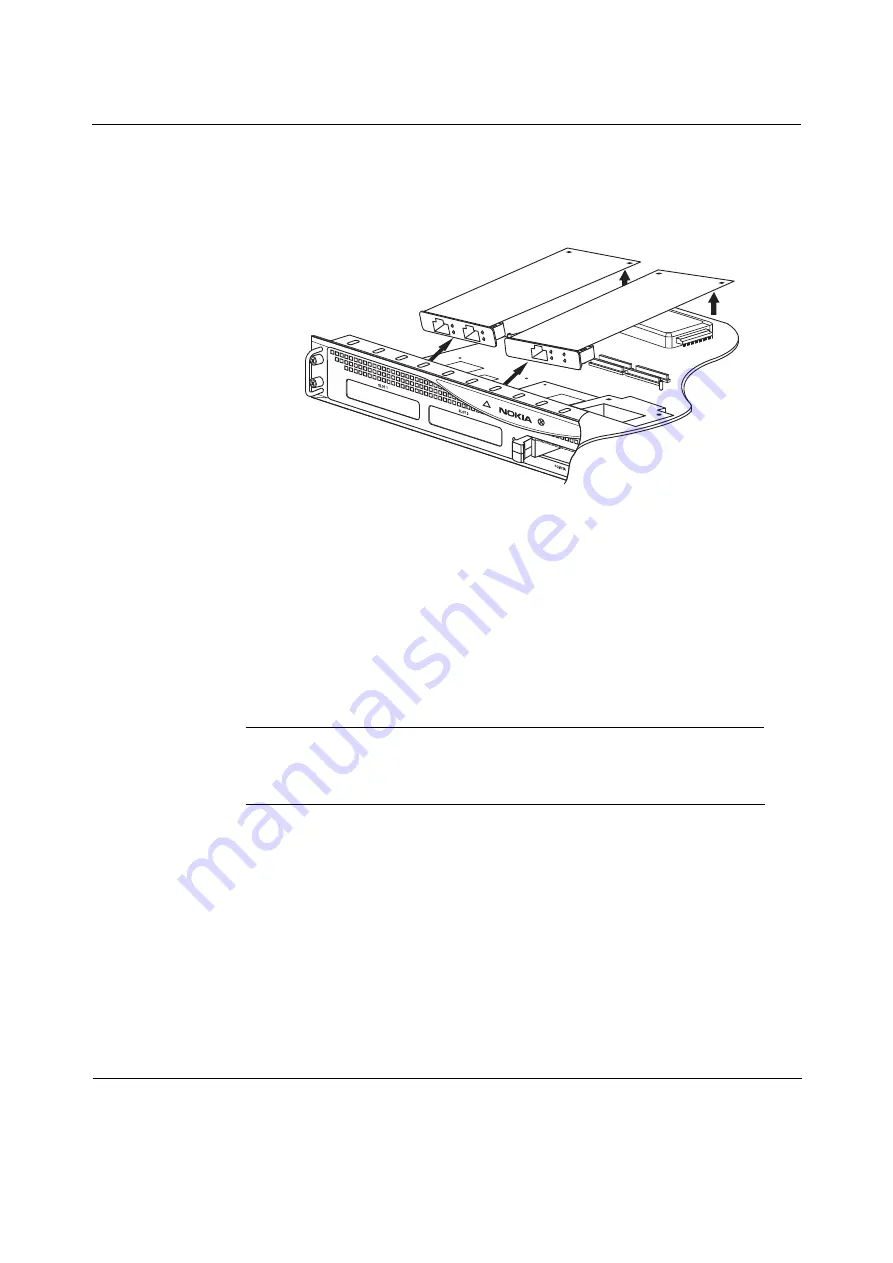
Remove the NIC by lifting the back of the NIC away from the chassis 
assembly and pulling the NIC gently away from the front panel.

7.

Insert the new NIC or blank bezel.

If you are removing a NIC without installing another NIC:

a.

Insert a blank bezel into the front panel slot formerly occupied by the 
NIC and push it gently into place. 

Make sure that the bezel is completely seated into the front panel and 
that the screw holes on the bottom of the bezel align with those in the 
front panel.

Note

To reduce electromagnetic interference (EMI), a blank bezel needs to 
be installed in the place of any NIC you have removed.

b.

Proceed to 

step 9

.

00257

All manuals and user guides at all-guides.com

Содержание IP300 Series

Страница 1: ...IP300 Series Security Platform Installation Guide Part No N450312006 Rev A Published September 2005 All manuals and user guides at all guides com a l l g u i d e s c o m ...

Страница 2: ...and any express or implied warranties including but not limited to implied warranties of merchantability and fitness for a particular purpose are disclaimed In no event shall Nokia or its affiliates subsidiaries or suppliers be liable for any direct indirect incidental special exemplary or consequential damages including but not limited to procurement of substitute goods or services loss of use da...

Страница 3: ...437 7089 email info ipnetworking_americas nokia com Europe Middle East and Africa Nokia House Summit Avenue Southwood Farnborough Hampshire GU14 ONG UK Tel UK 44 161 601 8908 Tel France 33 170 708 166 email info ipnetworking_emea nokia com Asia Pacific 438B Alexandra Road 07 00 Alexandra Technopark Singapore 119968 Tel 65 6588 3364 email info ipnetworking_apac nokia com Web Site https support noki...

Страница 4: ...4 Nokia IP300 Series Security Platform Installation Guide All manuals and user guides at all guides com ...

Страница 5: ...e 10 About the Nokia IP300 Series Flash Based Appliance 11 Managing the IP300 Series Appliance 12 About the IP300 Series Appliance 13 Ethernet Management Ports 14 Built in Console Port 15 Built in AUX Port 17 Status LEDs 18 Site Requirements 19 Product Disposal 19 Software Requirements 21 2 Installing the Appliance 23 Rack Mounting the Appliance 23 Connecting Power and Turning the Power on 25 Conn...

Страница 6: ...ating Interfaces 43 Monitoring Network Interface Cards 43 5 Connecting PMC Network Interface Cards 45 Four Port and Two Port 10 100 Mbps Ethernet Interface PMC 46 Ethernet PMC NIC Features 46 Connectors and Cables 47 Two Port V2 Gigabit Ethernet Card PMC Copper 49 Connectors and Cables 50 Two Port Gigabit Ethernet Card PMC Fiber 52 Connectors and Cables 53 6 Installing and Replacing Other Componen...

Страница 7: ... Card 79 8 Using the Boot Manager 81 Variables 82 Viewing the Variables and Other System Parameters 84 Setting the Variables 86 Other Commands 88 Booting the System 89 Using the Boot Manager to Install IPSO 89 Protecting the Boot Manager with a Password 90 Installing the Boot Manager 91 Upgrading the Boot Manager 92 9 Troubleshooting 95 General Troubleshooting Information 95 Troubleshooting Routin...

Страница 8: ... IP300 Series Security Platform Installation Guide B Compliance Information 113 Declaration of Conformity 113 Compliance Statements 115 FCC Notice US 116 Index 119 All manuals and user guides at all guides com ...

Страница 9: ...ts 31 Figure 11 Four Port Ethernet NIC Front Panel Details 46 Figure 12 Two Port Ethernet NIC Front Panel Details 47 Figure 13 Output Connector for the Ethernet Cable 48 Figure 14 Ethernet Crossover Cable Pin Connections 49 Figure 15 Two Port V2 Gigabit Ethernet NIC Copper 50 Figure 16 Ethernet Cable Connector Output Pin Assignments 51 Figure 17 Gigabit Ethernet Crossover Cable Pin Connections 52 ...

Страница 10: ...2 Nokia IP300 Series Security Platform Installation Guide All manuals and user guides at all guides com ...

Страница 11: ...Related Documentation In this Guide This guide is organized into the following chapters and appendixes Chapter 1 Overview presents a general overview of the IP300 Series appliance Chapter 2 Installing the Appliance describes how to rack mount the appliance and how to physically connect it to a network and power Chapter 3 Performing the Initial Configuration describes how to make the appliance avai...

Страница 12: ...ot Manager describes how to use the Nokia IPSO boot manager Chapter 9 Troubleshooting discusses problems you might encounter and proposes solutions to these problems Appendix A Technical Specifications gives technical specifications such as interface characteristics Appendix B Compliance Information includes compliance and regulatory information Conventions this Guide Uses The following sections d...

Страница 13: ...r one or more of the following elements on a command line path Table 1 Command Line Conventions Convention Description command This required element is usually the product name or other short word that invokes the product or calls the compiler or preprocessor script for a compiled Nokia product It might appear alone or precede one or more options You must spell a command exactly as shown and use l...

Страница 14: ...cessor argument You must enter a flag exactly as shown including the preceding hyphen ext A filename extension such as ext might follow a variable that represents a filename Type this extension exactly as shown immediately after the name of the file The extension might be optional in certain products Punctuation and mathematical notations are literal symbols that you must enter exactly as shown Si...

Страница 15: ...re nat Key names Keys that you press simultaneously are linked by a plus sign Press Ctrl Alt Del Menu commands Menu commands are separated by a greater than sign Choose File Open The words enter and type Enter indicates you type something and then press the Return or Enter key Do not press the Return or Enter key when an instruction says type Italics Emphasizes a point or denotes new terms at the ...

Страница 16: ...tallation Guide this document Nokia Network Voyager inline help feature and Nokia Network Voyager Reference Guide online CLI Reference Guide for the version of Nokia IPSO you are using You can find the Nokia IP300 Series Security Platform Installation Guide in PDF on the Nokia support site https support nokia com You can access inline help and the Nokia Network Voyager Reference Guide from Nokia N...

Страница 17: ...outing combined with the industry leading Check Point VPN 1 FireWall 1 enterprise security suite The small size of the IP300 Series appliance makes them ideal for installations that need to conserve space As network devices these appliances support a comprehensive suite of IP routing functions and protocols including RIPv1 RIPv2 IGRP OSPF and BGP4 for unicast traffic and DVMRP for multicast traffi...

Страница 18: ...ory configuration of 1 GB The Nokia IP300 Series appliance provides built in hardware based encryption acceleration The IP380 appliance also supports an optional encryption accelerator card to further enhance VPN performance Table 3 Specifications for IP300 Series Disk Based Appliances Feature Nokia IP350 Nokia IP380 Maximum memory size 512 MB 1 GB Optional encryption accelerator card No Yes Line ...

Страница 19: ...appliances have a maximum memory size of 1GB Nokia IPSO version 3 9 3 9 Check Point Enforcement Module support only Check Point NGX R60 Check Point NGX R60 Table 3 Specifications for IP300 Series Disk Based Appliances Feature Nokia IP350 Nokia IP380 Table 4 Specifications for IP300 Series Flash Based Appliances Feature Nokia IP355 Nokia IP385 Maximum memory size 1 GB 1 GB Compact Flash 512 MB 512 ...

Страница 20: ... Nokia Network Voyager on page 30 The IPSO command line interface CLI an SSHv2 secured interface that enables you to easily configure Nokia IP security platforms from the command line Everything that you can accomplish with Network Voyager manage monitor and configure the IP300 Series appliance you can also accomplish with the CLI Line cards 2 two port 10 100 NICs 1 four port 10 100 NIC 2 two port...

Страница 21: ...are and third party applications such as Check Point FireWall 1 for Nokia Horizon Manager can perform installations and upgrades on up to 2 500 Nokia IP security platforms offering administrators the most rapid and dependable upgrade to Check Point NG About the IP300 Series Appliance The following figures show component locations for the Nokia IP300 Series appliance Figure 1 Component Locations Fr...

Страница 22: ...ports and link LEDs Note The Ethernet management ports are intended for management purposes These ports do not provide the same performance as Ethernet cards in the PMC slots Figure 3 Ethernet Management Ports Details Caution Cables that connect to the Ethernet ports must be IEEE 802 3 compliant to prevent potential data loss 00249 Power plug Power switch 00120 Activity LED yellow Link LED green R...

Страница 23: ...ludes a PCMCIA slot that supports PCMCIA modems See Installing a PCMCIA Modem on page 56 Note Nokia products only support NICs purchased from Nokia Corporation or Nokia approved resellers The Nokia Global Support Services group can only provide support for Nokia products that use Nokia approved accessories For sales or reseller information contact a Nokia service provider listed in the Nokia Conta...

Страница 24: ...allation Guide Figure 4 Pin Assignments for Console Connection 700001 6 9 5 1 Pin Assignment Input Output 1 DCD Input 2 RXD Input 3 TXD Output 4 DTR Output 5 GND 6 DSR Input 7 RTS Output 8 CTS Input 9 DTR Output All manuals and user guides at all guides com ...

Страница 25: ...pin assignment information for modem connections Figure 5 Pin Assignments for Modem Connection 700001 6 9 5 1 Pin Input Output To DB25 Cable Out To DB9 Cable Out 1 DCD Input 8 DCD 7 RTS 8 CTS 2 RXD Input 2 TXD 3 TXD 3 TXD Output 3 RXD 2 RXD 4 DTR Output 20 DTR 6 DSR 9 RI 5 GND 7 GND 5 GND 6 DSR Input 6 DSR 4 DTR 7 RTS Output 4 RTS 1 DCD 8 CTS Input 5 CTS 1 DCD 9 RI Output 22 RI 4 DTR All manuals a...

Страница 26: ...f the appliance as Figure 6 shows Figure 6 Appliance Status LEDs Table 5 Appliance Status LEDs Status Indication Explanation LED Front Panel Symbol Solid Power on Solid Unit is experiencing an internal Voltage problem Blinking The unit is experiencing a temperature problem Solid red One or more fans are not operating properly or a 5V 3 3V or 12V fuse is blown Power status Fan problem Voltage All m...

Страница 27: ...ed of in accordance with all applicable national state and local laws and regulations These devices contain materials and components that must be disposed of properly Therefore to help prevent damage to the environment Nokia encourages you to dispose of these devices in an environmentally friendly manner The following resources are available to you to help with equipment disposal decisions Many No...

Страница 28: ...batteries according to the manufacturer s instructions Warning To reduce the risk of fire electric shock and injury when you use telephone equipment follow basic safety precautions Do not use the product near water Caution Do not place objects over the ventilation holes on the IP350 or IP380 appliance The components might overheat and become damaged The crossed out wheeled bin means that within th...

Страница 29: ...quirements The Nokia IP300 Series appliance supports the following operating system and applications Operating System Requirements IPSO v3 5 1 v3 7 and later Flash based appliances require IPSO v3 9 or later Firewall and VPN Software Requirements Check Point NG VPN 1 FW 1 FP2 or higher For information about changes to the software requirements or additional applications that have become available ...

Страница 30: ...1 Overview 22 Nokia IP300 Series Security Platform Installation Guide All manuals and user guides at all guides com ...

Страница 31: ...es Caution Protect your IP300 Series appliance and other electronic equipment from static discharge by making sure you are properly grounded before you touch any electronic components Note The operating temperature range for the Nokia IP300 Series appliance is 0 C to 45 C 32 F to 113 F Rack Mounting the Appliance The IP300 Series appliance mounts in a standard 19 inch rack with four mounting screw...

Страница 32: ...r appliance on the rack Figure 7 Mounting Screws Location You can relocate the mounting brackets as Figure 8 shows so that the unit is 2 inches forward of the rack Figure 8 Adjustable Mounting Brackets Two mounting positions are available allowing you to mount the unit either flush with the rack or two inches forward of the rack Mounting Screw Slots 00251a All manuals and user guides at all guides...

Страница 33: ...ws Note The IP300 Series appliance power supply automatically detects the input voltage 115VAC 60Hz 90 to 132 or 220VAC 50Hz 180 to 264 and configures itself appropriately Figure 9 Back Panel Power Switch To connect the power supply 1 Connect the power cord securely into the power socket on the back of the appliance 2 Plug the other end of the cord into a three wire grounded power strip or wall ou...

Страница 34: ...e power strip or wall receptacle you plugged the appliance in to If the fans are still not running or if the power LED does not illuminate contact your Nokia service provider as listed in Nokia Contact Information on page 3 for technical support Connecting Network Interfaces Connect at least one network interface to use as the Network Voyager system management interface This interface is configure...

Страница 35: ...rver to provide the initial configuration information the first time the appliance is started You can perform the initial configuration manually by using a console connection This chapter describes how to perform the initial configuration manually by using a console connection It includes the following sections Using a Console Connection to Perform the Initial Configuration Accessing Nokia Network...

Страница 36: ...uipment DTE interface or terminal emulation program configured with the following settings for the console 9600 bps 8 data bits No parity 1 stop bit To connect to the console 1 Connect the supplied null modem cable console cable to the console port on the front panel of the IP300 Series appliance Use only the DB9 port on the front panel labeled Console the serial AUX port is an auxiliary modem por...

Страница 37: ...t Manager After some miscellaneous output the following prompt appears Hostname If the Hostname prompt does not appear on the console check the console port and console display connections to ensure that the serial cable is completely plugged in at both ends If you verify the console connections and still do not see either the BOOTMGR or Hostname prompts verify that the terminal or terminal emulat...

Страница 38: ... the prompts during the initial configuration process see the release notes for the Nokia software release you are running 4 After you complete the initial configuration you can use Network Voyager to configure the remaining network ports Accessing Nokia Network Voyager You can use Network Voyager to configure the remaining network ports on your IP300 Series appliance To open Network Voyager 1 Sta...

Страница 39: ...ion and check that all cables are firmly connected Accessing Network Voyager Reference Information As you use Network Voyager the Nokia Network Voyager Reference Guide and Network Voyager inline help are available for you to use You can access both information sources from the Network Voyager interface as Figure 10 shows Figure 10 Network Voyager Reference Access Points Links to Inline Help Contex...

Страница 40: ...lso click Help at the top of the Network Voyager window to get inline help for the entire Network Voyager window To turn off inline help click Close Using Network Voyager to Monitor an IP300 Series Appliance After you install and configure your IP300 Series appliance you can use Network Voyager to monitor its operation Click Monitor from the Network Voyager home page to access the monitoring funct...

Страница 41: ...Using Nokia Horizon Manager You can use Horizon Manager to install and upgrade the Nokia proprietary IPSO operating system For information about how to obtain Horizon Manager see the Nokia Contact Information on page 3 All manuals and user guides at all guides com a l l g u i d e s c o m ...

Страница 42: ...3 Performing the Initial Configuration 34 Nokia IP300 Series Security Platform Installation Guide All manuals and user guides at all guides com ...

Страница 43: ...pics are covered Deactivating Configured Interfaces Removing Installing and Replacing NICs Configuring and Activating Interfaces Monitoring Network Interface Cards For detailed information on specific network interface cards see Chapter 5 Connecting PMC Network Interface Cards Caution You should have a working knowledge of networking equipment before attempting to service an IP300 Series appliance...

Страница 44: ...nterfaces on the NIC If you do not deactivate the interfaces before removing the NIC you may have to reinstall the NIC to deactivate its logical and physical interfaces in Network Voyager For information about how to access Network Voyager see Accessing Nokia Network Voyager on page 30 Removing Installing and Replacing NICs Note Before removing a configured network interface card with these instru...

Страница 45: ...ard Note Because power to the IP300 Series appliance is automatically disconnected when the chassis assembly is opened you do not need to manually disconnect the power for this procedure Any servicing of the unit however should be completed with the chassis assembly fully removed from the appliance Power is still active in the chassis body and care should be taken when working on the power supply ...

Страница 46: ...ingers or a screwdriver to loosen the retaining screws that hold the chassis assembly 3 Gently pull the chassis assembly forward to expose the NIC connectors Remove the tray completely to avoid damaging components Chassis assembly retaining screws 00252a All manuals and user guides at all guides com a l l g u i d e s c o m ...

Страница 47: ...e bezel retaining screws If you are installing a NIC in an unoccupied slot remove the blank bezel that occupies the space in the appliance front panel retain it for future use and proceed to step 7 5 From above the chassis assembly remove the NIC retaining screws from the back of the NIC 00254b 00255a All manuals and user guides at all guides com ...

Страница 48: ...g a NIC without installing another NIC a Insert a blank bezel into the front panel slot formerly occupied by the NIC and push it gently into place Make sure that the bezel is completely seated into the front panel and that the screw holes on the bottom of the bezel align with those in the front panel Note To reduce electromagnetic interference EMI a blank bezel needs to be installed in the place o...

Страница 49: ...he NIC bezel into the front panel b Gently push the back of the NIC down toward the chassis assembly Make sure that the NIC edge is completely seated into the connectors on the chassis assembly 8 From the top of the chassis assembly screw the NIC retaining screws into the standoffs on the back of the NIC 00256a 00255b All manuals and user guides at all guides com ...

Страница 50: ...Nokia IP300 Series Security Platform Installation Guide 9 From beneath the chassis assembly screw in the bezel retaining screws 10 Insert and close the chassis assembly until it clicks into place 00254a 00252c All manuals and user guides at all guides com ...

Страница 51: ...ork Voyager on page 30 Monitoring Network Interface Cards You can asses the general operating condition of the NICs in your appliance by looking at the LED status indicators on the NICs The status indicators for each NIC are explained in the NIC reference chapter For the status indicator information for the built in Ethernet ports or the two port Ethernet NIC see Four Port and Two Port 10 100 Mbps...

Страница 52: ...4 Installing and Replacing Network Interface Cards 44 Nokia IP300 Series Security Platform Installation Guide All manuals and user guides at all guides com ...

Страница 53: ...rt 10 100 Mbps Ethernet Interface PMC Two Port V2 Gigabit Ethernet Card PMC Copper Two Port Gigabit Ethernet Card PMC Fiber For instructions on adding or replacing interface cards see Chapter 4 Installing and Replacing Network Interface Cards Caution Protect your IP300 Series appliance and other electronic equipment from electrostatic discharge ESD damage by making sure you are properly grounded b...

Страница 54: ...pliance the NIC is installed before the appliance is delivered to you For information on how to add or replace a NIC later see Chapter 4 Installing and Replacing Network Interface Cards Ethernet PMC NIC Features The Ethernet PMC NIC supports tracing through tcpdump You can configure and monitor Ethernet interfaces with Network Voyager Specifically you set the port speed and full duplex or half dup...

Страница 55: ...t NIC Front Panel Details After the power is turned on the Ethernet link LEDs on the appliance and on the remote equipment illuminate to indicate the connection As data is transmitted the activity LEDs on the appliance light up Connectors and Cables The connectors on the Ethernet NIC are RJ 45 connectors To connect to a 10 Mbps or 100 Mbps hub use a straight through RJ 45 cable To connect directly...

Страница 56: ...u can order additional cables from a cable vendor of your choice Figure 13 shows the pin assignments for the cable The RJ 45 cable output connector is numbered from right to left with the copper tabs facing up and toward you Figure 13 Output Connector for the Ethernet Cable Figure 14 shows the pin assignments for the RJ 45 cross over cable Pin Assignment 1 TX 2 TX 3 RX 4 5 6 RX 7 8 00270 8 1 All m...

Страница 57: ...an occupy any of the slots or subslots in an appliance that other I O cards do not occupy Note Copper Gigabit Ethernet NICs you use in IP300 Series appliances need to be the Version 2 type as indicated on the right end of the NIC faceplate These NICs are sold by Nokia under the order code NIF4425 The V2 copper Gigabit Ethernet NIC supports packet tracing for analysis using the tcpdump program in t...

Страница 58: ...tegory 5 type cable or as required by your network configuration Note Certain circumstances might require shielded Category 5 Ethernet cables to meet Class B emissions requirements Note All Nokia copper Gigabit Ethernet NICs support cable auto sensing You can use a straight through or crossover cable to connect the NIC to a Gigabit Ethernet hub or switch or to connect directly to a host In Figure ...

Страница 59: ...thernet Cable Connector Output Pin Assignments To connect directly to a host use an RJ 45 crossover cable wired as Figure 18 shows 00270 Pin Gigabit Ethernet Assignment 10 100 Mbps Assignment 1 BI_DA TX 2 BI_DA TX 3 BI_DB RX 4 BI_DC 5 BI_DC 6 BI_DB RX 7 BI_DD 8 BI_DD 8 1 All manuals and user guides at all guides com ...

Страница 60: ...network components you can order appropriate adapter cables separately from a cable vendor of your choice Two Port Gigabit Ethernet Card PMC Fiber All NICs installed in the IP300 Series appliance are installed into slots on the appliance Ethernet NICs can occupy any of the slots or subslots in an appliance that other I O cards do not occupy 00020 1 2 3 4 5 6 7 8 1 2 3 4 5 6 7 8 00017 1 1 2 3 4 5 6...

Страница 61: ...and monitor Ethernet interfaces with Nokia Network Voyager the Web based element management interface to Nokia IP security platforms Specifically you set the port speed and full duplex mode with Network Voyager Figure 19 shows the front panel details for the two port fiber optic Gigabit Ethernet NIC you use in the IP300 Series appliance Figure 19 Two Port Gigabit Ethernet NIC Fiber Connectors and ...

Страница 62: ...he type of connector required for the destination Gigabit Ethernet device You can also use a half duplex LC to LC cable to loop back the transmit port of an interface to the receiver port Two LC to SC cables are included with two port fiber optic Gigabit Ethernet NICs You can order additional cables from a cable vendor of your choice All manuals and user guides at all guides com ...

Страница 63: ... PCMCIA Modem Replacing a Hard Disk Drive Replacing or Upgrading Memory Installing an Encryption Accelerator Card Replacing the Battery For instructions on adding or replacing interface cards see Chapter 4 Installing and Replacing Network Interface Cards Caution You should have a working knowledge of networking equipment before attempting to service an IP300 Series appliance Limit service of the a...

Страница 64: ...about the country codes see the Nokia Network Voyager Reference Guide Note The IP300 Series appliance supports PCMCIA modems Nokia supports only Nokia supplied modems For further information contact the appropriate Nokia customer support site listed Nokia Contact Information on page 3 Before You Start To install the modem in your appliance you need the following Physical access to the appliance A ...

Страница 65: ...is used To configure IPSO to allow logins through the modem click Config on the Home page in Network Voyager and then click on the Network Access and Services link in the Security and Access Configuration section For information about accessing Network Voyager and the related reference materials see Accessing Nokia Network Voyager on page 30 Replacing a Hard Disk Drive The IP350 and IP380 applianc...

Страница 66: ...efore You Start To install the hard disk drive in your appliance you need the following Physical access to the appliance A Nokia approved hard disk drive Access to the appliance through Network Voyager A Phillips head screwdriver A torque screwdriver capable of a 69 4ozf in 5kgf cm setting To replace a hard disk drive 1 Use Network Voyager to shut the appliance down For information about how to ac...

Страница 67: ...power to an IP300 Series appliance is automatically disconnected when the chassis assembly is opened you do not need to manually disconnect the power for this procedure Any servicing of the unit however should be completed with the chassis assembly fully removed from the appliance Power is still active in the chassis body and care should be taken when working on the power supply or power supply wi...

Страница 68: ...ide 4 From the bottom of the chassis assembly remove the retaining screws that hold the hard disk drive unit 5 Gently remove the hard disk drive from the motherboard taking care not to damage the connector 6 Insert the new hard disk drive unit 00261 00262 All manuals and user guides at all guides com ...

Страница 69: ... drive gently into place Take care to align the connectors correctly as the connectors are not keyed 7 Tighten the retaining screws that holds the hard disk drive into place 8 Slide the chassis assembly back into the appliance until it clicks into place 00261 00252c All manuals and user guides at all guides com ...

Страница 70: ...ither appliance by using a Nokia approved memory upgrade kit The IP350 and IP380 come with different memory configurations Contact Nokia customer support for more information on the supported memory configurations Note Nokia recommends that you obtain memory kits only from Nokia or authorized resellers For further information contact the appropriate Nokia customer support site listed Nokia Contact...

Страница 71: ... Series appliance and the memory modules from electrostatic discharge ESD make sure you are properly grounded before you touch these components Note Because power to an IP300 Series appliance is automatically disconnected when the chassis assembly is opened you do not need to manually disconnect the power for this procedure Any servicing of the unit however should be completed with the chassis ass...

Страница 72: ...er cord Adding or Replacing DIMMs To add or replace DIMMs 1 Use Network Voyager the CLI or the IPSO shell to halt the IP350 or IP380 appliance To use the CLI or IPSO shell simply enter halt For information about accessing Network Voyager see Accessing Nokia Network Voyager on page 30 2 Loosen the two front panel retaining screws Chassis assembly retaining screws All manuals and user guides at all ...

Страница 73: ...y memory module necessary by pressing the two retaining clips outward and carefully pulling each DIMM upward as the following figure shows You might need to pull opposite ends of the DIMM alternately to gradually free it from the contact pins 5 The memory DIMMs are keyed to prevent improper insertion Press the new DIMM into the socket until it clicks into place 00252a 00263 All manuals and user gu...

Страница 74: ...ent length sets of contacts which mate with the slots on the socket Be sure the contacts and slots are properly aligned before you insert the DIMM The retaining clips move into the lock position as you press the DIMM into place 6 Slide the chassis assembly back into the appliance until it clicks into place 00264 00252c All manuals and user guides at all guides com ...

Страница 75: ...elerator Card Note The IP350 and IP355 do not support the optional encryption accelerator card The encryption accelerator card provides high speed cryptographic processing that enhances VPN performance in the IP380 The IP380 and IP385 appliances also support an optional encryption accelerator card to further enhance VPN performance No hardware configuration is required for the encryption accelerat...

Страница 76: ...lerator card software package is part of IPSO so the appliance automatically detects and configures the card You must use Network Voyager to configure your software applications IPSec or Checkpoint VPN to make use of the available hardware accelerator For details see Configuring Software to Use Hardware Acceleration on page 72 Before You Start Before you install the encryption accelerator card you...

Страница 77: ... front panel retaining screws 3 Slide the chassis assembly forward to expose the motherboard components as the following figure shows 4 Locate the PMC connectors on the rear of the motherboard Caution Make sure you locate the correct connectors for the VPN acceleration card Do not use the PMC connectors located at the front of the motherboard those connectors are for NICs Chassis assembly retainin...

Страница 78: ... the motherboard The two sets of connectors should be aligned with each other The four screw holes and four standoffs should also be aligned with one another 6 Push down on the card until it is properly seated on the motherboard 00267 A B Standoffs Insert the VPN card into connectors Screw card into standoffs PMC connectors for VPN card All manuals and user guides at all guides com ...

Страница 79: ...ctions are properly aligned 10 To secure the connections tighten the screws firmly but do not overtighten 11 Slide the chassis assembly back into the appliance and resecure the two retaining screws Reseating the chassis assembly automatically restores power to the appliance 12 Configure your software to use hardware acceleration For more information see Configuring Software to Use Hardware Acceler...

Страница 80: ... to create a VPN tunnel see To configure Check Point VPN on page 72 To configure IPsec 1 Start Nokia Network Voyager for your appliance 2 On the Network Voyager home page click Config 3 Under Interfaces click IPSec 4 Scroll down and click IPSec Advanced Configuration 5 At Hardware Device Configuration click On 6 Click Apply to enable the card To configure Check Point VPN 1 Start Nokia Network Voya...

Страница 81: ...iance Physical access to the appliance A Phillips head screwdriver A wrist grounding strap Optional Safety glasses Warning An explosion might occur if the battery is incorrectly placed Replace the battery only with the same or equivalent type that the manufacturer recommends Dispose of used batteries according to the manufacturer s instructions Warning Make certain that you removed the power cord ...

Страница 82: ...ect against electrostatic discharge damage to the appliance Use the disposable grounding strap included in the battery replacement kit To install the battery perform the following tasks 1 Locate the battery on the motherboard The battery is in a black battery holder secured with a battery retaining pin Figure 22 shows the battery location in the IP300 Series appliance All manuals and user guides a...

Страница 83: ... such as a plastic probe to slide the battery out of the battery holder through the cutout in the holder Caution You must place the new battery into the battery holder observing the correct polarity The positive terminal of the battery must be facing up 3 With the positive side facing up slide the new battery through the cutout in the battery holder 00459 All manuals and user guides at all guides ...

Страница 84: ...ld start up normally with the new battery installed If it does not repeat this procedure If the appliance does not start up normally after that contact your Nokia service provider 5 Reset the appliance date and time information using Network Voyager or the command line interface You need to do this because the battery is required to maintain the date and time whenever you shut down the appliance A...

Страница 85: ...CIA slots that can support a flash memory PC card having a capacity of 1 GB or higher Before You Begin To install a PC card you need Physical access to the appliance Access to the appliance by using Nokia Network Voyager or the command line interface CLI Replacement PC card and accompanying documentation Caution To avoid potential equipment malfunction Nokia recommends that you obtain PC cards onl...

Страница 86: ...rd Storing System Logs on the Flash Memory PC Card You can use the flash memory PC card to store system log messages Use Nokia Network Voyager to configure the flash memory PC card as an optional disk After you reboot the Nokia IP300 Series appliance use Network Voyager to configure system logging options For more information see the Nokia Network Voyager Reference Guide You must disable the flash...

Страница 87: ...ates the PC card slot set optional disk device id 1 2 off 3 Enter the following command halt or reboot You can now remove the flash memory PC card Caution When you remove the card hold the flash memory PC card while you push the eject button to prevent the card from ejecting too quickly Transferring Files with the Flash Memory PC Card You can copy configuration files between the internal compact f...

Страница 88: ...ing the following command mount dev wd1 cdrom The cdrom directory is a default directory in IPSO for mounting media 4 Use the cp command to transfer IPSO images or configuration files to and from the flash memory PC card For example to copy the current IPSO image from the compact flash to the flash memory PC card use the following command cp image current ipso tgz cdrom 5 Use the following command...

Страница 89: ...cluding the following Booting from alternate kernels which might reside on nondefault devices or directories Installing new versions of IPSO the operating system Obtaining system information Performing various housekeeping tasks When you first receive your IP300 Series appliance the boot manager uses factory default parameters kernel boot device and so on for the boot process The factory defaults ...

Страница 90: ...ion number of the boot manager This variable cannot be set from the command line autoboot If autoboot is set to no the IP300 Series appliance stops at the boot manager command line during the boot process If autoboot is set to yes the IP300 Series appliance does not stop at the boot manager command line during a boot up It does wait for the amount of time specified in bootwait for input from the k...

Страница 91: ...lt image current kernel boot flags The string of flags passed to the kernel Factory default x Flag Meaning d Debug Mode Enters the kernel debugger as soon as possible in the kernel initialization s Single User Mode If the console is marked as insecure you must enter the root password to access the manager v Verbose Mode Verbose during device probing and thereafter Table 6 Boot manager variables Va...

Страница 92: ...mand to view the values of variables currently stored in the boot manager nonvolatile memory The command has the following syntax printenv For example BOOTMGR 93 printenv Bootmgr Revision 3 3 base kernel 3 5 1 06 12 2002 080000 autoboot YES testboot NO bootwait 0 boot file boot flags boot device vendor Nokia model IP All manuals and user guides at all guides com ...

Страница 93: ... B S Network Interfaces loop0 flags 10b UP LINK LOOPBACK PRESENT soverf0 flags 2923 UP LINK MULTICAST PRESENT IPV6ONLY stof0 flags 2903 UP LINK PRESENT IPV6ONLY tun0 flags 107 UP LINK POINTOPOINT PRESENT eth1 flags 131 LINK BROADCAST MULTICAST PRESENT ether 0 20 30 0 11 4 speed 10M full duplex eth2 flags 130 BROADCAST MULTICAST PRESENT ether 0 20 30 0 11 5 speed 10M full duplex eth3 flags 130 BROA...

Страница 94: ...ice and directory are optional The default directory is image on the wd0 device For example BOOTMGR 2 ls wd0 image current description bootmgr etc kernel debug usr VERSION cdrom ipso tgz mnt web bin dev kernel sbin Setting the Variables setenv Use the setenv command to set a particular variable The command has the following syntax setenv name value where name is the name of the variable and value ...

Страница 95: ...se the set defaults command to set variables to their factory default values The command has the following syntax set defaults name where name is the name of the variable to be set to its factory default If name is not specified all variables are set to their factory defaults For example the following command sets the value of autoboot to be yes the factory default BOOTMGR 2 set defaults autoboot ...

Страница 96: ...ias The command has the following syntax unsetalias name where name is the name of the alias to be cleared For example the following command deletes the disk alias from the list of aliases BOOTMGR 2 unsetalias disk Other Commands halt Use the halt command to halt the system The command has the following syntax halt help Use the help command to display a list of the available commands The command h...

Страница 97: ...mand prompt enter the following BOOTMGR 0 boot wd0 image current mykernel vd This command boots mykernel from disk wd0 in verbose and debug mode You can supply all any or none of the arguments If you do not supply an argument the boot manager uses its default It first searches its nonvolatile memory to see if the corresponding default argument is specified there If so it uses that value if not it ...

Страница 98: ...mation the install command requests your system IP address the server IP address and other information 3 Reboot the IP300 Series appliance Protecting the Boot Manager with a Password To prevent accidental or unauthorized access to your IP300 Series appliance hard disk you can require that the user enter a password to access the boot manager install command Use the password command to set the passw...

Страница 99: ...you should not need to reinstall it If you should need to reinstall the boot manager contact the appropriate Nokia customer support site listed in the Nokia Contact Information on page 3 for instructions and a new boot manager The command to install the boot manager has the following syntax install_bootmgr boot device boot file where boot device is the storage device to which you write the new boo...

Страница 100: ...ile where boot device is the storage device from which the boot manager loads at boot up and boot file is the new boot manager image The new boot manager options are cpipflash cpvpnflash nkipflash and nkvpnflash Execute the upgrade_bootmgr command from IPSO the operating system not from the boot manager For complete upgrade procedures refer to the appropriate version of release notes Note To insta...

Страница 101: ...nd prompt enter etc upgrade_bootmgr wd0 etc nkipflash The command upgrades the boot manager with the new image nkipflash writing it into the hard disk drive wd0 The upgrade takes some time to complete Do not interrupt the upgrade process All manuals and user guides at all guides com a l l g u i d e s c o m ...

Страница 102: ...8 Using the Boot Manager 94 Nokia IP300 Series Security Platform Installation Guide All manuals and user guides at all guides com ...

Страница 103: ...o the Console Port No Error Message Two laptop computers using terminal emulation programs or terminals should be able to communicate back to back in the same way that the terminal communicates with the IP300 Series appliance If this is not possible using your laptop computer or terminal the problem is with the terminal or cable and not the appliance Problem You do not have a console connection to...

Страница 104: ...ot use flow control The terminal should be set for no flow control Problem Defective IP300 Series appliance or file system Solution Contact the Nokia customer support site listed in Nokia Contact Information on page 3 Problem Database is corrupt Solution Return to default settings according to the instructions included in the instructions for resetting the default password or contact the Nokia cus...

Страница 105: ...e boots up the following text appears Enter pathname of shell or RETURN for sh Press Enter 3 Type etc overpw at the prompt When the response asks if you want to continue type y 4 The admin password defaults to no password for admin Continue to boot to multiuser mode 5 Reconfigure the password as you normally would Note Blank passwords are not accepted in Network Voyager In such cases enter the fol...

Страница 106: ...default configuration 3 Create the new default configuration Do Not Get a Login Prompt Error Messages Appear Problem The IP300 Series appliance is defective or the file system on the IP300 Series appliance is defective Solution Contact the Nokia customer support site listed in Nokia Contact Information on page 3 Note Use the full installation procedure to install a new system The new system comple...

Страница 107: ...ection to verify the interface configuration and fix it if necessary Problem Host port configuration is incorrect Solution Use the CLI over the console connection to verify the interface configuration and fix it if necessary Problem Wrong link speed Solution Use the CLI over the console connection to verify the interface configuration and fix it if necessary Do Not See Interfaces that Should be Pr...

Страница 108: ...e page in Network Voyager that the interface port is configured as active Problem High collision rate on the hub Solution Disconnect connections one at a time until the problem is localized to one computer and troubleshoot further Unable to Ping Through Appliance No Connectivity Between Ports This section covers connectivity issues that are isolated within an IP300 Series appliance or network Loca...

Страница 109: ...the local interface is the default route for that computer Problem The ARP table has old information Solution If the ARP table has an old or invalid entry for the device associated with the IP address you are attempting to ping use Network Voyager to delete the invalid entry For information about how to access Network Voyager and the related reference materials see Accessing Nokia Network Voyager ...

Страница 110: ...on each network Problem DVMRP is not enabled on the interfaces Solution Verify that DVMRP is enabled on the interfaces in use Problem Exceeding TTL on clients Solution Verify that the client is set up for the proper TTL number Many clients are set to receive local traffic only one hop away Problems Interfacing to 1483 Devices Classical IP Problem Remote and local devices are not configured for the...

Страница 111: ...is not properly plugged in Solution Check cord Make sure it is properly seated at both ends Problem Power supply not providing power Solution Check power source If there is no power at the source take appropriate action such as inserting a new fuse or resetting circuit breaker Appliance Does Not Recognize New Memory Configuration Problem DIMMs are not properly seated in DIMM sockets Solution Repea...

Страница 112: ... command at the boot manager prompt as shown in this example Loading boot manager BOOTMGR 0 printenv Bootmgr Revision 3 3 base kernel 3 5 1 fcs1 02 12 2001 102644 autoboot NO bootwait 5 boot file boot flags boot device No referenced boot file or boot device appears Setting the boot manager to defaults causes the boot manager to determine that no environment variables are set and it responds by imp...

Страница 113: ... Routing Problems Several useful tools are available to troubleshoot routing problems The first tool is available from the Monitor page in Network Voyager from which you display routing statistics and errors You can access this information from the command line interface using the ICLID IPSRD command line interface daemon command An example use of the ICLID command is shown below For information a...

Страница 114: ...ilter dvmrp interface memory resource version hostname IP address show route aggregate bgp igrp ospf static all direct inactive rip summary hostname IP address show route ospf Codes C connected S static I IGRP R RIP B BGP O OSPF E OSPF external A Aggregate K Kernel Remnant H Hidden S Suppressed The response to the preceding ICLID command is as follows 0 172 16 16 via 10 1 1 225 eith sp4p1c0 cost 3...

Страница 115: ...n page 30 Problem OSPF is not configured Solution Verify that OSPF is properly configured for all interfaces that are involved in OSPF routing For more information see Configuring OSPF from the Configuring Routing document page in Network Voyager You can access the document page by pressing Doc Problem OSPF hello and dead timers are not the same on each interface for a given link Solution Verify t...

Страница 116: ...bnet mask netmask does not match the class of IP address for RIP v1 Solution RIP version 1 must use consistent subnet masks change to RIP version 2 or OSPF to use inconsistent subnet masks Problem Number of networks exceeds the RIP limit Solution RIP can span up to 16 networks Verify that your network topology does not exceed this limit Common Problems Exchanging Routes Always enter a metric value...

Страница 117: ...nstallation Guide 109 Problem Routing protocol is not functioning properly Solution to ensure that each routing protocol is functioning properly see Common Problems with OSPF on page 107 and Common Problems with RIP on page 108 All manuals and user guides at all guides com ...

Страница 118: ...9 Troubleshooting 110 Nokia IP300 Series Security Platform Installation Guide All manuals and user guides at all guides com ...

Страница 119: ...res the following space in a rack 1 75 inches 4 45 centimeters of vertical space 18 inches 46 centimeters behind the front panel of the rack 6 inches 15 centimeters behind the IP300 Series appliance to allow the back exit fan to move air through the appliances Dimensions Height 1 75 in 4 45 cm Width 17 in 44 cm 19 in 48 cm rack mountable Depth 16 12 in 40 94 cm Weight 17 lbs 7 7 kg base system All...

Страница 120: ...put Connector Four port and two port Ethernet IEEE 802 3 10BASE T 100BASE T 1000BASE T unshielded twisted pair full duplex or half duplex RJ 45 Two port Fiber Gigabit Ethernet IEEE 802 32 Gigabit Ethernet Multimode Fiber LC Two port V2 Copper Gigabit Ethernet Straight through RJ 45 cable Category 5 type or crossover cable in some cases shielded Category 5 Ethernet cable to meet Class B emissions s...

Страница 121: ...mpliance information Declaration of Conformity Compliance Statements FCC Notice US Declaration of Conformity According to ISO IEC Guide 22 and EN 45014 Manufacturer s Name Nokia Inc Manufacturer s Address 313 Fairchild Drive Mountain View CA 94043 2215 USA All manuals and user guides at all guides com a l l g u i d e s c o m ...

Страница 122: ...irements of the Low Voltage Directive 73 23 EEC and the EMC Directive 89 336 EEC with Amendment 93 68 EEC Product Name IP350 IP355 IP380 IP385 100i 100s Model Number IP0380 Product Options All Serial Number 1 to 100 000 Date First Applied 2002 Safety EN60950 1 2001 A11 IEC60950 1 2001 UL60950 Third Edition 2000 CAN CSA C22 2 No 60950 2000 EMC EN55024 1998 EN55022A 1998 EN61000 3 2 EN61000 3 3 All ...

Страница 123: ...rds Christopher Saleem Compliance Reliability Engineering Manager Security Mobile Connectivity Enterprise Solutions Mountain View California January 2005 Elie Habib Senior Vice President Security Mobile Connectivity Enterprise Solutions Mountain View CA FCC Part 15 Subpart B Class A US Canada EN55022 CISPR 22 Class A European Community CE All manuals and user guides at all guides com ...

Страница 124: ...ion against harmful interference in a residential installation This device generates uses and can radiate radio frequency energy and if not installed and used in accordance with the instruction may cause harmful interference to radio communications However there is no EN55024 European Community CE EN61000 4 2 EN61000 4 3 EN61000 4 4 EN61000 4 5 EN61000 4 6 EN61000 4 11 EN61000 3 2 European Communi...

Страница 125: ...e of the following measures Reorient or relocate the receiving antenna Increase the separation between the computer and receiver Connect the computer into an outlet on a circuit different from that to which the receiver is connected Consult the dealer or an experienced radio TV technician for help Caution Any changes or modifications not expressly approved by the grantee of this device could void ...

Страница 126: ...B Compliance Information 118 Nokia IP300 Series Security Platform Installation Guide All manuals and user guides at all guides com a l l g u i d e s c o m ...

Страница 127: ...ce variable 83 boot file variable 83 boot flags variable 83 bootwait variable 82 built in console port 15 C cable output connector 112 cable type 112 Check Point 11 12 commands halt 88 help 88 ICLID 105 install 89 ls 86 printenv 84 setalias 87 set defaults 87 setenv 86 sysinfo 85 unsetalias 88 unsetenv 87 compact flash 11 compliance information 113 component locations 13 connections Ethernet netwo...

Страница 128: ... assignments 48 connecting to 47 F fiber two port Gigabit Ethernet network inter face card 53 flash based appliances 11 flash memory card disabling 78 transferring files 79 flash memory PC cards 77 four port Ethernet network interface card 46 G Gigabit Ethernet network interface cards 50 53 connectors 53 H halt command 88 hard disk drive replacing 57 height 111 help command 88 I ICLID command 105 ...

Страница 129: ...twork Voyager 12 accessing 30 configuring VPN tunnels 72 Nokia Horizon Manager 13 Nokia IPSO version 11 12 null modem cable 28 O opening Network Voyager 30 operating temperature range 23 optional disk 12 optional PC card 11 output connector for the Ethernet cable 48 P PCI mezzanine card 15 PCMCIA modem installing 56 PCMCIA modems slot for 15 physical dimensions 111 pin assignments for modem connec...

Страница 130: ...s storing 78 T tcpdump 46 technical specifications 111 temperature range 23 transfer Nokia IPSO images 80 transferring files with flash memory PC card 79 troubleshooting 95 two port Ethernet network interface card 47 two port Gigabit Ethernet network interface card fiber 53 two port V2 Gigabit Ethernet network inter face card copper 50 U unsetalias command 88 unsetenv command 87 upgrading memory 6...

Отзывы: