background image

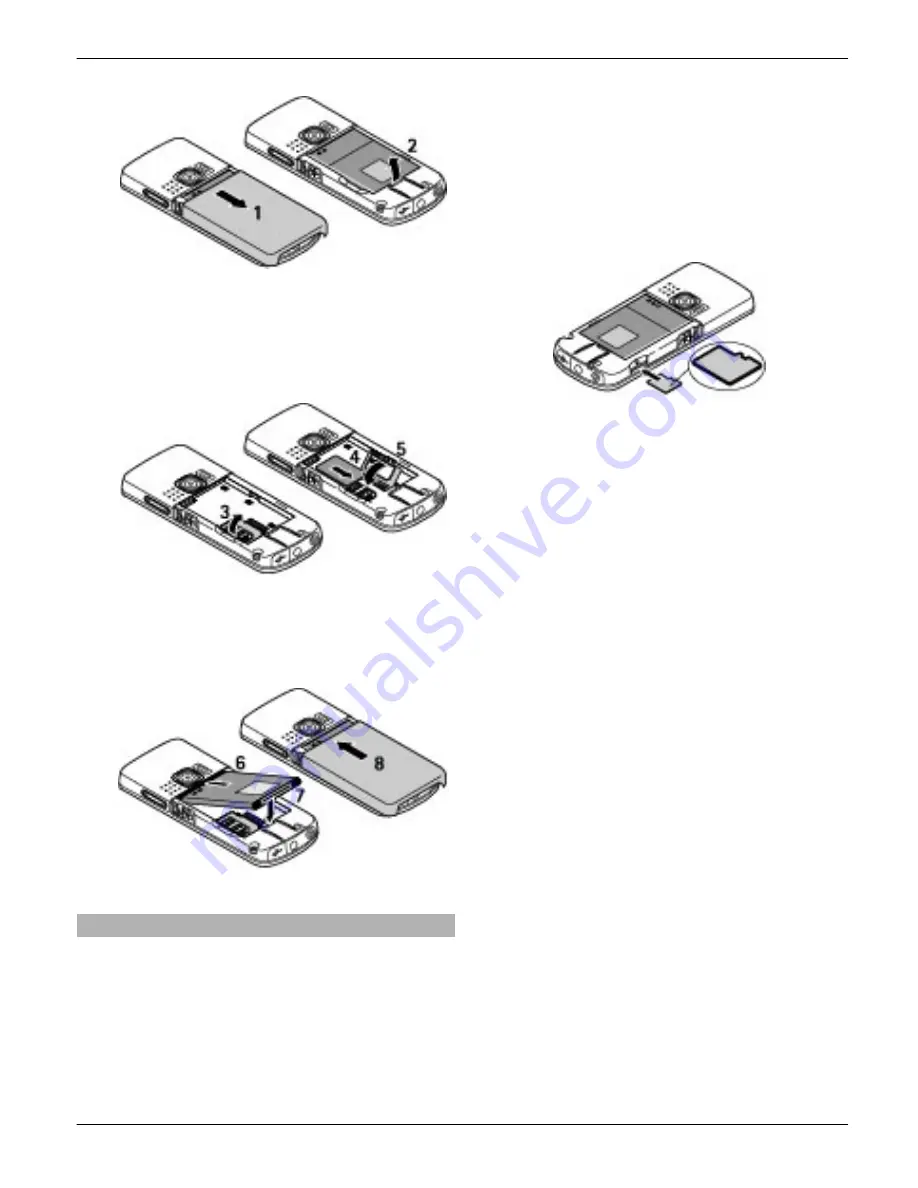
2 Open the SIM card holder (3). Insert

the SIM card into the holder with the

contact surface facing down (4). Close

the SIM card holder (5).

3 Observe the battery contacts (6), and

insert the battery (7). Replace the

back cover (8).

Insert and remove the memory card

Use only compatible microSD cards

approved by Nokia for use with this

device. Nokia uses approved industry

standards for memory cards, but some

brands may not be fully compatible with

this device. Incompatible cards may

damage the card and the device and

corrupt data stored on the card.
Your phone supports microSD cards of up

to 4 GB.

Insert the memory card

1 Remove the back cover.

2 Insert the card into the memory card

slot with the contact surface facing

down, and press until it locks into

place.

3 Replace the back cover.

Remove the memory card

Important: 

 Do not remove the memory

card in the middle of an operation when

the card is being accessed. Removing the

card in the middle of an operation may

damage the memory card as well as the

device, and data stored on the card may

be corrupted.
You can remove or replace the memory

card during phone operation without

switching the device off.
1 Ensure that no application is currently

accessing the memory card.

2 Remove the back cover.

3 Press the memory card slightly in to

release the lock, and remove it.

4 Replace the back cover.

Start up

7

© 2009 Nokia. All rights reserved.

7

Содержание 6303 classic

Страница 1: ...Nokia 6303 classic User Guide ...

Страница 2: ...hanges and improvements to any of the products described in this document without prior notice TO THE MAXIMUM EXTENT PERMITTED BY APPLICABLE LAW UNDER NO CIRCUMSTANCES SHALL NOKIA OR ANY OF ITS LICENSORS BE RESPONSIBLE FOR ANY LOSS OF DATA OR INCOME OR ANY SPECIAL INCIDENTAL CONSEQUENTIAL OR INDIRECT DAMAGES HOWSOEVER CAUSED THE CONTENTS OF THIS DOCUMENT ARE PROVIDED AS IS EXCEPT AS REQUIRED BY AP...

Страница 3: ...cord a video clip 29 Camera and video options 29 Gallery 29 Entertainment 31 Listen to music 31 Web 33 Games and applications 35 Maps 36 Download maps 36 Maps and GPS 36 Extra services 37 Organise 38 Manage contacts 38 Business cards 39 Date and time 39 Alarm clock 39 Calendar 39 To do list 39 Notes 40 Nokia PC Suite 40 Calculator 40 Countdown timer 40 Stopwatch 40 Support and updates 41 Support 4...

Страница 4: ...plosive environments 46 Emergency calls 46 Certification information SAR 47 MANUFACTURER S LIMITED WARRANTY 47 Warranty period 47 How to get warranty service 47 What is not covered 48 Other important notices 48 Limitation of Nokia s liability 48 Statutory obligations 49 Index 50 4 Contents 2009 Nokia All rights reserved 4 ...

Страница 5: ...consideration while driving should be road safety INTERFERENCE All wireless devices may be susceptible to interference which could affect performance SWITCH OFF IN RESTRICTED AREAS Follow any restrictions Switch the device off in aircraft near medical equipment fuel chemicals or blasting areas QUALIFIED SERVICE Only qualified personnel may install or repair this product ACCESSORIES AND BATTERIES U...

Страница 6: ...14 Volume down key 15 Volume up key 16 Loudspeaker 17 Power key 18 Camera flash 19 Camera lens Install SIM card and battery Always switch the device off and disconnect the charger before removing the battery This phone is intended for use with a BL 5CT battery Always use original Nokia batteries See Nokia battery authentication guidelines p 44 The SIM card and its contacts can be easily damaged by...

Страница 7: ...nsert the memory card 1 Remove the back cover 2 Insert the card into the memory card slot with the contact surface facing down and press until it locks into place 3 Replace the back cover Remove the memory card Important Do not remove the memory card in the middle of an operation when the card is being accessed Removing the card in the middle of an operation may damage the memory card as well as t...

Страница 8: ... Antenna Your device may have internal and external antennas As with any radio transmitting device avoid touching the antenna area unnecessarily while the antenna is transmitting or receiving Contact with such an antenna affects the communication quality and may cause the device to operate at a higher power level than otherwise needed and may reduce the battery life The figure shows the antenna ar...

Страница 9: ...than those approved by Nokia for use with this device to the Nokia AV Connector pay special attention to volume levels Do not connect products that create an output signal as this may cause damage to the device Do not connect any voltage source to the Nokia AV Connector Strap 1 Remove the back cover 2 Attach a strap and tighten it 3 Replace the back cover Start up 9 2009 Nokia All rights reserved ...

Страница 10: ...ty instructions Do not connect incompatible products Remember to make back up copies or keep a written record of all important information stored in your device Refer to the user guide for other important information about your device Network services To use the device you must have service from a wireless service provider Many of the features require special network features These features are no...

Страница 11: ...de incorrectly three times in succession you are asked for the PUK code If the codes are not supplied contact your service provider The barring password is required when using the call barring service to restrict calls to and from your phone network service To view or change the security module settings for the browser select Menu Settings Security Security module sett Switch the device on and off...

Страница 12: ...reen key Depending on the setting in the home screen mode scroll up or down to navigate in the list and select Select View or Edit The arrows indicate that further information is available To stop navigating select Exit Shortcuts When your device is in the standby or home screen mode you can use the following shortcuts List missed received and dialled calls Press the call key To make a call scroll...

Страница 13: ... 5 seconds To unlock the keypad select Unlock and press within 1 5 seconds If requested enter the lock code To answer a call when the keypad is locked press the call key When you end or reject the call the keypad locks automatically Further features are automatic keyguard and security keyguard See Phone p 15 When the device or keypad is locked calls may be possible to the official emergency number...

Страница 14: ... profiles If the device has been locked enter the lock code If you need to make an emergency call while the device is locked and in the flight profile you may be also able to enter an official emergency number programmed in your device in the lock code field and select Call The device will confirm that you are about to exit flight profile to start an emergency call 14 Switch it on 2009 Nokia All r...

Страница 15: ...ch the phone on ConfirmSIM actions network service See SIM services p 20 Security When security features that restrict calls are in use such as call barring closed user group and fixed dialling calls may be possible to the official emergency number programmed into your device Select Menu Settings Security and from the following PIN code request or UPIN code request to request for your PIN or UPIN ...

Страница 16: ...nalise to change the profile settings Timed to set the profile to be active for a certain time When the time set for the profile expires the previous profile that was not timed becomes active Themes A theme contains elements for personalising your phone Select Menu Settings Themes and from the following options Select theme Open the Themes folder and select a theme Theme downloads Open a list of l...

Страница 17: ...hortcuts and from the following Navigation key to assign other functions from a predefined list to the navigation key scroll key Home screen key to select the movement of the navigation key to activate the home screen mode Assign dialling shortcuts Create shortcuts by assigning phone numbers to the number keys 2 9 1 Select Menu Contacts Speed dials and scroll to a number key 2 Select Assign or if ...

Страница 18: ...ry power and reduce the battery life Set up a Bluetooth connection Select Menu Settings Connectivity Bluetooth and do the following 1 Select My phone s name and enter a name for your phone 2 To activate Bluetooth connectivity select Bluetooth On indicates that Bluetooth connectivity is active 3 To connect your phone to an audio accessory select Conn to audio acc and the device that you want to con...

Страница 19: ...PC that does not have Nokia software and use the phone as data storage To change the USB mode select Menu Settings Connectivity USB data cable and the desired USB mode Synchronisation and backup Select Menu Settings Sync and backup and from the following Phone switch Synchronise or copy selected data between your phone and another phone using Bluetooth technology Create backup Create a backup of s...

Страница 20: ...ious topics from your service provider network service For more information contact your service provider Select Menu Messaging Info messages and from the available options Service commands Service commands allow you to write and send service requests USSD commands to your serviceprovider suchasactivation commands for network services To write and send the service request select Menu Messaging Ser...

Страница 21: ...w personal accounts for various services manually and activate or delete them To add a new personal account select Add or Options Add new Select the service type and enter the required details To activate a personal account select Options Activate Make it your phone 21 2009 Nokia All rights reserved 21 ...

Страница 22: ...me key up or down Dialling shortcuts Assign a phone number to one of the number keys 2 9 See Assign dialling shortcuts p 17 Use a dialling shortcut to make a call in one of the following ways Press a number key then the call key If Menu Settings Call Speed dialling On is selected press and hold a number key Voice dialling Make a phone call by saying the name that is saved in Contacts As voice comm...

Страница 23: ...ce for calls and services from your service provider may vary depending on network features rounding off for billing taxes and so forth Call Select Menu Settings Call and from the following Call divert to divert your incoming calls network service You may not be able to divertyour calls if some callbarring functions are active See Security p 15 Anykey answer to answer an incoming call by briefly p...

Страница 24: ...he same keyasthepresent one wait until the cursor appears and enter the letter To access the most common punctuation marks and special characters press 1 repeatedly To access the list of special characters press To insert a space press 0 Predictive text input Predictive text input is based on a built in dictionary to which you can also add new words 1 Start writing a word using the keys 2 to 9 Pre...

Страница 25: ...Messages may contain malicious software or otherwise be harmful to your device or PC For availability and subscription to the multimedia messaging service MMS contact your service provider Create a text or multimedia message 1 Select Menu Messaging Create message Message 2 To add recipients scroll to the To field and enter the recipient s number or e mail address or select Add to select recipients...

Страница 26: ...racters and select Send Instant messaging With instant messaging IM network service you can send short text messages to online users You must subscribe to a service and register with the IM service you want to use Check the availability of this service pricing and instructions with your service provider The menus may vary depending on your IM provider To connect to the service select Menu Messagin...

Страница 27: ...ail You may write your e mail before connecting to the e mail service 1 Select Menu Messaging Create message E mail message 2 Enter the recipient s e mail address the subject and the e mail message To attach a file select Options Insert and from the available options 3 If more than one e mail account is defined select the account from which you want to send the e mail 4 To send the e mail select S...

Страница 28: ...account for new e mail Automatic retrieval to retrieve new e mail automatically from your e mail account 3 To enable the new e mail notification select Menu Messaging Message settings E mail messages New e mail notif On 28 Stay in touch 2009 Nokia All rights reserved 28 ...

Страница 29: ...deo function Select Menu Media Video or if the camera function is on scroll left or right Video recording To start recording selectRecord to pause recording select Pause to resume recording select Continue to stop recording select Stop The phone saves the video clips on the memory card if available or in the phone memory Camera and video options In the camera or video mode select Options and from ...

Страница 30: ...eo clips songs sound files images and messaging data Some of the folders in Gallery with content used by the phone for example Themes may be stored on the memory card Format the memory card Some supplied memory cards are pre formatted others require formatting When you format a memory card all data on the card is permanently lost 1 To format a memory card select Menu Gallery or Applications the me...

Страница 31: ...pdate library Create a playlist 1 Select Playlists Create playlist and enter the name of the playlist 2 Add music or video clips from the displayed lists 3 Select Done to store the playlist Configure a streaming service network service You may receive the streaming settings as a configuration message from your service provider You can also enter the settings manually See Configuration p 20 1 Selec...

Страница 32: ...r hearing Do not hold the device near your ear when the loudspeaker is in use because the volume may be extremely loud Select Menu Media Radio To adjust the volume use the volume keys Use the graphical keys on the display Scroll up down left or right Close the radio menu Briefly press the end key The radio continues playing in the background Switch the radio off Press and hold the end key Tune rad...

Страница 33: ...recordings Equaliser Adjust the sound when using the music player Select Menu Media Equaliser To activate a predefined equaliser set scroll to one of the sets and select Activate Create a new equaliser set 1 Select one of the last two sets in the list and Options Edit 2 Scroll left or right to access the virtual sliders and up or down to adjust the slider 3 To save the settings and create a name f...

Страница 34: ...ce Appearance settings While browsing the web select Options Settings and from the following Display Select the font size whether images are shown and how the text is displayed General Select whether web addresses are sent as Unicode UTF 8 the encoding type for the contents and whether JavaScript is enabled The available options may vary Cache memory A cache is a memory location that is used to st...

Страница 35: ...ations Games Memory card or Collection Scroll to a game or an application and select Open To set sounds lights and shakes for a game select Menu Applications Options Application settings Other available options may include the following Update version to verify that a new version of the application is available for download from the web network service Web page to provide further information or ad...

Страница 36: ...ice You can set your phone to automatically download maps that you do not have in your phone when needed Select Menu Organiser Maps Settings Network settings Allow network usage Yes or In home network To prevent automatic download of maps select No Note Downloading maps may involve the transmission of large amounts of data through your service provider s network Contact your service provider for i...

Страница 37: ...eceiver and cellular radio networks for positioning or navigation Extra services You can upgrade Maps to fully voice guided navigation which requires a regional licence To use this service you need a compatible external GPS device that supports Bluetooth wireless technology To purchase a navigation service with voice guidance select Menu Organiser Maps Extra services Purchase navigation and follow...

Страница 38: ...first characters of the contact s name Save a name and phone number Select Menu Contacts Add new Add and edit details Select a contact and Details Options Add detail Delete a detail Select a contact and Details Select a detail and Options Delete Delete a contact Select a contact and Options Delete contact Delete all contacts Select Menu Contacts Del all contacts From phone memory or From SIM card ...

Страница 39: ...cted days of the week select Repeat On and the days 4 Select the alarm tone If you select the radio as the alarm tone connect the headset to the phone 5 Set the snooze time out and select Save Stop the alarm To stop the sounding alarm select Stop If you let the alarm sound for a minute or select Snooze the alarm stops for the snooze time out then resumes Calendar Select Menu Organiser Calendar The...

Страница 40: ...t is displayed when the time expires To change the time select Change time 2 To start the timer select Start 3 To stop the timer select Stop timer Interval timer 1 To have an interval timer with up to 10 intervals started first enter the intervals 2 Select Menu Organiser Countd timer Interval timer 3 To start the timer select Start timer Start To select how the interval timer should start the next...

Страница 41: ...tent interactive demonstrations a personalised web page and news about the latest Nokia products and services Get the most out of your Nokia phone and register to My Nokia today For more information and availability in your region see www nokia com mynokia Download content You may be able to downloadnew content for example themes to your phone network service Important Use only services that you t...

Страница 42: ... update Software update settings This option may not be available depending on your phone To allow or disallow software and configuration updates select Menu Settings Configuration Device manager sett Serv softw updates Request a software update 1 Select Menu Settings Phone Phone updates to request available software updates from your service provider 2 Select Current softw details to display the ...

Страница 43: ...perly Installation of any complex car accessories must be made by qualified personnel only Battery Important Battery talk and stand by times are estimates and only possible under optimal network conditions Actual battery talk and standby times depend on SIM cards features used battery age and condition temperatures to which battery is exposed network conditions and many other factors and may be si...

Страница 44: ... of the positive and negative terminals of the battery These look like metal strips on the battery This might happen for example when you carry a spare battery in your pocket or purse Short circuiting the terminals may damage the battery or the connecting object Do not dispose of batteries in a fire as they may explode Batteries may also explode if damaged Dispose of batteries according to local r...

Страница 45: ...only the supplied or an approved replacement antenna Unauthorised antennas modifications or attachments could damage the device and may violate regulations governing radio devices Use chargers indoors Always create a backup of data you want to keep such as contacts and calendar notes To reset the device from time to time for optimum performance power off the device and remove the battery These sug...

Страница 46: ...e itsparts oraccessories Forvehiclesequippedwith anairbag remember that air bags inflate with great force Do not place objects including installed or portable wireless equipment in the area over the air bag or in the air bag deployment area If in vehicle wireless equipment is improperly installed and the air bag inflates serious injury could result Using your device while flying in aircraft is pro...

Страница 47: ...orkmanship free of charge by repairing or should Nokia in its absolute discretion deem it necessary replacing the Product in accordance with this Limited Warranty unless otherwise required by law This Limited Warranty is only valid and enforceable in the country where you have purchased the Product provided that it is intended for sale in that country Warranty period The warranty period starts at ...

Страница 48: ... to spillage of food or liquid or to influence from chemical products Other important notices A thirdparty independent operator provides the SIM cardand cellular and or other network or system on which the Product operates Therefore Nokia will not accept responsibility under this warranty for the operation availability coverage services or range of the cellular or other network or system Before th...

Страница 49: ...visions apply to the extent to which Nokia is able to do so its liability under those provisions will be limited at its option to in the case of goods the replacement of the goods or the supply of equivalent goods the repair of the goods the payment of the cost of replacing the goods or of acquiring equivalent goods or the payment of the cost of having the goods repaired and in the case of service...

Страница 50: ...y 11 16 downloads 41 E e mail 27 equaliser 33 F factory settings 42 flash messages 26 flight mode 13 flight query 15 font size 17 G games 35 GPS 36 H handsfree 23 headset 8 help text 15 home screen 12 16 I IM 26 image 29 in call timer 23 indicators 12 info messages 20 instant messaging 26 internet 33 K keyguard 15 keypad lock 13 keys 6 L language 15 lights 16 location information 20 loudspeaker 23...

Страница 51: ...curity module 10 service commands 20 sharing 34 shortcuts 12 17 signal strength 11 SIM services 20 SIM card 6 13 SIM messages 20 sleep mode 17 software update 42 software updates 41 speed dialling 17 22 23 start up tone 15 status indicators 11 stereo widening 33 stopwatch 40 strap 9 support resources 41 T text modes 24 themes 16 tones 16 traditional text input 24 U updates device software 41 UPIN ...

Отзывы: