background image


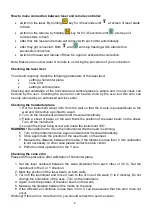
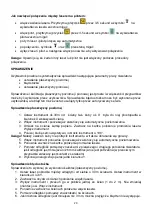
How to make connection between laser and remote controller: 

  switch on the laser. By holding 

 key for 3-5seconds until 

 at screen of laser starts 

to flash 

  switch on the remote, by holding 

 key for for 3-5seconds until 

 at screen of 

remote starts to flash 

  after that, the laser and remote will connect with each other automatically 

  after they got connected. Both 

and 

 will stop flashing which stands for a 

successful connection 

  switch both laser and remote off then On again to activate the connection. 

 
Note: Make sure no other laser or remote is on during the procedure of your connection. 

 
Checking the laser level 

 
   You should regularly check the following parameters of the laser level 


 setting a horizontal plane  


 cone error 


 setting a vertical plane  

Checking and calibration of the horizontal and vertical planes is simple and in most cases can 
be done by the user. Checking the cone error can be also done by the user, but this error can 
be only removed by an authorized service center.  
 

Checking the horizontal plane 

1. Set  the  instrument  about  30m from  the  wall  so  that  the  X-axis  is  perpendicular  to  the 

wall and X direction a pointed to a wall.  

2. Turn on the instrument and wait until it level automatically.  
3. Place a sheet of paper on the wall. Mark the position of the laser beam on the sheet. 

Turn off the instrument.  

4. Loosen the tripod fixing screw and rotate the instrument 180

°.  

WARNING!

 Be careful not to move the instrument while the head is spinning. 

5.  Turn on the instrument once again and wait until it level automatically. 
6.  Once again mark the position of the laser beam on the sheet. 
7.  Measure the distance between the marks, if the distance is less than  6 mm calibration 

is not necessary, in other case please contact service center 

8.  Perform similar operations for the Y axis . 

 
Checking the cone error 

Please do this procedure after calibration of horizontal plane. 
 

1. Set  the  laser  centered  between  the  walls  distanced  from  each  other  of  30  m.  Set  the 

instrument in the X or Y direction.  

2. Mark the position of the laser beam on both walls.  
3. Turn off the instrument and move it near to the of one of the walls (1 to 2 meters). Do not 

change the orientation of the axes. Turn on the instrument.  

4. Again, mark the position of the laser beam on the walls 
5. Measure the distance between the marks on the walls.  
6. If the difference in distance is less than 3 mm, it can be assumed that this error does not 

occur.  

Warning! If this error is more than 3m, you should contact the service center. 

Содержание NL540

Страница 1: ...1 ...

Страница 2: ...ank you for purchasing a Nivel System NL540 laser level To best use the purchased instrument please read the instructions carefully and put in a convenient spot so that in the future you will be able to use it ...

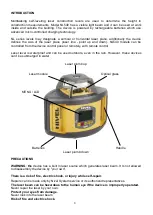
Страница 3: ...anel or remotely with remote control Laser level is waterproof and can be used outdoors even in the rain However these devices can t be submerged in water Laser plumb up Laser module Optical glass MENU LCD Batteries Handle Laser plumb down PRECAUTIONS WARNING the device has a built in laser source which generates laser beam It Is not allowed to disassembly the device by your own There is a risk of...

Страница 4: ...ged transport box or transport box latches can lead to falling out of the box and damage the laser The collapse of laser level to the ground can lead to damage Shaky unstable site of laser level can lead to collapse and damage the laser Always make sure that all screws and latches in a tripod works properly Exclusions of liability 1 It is expected from the user to comply all recommendations regard...

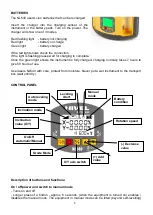
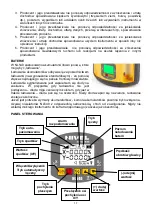
Страница 5: ...ully charged charging normally takes 7 hours to give 50 hours of use Use lasers NL540 with care protect from moisture Never put a wet instrument to the transport box wait until dry CONTROL PANEL Description of buttons and functions On off power and switch to manual mode Turns on and off Longer press of a button approx 6 seconds when the equipment is turned on enables disables the manual mode The e...

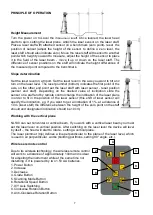
Страница 6: ...de available via remote controller The scan Mode is to be used when you want the beam focused on a smaller range Press the button panel of remote controller for a single point Press the same button to get angles of approximately 10o 45o 90o and 180o directional scan button narrowing of the laser line in the required range where the work is carried out available display of beam angles 0 10 45 90 18...

Страница 7: ...n a staff and by remote control change the inclination of the laser plane in order to fit in the position of the laser sensor this shift of laser sensor will specify the inclination eg If you want to get a inclination of 1 at a distance of 10 m laser staff the difference between the height of the zero point on the staff should and designated inclination should be 10 cm Working with the vertical pl...

Страница 8: ... 2 Turn on the instrument and wait until it level automatically 3 Place a sheet of paper on the wall Mark the position of the laser beam on the sheet Turn off the instrument 4 Loosen the tripod fixing screw and rotate the instrument 180 WARNING Be careful not to move the instrument while the head is spinning 5 Turn on the instrument once again and wait until it level automatically 6 Once again mar...

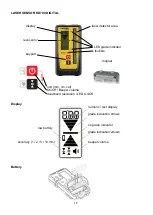
Страница 9: ...between the markers 7 Do not change the position of the laser and spin it 180 8 Mark the position of the laser beam on the paper sheet Measure the distance between the markers 9 If the distance between the markers is less than 3mm calibration is not necesery LASER SENSOR RD200 LCD Display Precise mode Coarse mode Too high the laser signal is below please Lower the sensor you will hear a high frequ...

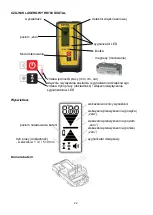
Страница 10: ... zero LED grade indicator lbubble keypad magnet unit mm cm cal On Off Beeper volume deadband resolution LED On Off Display numeric text display grade indication arrows on grade indicator low battery grade indication arrows accuracy 1 2 5 10 mm beeper volume Battery ...

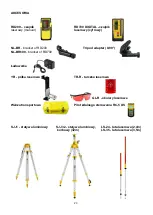
Страница 11: ...al sensor digital NL BR bracket of RD200 Tripod adapter 0 90 NL BR600 bracket of RD700 Charger YR półka laserowa TR R laser target GL laser glasses Laser case Remote controller RC 5 DS SJJ1 tripod SJJ32 tripod 3 2m LS 24 laser staff 2 4m LS 35 laser staff 3 5m ...

Страница 12: ...be charged for unjustified complaints in accordance with the effective price lists Warranty repairs shall be carried out only and exclusively based on purchase document Under the warranty the Warrantor shall not be liable for the consequences of defects that is damage caused to people third parties property lost profits etc 2 The warranty shall be terminated if the following is found the standards...

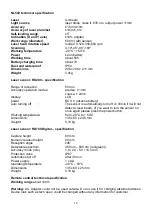
Страница 13: ... battery auto turning off The sensor is automatically turn off in 30min if it will not detect a laser beam if you want to turn the sensor on once again please press the power button Working temperature from 20 C to 50 C Dimensions 135 x 65 x 24 5 mm Weight 0 15 kg Laser sensor RD700 Digital specification Capture height 90 mm Numeric readout height 80 mm Reception angle 45 Detectable spectrum 450 n...

Страница 14: ...kupienie niwelatora laserowego firmy Nivel System model NL540 Aby móc jak najlepiej wykorzystać zakupiony instrument prosimy uważnie przeczytać instrukcję i położyć w dogodnym miejscu żeby w przyszłości móc z niej skorzystać ...

Страница 15: ... mikro kontrolowanego ładowania Niwelatory serii NL mogą wyznaczać pionową lub poziomą płaszczyznę laserową dodatkowo urządzenia wyznaczają oś płaszczyzny laserowej laser liniowy punkt do góry i punkt do dołu Model 540 może być sterowany zarówno z panelu kontrolnego urządzenia jak i zdalnie z pilota Niwelator jest wodoszczelny i może pracować na zewnątrz także podczas deszczu Jakkolwiek urządzeń t...

Страница 16: ...nikające z tego powodu straty Niewłaściwe użycie lasera oraz stosowanie go niezgodnie z opisanymi w tej instrukcji procedurami może spowodować obrażenia lub narażenie się na nadmierną dawkę promieniowania Nie można pozwolić aby ktokolwiek pracował w promieniu lasera Przed rozpoczęciem pracy należy upewnić się że wiązka lasera znajduje się ponad głowami pracowników Oświetlenie wiązką laserową może ...

Страница 17: ...540 zastosowano akumulatorki litowo jonowe które mogą być ładowane Ładowanie akumulatorków odbywa się za pośrednictwem ładowarki na wyposażeniu standardowym za pomocą złącza znajdującego się na panelu frontowym niwelatora Ładowanie sygnalizowane jest zapaleniem się diody na zasilaczu W przypadku gdy ładowarka nie jest podłączona dioda miga czerwonym kolorem gdy jest w trakcie ładowania dioda pali ...

Страница 18: ...hylone Jeśli praca lasera zostanie zakłócona przez wstrząs uderzenie usłyszymy sygnał dźwiękowy alarmu wskazujący że laser mógł się poruszyć głowica przestanie się kręcić Pozostałe funkcje Another Functions Tryb skanowania dostępny za pośrednictwem pilota zdalnego sterowania Tryb skanowania używamy gdy chcemy zawęzić wiązkę laserową nakreślić linię lasera w zawężonym zakresie Naciśnij przycisk pan...

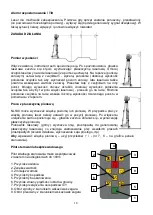
Страница 19: ...a położenia czujnika na łacie wskaże różnicę wysokości mierzonego punktu w porównaniu z reperem Praca z płaszczyzną pionową NL540 może wyznaczać wiązkę poziomą lub pionową W przypadku pracy z wiązką pionową laser należy ustawić go w pozycji pionowej Po włączeniu urządzenie samo spoziomuje się głowica zacznie obracać się wyznaczając płaszczyznę pionową Pionownik laserowy górny wyznacza linię prosto...

Страница 20: ...ywał ścianę 2 Włącz instrument i poczekaj aż zakończy się automatyczne poziomowanie 3 Umieść na ścianie kartkę papieru Zaznacz na kartce położenie promienia lasera Wyłącz instrument 4 Poluzuj śrubę sercową statywu i obrócić instrument o 180 Uwaga Należy uważać żeby nie potrącić instrumentu w trakcie obracanie się głowicy 5 Włącz instrument ponownie i poczekaj aż zakończy się automatyczne poziomowa...

Страница 21: ...nikami 7 Nie zmieniając pozycji lasera obróć go o 180 8 Zaznacz na kartce miejsce położenia promienia lasera Pomierz odległość między znacznikami 9 Jeśli różnica odległości jest mniejsza niż 3 mm kalibracja nie jest konieczna CZUJNIK LASEROWY RD200 Wyświetlacz LCD Tryb precyzyjny Tryb zgrubny Za wysoko sygnał laserowy znajduje się poniżej obniż czujnik słyszalny będzie dźwięk wysokiej częstotliwoś...

Страница 22: ...znie i wyłączanie zasilania sygnalizatora dżwiękowego zmiana trybu pracy dokładność włączenie wyłączenie sygnalizatorów LED Wyświetlacz wskazania różnicy wysokości wskazania przewyższenia powyżej zera wskazania przewyższenia poziom poziom naładowania baterii zero wskazania przewyższenia poniżej zero tryb pracy dokładność sygnalizator dźwiękowy w zakresie 1 2 5 10 mm Komora baterii ...

Страница 23: ...ket of RD200 Tripod adapter 0 90 NL BR600 bracket of RD700 Ładowarka YR półka laserowa TR R tarczka laserowa GL R okulary laserowe Waliza transportowa Pilot zdalnego sterowania RC 5 DS SJJ1 statyw aluminiowy SJJ32 statyw aluminiowy LS 24 łata laserowa 2 4m korbowy 32m LS 35 łata laserowa 3 5m ...

Страница 24: ... W ramach gwarancji Gwarant nie ponosi odpowiedzialności z tytułu skutków usterek tj szkód wyrządzonych ludziom zniszczenia cudzej własności strat w zyskach itp 2 Gwarancja traci ważność w przypadku stwierdzenia przekroczenia norm użytkowania sprzętu uszkodzeń powstałych w wyniku użytkowania sprzętu niezgodnie z instrukcją obsługi uszkodzeń mechanicznych dokonywania przez użytkownika napraw we wła...

Страница 25: ...omatyczne wyłączanie Czujnik wyłączy się automatycznie jeśli przez 30min nie wykryje promienia laserowego Żeby włączyć czujnik należy ponownie nacisnąć przycisk zasilania Temperatura pracy 20 C do 50 C Wymiary 135 x 65 x 24 5 mm Waga 0 15 kg Specyfikacja czujnika laserowego RD700 Digital Zakres detekcji 90 mm Numeryczne wskazanie zakres 80 mm Kąt odbioru wiązki 45 Odbiór wiązki laserowej 450 nm 80...

Страница 26: ...ing laser level Trade mark Nivel System Model NL540 Serial number The date of the check Instrument checked and calibrated Calibration technician EC declaration of conformity We declare that products Nivel System NL540 conform to EN 61010 1 2010 EN 61326 1 2013 ...

Страница 27: ...27 WARNING The device contains a rechargeable Li ion batteries which must be recycled and should be disposed in accordance with the requirements ...

Страница 28: ...28 ...

Отзывы: