7
PRINCIPLE OF OPERATION
Height Measurement
Turn the power on to Level the instrument itself. Once leveled, the laser head
starts to spin, setting the laser plane. Attach the laser sensor on the laser staff.
Place a laser staff with attached sensor on a benchmark (zero point)- reset the
position of sensor (adjust the height of the sensor to define a zero level, the
laser staff should also indicate zero). Move the laser staff with sensor to another
point which height you want to measure, adjust the height of the sensor to place
it in the field of the laser beam - move it up or down on the laser staff. The
difference of sensor positions on the staff will indicate the height differences of
the measured point compared to the benchmark.
Slope determination
Set the laser level on a tripod. Set the laser level in the axis you want to tilt and
turn on the laser level. The laser plummet (bottom) indicates the first point of the
axis, on the other end point set the laser staff with laser sensor - reset position
(sensor and staff). Depending on the desired value of inclination slide the
sensor on a staff and by remote control change the inclination of the laser plane
in order to fit in the position of the laser sensor (this shift of laser sensor will
specify the inclination, eg. If you want to get a inclination of 1%, at a distance of
10 m (laser staff) the difference between the height of the zero point on the staff
should and designated inclination should be 10 cm).
Working with the vertical plane
NL540 can set horizontal or vertical beam. If you work with a vertical laser beam you must
set the laser level on vertical position. After switching on the laser level the device will level
by itself
– the head will start to rotate - setting a vertical plane.
The laser plummet (top) defines a line perpendicular to the plane of the laser level, which
is used in all perpendicular works (building partitions, setting 90
° angle, etc.).
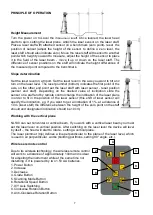
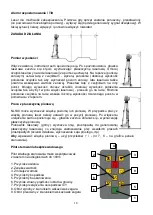
Wire less remote control
Due to its wireless technology, the wireless remote control
will work to a distance of approximately 100m and is ideal
for adjusting the instrument while at the same time not
disturbing it. It is powered by two 1.5V AA batteries.
1. Power Button
2. Increase
3. Decrease
4. Grade Button
5. Scanning Mode Button
6. Rotational Speed Button
7. X/Y Axis Switching.
8. Clockwise Rotation Button
9. Anti-Clockwise Rotation Button
2
7
8
2
6
4
3
9
5
1


