nitedevil CAM630 Скачать руководство пользователя страница 3

             www.nitedevil.com

Doc XCAM630

                                    NiteDevil Hi-Res 600TVL Colour Dome Camera

Email:

[email protected]

                                                                                              Last Revised: 15/06/2012

OSD (On Screen Display) Function.

Remove the dome cover using the allen key supplied to access the pcb board for entering the menu.

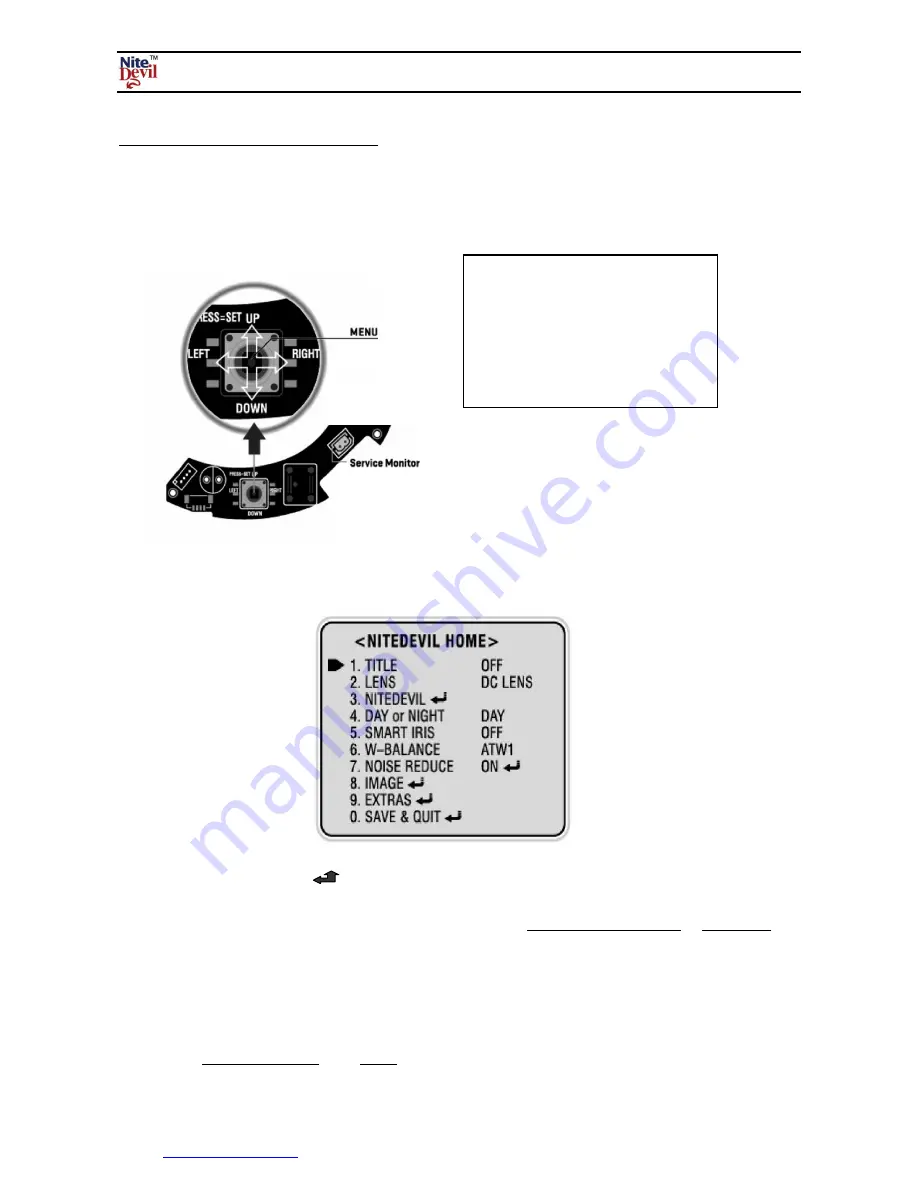
The following menu will be displayed on your monitor on pressing SET button (Joystick controller):

NOTE:

  All items with the

 icon allow you to access a submenu by pressing the SET button

down. The above menu shows the default settings. The Initial option it the submenu only defaults
that menu. If you wish to default all settings you must select

NITEDEVIL RESET

 in

EXTRAS

menu.

MENU SETUP

The above menu is displayed when this camera is defaulted. To get the best setup for this camera you
must adjust the menu settings according to the environment it is being used in. It is recommended
that you set

DAY or NIGHT

 from

DAY

 to

AUTO

 to enable night time viewing.

Press and hold MENU button down for
one second to access setup mode.

Select the status using the joystick by
using UP, DOWN, LEFT and RIGHT.

Содержание CAM630

Страница 1: ...Ensure that a regulated power supply is used if using 12vDC and allow adequate headroom i e only use a power supply with a minimum rating of 500mA Connecting RS845 The RS485 for controlling the menu h...

Страница 2: ...1 ATW2 W BALANCE PUSH COLOUR TEMP INDOOR OUTDOOR RED 100 100 MANUAL BLUE 100 100 NOISE REDUCE ON LEVEL 0 63 MOTION ON OFF ZOOM X1 00 x 6 13 DZOOM PAN 100 100 DIGITAL ZOOM DZOOM TILT 100 100 FLIP OFF V...

Страница 3: ...the SET button down The above menu shows the default settings The Initial option it the submenu only defaults that menu If you wish to default all settings you must select NITEDEVIL RESET in EXTRAS me...

Страница 4: ...d letter and select the letter by pressing the MENU button 1 3 Repeat this to enter multiple letters 1 4 You can enter up to 15 letters 2 LENS This option set to DC LENS 3 NITEDEVIL This options allow...

Страница 5: ...NITIAL SET This allows defaulting the settings of this menu Select INITIAL SET using the UP or DOWN button and then press the MENU button 4 DAY or NIGHT This option sets DAY colour only NIGHT b w only...

Страница 6: ...VEL BLC compensation level Select from LOW MIDDLE and HIGH using the LEFT or RIGHT button 5 3 1 AREA SETTING Select AREA setting using the UP or DOWN button and then press MENU button to enter mode Th...

Страница 7: ...TEMP Select Indoor or Outdoor Select between Indoor and Outdoor using the LEFT or RIGHT button INDOOR 3200 K OUTDOOR 5100 K 6 4 2 RED Select RED using the UP or DOWN button You can adjust the RED colo...

Страница 8: ...n 0 100 using the LEFT or RIGHT button 8 6 CR GAIN Select red gain between 100 100 using the LEFT or RIGHT button 8 7 CB GAIN Select blue gain between 100 100 using the LEFT or RIGHT button 9 EXTRAS S...

Страница 9: ...ing LEFT or RIGHT button 9 2 4 MOVE X Move Horizontal Position You can move the horizontal position of the zone between 8 92 by using LEFT or RIGHT button 9 2 5 MOVE Y Move Vertical Position You can m...

Страница 10: ...FT or RIGHT button 9 3 7 MOVE Y Move Vertical Position You can move the vertical position of the mask between 2 98 by using LEFT or RIGHT button 9 4 MENU The Language is ENGLISH only 9 5 ANTI SHAKE Th...

Страница 11: ...onnections are correctly connected on the keypad or DVR On the Alien DVR the T refers to the and the T refers to the connections The control works only on the PELCO D setting and this must be set in t...

Страница 12: ...Digital Zoom X 1 00 x 6 13 Day or Night AUTO DAY NIGHT NITE TURBO ON OFF Motion ON OFF 4 programmable Zones Privacy ON OFF 8 programmable Zones RS485 menu control PELCO D protocol baud rate and ID adj...

Отзывы: