background image


Electrical connection

Risk of injury!

There is a risk of injury from accidental operation of the foot control.
Once you have finished working or before you start maintenance, always turn off 
and unplug the machine.

Electrical connection

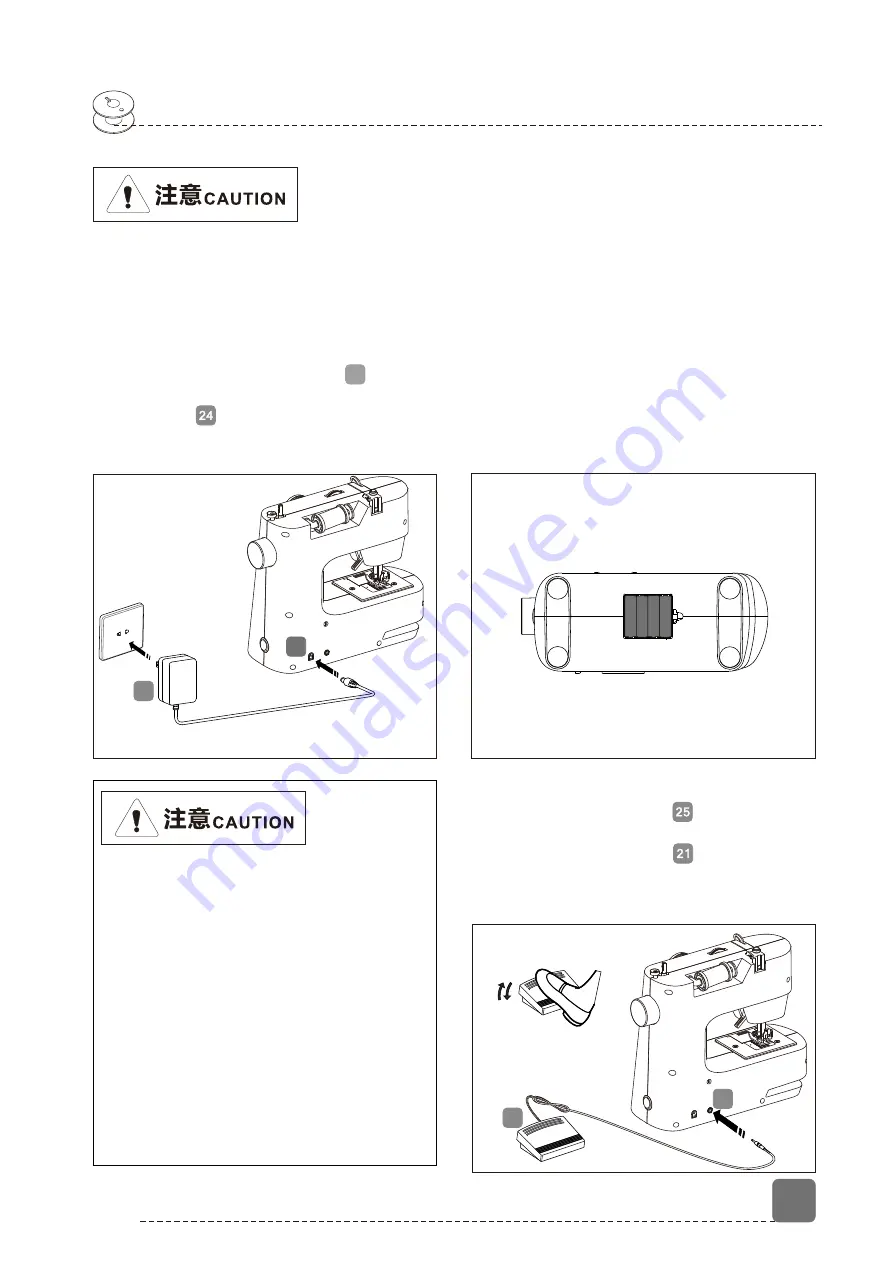
1. Use AC power supply

2. Use batteries

Connect the DC input socket      on he back 
of the sewing machine, and then connect 
the adapter      to the main power supply.

Turn the sewing machine on its side on
a flat surface and remove the battery
cover. Insert 4 AA batteries into the 
compartment and put the battery cover
back on.

Foot pedal connection

Connect the foot pedal      to the sewing
machine by inserting the jack into the 
foot pedal input socket      in the back of
the sewing machine. And place the 
pedal to the ground in order to control 
the machine conveniently.

3. The machine can’t work if the 
batteries not install in a right way. 
Please follow the instruction.

1. Make sure that the power switch is in 
the OFF position and the speed control 
switch is in the STOP position, when 
inserting or changing the batteries.

batteries or the adapter. It’s not 
necessary to use both at once. 
Otherwise, the machine will be hardly 
damaged. Make sure remove the 
batteries before using the power 
adapter.

2. The sewing machine can use either

20

21

25

6

24

20

Содержание Stitch4you

Страница 1: ...for the first time read through these operating instructions carefully and follow the safety advice This product may only be used as directed in the operating instructions and for the intended purpose...

Страница 2: ...Bobbing winding 10 Replacing the bobbin 11 Bring up the lower thread 15 Sewing function 9 Device parts 2 Proper use 6 Electrical connection 7 Selection of stitches pattern 8 Adjusting the upper thread...

Страница 3: ...ad guide Reel cover Upper thread tension dial Thread cutter Presser foot holder Presser foot Pattern selection dial Bobbin spindle Thread take up Feeder teeth Presser foot holder screw Speed control s...

Страница 4: ...1 Needle 1 Buttonhole foot Packaging film can be swallowed or used improperly Therefore there is a risk of suffocation Keep packaging material such as plastic film or plastic bags away from children B...

Страница 5: ...le changing the needle setting the presser foot 5 Do not use the sewing machine outdoors 6 Do not use the sewing machine in spray or oxygen storage area 1 Do not play sewing machine as a toy Children...

Страница 6: ...rd indicates a hazard with a low level of risk which if not avoided could result in minor or moderate injury This symbol gives you useful additional information on assembly or operation Declaration of...

Страница 7: ...tery cover back on Foot pedal connection Connect the foot pedal to the sewing machine by inserting the jack into the foot pedal input socket in the back of the sewing machine And place the pedal to th...

Страница 8: ...e in cases of improper use Do not modify the product without our consent and do not use any additional equipment which we have not approved or supplied Use only spare parts and accessories that we hav...

Страница 9: ...turning the hand wheel towards you And then turn the pattern selection dial to select the pattern you want Do not turn the pattern selection dial while sewing When the needle in the fabric never turn...

Страница 10: ...ead Cut the thread with the thread cutter at the lamp cover of the sewing machine Pull and tighten the thread to the cutter it will be easy for cutting the thread Leave around 15cm of the thread hangi...

Страница 11: ...d of the thread through the hole in the bobbin as illustrated and wind the thread around the bobbin a few times by hand Place the bobbin on the spindle 3 Move the bobbins spindle to the right towards...

Страница 12: ...he bobbin 1 Hold the bobbin between the thumb and index finger and leave about 15cm of the thread hanging out Then put the bobbin into the bobbin holder pull the thread it can be turned anti clockwise...

Страница 13: ...on discs from the bottom the upper thread will sew with tension like this 4 1 Before threading the needle raise the needle to its highest position by turning the hand wheel 22 2 Raise the presser foot...

Страница 14: ...refully that the thread is between the tension discs 6 Then pass the thread between the tension discs of the upper thread tension regulator Turn the hand wheel if necessary in order to raise the threa...

Страница 15: ...14 Diagram of the upper thread guide The diagram summarises the route of the upper thread The numbers indicate the sequence of the steps in the threading process 1 2 3 4 5 6 7...

Страница 16: ...d upwards slightly so that the lower thread forms a loop 5 Pull a length of about 15cm of both threads towards the back under the presser foot 4 1 As shown turn the hand wheel towards you with your ri...

Страница 17: ...ric may gather We recommend that you carry out a test on a scrap of fabric before starting work Correct stitching upper thread lower thread lower fabric layer upper fabric layer As shown the tension o...

Страница 18: ...ind the needle Lower the presser foot lever Holding the thread with your left hand turn the hand wheel towards you and lower the needle to the point on the fabric where you want to start sewing Press...

Страница 19: ...t of the machine put it in the machine or change the presser foot Removing and fitting the presser foot Removal Turn the hand wheel towards you until the needle has reached its highest position Lift t...

Страница 20: ...and unplug the machine Turn the hand wheel towards you until the needle has reached its highest position Loosen the needle holding screw by turning it anticlockwise towards you Remove the needle from...

Страница 21: ...the buttonhole Pass the upper thread through the opening on the buttonhole sewing foot and pull both the upper and lower thread to the left hand side Procedure Select the program for the left hand bar...

Страница 22: ...ad not threaded correctly Thread breaks Needle is inserted incorrectly Upper thread or lower thread not threaded correctly Needle bent Upper thread tension too high Upper thread tension too high Fabri...

Страница 23: ...loose Re insert the needle page 19 Re insert the needle page 19 Remove and re insert a new needle page 19 Machine stopped by knotted thread Thread knotted under the fabric Needle can t go through the...

Страница 24: ...Contents of this manual are subject to change without prior notice Sewplus Ningbo Co Ltd reserve all the right for the nal explanation...

Отзывы: