background image

EN

ENGLISH

 Nilfisk ALTO


Operator's Manual (EN) - SCRUBTEC  866, 871, 866, Boost 8 and 871C

                                         - 5 -

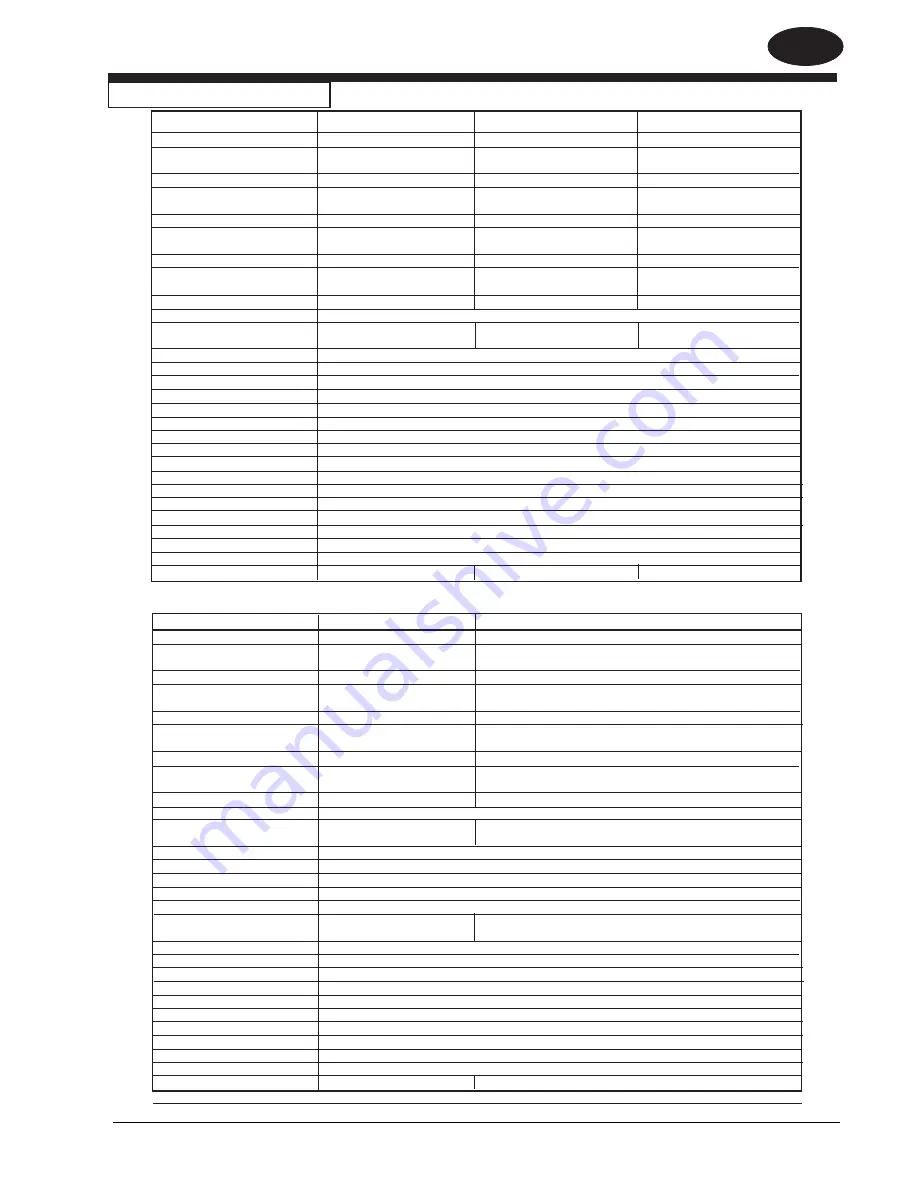
Model

Scrubtec 871 C

Scrubtec BOOST 8

Pad / Brush Size

(2) 5.75” x 28” (14.6 x 69cm)

(2) 14” x 28” (35.6 x 71cm)

Brush Motor (s)

(2) .81 hp (.6 kw)

(2) 3/4 hp (.56 kw)

613 RPM

2250 RPM

Cleaning Width

28” (71 cm)

28” (71 cm)

Brush Pressure

80 lbs. (36 kg)

1

st

 - 65 lbs. (29.5 kg)

2

nd

 -


125 lbs. (56.7 kg)

Brush Retention

N/A

Hook & Loop

Brush Head

Side Skirts

N/A

Water Retention
Squeegee Width

35” (89 cm)

35” (89 cm)

Width of Machine

30.69” (78 cm) Head

28.75” (73 cm) Head

23.5” (60 cm) Body

23.5” (60 cm) Body

Length of Machine

59.5” (151 cm)

60.5” (154 cm)

Height of Machine

                                                         44” (112 cm)

Weight w/250 Ah batteries

792 lbs. (359.3 kg)

794 lbs. (360.2 kg)

and full Solution Tank
Power Supply

                                          24 volt, (4 - 6 volt batteries)

Vacuum Motor

                              .75 hp (550W), 3 stage, tangential discharge

Vacuum Motor Protection

                                                Electronic Float Shut-Off

Solution Tank

                                                   23 gallons (87 liters)

Solution Fill

                                             Rear Fill with Bucket or Hose

Solution Flow

0 - 1 gal/min (0 - 3.8 liters/min)     Normal BOOST Scrubbing .12 gal/min (.45 liters/min),

              Full range .0 - .65 gal/min (0 -2.5 liters/min)

Recovery Tank

                                                23 gallons (87 liters)

Motor Traction

                                                        .44 hp (.33 kw)

Speed Forward

ward

                                              0 - 260 ft/min (0 - 4.8 km/h)

Speed Reverse

                                              0 - 174 ft/min (0 - 3.2 km/h)

Drive Wheel

          (2) 10.24” (260 mm) x 3.35” (85 mm) Light Gray, Non-Marking, Foam Filled

Caster

                                            (2) 3.94” (10 cm) Polyurethane

Squeegee Material

                                     Urethane Front Blade and Rear Blade

Cleaning Grade

                                                                 2 %

Charger

                                              On Board , 24 volt, 25 amp

Vibration @ handle

                                                             <2.5m/s

2

Sound test @ operator’s ear

71 dBA

63 dBA

Machine Specifications

Model

Scrubtec 866

Scrubtec 871

Scrubtec 886

Pad / Brush Size

(2) 13” (33 cm)

(2) 14” (36 cm)

(2) 17” (43 cm)

Brush Motor (s)

(2) 3/4 hp (.56 kw)

(2) 3/4 hp (.56 kw)

(2) 3/4 hp (.56 kw)

200 RPM

200 RPM

200 RPM

Cleaning Width

26” (66 cm)

28” (71 cm)

34” (86.4 cm)

Brush Pressure

1

st

 - 80 lbs. (36 kg)

1

st

 - 80 lbs. (36 kg)

1

st

 - 80 lbs. (36 kg)

2

nd

 -


150 lbs. (68 kg)

2

nd

 -


150 lbs. (68 kg)

2

nd

 -


150 lbs. (68 kg)

Brush Retention

Gimbal

Gimbal

Gimbal

Brush Head

Steel Deck w/ Bristle Skirt

Steel Deck w/ Bristle Skirt

Steel Deck w/Bristle Skirt

Water Retention
Squeegee Width

32.5” (81 cm)

35” (89 cm)

41” (107 cm)

Width of Machine

28” (71 cm) Head

30” (76 cm) Head

35.7” (91 cm) Head

23.5” (60 cm) Body

23.5” (60 cm) Body

23.5” (60 cm) Body

Length of Machine

61” (155 cm)

62” (157 cm)

64” (162 cm)

Height of Machine

                                                         44” (112 cm)

Weight w/250 Ah batteries

796 lbs. (361.1 kg)

800 lbs. (362.9 kg)

791 lbs. (358.8 kg)

and full solution tank
Power Supply

                                              24 volt, (4 - 6 volt batteries)

Vacuum Motor

                                 .75 hp (550W), 3 stage, tangential discharge

Vacuum Motor Protection

                                                Electronic Float Shut-Off

Solution Tank

                                                   23 gallons (87 liters)

Solution Fill

                                             Rear Fill with Bucket or Hose

Solution Flow

                                             0 - 1 gal/min (0 - 3.8 liters/min)

Recovery Tank

                                                23 gallons (87 liters)

Motor Traction

                                                        .44 hp (.33 kw)

Speed Forward

                                              0 - 260 ft/min (0 - 4.8 km/h)

Speed Reverse

                                              0 - 174 ft/min (0 - 3.2 km/h)

Drive Wheel

           (2) 10.24” (260 mm) x 3.35” (85 mm) Light Gray, Non-Marking, Foam Filled

Caster

                                            (2) 3.94” (10 cm) Polyurethane

Squeegee Material

                                      Urethane Front Blade and Rear Blade

Cleaning Grade

                                                              2 %

Charger

                                                   On Board, 24 volt, 25 amp

Vibration @ handle

                                                             <2.5m/s

2

Sound test @ operator’s ear

65 dBA

65 dBA

67 dBA

Содержание SCRUBTEC 866

Страница 1: ...S A SCRUBTEC 8 SCRUBTEC 8 SCRUBTEC 8 SCRUBTEC 8 SCRUBTEC 8 SCRUBTEC 866 SCRUBTEC 866 SCRUBTEC 866 SCRUBTEC 866 SCRUBTEC 866 SCRUBTEC 871 SCRUBTEC 871 SCRUBTEC 871 SCRUBTEC 871 SCRUBTEC 871 SCRUBTEC 871C SCRUBTEC 871C SCRUBTEC 871C SCRUBTEC 871C SCRUBTEC 871C SCRUBTEC 886 SCRUBTEC 886 SCRUBTEC 886 SCRUBTEC 886 SCRUBTEC 886 ...

Страница 2: ...Parts List 45 Brush Head Assembly Drawing 866 871 46 Parts List 47 Brush Head Assembly Drawing 886 48 Parts List 49 Brush Head Assembly Drawing BOOST 8 50 Parts List 51 Brush Head Assembly Drawing 871C 52 Parts List 53 Chemical Mixing Kit Drawing 54 Parts List 55 Electrical Schematic 56 Connection Diagram 58 READ THIS BOOK CAUTION Read the Operator s Manual before using the appliance This book has...

Страница 3: ...picking up hazardous dust DANGER Lead acid batteries generate gases which can cause an explosion Keep sparks and flames away from batteries Do not smoke around the machine Charge the batteries only in an area with good ventilation Make sure that you unplug the AC charger from the wall outlet before operating the machine DANGER Working with batteries can be dangerous Always wear eye protection and ...

Страница 4: ...nvironmental Protection Agency has established certain regulations regarding dis charge of waste water Also city and state regulations regarding this discharge may be in your area Understand and follow the regulations in your area Be aware of the environmental hazards of chemicals that you dispose CAUTION Use of this machine to move other objects or to climb on could result in injury or damage Do ...

Страница 5: ...mp Vibration handle 2 5m s2 Sound test operator s ear 71 dBA 63 dBA Machine Specifications Model Scrubtec 866 Scrubtec 871 Scrubtec 886 Pad Brush Size 2 13 33 cm 2 14 36 cm 2 17 43 cm Brush Motor s 2 3 4 hp 56 kw 2 3 4 hp 56 kw 2 3 4 hp 56 kw 200 RPM 200 RPM 200 RPM Cleaning Width 26 66 cm 28 71 cm 34 86 4 cm Brush Pressure 1st 80 lbs 36 kg 1st 80 lbs 36 kg 1st 80 lbs 36 kg 2nd 150 lbs 68 kg 2nd 1...

Страница 6: ...the top of the ramp 11 Turn the key switch OFF 12 Fasten the machine to the vehicle How To Remove The Machine From A Van Or Truck 1 Make sure there are no obstructions in the area 2 Make sure the unloading ramp is at least eight 8 feet long and strong enough to support the machine 3 Make sure the ramp is clean and dry 4 Put the ramp in position 5 Unfasten the machine WARNING The machine is heavy M...

Страница 7: ... before performing any procedure WARNING Do not use the machine on slopes exceeding the specifications WARNING Do not wash the machine with direct or pressurized water jets Charge Battery Meter Chemical Mixing Control Optional On Off Key Switch Traverse Speed Control One Touch Control Additional Brush Pressure Not Available on Cylindrical Vacuum On Off Solution Control ...

Страница 8: ...al scrub solution setting is indicated by two green bars on the meter On cylindrical machines with most floor conditions the solution setting should be set one step higher To increase the flow press the solution flow button G until the desired flow is reached To decrease the flow press the solution flow button F until the desired flow is reached To shut off the solution press the solution flow but...

Страница 9: ...EN ENGLISH Nilfisk ALTO Operator s Manual EN SCRUBTEC 866 871 866 Boost 8 and 871C 9 Figure 1 MACHINE CONTROL PANEL I H D E C F G N J M H B K L A ...

Страница 10: ...ition See figure 4 CAUTION Before raising the tank be sure tank is empty WARNING Do not operate the machine while the recovery tank is in the open position The tank can be accidentally bumped and it may slam shut 4 Place the batteries in the tray as shown in figure 5 WARNING The batteries are heavy Lifting batteries without help could result in an injury Get help to lift the batteries WARNING Work...

Страница 11: ...rn the key switch item A ON c Continue to hold the buttons items E and F until the battery meter LED light turns ON and OFF and then release both buttons d Within 3 seconds toggle the button item F to advance the green bar item G to the desired charger setting see green bar position for charger settings below Green bar setting item G 1st green bar WET 25 amps 250 330 ah batteries 4 RED blinks 2nd ...

Страница 12: ...electrolyte does not cover the plates Keep the electrolyte at the correct level CAUTION Machine damage and discharge across the tops of the batteries can occur if the batteries are over filled Do not fill the batteries up to the bottom of the tube in each cell Wipe any acid from the machine or the tops of the batteries Never add acid to a battery after installa tion CAUTION Batteries must be refil...

Страница 13: ... raising tank be sure tank is empty WARNING Do not operate the machine while the recovery tank is in the open position The tank can be accidentally bumped and it may slam shut 3 Connect the battery charger AC cord located at the rear of the machine to a 15 amp min 120V properly grounded wall receptacle 4 Observe indicator lights on the charger battery meter to ensure the charging process has start...

Страница 14: ...ure 10 NOTE When using a black pad position pad on head Lower head and operate momentarily to affix pad to pad driver if you have difficulty position pad on floor and lower head then operate How To Remove The Brush Or Pad BOOST Machine To remove the brush or pad from the machine follow this procedure 1 Turn the key switch ON 2 Put the brush head assembly in the Up position 3 Turn the key switch OF...

Страница 15: ... 5 6 and 7 to install the second brush or pad driver 9 Reinstall right and left brush housings and latch front cover DANGER Operating a machine that is not completely or fully assembled could result in injury or property damage Do not operate this ma chine unless it is completely as sembled Inspect the machine carefully before operation How To Remove The Brushes Or Pad Drivers On the Disc Machine ...

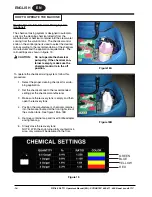
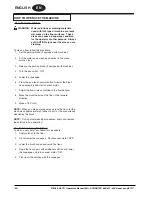
Страница 16: ...figure 15 7 Inspectbrushcondition Ifdamagedorworn replace it Otherwise turn brush end for end periodically to reverse bristle direction for better life 8 Slide brush onto driver or opposite side and rotate slowly until drive lugs are lined up with brush slots Push brush all the way in 9 Install brush door assembly into brush 10 Raise door and tighten thumb screw 11 Repeat for the other brush DANGE...

Страница 17: ...d a cleaning chemical to the solution tank For the correct amount of chemical follow the directions shown on the container 3 Fill the solution tank with water 4 Replace solution tank lid WARNING Water solutions or cleaning materials used with this type of machine can leave wet areas on the floor surface These areas can cause a dangerous condition for the operator or other persons Always put CAUTIO...

Страница 18: ...not operate the chemical pump dry If the chemical con tainer is empty make sure the chemical control is in the off position To operate the chemical mixing system follow this procedure 1 Select the proper cleaning chemical for scrub bing application 2 Set the chemical knob to the recommended setting per the chemical manufacturer 3 Make sure the recovery tank is empty and then open the recovery tank...

Страница 19: ...he following 1 Move the machine in a straight direction forward and backward 2 Stop the machine safely 3 Turn the machine both left and right and return to a straight direction To move the machine follow this procedure 1 Release the parking brake if equipped with machine 2 Turn the key switch to the ON position 3 Raise the brush 4 Raise the squeegee 5 When either the left or right forward palm but...

Страница 20: ...N 5 Lower the squeegee 6 Press the one touch control button to lower the brush head assembly and start vacuum motor 7 Adjust the flow of clean solution to the flow desired 8 Move the machine across the floor in the forward direction 9 Make a 180 turn NOTE When you make more passes across the floor let the brush clean approximately 2 inches 5 cm of the area already cleaned by the brush NOTE During ...

Страница 21: ...epairsand have longer life Do These Procedures When You Begin Your Work Period 1 Turn off key switch 2 Disconnect AC power from battery charger fol low charger instructions 3 Make sure the screen filter over the vacuum motor is clean and in position see figure 21 4 Make sure the valve on the recovery drain hose is clean Tightly close the valve 5 Make sure the brushes are in position and installed ...

Страница 22: ...r hose into the drain hose 4 Leave the tanks and the recovery drain valve open to dry in the air 5 Check the squeegee blade Use a cloth to clean the squeegee blade If the squeegee blade is damaged or worn turn or replace the blade 6 Check and clean the solution lid gasket Use a mild cleaning solution and rinse the parts in clean water Check the batteries and if necessary add distilled water afterc...

Страница 23: ...ll Wipe any acid from the machine or the tops of the batteries Do not add acid to battery after installation NOTE Always turn off key switch before servicing the machine WARNING Always wear eye protection and protective clothing when working near batteries NO SMOKING 1 To inspect batteries tip up recovery tank to it s full open position See figure 24 To close the tank slowly lower the tank to the ...

Страница 24: ...lockwiseorcounterclockwise seefigure26 toachieve uniform squeegee blade flare WARNING Maintenance and repairs must be done by authorized personnel only WARNING Electrical repairs must be done by authorized personnel only Maintenance Procedures Must Be Done Contact a Nilfisk ALTO Authorized Service Center to perform these procedures Every 6 Months 1 Check the carbon brushes in the electric motors 2...

Страница 25: ...ruction or repair the damage Check for blown fuse Have an authorized service person make repairs Connect the hose Turn or replace the squeegee blade Correctly install the squeegee blade Replace the gasket Close valve Clean the terminals and connectors Replace the damaged cables Charge the batteries Add distilled water to each cell and charge the batteries Charge the batteries for a full 16 hour ch...

Страница 26: ...97002 Urethane Squeegee Blade Kit 11332A Red Pad 14x28 5 pack 997001 Linatex Squeegee Blade Kit 11338A Blue Pad 14x28 5 pack 997006 Gum Squeegee Blade Kit 11335A Maroon Pad 14x28 10 pack 997018 Black Pad 14x28 5 pack 997000 Poly Brush 14x28 30752A Nylon Brush 14x28 30751A Grit Brush 14x28 30753A Two Sided Velcro 30794A Scrubtec 866 Description Part No Description Part No Pad Driver Brushes 32 5 Sq...

Страница 27: ...No Pad Driver Brushes 41 Squeegee Blades front rear Pad Driver 17 38034A Urethane Squeegee Blade Kit 11331A Poly Brush 17 11424B Linatex Squeegee Blade Kit 11337A Soft Nylon Brush 17 10875A Gum Squeegee Blade Kit 11334A Lite Grit Brush 17 10384A Medium Grit Brush 17 11430B Heavy Grit Brush 17 11425B Scrubtec 871C Description Part No Description Part No Brushes 35 Squeegee Blades front rear Poly Br...

Отзывы: