


8/00 revised 6/01 Form No. 56040724 (page 3 of 13)
© 2001 Printed in USA, Nilfisk-Advance, Inc.
kg
lb
kg
lb
1/10
J
K
L
12
To test the presweep, turn the key switch ON and lower the
main and side brooms by depressing the foot pedal on the
presweep unit. This will automatically enable the electrical
system for the presweep. The main and side brooms will
now turn on when the drive pedal is moved from the neutral
position. The brooms will turn off approximately 1.6 seconds
after the machine stops moving in neutral. The dust control
feature can be enabled at any time via the Dust Control But-
ton
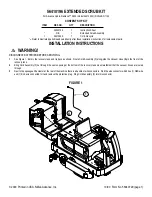
(J)
on the Operator’s Control Panel of the machine
(see
figure 3)
, however it will only turn on when the brooms turn
on.
M
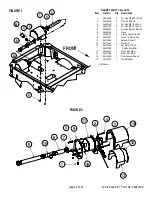
Left Side of Pre-sweep Assembly
FIGURE 4
FIGURE 3
Presweep Dust Control Indicator (K):
•
This indicator will be GREEN when the dust control feature is ON.
•
This indicator will be YELLOW when the dust control feature is enabled but not ON.
•
This indicator will be OFF if the dust control feature is not enabled.
Presweep Power Indicator (L):
•
This indicator will be GREEN when the optional presweep kit is installed and turned ON.
•
This indicator will be YELLOW when the optional presweep kit is installed and enabled, but not ON (machine in neutral).
•
This indicator will be OFF if the foot pedal on the optional presweep kit is UP.
12
After testing for proper operation, check the side and main brooms for proper adjustment.
To adjust the main broom:
13
Park the machine on a level floor and set the parking brake.
14
Turn the key switch ON and lower the presweep with the foot pedal. Let the main broom run for about 1 minute. This allows the broom to polish
a “strip” on the floor.
15
After 1 minute, release the parking brake and move the machine so that the polished strip is visible. The strip should be 1-1/2 to 2 inches (3.81
to 5.14 cm) wide its entire length.
Note:
Adjusting the broom for a pattern wider than specified decreases sweeping performance and increases broom wear.
16
If the polished strip is tapered toward either end, loosen nut
(M)
(see figure 4)
and raise or lower the left end of the broom to compensate and
retighten nut
(M)
.
17
Re-test the broom to make sure the polished strip is an even width its entire length (repeat step 16 if necessary and re-test after each adjustment).
Содержание BR 1100
Страница 88: ...www nilfisk advance com 2005 Printed in USA ...


