background image

Taking Pictures

5

Taking Pictures

Taking Pictures

Place the camera in the COOL-STATION

5

Power lamp

1

Open cover for connection 
to MV-12

2

3

Multi connector cover

Camera connector

An exhausted battery takes about two 
hours to fully recharge.

6

Charge the battery

The indicator next to the camera monitor 
will blink green while the battery charges.

Charging is complete when the indicator 
stops blinking.  When charging is com-
plete, remove the camera from the COOL-
STATION, close the multi connector cover, 
and unplug the AC adapter.  Make sure that 
the multi connector cover is tightly closed.

Charge the battery

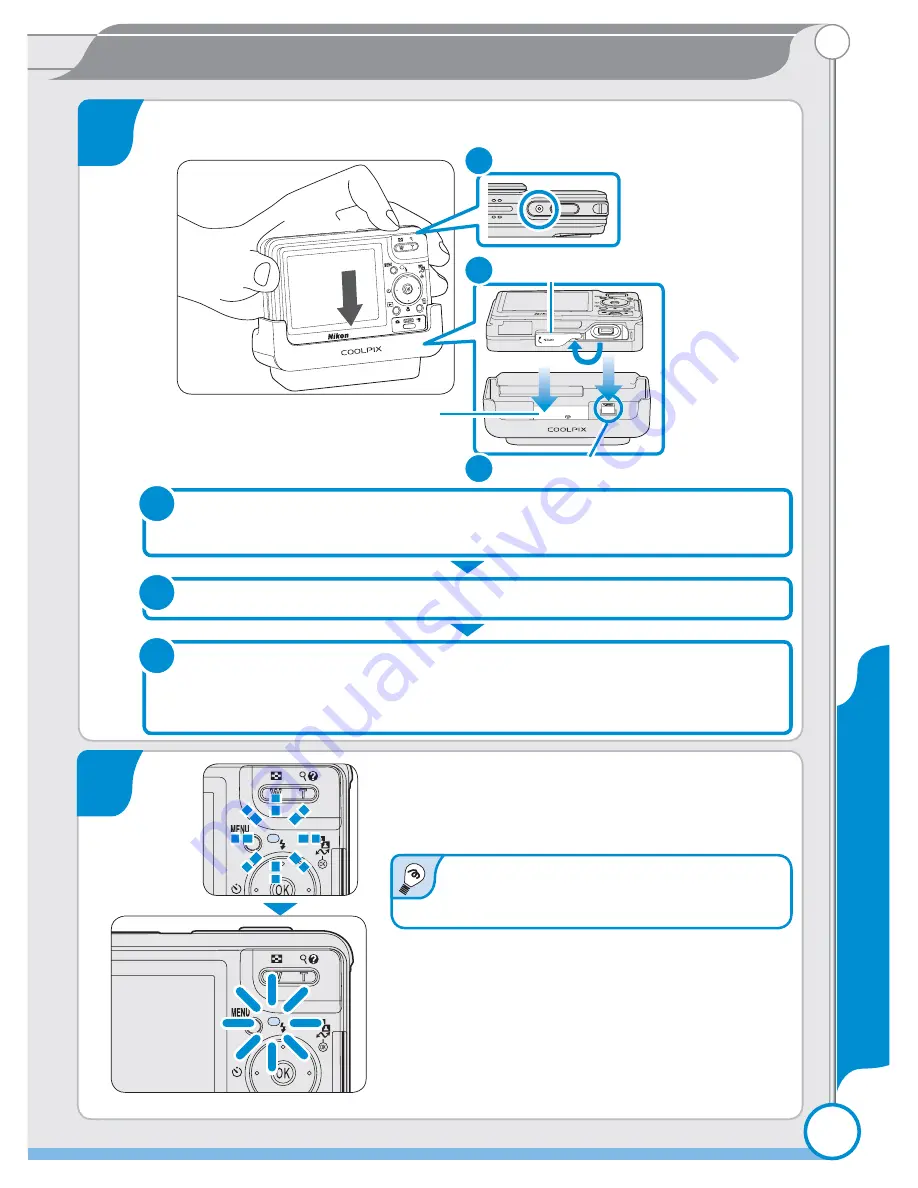
Close the sliding lens cover and confi rm that the power-on lamp is 
off.  

The battery will not charge while the camera is on.

1

Open the multi connector cover.

2

Place the camera in the COOL-STATION with the monitor towards 
you, making sure that the connector is fully inserted in the match-
ing connector on the COOL-STATION.

3

Содержание CoolPix S2

Страница 1: ...En pg 3 pg 13 pg 2 Bundled software Taking Pictures Package Contents PictureProject D I G I T A L C A M E R A Quick Start Guide Quick Start Guide ...

Страница 2: ...uide EG E5000 audio video cable UC E10 USB interface cable Warranty Guide to Digital Photography with the COOLPIX S2 PictureProject installer CD PictureProject reference manual CD Warranty Camera strap MV 12 COOL STATION EN EL8 rechargeable bat tery with terminal cover EH 63 AC adapter with power cable En D I G I T A L C A M E R A Quick Start Guide Quick Start Guide Attach the camera strap Attach ...

Страница 3: ... AC adapter Charge the battery Important Read Before Use The COOLPIX S2 is not waterproof and should never be immersed in water It is water and dust tight giving it water resistance equivalent to IEC 60529 IPX4 splash proof Its enclosures are intended for use indoors and outdoors to pro tect the enclosed equipment against water splashed from any direction NOTE The accessories provided with the cam...

Страница 4: ...t the entrance to the battery chamber mak ing sure that the positive and negative terminals are in the correct orientation When the battery is fully inserted the orange battery latch will pop up locking the battery in place 3 Inserting the battery upside down or backwards could damage the camera Be sure that the battery is in the cor rect orientation Battery latch Charge the battery Important If t...

Страница 5: ...plete when the indicator stops blinking When charging is com plete remove the camera from the COOL STATION close the multi connector cover and unplug the AC adapter Make sure that the multi connector cover is tightly closed Charge the battery Close the sliding lens cover and confirm that the power on lamp is off The battery will not charge while the camera is on 1 Open the multi connector cover 2 ...

Страница 6: ...will turn off altogether and the camera will enter stand by mode further reducing the drain on the battery The display can be reactivated by pressing the shutter release button halfway See the Guide to Digital Photography for more information on the options avail able for auto power off Turn the camera on Open the sliding lens cover Avoid touching the camera lens when opening the sliding lens cove...

Страница 7: ...rsor left Press center to make selection 2 DATE DATE DATE Confirm Confirm Confirm Set time and date Yes No No 3 DATE DATE DATE Confirm Confirm Confirm Set time and date No Yes 4 TIME ZONE TIME ZONE TIME ZONE Confirm Confirm Confirm DaylightSaving London Casablanca 1 Cancel Cancel Confirm Confirm Cancel Confirm To turn daylight saving time on or off press multi selector down to highlight DaylightSa...

Страница 8: ...time zone HOME TIME ZONE HOME TIME ZONE HOME TIME ZONE Back Back Confirm Confirm Back Confirm Madrid Paris Berlin Select Month Repeat 8 9 to edit Month Year hour and minute DATE DATE DATE Y D M 2005 20 00 00 04 Highlight D M Y DATE DATE DATE 2005 20 04 15 20 Y D M Confirm Confirm Confirm Choose order in which Day Month and Year will be displayed DATE DATE DATE 2005 04 20 15 20 Y M M D Confirm Conf...

Страница 9: ...to Digital Photography Battery level indicator Battery level is shown as follows Display Description NO ICON Battery fully charged Low battery If flash fires monitor will turn off while flash recharges Prepare to recharge or change battery WARNING BATTERY EXHAUSTED Battery exhausted No pictures can be taken until bat tery has been recharged or replaced with fully charged spare battery Number of ex...

Страница 10: ...mera Hold the camera steadily in both hands Important Don t Block the Shot Don t Block the Shot To avoid dark or partially obscured pictures keep your fingers and other objects away from the lens and flash window Zoom buttons Press T to zoom in on the subject so that it fills a larger area of the frame Press W to zoom out increasing the area visible in the frame Take pictures ...

Страница 11: ... Focus indicator On green Subject in focus Blinks red Camera unable to focus Change compo sition and try again Indicator lamp flash lamp On red Flash will fire when picture is taken Blinks red Flash charging Off Flash off or not required The COOLPIX S2 has a two stage shutter release button Pressing the shut ter release button halfway focuses the camera Pressing it the rest of the way down release...

Страница 12: ... If the sliding lens cover is closed pressing the button for about one second will turn the camera on with a picture dis played in the monitor playback button View pictures View pictures View additional pictures Press the multi selector down or right to view pictures in the order recorded up or left to view pictures in reverse order Keep the multi se lector pressed to scroll quickly to the desired...

Страница 13: ...tion SE Hard disk space 60MB required for installation RAM Minimum 64 MB 128 MB with muvee option Video resolution 800 600 or more with 16 bit color High Color or better Miscellaneous Only computers with built in USB ports supported OS Mac OS X version 10 1 5 or later version 10 2 8 or later required for Burn Disc option Hard disk space 60MB required for installation RAM Minimum 64MB Video resolut...

Страница 14: ...ceeding to the next step turn off any virus checking software and exit any other applications that may be running Important Windows XP Windows 2000 Windows XP Windows 2000 Log on to an account with administrator privileges when installing or uninstalling PictureProject under Windows XP Home Edition Windows XP Professional or Windows 2000 Professional Insert the PictureProject installer CD into the...

Страница 15: ...ws Me No drivers are installed Proceed to Step 6 Windows 98 SE Follow the on screen instructions to install the Mass Storage Drivers The Panorama Maker install wizard will start Follow the on screen instructions to complete installation 6 7 4 Click Easy Install to begin installation of the following software PTP drivers for COOLPIX series cameras Windows XP only Nikon Mass Storage Camera Drivers W...

Страница 16: ...llow the on screen instructions to complete installation The PictureProject setup program will now start After reading the license agreement click Yes to accept the agreement and proceed with installation Click Next to install PictureProject to the location shown under Destination Folder or click Browse to choose a different folder Complete the following steps Click Yes when prompted to create a n...

Страница 17: ...nof PictureProject Remove the PictureProject installer CD from the CD ROM drive 14 13 Click Finish or Yes to restart the computer 12 Displayed if DirectX is installed Displayed if DirectX is not installed When the computer restarts the PictureProject Import Assistant will be displayed The Import Assistant is used to catalog pictures already on the computer for dis play in PictureProject To proceed...

Страница 18: ...displayed Select a re gion and click Next The Select Region dialog is not displayed in the European release of PictureProject European users can proceed directly to Step 3 A language selection dialog will be displayed Select a language and click Next Click Easy Install to begin installation of the following software Panorama Maker PictureProject Apple QuickTime 6 if required Once installation is c...

Страница 19: ...roceed directly to Step 7 Click OK Enter your administrator name and pass word and click OK The PictureProject license agreement will be displayed After reading the license agreement click Accept to accept the terms and conditions of the agreement and view the ReadMe file Take a few moments to read this file which may contain important information that could not be included in this manual After vi...

Страница 20: ...en the dialog shown at right is displayed click Continue Do not complete the Registered To Organization and Registration Number fields On some systems the QuickTime installer may require considerable time to complete installation Click Restart to restart the computer 10 Displayed if QuickTime 6 is not installed Displayed if QuickTime 6 is installed Click Yes to add PictureProject to the Dock Click...

Страница 21: ...t Assistant will be displayed The Import Assistant is used to cata log pictures already on the comput er for display in PictureProject To proceed without cataloging existing pictures click Close existing pictures can be cataloged manually at any time see the PictureProject reference manual for details For more information on importing pictures into PictureProject see the PictureProject Reference M...

Страница 22: ...mera power on lamp is off open the multi connector cover and place the camera in the COOL STATION Start the computer and connect it directly to the COOL STATION using the supplied UC E10 USB cable Do not connect the COOL STATION via a USB hub or keyboard Connecting the Camera to a Computer Connecting the Camera to a Computer Be sure to install PictureProject before connecting the camera to your co...

Страница 23: ... to that shown at right will be displayed when the camera is turned on Select Copy pictures to a folder on my computer using PictureProject and click OK to start PictureProject To bypass this dialog in the future check Always do the selected action See the PictureProject reference manual on CD for information on what to do if PictureProject Transfer fails to start automatically View pictures on a ...

Страница 24: ...24 24 PictureProject Bundled software The pictures will be displayed in PictureProject when transfer is complete 4 Macintosh Windows View pictures on a computer ...

Страница 25: ...ndows or Mac OS X version 10 2 8 or later The main controls in the PictureProject window are shown below View pictures on a computer Organize button Click to view and organize pictures Edit button Click to enter edit mode where you can crop pic tures adjust brightness and hue and use other retouch tools Collection list Group pictures into collections Picture list View the pictures in the current c...

Страница 26: ...ows XP Home Edition Windows XP Professional Click the Safely Remove Hardware icon in the taskbar and select Safely remove USB Mass Storage Device from the menu that appears Windows 2000 Professional Click the Unplug or Eject Hardware icon in the taskbar and select Stop USB Mass Storage Device from the menu that appears Windows Millennium Edition Me Click the Unplug or Eject Hardware icon in the ta...

Страница 27: ...tal camera be sure to read the Guide to Digital Photography Viewing the PictureProject Reference Manual 2 3 1 View pictures on a computer Insert the PictureProject reference manual CD in a CD ROM drive Double click the CD icon Windows Open My Computer and double click the CD Nikon icon Macintosh Double click the CD Nikon icon on the desktop Double click the INDEX or INDEX pdf icon to display a lan...

Страница 28: ...es Record movies with sound Page 36 Voice Recordings Record and play audio Page 33 PictBridge Printing Print pictures via di rect USB connection Page 52 Water Resistance Take pictures in rain or spray see page 3 of this guide Printed in Japan SB5C00200101 11 6MA09411 Do More with the COOLPIX S2 Do More with the COOLPIX S2 Page numbers refer to the Guide to Digital Photography ...

Отзывы: