Night Owl AHD7 SERIES Скачать руководство пользователя страница 37

72

73

AHD7 DVR Series

 Users Manual

Chapter


11:

 Troubleshooting

Chapter 11: 

Troubleshooting

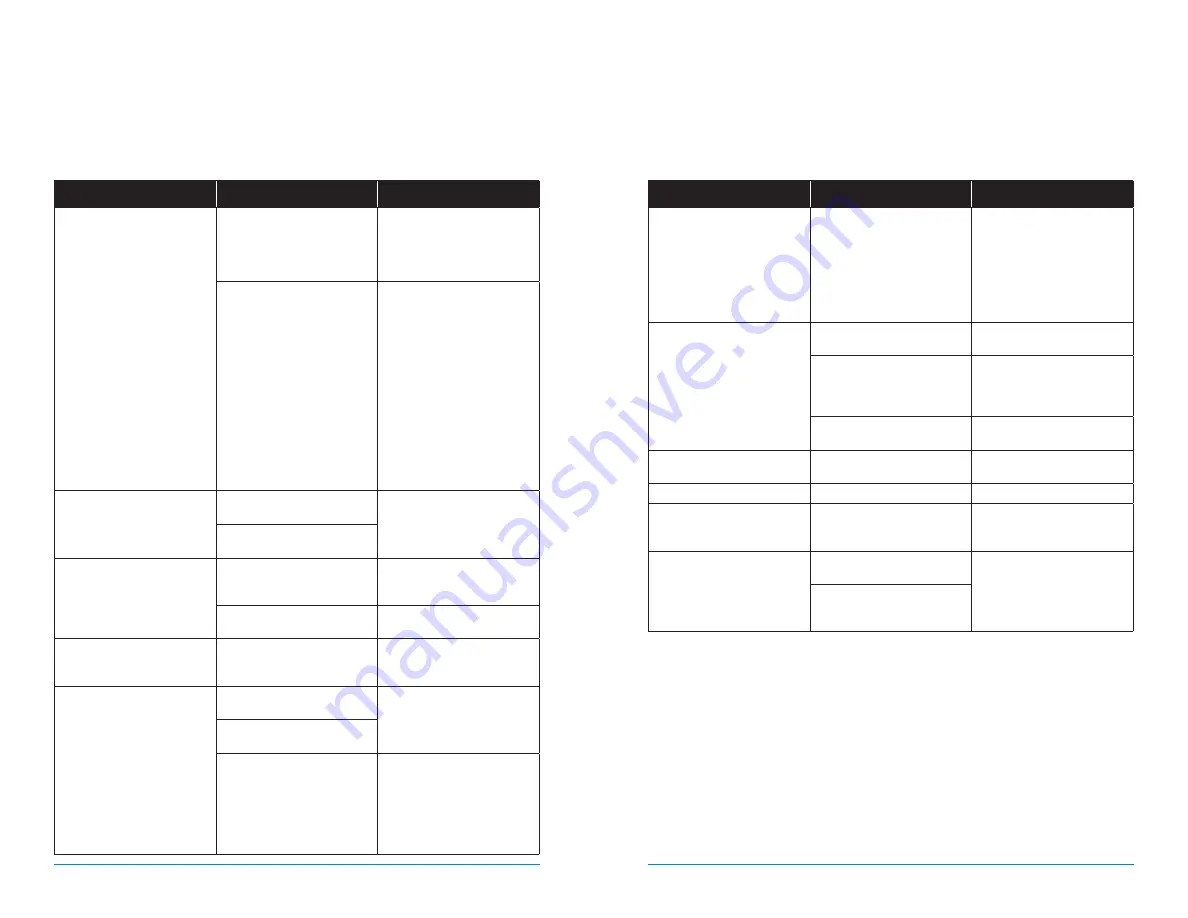
If a problem occurs, you may be able to easily correct it yourself. The following 
table describes some common issues and their most likely solutions. Please refer 
to the table before calling technical support.

Error

Possible Causes

Solutions

System is not receiving power, 
or is not powering up.

Cable from power adapter is 
loose or is unplugged.

1. Confirm that all cables are 

connected correctly.

2. Confirm that the power 

adapter is securely connected 
to the back of the unit. 

Cables are connected, but 
system is not receiving sufficient 
power.

1. Confirm that the system is 

powered ON (LED indicators 
on the front should be ON).

2. If the unit is connected 

through a power bar or surge 
protector, try bypassing the 
bar and connecting the power 
directly to the wall outlet.

3. Confirm that there is power at 

the outlet.

4. Connecting the power cable 

to another outlet. 

5. Test the outlet with another 

plugged device (such as a 
phone charger).

Remote control is not detected 
by the system.

Battery in the remote control is 
drained.

Install two fresh AAA alkaline 
batteries in the remote control.

There are no batteries in the 
remote control.

Hard drive is not detected by 
the system.

Hard drive cables are loose or 
not properly connected.

Remove the cover and check 
that the hard drive cables are 
firmly connected.

There is no hard drive in the 
system.

Open the cover and install a 
3.5” SATA hard drive.

Hard drive is full (0%) and the 
unit is no longer recording.

Overwrite is not enabled.

Go to the Device Menu > HDD 
and ensure that 

Overwrite

 is set 

to 

Auto

.

Mouse not detected by system.

Mouse cable is not firmly 
connected to the system.

Firmly connect the mouse cable 
to the USB Mouse port on the 
front panel.

Mouse is not connected to the 
system.

System needs to be reset.

Power off the system 
(disconnect power cable). Firmly 
connect a USB mouse to the 
USB Mouse port on the front 
panel of the system. Reconnect 
the power cable to the DC 19V 
port on the real panel. 

Error

Possible Causes

Solutions

There is no picture on selected 
channels/camera picture Is not 
being displayed. 

Camera cables are loose of have 
become disconnected.

1. Check the camera video 

cable and connections.

2. Disconnect and reconnect the 

cable at the system and at 
the camera.

3. Try moving the camera to 

another channel or use 
another cable. 

The image on the DVR appears, 
but does not have sound.

Audio cables are loose or have 
been disconnected.

Check the AUDIO connection to 
the DVR.

Audio channels are disable.

Left click in Live View to bring 
up the 

Volume

 control and 

ensure that the channel(s) are 
not low or muted.

Volume on external speakers 
(not included) is low or off.

Increase volume on external 
speakers (not included).

A “whirring” noise is coming 
from the system.

Fan is active.

The noise means the exhaust 
fan is working normal.

The system beeps at startup.

The beep at startup is normal.

The system beeps during motion 
detection.

Motion detection is enabled, but 
the alarm buzzer is activated.

Go to the General Menu > 
Alarm, select the channel and 
turn 

Buzzer

 to 

OFF

.

I am not receiving email 
notifications.

Email notification is disabled.

See section 7.1.2. for details on 
email configuration.

Default setting is disabled, but 
you have not entered your own 
SMTP information. 

Содержание AHD7 SERIES

Страница 1: ...www NightOwlSP com USER MANUAL AHD7 SERIES 4 8 16 CHANNEL...

Страница 2: ...block top to bottom on the DVR For example a 900TVL camera will not display an image if it is connected to the same channel block top to bottom as an AHD 720p camera Please refer to the image below fo...

Страница 3: ...6 3 1 Login Screen 29 6 3 2 Live View All Channels 30 6 3 3 Live View Single Channel 31 6 3 4 Menu Screen 32 CHAPTER 7 MENUS AND SETTINGS 33 7 1 General Menu 35 7 1 1 Display 35 a Output 35 b Privacy...

Страница 4: ...CC WARNINGS For your reference we have created an instructional video that explains the menu structure and functionality of your Night Owl recorder in detail Click on the icon at any time to view Nigh...

Страница 5: ...ommunication However there is no guarantee that interference will not occur in television reception which can be determined by turning the equipment off and on The user is encouraged to try and correc...

Страница 6: ...move it When moving this device be sure to handle it with care Make sure there is good air circulation around the DVR This DVR uses an internal hard drive which generates heat during operation for vi...

Страница 7: ...t port on the DVR to the HDMI input port on your TV Monitor Chapter 3 Specifications 3 1 System Requirements Please be sure that your PC MAC complies with the following specifications PC Operating Sys...

Страница 8: ...ble from the VGA output port on the DVR to the VGA input port on your TV Monitor 6 RJ 45 Ethernet Port RJ 45 port will be used to connect the DVR to your router modem via the included Ethernet cable K...

Страница 9: ...17 Chapter 4 Camera Installation 16 AHD7 DVR Series Users Manual CHAPTER 4 CAMERA INSTALLATION REMOTE SUPPORT VIDEOS...

Страница 10: ...rking prior to mounting by connecting them as described in the section above Once all cameras are confirmed to be fully operational you can run the cables and mount the cameras at their final location...

Страница 11: ...s near to the camera as possible when the distance exceeds 200 as the power level will drop over extended distances resulting in video degradation Do not place near high voltage wires or other sources...

Страница 12: ...23 Chapter 5 DVR Installation 22 AHD7 DVR Series Users Manual CHAPTER 5 DVR INSTALLATION SUPPORT VIDEOS...

Страница 13: ...attach the yellow RCA video connector of the cable to a yellow Video Input port on your TV The opposite BNC video connector on the cable should then connect to the Video Out V OUT port on the back of...

Страница 14: ...r supply UPS plug the adapter cable into one of its output sockets Keep in mind Night Owl always recommends utilizing a surge protector to minimize the risk of damage caused to your DVR in the event o...

Страница 15: ...ile app lets you access your DVR remotely with live viewing from your tablet or smartphone Download our free Night Owl HD application from the iTunes App or Google Play store Scan or click the QR code...

Страница 16: ...nu to control pan tilt speed of rotation zoom focus and the iris if the camera is equipped with PTZ functionality Device ID the value in the field should match the value in the parentheses on the righ...

Страница 17: ...configure display network and alarm settings 2 Cameras Menu access channel display and color settings 3 Record Menu setup or modify general recording triggered events and recording settings 4 Device...

Страница 18: ...seconds per channel To begin the auto sequence feature click on the Auto Sequence icon which is located on the quick access bar VGA HDMI Resolution optimize the display resolution to best fit your TV...

Страница 19: ...f 2049 or 2051 will provide the most optimal connectivity IP Address network address of the connected DVR Subnet Mask the range of IP addresses that can be found in the network This should always be s...

Страница 20: ...uring the DDNS registration process Password the password created during the DDNS registration process b Substream configure or optimize the video quality of your Live View Video Enable or Disable vid...

Страница 21: ...ion alarm settings for your DVR system Channel select the channel to configure motion alarm settings Enable activate motion alarms Sensitivity adjust the level of motion detection A lower setting will...

Страница 22: ...ime choose a start and end time that the event happened Channel pick the channel s with the desired video Type select from All Normal or Motion video Search once the parameters are set click this butt...

Страница 23: ...led Audio enabled cameras are only included in certain kit models Audio enabled cameras will have a white RCA plug to transmit the audio signal 7 3 3 Settings Recordings View or modify general recordi...

Страница 24: ...Cruise Enable or Disable the PTZ cruise function which allows the camera to automatically scan the area periodically with no manual input Address enter an ID number for the PTZ camera greater than 0...

Страница 25: ...th America Menu Timeouts select the duration of time for an inactive menu to be displayed on screen Support Overscan when this option is enabled the DVR will automatically resize the viewing window to...

Страница 26: ...a access control address on the network HDD Capacity the max capacity of installed hard drives Video Format your current video recording format Media Port By default should be left at 9000 Web Port By...

Страница 27: ...Shutdown reboot the DVR 7 6 2 Events Configure notification settings for other triggered events not related to motion detection such as disk error disk full or and or video loss Event Type choose the...

Страница 28: ...automatically when this feature is enabled The default selection for the auto upgrade feature is enable Check For Updates check this tick box to periodically check for updated software versions Detect...

Страница 29: ...r 8 3 Network Configuration 8 3 1 Windows Operating Systems Make sure that the DVR is properly connected to the router modem and that you have a computer that works with Windows and connected to the s...

Страница 30: ...s if they are not they need to be set as follows DNS1 Gateway DNS2 8 8 8 8 5 Click the Save button to apply all changes 6 Reboot or power cycle the DVR NOTE Write these addresses down in the User Info...

Страница 31: ...on to apply all changes 6 Reboot or power cycle the DVR NOTE Write these addresses down in the User Information section at the end of the manual for future reference 8 3 3 Port Configuration After you...

Страница 32: ...rts on your router you should check to make sure they have been correctly forwarded 1 Go to http www yougetsignal com tools open ports 2 Type in port 9000 and select the Check button to see if the por...

Страница 33: ...s Go to the General menu and then to the Network settings and the DDNS section 1 Set the DDNS field to Enable 2 Verify that the Server field is still set to NIGHTOWL 3 In the Domain field input the do...

Страница 34: ...nization that provides services for accessing or using the Internet IP Internet Protocol Protocol for standard communications across the Internet PPPOE Point to Point Protocol Over Ethernet Specificat...

Страница 35: ...any person to assume for it any other obligation or liability in connection with the sale or service of the Product In no event shall Night Owl be liable for any special or consequential damages arisi...

Страница 36: ...71 Chapter 11 Troubleshooting 70 AHD7 DVR Series Users Manual CHAPTER 11 TROUBLESHOOTING SUPPORT VIDEOS...

Страница 37: ...led Go to the Device Menu HDD and ensure that Overwrite is set to Auto Mouse not detected by system Mouse cable is not firmly connected to the system Firmly connect the mouse cable to the USB Mouse po...

Страница 38: ...74 75 AHD7 DVR Series Users Manual Chapter 12 Customer Suppport CHAPTER 12 CUSTOMER SUPPORT SUPPORT VIDEOS...

Страница 39: ...OwlSP com 24 7 Product Support How To Videos Manuals Firmware Updates etc EMAIL Technical Support support NightOwlSP com Sales Support sales NightOwlSP com PHONE English Spanish Technical Support regi...

Страница 40: ...mber ___________________________________________________________ Internet Login Information Internal IP Address _______________________________________________________ Public IP Address ______________...

Страница 41: ...www NightOwlSP com...

Отзывы: