


40
41
AHD7 DVR Series
Users Manual
Chapter
7:
Menus and Settings
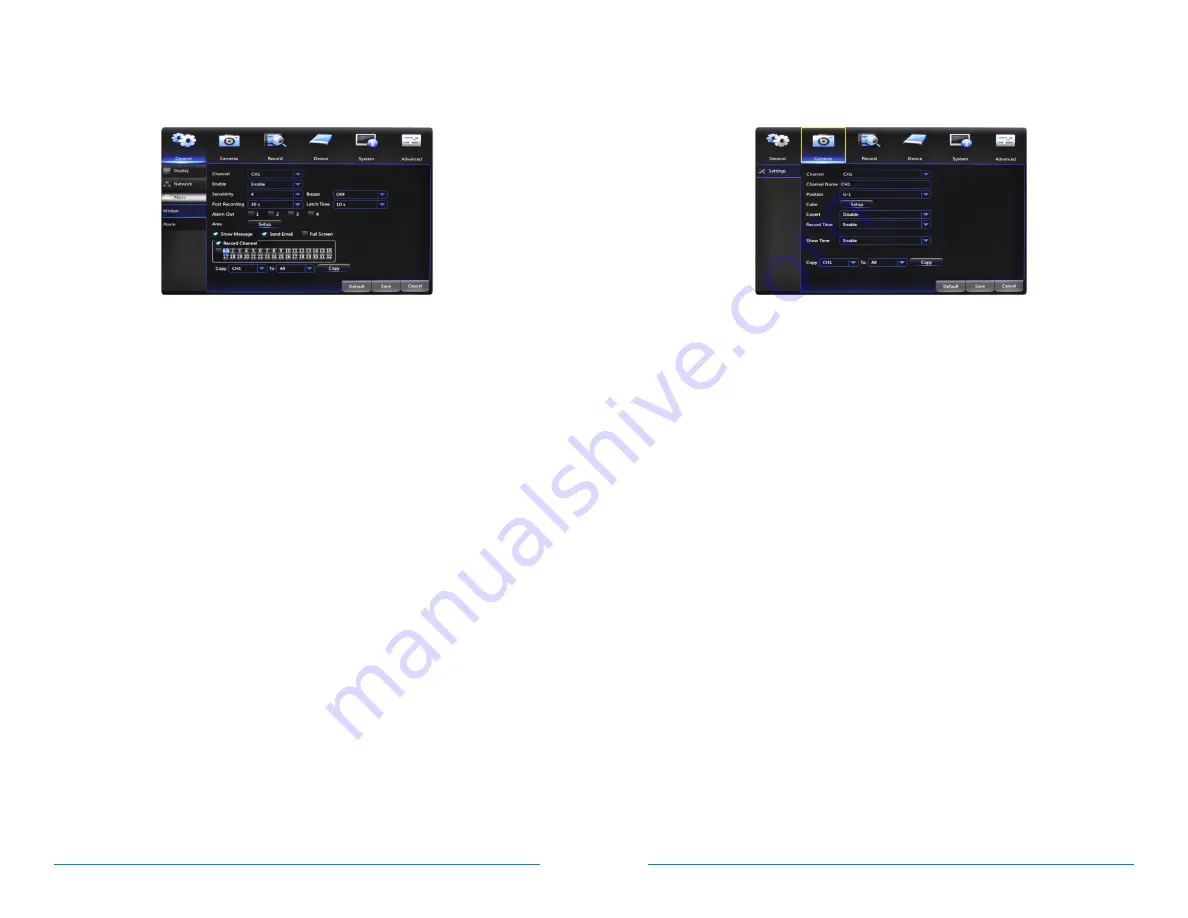
7.2
Cameras Menu
Adjust or modify individual camera settings connected to your DVR.
7.2.1
Settings
Channel:
select the channel you want to configure a camera for.
Channel Name:
create a name for the selected channel; this name will be
displayed on-screen during live view and playback.
Position:
change the position of Channel Name while viewing in Live View. For
example U-L = Upper-Left; D-L= Down Left; U-R=Upper Right; D-R=Down Right
Color:
click
Setup
to access a sub-menu to adjust the colors of the selected
channel. In this sub-menu you can adjust the
Hue, Brightness, Contrast,
and
Saturation
of the image.
Covert:
Enable
or
Disable
the display of this channel. Enabling the Covert mode
will not affect the channel’s recording functions; only block the channel while
viewing in live view mode.
Record Time:
Enable
or
Disable
the recording time display on-screen during
playback mode.
Show Time:
Enable
or
Disable
the on-screen timestamp during live view mode.
7.1.3
Alarm
a. Motion:
configure the motion alarm settings for your DVR system.
Channel:
select the channel to configure motion alarm settings.
Enable:
activate motion alarms.
Sensitivity:
adjust the level of motion detection. A lower setting will require more
movement in the camera range to begin recording.
Buzzer:
toggle between
ON
and
OFF
to enable an audible alert from the DVR.
Post Recording:
set the amount of time to record after the motion is detected. You
can select between 30 and 300 seconds.
Area:
clicking
Setup
will allow you to configure areas which will and will not
detect motion. Red boxes denote areas that will detect motion and uncolored
boxes show areas that will not. When finished, right click to go back to menu.
Show Message:
check the tick box to enable the display of a red “M” on-screen
while in Live View mode. “M” means motion is occuring.
Send Email:
check the tick box to send an email alert when motion is detected.
See section 7.1.2. for email setup and configuration.
Full Screen:
when this tick box is checked, the selected channel will go to full
screen when motion is detected.
Record Channel:
this option gives you the ability to start recording on the
channels you select/highlight as soon as motion has been detected on the Channel
selected above within the Channel field.
Содержание AHD7 SERIES
Страница 1: ...www NightOwlSP com USER MANUAL AHD7 SERIES 4 8 16 CHANNEL...
Страница 12: ...23 Chapter 5 DVR Installation 22 AHD7 DVR Series Users Manual CHAPTER 5 DVR INSTALLATION SUPPORT VIDEOS...
Страница 36: ...71 Chapter 11 Troubleshooting 70 AHD7 DVR Series Users Manual CHAPTER 11 TROUBLESHOOTING SUPPORT VIDEOS...
Страница 38: ...74 75 AHD7 DVR Series Users Manual Chapter 12 Customer Suppport CHAPTER 12 CUSTOMER SUPPORT SUPPORT VIDEOS...
Страница 41: ...www NightOwlSP com...


