Night Owl AHD7 SERIES Скачать руководство пользователя страница 30

58

59

AHD7 DVR Series

 Users Manual

Chapter


8:

 Remote Access

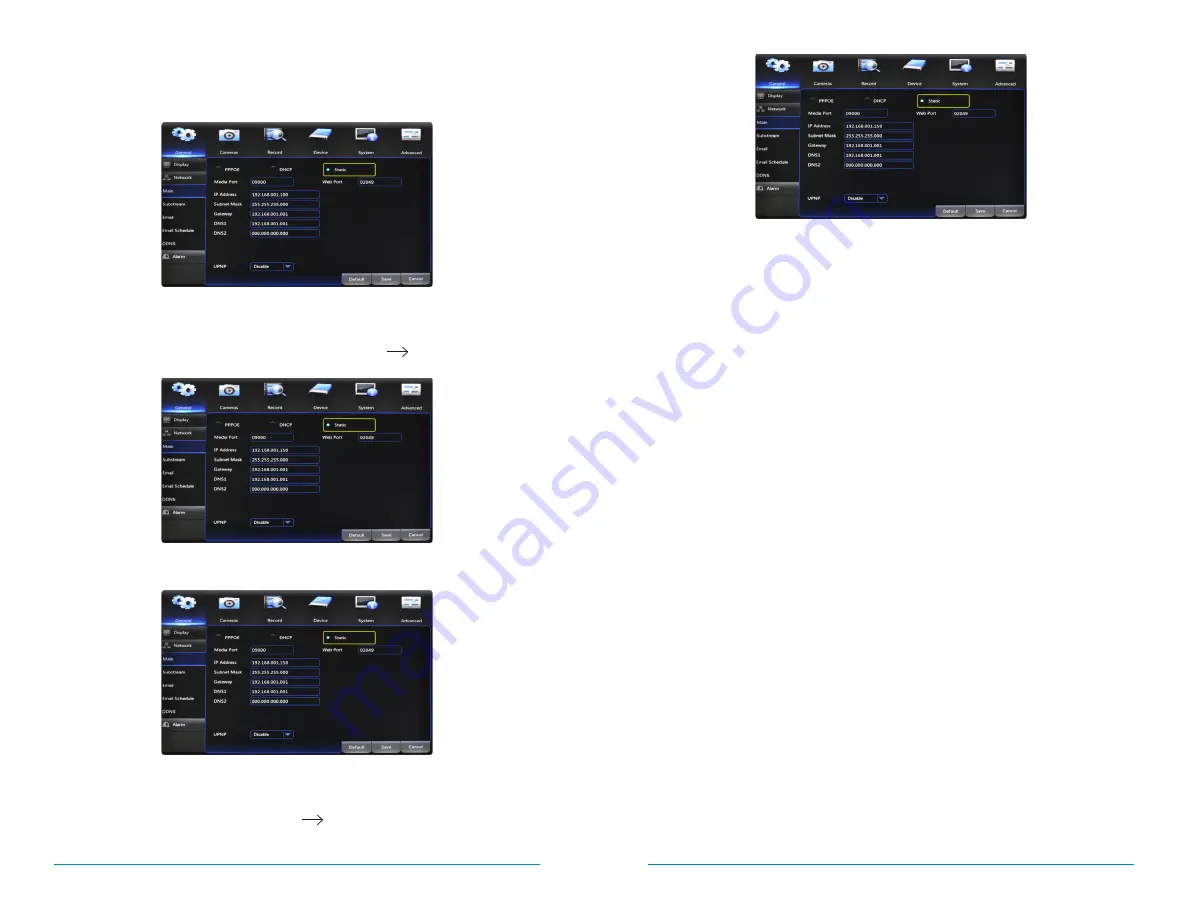
For the following steps, use the information that you just wrote down. To access 
the network settings on your DVR, go to the General Menu, then to Network > 
Main and choose the Static option. 

1.  Manually enter the IP address into the 

IP Address

 field; this is the number 

that ends with 150. You may have to add placeholder zeros for any sections 
that do not contain three digits e.g. 192.168.1.150 

 192.168.001.150.

2.  Confirm that the 

Subnet Mask

 is set to 255.255.255.000. 

3.  Enter the “Default Gateway” number from the prior section into the 

Gateway


field. Again you will need to add placeholder zeros in any sections that do not 
contain three digits e.g. 192.168.1.1 

 192.168.001.001.

4. 

DNS1

 and 

DNS2

 fields are auto-populated in most cases, if they are not they 

need to be set as follows:  DNS1: [Gateway]  DNS2: 8.8.8.8.

5.  Click the 

Save

 button to apply all changes.

6.  Reboot or power cycle the DVR.

NOTE:

 Write these addresses down in the User Information section at the end of 

the manual for future reference.

8.3.2 

Mac

®

 Operating Systems

Make sure that the DVR is properly connected to the router/modem. 

Follow these steps to determine basic information about your network: 

1.  Select the 

Airport

 icon on your computer screen and choose the “Open 

Network Preferences” option. 

2. Choose 

Ethernet

 and select the 

Advanced

 button in the lower right corner. 

3.  Select the 

TCP/IP

 tab at the top to display your computer’s network 

information. 

4.  Write down the “IPv4 address.“

5.  Change the last three digits of the address to 150 and write this address down 

as well e.g. 192.168.1.150. This will become the IP address of your DVR at a 
later time. 

6.  Make note of the IP address listed for router. You will need to enter this into 

the DVR network settings. 

Содержание AHD7 SERIES

Страница 1: ...www NightOwlSP com USER MANUAL AHD7 SERIES 4 8 16 CHANNEL...

Страница 2: ...block top to bottom on the DVR For example a 900TVL camera will not display an image if it is connected to the same channel block top to bottom as an AHD 720p camera Please refer to the image below fo...

Страница 3: ...6 3 1 Login Screen 29 6 3 2 Live View All Channels 30 6 3 3 Live View Single Channel 31 6 3 4 Menu Screen 32 CHAPTER 7 MENUS AND SETTINGS 33 7 1 General Menu 35 7 1 1 Display 35 a Output 35 b Privacy...

Страница 4: ...CC WARNINGS For your reference we have created an instructional video that explains the menu structure and functionality of your Night Owl recorder in detail Click on the icon at any time to view Nigh...

Страница 5: ...ommunication However there is no guarantee that interference will not occur in television reception which can be determined by turning the equipment off and on The user is encouraged to try and correc...

Страница 6: ...move it When moving this device be sure to handle it with care Make sure there is good air circulation around the DVR This DVR uses an internal hard drive which generates heat during operation for vi...

Страница 7: ...t port on the DVR to the HDMI input port on your TV Monitor Chapter 3 Specifications 3 1 System Requirements Please be sure that your PC MAC complies with the following specifications PC Operating Sys...

Страница 8: ...ble from the VGA output port on the DVR to the VGA input port on your TV Monitor 6 RJ 45 Ethernet Port RJ 45 port will be used to connect the DVR to your router modem via the included Ethernet cable K...

Страница 9: ...17 Chapter 4 Camera Installation 16 AHD7 DVR Series Users Manual CHAPTER 4 CAMERA INSTALLATION REMOTE SUPPORT VIDEOS...

Страница 10: ...rking prior to mounting by connecting them as described in the section above Once all cameras are confirmed to be fully operational you can run the cables and mount the cameras at their final location...

Страница 11: ...s near to the camera as possible when the distance exceeds 200 as the power level will drop over extended distances resulting in video degradation Do not place near high voltage wires or other sources...

Страница 12: ...23 Chapter 5 DVR Installation 22 AHD7 DVR Series Users Manual CHAPTER 5 DVR INSTALLATION SUPPORT VIDEOS...

Страница 13: ...attach the yellow RCA video connector of the cable to a yellow Video Input port on your TV The opposite BNC video connector on the cable should then connect to the Video Out V OUT port on the back of...

Страница 14: ...r supply UPS plug the adapter cable into one of its output sockets Keep in mind Night Owl always recommends utilizing a surge protector to minimize the risk of damage caused to your DVR in the event o...

Страница 15: ...ile app lets you access your DVR remotely with live viewing from your tablet or smartphone Download our free Night Owl HD application from the iTunes App or Google Play store Scan or click the QR code...

Страница 16: ...nu to control pan tilt speed of rotation zoom focus and the iris if the camera is equipped with PTZ functionality Device ID the value in the field should match the value in the parentheses on the righ...

Страница 17: ...configure display network and alarm settings 2 Cameras Menu access channel display and color settings 3 Record Menu setup or modify general recording triggered events and recording settings 4 Device...

Страница 18: ...seconds per channel To begin the auto sequence feature click on the Auto Sequence icon which is located on the quick access bar VGA HDMI Resolution optimize the display resolution to best fit your TV...

Страница 19: ...f 2049 or 2051 will provide the most optimal connectivity IP Address network address of the connected DVR Subnet Mask the range of IP addresses that can be found in the network This should always be s...

Страница 20: ...uring the DDNS registration process Password the password created during the DDNS registration process b Substream configure or optimize the video quality of your Live View Video Enable or Disable vid...

Страница 21: ...ion alarm settings for your DVR system Channel select the channel to configure motion alarm settings Enable activate motion alarms Sensitivity adjust the level of motion detection A lower setting will...

Страница 22: ...ime choose a start and end time that the event happened Channel pick the channel s with the desired video Type select from All Normal or Motion video Search once the parameters are set click this butt...

Страница 23: ...led Audio enabled cameras are only included in certain kit models Audio enabled cameras will have a white RCA plug to transmit the audio signal 7 3 3 Settings Recordings View or modify general recordi...

Страница 24: ...Cruise Enable or Disable the PTZ cruise function which allows the camera to automatically scan the area periodically with no manual input Address enter an ID number for the PTZ camera greater than 0...

Страница 25: ...th America Menu Timeouts select the duration of time for an inactive menu to be displayed on screen Support Overscan when this option is enabled the DVR will automatically resize the viewing window to...

Страница 26: ...a access control address on the network HDD Capacity the max capacity of installed hard drives Video Format your current video recording format Media Port By default should be left at 9000 Web Port By...

Страница 27: ...Shutdown reboot the DVR 7 6 2 Events Configure notification settings for other triggered events not related to motion detection such as disk error disk full or and or video loss Event Type choose the...

Страница 28: ...automatically when this feature is enabled The default selection for the auto upgrade feature is enable Check For Updates check this tick box to periodically check for updated software versions Detect...

Страница 29: ...r 8 3 Network Configuration 8 3 1 Windows Operating Systems Make sure that the DVR is properly connected to the router modem and that you have a computer that works with Windows and connected to the s...

Страница 30: ...s if they are not they need to be set as follows DNS1 Gateway DNS2 8 8 8 8 5 Click the Save button to apply all changes 6 Reboot or power cycle the DVR NOTE Write these addresses down in the User Info...

Страница 31: ...on to apply all changes 6 Reboot or power cycle the DVR NOTE Write these addresses down in the User Information section at the end of the manual for future reference 8 3 3 Port Configuration After you...

Страница 32: ...rts on your router you should check to make sure they have been correctly forwarded 1 Go to http www yougetsignal com tools open ports 2 Type in port 9000 and select the Check button to see if the por...

Страница 33: ...s Go to the General menu and then to the Network settings and the DDNS section 1 Set the DDNS field to Enable 2 Verify that the Server field is still set to NIGHTOWL 3 In the Domain field input the do...

Страница 34: ...nization that provides services for accessing or using the Internet IP Internet Protocol Protocol for standard communications across the Internet PPPOE Point to Point Protocol Over Ethernet Specificat...

Страница 35: ...any person to assume for it any other obligation or liability in connection with the sale or service of the Product In no event shall Night Owl be liable for any special or consequential damages arisi...

Страница 36: ...71 Chapter 11 Troubleshooting 70 AHD7 DVR Series Users Manual CHAPTER 11 TROUBLESHOOTING SUPPORT VIDEOS...

Страница 37: ...led Go to the Device Menu HDD and ensure that Overwrite is set to Auto Mouse not detected by system Mouse cable is not firmly connected to the system Firmly connect the mouse cable to the USB Mouse po...

Страница 38: ...74 75 AHD7 DVR Series Users Manual Chapter 12 Customer Suppport CHAPTER 12 CUSTOMER SUPPORT SUPPORT VIDEOS...

Страница 39: ...OwlSP com 24 7 Product Support How To Videos Manuals Firmware Updates etc EMAIL Technical Support support NightOwlSP com Sales Support sales NightOwlSP com PHONE English Spanish Technical Support regi...

Страница 40: ...mber ___________________________________________________________ Internet Login Information Internal IP Address _______________________________________________________ Public IP Address ______________...

Страница 41: ...www NightOwlSP com...

Отзывы: