background image

24

1. Przekręcić kluczem o 90 w żądanym kierunku; 

Rys. 3

2. Przekręcić uchwyt wysprzęglenia o 90; 

Rys. 4

3. Odkręcić i wyciągnąć wkręt mocujący osłonę; 

Rys. 5 

4. Odczepić sprężynę naciskającą osłonę; 

Rys. 6

5. Dosunąć do ściany selektor i zaznaczyć pozycję otworów;
6. Wywiercić cztery otwory i przymocować selektor do ściany 4

wkrętami, pamiętając o założeniu podkładek; 

Rys. 7

7. Podłączyć do wysprzęglenia linkę stalową, której 20 mm ma

wystawać z powłoki;

8. Delikatnie odczepić pokrywkę (A) i ustawić wodzik na pozycji

wskazanej na rysunku, po czym odkręcić śrubkę; 

Rys. 8

9. Założyć stalową linkę i zablokować śrubką; 

DOKR CIĆ DO

OPORU

Rys. 8b

10. Zarejestrować natężenie linki mając na uwadze, że w tej

pozycji automatyka jest odblokowana;

11. Założyć pokrywkę, o której mowa w punkcie 7;
12. Założyć na miejsce sprężynkę i ustawić osłonę (B) I przykręcić

wkrętem (C). 

Rys. 9

1) Opis

KIO służy jako selektor kluczowy ze światełkiem nocnym i jako
ręczne wysprzęglenie. Przekręcając kluczem o kąt około 30 od
pozycji poziomej będziemy mieć do dyspozycji dwa wyłączniki:
jeden w kierunku zegarowym i drugi w kierunku przeciwnym.
Kontynuując przekręcanie klucza (w dowolnym kierunku) uchwyt
otworzymy i będzie można wykonać ruch wysprzęglenia. 
Maksymalna długość ruchu wodzika wewnątrz uchwytu wynosi
60mm.

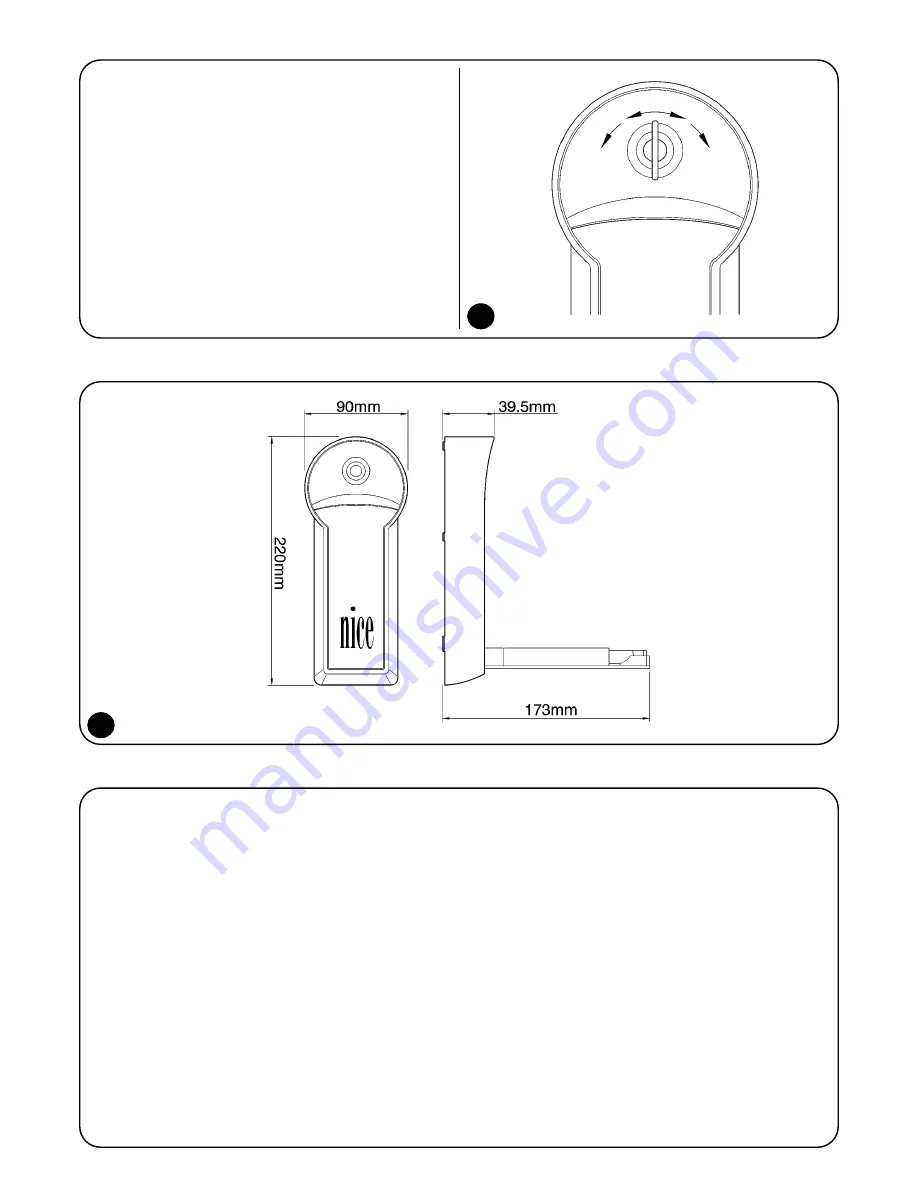
2) Wymiary Gabarytowe

1

2

Wysprzęglenie

Wysprzęglenie

Ot

Za

Содержание KIO

Страница 1: ...ions and warnings for the fitter Instructions et recommandations pour l installation Anweisungen und hinweise für den installateur Instrucciones j advertencias para el instalador Instrukcja dla instalatora Key operated selector switch with cord type release ...

Страница 2: ......

Страница 3: ...e important information regarding safety installation use and maintenance Any use or operation not explicitly provided for in these instructions is not permitted Improper use may cause damage and personal injury KIO is not suitable for use in potentially explosive atmospheres page 6 Testing 5 7 Maintenance 5 8 Disposal 6 9 Technical features 6 GB 3 Table of contents page 1 Description 4 2 Dimensio...

Страница 4: ...Fig 8 9 Insert the steel wire block it in position with the grub screw SCREW VERY TIGHTLY Fig 8b 10 Adjust the wire tension keeping in mind that the automatism will result unblocked in the present position 11 Replace the cover in position as in point 8 12 Insert the spring in its housing and replace the protection guard B Fixing it in position with the screws Fig 9 1 Description KIO can be operate...

Страница 5: ...ticlockwise direction until it is blocked 8 Re insert the knob in the handle 9 Close the handle with slight pressure The handle can be closed even with the motor released 5 Manual manoeuvres 10 OPEN COURTESY LIGHT CLOSE To test the KIO follow this procedure Make sure that the fusible elements are in good condition Check that the lock is not rusted and that no friction exists when the key is turned...

Страница 6: ...sal 9 Technical features Type Key operated selector switch with cord type release Courtesy light supply Between 12V and 36Vdc 12V and 28Vac Protection class IP55 Working temperature Between 20 and 50 C without ice forming Maximum contact voltage 50Vac Vdc Maximum contact current 1 A Lock Combinations 250 000 Nice S p a reserves the right to make changes to its products at any time as it deems nece...

Страница 7: ...na informazione contenuta nel presente fascicolo può essere considerata d interesse per l utilizzatore finale E necessario leggere attentamente le istruzioni prima di procedere all in stallazione in quanto forniscono importanti indicazioni riguardanti la sicurezza l installazione l uso e la manutenzione Tutto quello che non è espressamente previsto in queste istruzioni non è permesso L uso impropr...

Страница 8: ...io bloccandolo con il grano SERRARE A FONDO Fig 8b 10 Registrare la tensione del cavo tenendo presente che in questa posizione l automatismo risulterà sbloccato 11 Re inserire il coperchio tolto al punto 7 12 Inserire la molla nell apposita sede e posizionare il carter B fis sandolo con la vite C Fig 9 1 Descrizione del prodotto KIO ha la funzione sia di selettore a chiave con luce di cortesia che...

Страница 9: ...in senso antiora rio fino bloccaggio 8 Re inserire il pomello dentro la maniglia 9 Chiudere la maniglia con una leggera pressione E possibile richiudere la maniglia anche a motore sbloccato 5 Manovra manuale Per il collaudo del KIO eseguire questa procedura Verificare che le fusioni siano i buono stato Verificare che la serratura non sia ossidata e la rotazione della chia ve non presenti punti d a...

Страница 10: ...istiche tecniche Tipologia Selettore a chiave con sblocco a fune Alimentazione luce di cortesia Da 12V a 36Vdc da 12V a 28Vac Grado di protezione IP55 Temperatura di funzionamento Da 20 a 50 C senza formazione di ghiaccio Tensione massima contatti 50Vac Vdc Corrente massima contatti 1A Combinazioni serratura 250 000 Nice S p a si riserva il diritto di apportare modifiche ai prodotti in qualsiasi m...

Страница 11: ...n contenue dans ce fascicule ne peut être considérée comme intéressante pour l utilisateur final Il est nécessaire de lire attentivement les instructions avant de procéder à l installation étant donné qu elles fournissent d importantes indications au sujet de la sécurité de l installation de l utilisation et de la mainte nance Tout ce qui n est pas expressément prévu dans ces instructions est inte...

Страница 12: ...jon SER RER À FOND Fig 8b 10 Régler la tension du câble en tenant compte du fait que dans cette position l automatisme sera débrayé 11 Remettre en place le couvercle enlevé au point 8 12 Introduire le ressort dans son logement et positionner le carter B en le fixant avec la vis C Fig 9 1 Description KIO a la fonction à la fois de sélecteur à clé avec éclairage de fonc tionnement et de débrayage ma...

Страница 13: ...opérateur tourner la poignée dans le sens contraire aux aiguilles d une montre jusqu au blocage 8 Enfoncer la poignée à l intérieur de son logement 9 Fermer le corps de la poignée avec une légère pression on peut le refermer même avec le moteur débrayé 5 Manœuvre manuelle 10 OUVRE ÉCLAIRAGE AUTOMATIQUE FERME Pour l essai du sélecteur KIO procéder de la façon suivante Vérifier que les parties moulé...

Страница 14: ...ristiques techniques Typologie Sélecteur à clé avec débrayage par câble Alimentation éclairage automatique De 12V à 36Vcc de 12V à 28Vca Indice de protection IP55 Température de fonctionnement De 20 à 50 C sans formation de glace Tension maximum contacts 50Vca Vcc Courant maximum contacts 1A Combinaisons serrure 250 000 Nice S p a se réserve le droit d apporter des modifications aux produits à tou...

Страница 15: ...Installation qualifiziert ist Keine im vorliegenden Heft enthaltene Information kann als interessant für den Endbenutzer betrachtet werden Die Anweisungen vor der Installation genau lesen da sie wichtige Hin weise liefern was Sicherheit Installation Bedienung und Wartung betrifft Alles nicht ausdrücklich in diesen Anweisungen vorgesehene ist unzu lässig Ein unsachgemäßer Gebrauch könnte Schäden un...

Страница 16: ...lseil einfügen mit der Stiftschraube blockieren FEST ANZIEHEN Abb 8b 10 Die Seilspannung registrieren dabei berücksichtigen dass der Automatismus in dieser Stellung entriegelt ist 11 Den in Punkt 8 entfernten Deckel wieder anbringen 12 Die Feder in ihren Sitz einfügen und das Gehäuse B anbringen und mit der Schraube C befestigen Abb 9 1 Beschreibung KIO dient sowohl als Schlüsseltaster mit zusätzl...

Страница 17: ...s er blockiert ist 8 Den Knauf wieder in den Griff einfügen 9 Den Griff mit leichtem Druck schließen Der Griff kann auch mit entriegeltem Motor geschlossen werden 5 Handbedienung 10 ÖFFNET ZUSÄTZLICHE BELEUCHTUNG SCHLIEßT Zur Endprüfung des KIO ist wie folgt vorzugehen Prüfen dass die Teile aus Aludruckguss in gutem Zustand sind Prüfen dass der Schlüsseltaster keine Roststellen aufweist und dass d...

Страница 18: ...sorgen können 8 Entsorgung 9 Technische Merkmale Typik Schlüsseltaster mit Seilentriegelung Versorgung zusätzliche Beleuchtung von 12V bis 36Vdc von 12V bis 28Vac Schutzart IP55 Betriebstemperatur von 20 bis 50 C ohne Eisbildung Höchstspannung Kontakte 50Vac Vdc Höchststrom Kontakte 1A Schlosskombinationen 250 000 Nice S p a behält sich das Recht vor jederzeit Änderungen am Produkt anzubringen ...

Страница 19: ...información contenida en este manual puede ser considerada de interés para el usuario final Es necesario leer con aten ción las instrucciones antes de comenzar con la instalación porque estas ofrecen indicaciones importantes acerca de la seguridad instala ción uso y mantenimiento Está prohibido todo aquello que no esté expresamente previsto en estas instrucciones El empleo inadecuado puede ser cau...

Страница 20: ...uéelo con el tornillo sin cabe za APRIETE HASTA EL FONDO Fig 8b 10 Regule la tensión del cable teniendo en cuenta que en esta posición el automatismo estará desbloqueado 11 Monte de nuevo la tapa que ha quitado en el punto 7 12 Introduzca el muelle en su alojamiento y coloque el cárter B fijándolo con el tornillo C Fig 9 1 Descripción KIO cumple la función tanto de selector de llave con luz de cor...

Страница 21: ...entido antiho rario hasta que se bloquee 8 Introduzca de nuevo el pomo adentro de la manilla 9 Cierre la manilla presionando ligeramente Es posible cerrar la manilla incluso con el motor desbloqueado 5 Maniobra manual 10 ABRIR LUZ DE CORTESÍA CERRAR Para el ensayo de KIO siga este procedimiento Controle que todos los componentes metálicos estén en buenas condiciones Controle que la cerradura no es...

Страница 22: ...erísticas técnicas Tipo Selector de llave con desbloqueo por tirador Alimentación de la luz de cortesía De 12V a 36Vdc de 12V a 28Vac Grado de protección IP55 Temperatura de funcionamiento De 20 a 50 C sin formación de hielo Tensión máxima en los contactos 50Vac Vdc Corriente máxima en los contactos 1A Combinaciones cerradura 250 000 Nice S p a se reserva el derecho de modificar los productos cuan...

Страница 23: ...nformacji zawartych w niniejszej instrukcji nie służy użytkownikowi Przed przystąpieniem do instalowania automatyki należy uważnie przeczytać całą instrukcję ponieważ dostarcza ona ważnych informacji związanych z bezpieczeństwem instalacją użytkowaniem i czynnościami konserwacyjnymi Inne czynności poza tymi zawartymi w niniejszej instrukcji nie są dozwolone Niewłaściwe użytkowanie może być źródłem...

Страница 24: ...yć stalową linkę i zablokować śrubką DOKR CIĆ DO OPORU Rys 8b 10 Zarejestrować natężenie linki mając na uwadze że w tej pozycji automatyka jest odblokowana 11 Założyć pokrywkę o której mowa w punkcie 7 12 Założyć na miejsce sprężynkę i ustawić osłonę B I przykręcić wkrętem C Rys 9 1 Opis KIO służy jako selektor kluczowy ze światełkiem nocnym i jako ręczne wysprzęglenie Przekręcając kluczem o kąt o...

Страница 25: ... według poniższej procedury Sprawdzić stan odlewow Sprawdzić czy zamek nie jest zardzewiały i czy klucz przekręca się swobodnie Sprawdzić czy ruch wysprzęglania odbywa się swobodnie Sprawdzić czy wnętrze wyłącznika nie jest zabrudzone osadem Sprawdzić stan połączeń elektrycznych Sprawdzić stan połączeń śrubowych Sprawdzić funkcjonowanie złączy 6 Test odbiorczy KIO nie wymaga specjalnej uwagi ale n...

Страница 26: ...6 9 3 4 5 12 7 8b 13 8 11 14 A B C ...

Страница 27: ...540 10 PPD0800 4540 11 PPD0801 4540 12 PPD0804 4540 13 PMD0806 4610 14 PMD0807 4610 15 V4x10 B 5102 16 V4 2x9 5101 17 MO 0922 2640 18 V3 5x25 5101 19 V3 5x13 5101 20 R05 5120 21 PMCS42 4630 22 G5x6 5123 23 MO 0923 2640 24 PMD0925 4610 25 PMCSE8 4630 26 MICROI C 1617 27 GOR E 5501 28 GOR A 5501 29 149 A 8001 30 CM H 1630 31 MO 0924 2640 32 MPTASS A 5101 ...

Страница 28: ... relative alla compatibilità elettromagnetica Council Directive 89 336 EEC of 3 May 1989 on the approximation of the laws of the Member States relating to electromagnetic compatibility Oderzo 4 Aprile 20003 IST RN 4865 REV 00 www niceforyou com Nice S p a Oderzo TV Italia Via Pezza Alta 13 Z I Rustignè Tel 39 0422 85 38 38 Fax 39 0422 85 35 85 info niceforyou com Nice Padova Sarmeola I Tel 39 049 ...

Отзывы: