NI SPEEDY-33 Скачать руководство пользователя страница 3

©

 National Instruments Corporation

3

NI SPEEDY-33 Installation Guide

Step 3. Connect the Hardware
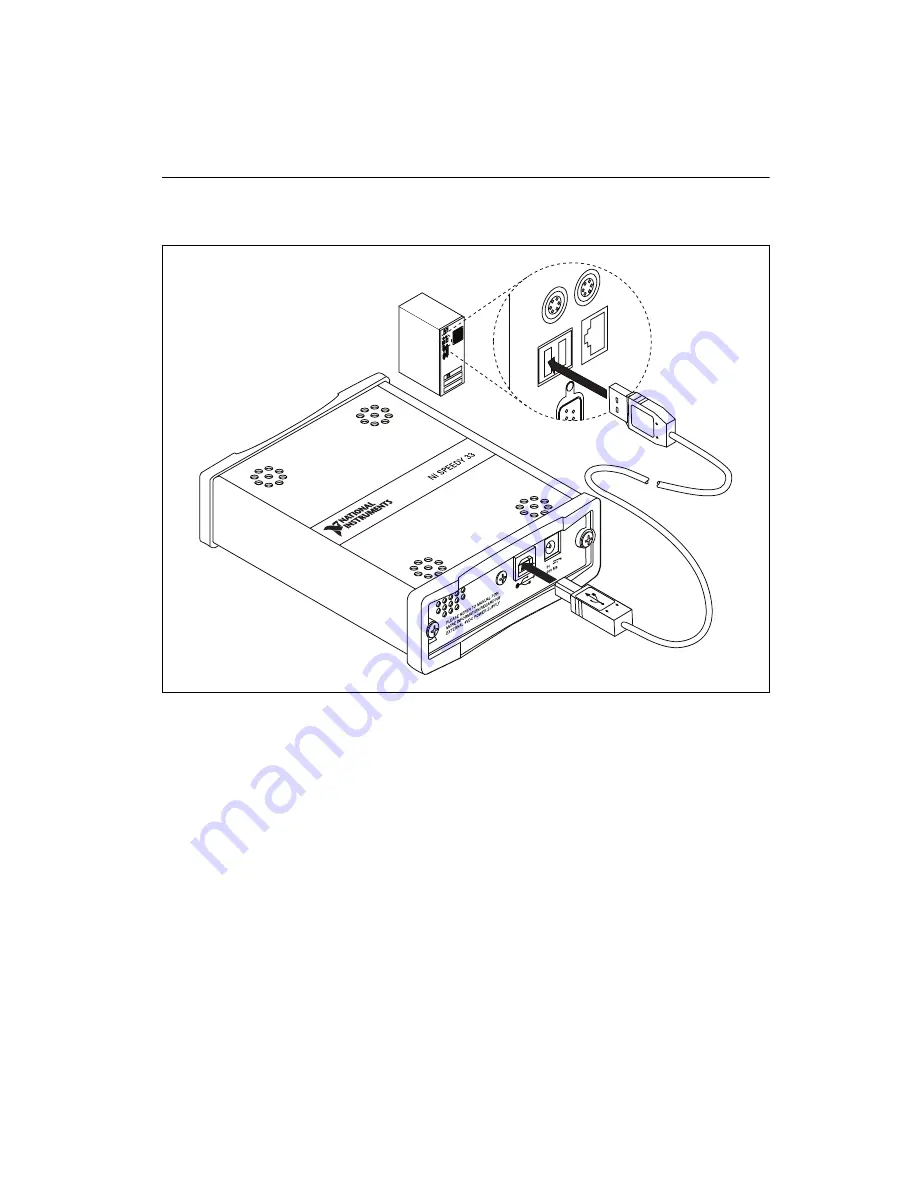
Refer to Figures and as you complete the following steps to connect the 
NI SPEEDY-33 to a PC.

Figure 2.  

NI SPEEDY-33 Installation

1.

Power on your computer. Log on as an administrator or as a user with 
administrator privileges.

2.

Connect one end of the USB cable to the PC USB port on the 
NI SPEEDY-33.

The cable connectors are different on each end. Only one end fits into 
the PC USB port.

3.

Connect the other end of the USB cable to a USB port on the PC.

The USB cable also serves as the NI SPEEDY-33 power supply. 
The green power LED on the device lights.

Содержание SPEEDY-33

Страница 1: ...NI SPEEDY 33 DSP device for use with a PC Figure 1 depicts the NI SPEEDY 33 Figure 1 NI SPEEDY 33 DSP Device 1 Power Port for Standalone Mode 2 PC USB Port 3 Power LED 4 Reset Button 5 Audio Stereo In...

Страница 2: ...ccessories Your device is shipped in an antistatic package to prevent electrostatic discharge from damaging device components To prevent such damage when handling the device take the following precaut...

Страница 3: ...ion 1 Power on your computer Log on as an administrator or as a user with administrator privileges 2 Connect one end of the USB cable to the PC USB port on the NI SPEEDY 33 The cable connectors are di...

Страница 4: ...00 Windows recognizes any newly installed device and opens the Found New Hardware window Because the NI SPEEDY 33 driver was installed in Step 1 Install the Software and Driver Windows 2000 finds the...

Страница 5: ...de 1 Select Install the software automatically Recommended 2 Click Next Windows begins scanning the hard drive for the files it needs Note On non English Windows operating systems it can take up to fi...

Страница 6: ...nstallation alert might appear during the hardware scan Click Continue Anyway When Windows finishes detecting the required files the following window opens 3 Click Finish Your computer is now set up s...

Страница 7: ...e driver and select Update Driver from the shortcut menu b Follow the instructions from the Hardware Update Wizard Windows Vista Windows recognizes any newly installed device and a device driver insta...

Страница 8: ...are from the shortcut menu b Follow the instructions from the Update Driver Software dialog Step 4 Launch the Software Launch LabVIEW by selecting Start All Programs National Instruments LabVIEW LabVI...

Страница 9: ...LED vi in the Project Explorer window The Blink LED VI front panel opens 6 Run the VI by clicking the Run button shown at left on the LabVIEW front panel menu bar The VI front panel displays a blinki...

Страница 10: ...cks the memory blinks all the LEDs and then generates a frequency sweep through the analog output channel Click the Close button when the test finishes 8 Close LabVIEW You do not need to save changes...

Страница 11: ...at 11500 North Mopac Expressway Austin Texas 78759 3504 National Instruments also has offices located around the world to help address your support needs For telephone support in the United States cre...

Страница 12: ...Instruments trademarks Other product and company names mentioned herein are trademarks or trade names of their respective companies For patents covering National Instruments products refer to the appr...

Отзывы: