NI Climbing Frames The Oaks Скачать руководство пользователя страница 16

Step 11:  


Lift the roof onto the climbing frame and ensure it is positioned evenly on all sides before 

securing the roof to the top of the post using 2 x decking screws for each 2” x 1” support of 

the roof panel 


Secure the middle roof panel support from below and the side supports from above 


Содержание The Oaks

Страница 1: ...The Oaks Instruction Manual...

Страница 2: ...Parts List Item Number Description Image Quantity 1 2 4m post cut at 40 angle 4 2 720mm post 3 3 900mm x 3 x 1 5 10 4 720mm x 3 x 1 5 3...

Страница 3: ...5 900mm x 650mm roof panel 2 6 6 x 1 small board for roof 2 7 6 x 1 large board for roof 2 8 850mm x 6 x 1 3 9 900mm decking boards 7...

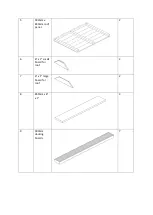
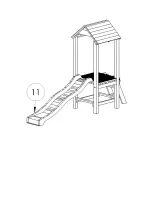
Страница 4: ...10 Steps 1 11 Slide 1 12 Decking screws 150 13 200mm index screws 12...

Страница 5: ...14 120mm screws 6 15 Grab Handles 6 16 Screw covers 6 17 Telescope 1...

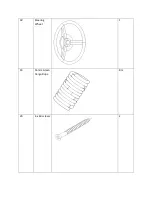
Страница 6: ...18 Steering Wheel 1 19 16mm Green Cargo Rope 8m 20 6 x 60 screws 2...

Страница 7: ...21 Large U Nails 25 Tools needed Cordless drill Handsaw Spirit Level Hammer Shovel Stepladder Pencil Measuring tape 10mm Hex bit PZ 2 Drill Bit...

Страница 8: ...step Step 1 H Frame Assembly Lay 2 x 2 4m posts that are cut at a 40 angle on a level surface Ensure the cut angle is facing the same way on both posts and the holes are on the outside Step 2 Place th...

Страница 9: ...r and the 65mm decking screws screw the timber to the 2 4m posts at the 1 8m mark you made on the posts this is to strengthen the H frame structure without this additional support at the bottom the fr...

Страница 10: ...mber on the 40 angle on the top of the post and screw into place using the 65mm decking screws Steps 3 and 4 strengthen the H frame structure without this additional support at the top and bottom the...

Страница 11: ...g holes in the grass in the position that you want the climbing frame to be placed with a diameter of approx 300mm and 300mm deep Lift both H frames into the holes that have been cut out in the ground...

Страница 12: ...Step 7 Using 2 pieces of 720mm x 3 x 1 5 timber connect the two H frames together using decking screws These pieces of timber will also be removed at the end of the installation...

Страница 13: ...and the decking boards Two of the decking boards should be cut out at the corners to fit around the posts Secure the other decking boards in between them and this should give you a 900mm x 900mm base...

Страница 14: ...nd on its own Lift the base and place it onto the two horizontal posts The 3 x 1 5 base supports should sit onto the horizontal posts Secure the base to the posts using the 120mm screws provided They...

Страница 15: ...f Assembly Place one of the 950mm x 650mm roof panels directly onto the ground so that the shingled part is facing downwards Using the v boards provided assemble the two roof panels together using dec...

Страница 16: ...e and ensure it is positioned evenly on all sides before securing the roof to the top of the post using 2 x decking screws for each 2 x 1 support of the roof panel Secure the middle roof panel support...

Страница 17: ...are secured using decking screws through the top and sides of the steps into the base of the tower Again ensure these holes are well pre drilled to avoid splitting The holes and screws will have to be...

Страница 18: ...Secure a piece of 720mm x 3 x 1 5 to the front of the base using decking screws the slide will be secured to this Using two 6 x 60 screws secure the slide to the 720mm x 3 x 1 5 through the pre drill...

Страница 19: ......

Страница 20: ...1 5 to the outside of two upright posts the 3 x 1 5 should be level with the 720mm post that the base is secured to Secure another 900mm x 3 x 1 5 to the posts ensure there is 850mm between the timbe...

Страница 21: ...Step 15 Railings Assembly Secure the 3 pieces of 850mm x 6 x 1 boards to the timbers secured in the last step using decking screws...

Страница 22: ...Step 16 Railings Assembly On the other side of the tower secure a piece of 900mm x 3 x 1 5 using decking screws at the same height as the higher 900mm timber on the other side of the tower...

Страница 23: ...tep 17 Drill 32mm holes approx 20mm deep on the outside of two upright posts at the bottom place the remaining 720mm post between the uprights and secure using 200mm index screws through the 32mm hole...

Страница 24: ...cargo net horizontally along the top post and then make marks every 250mm this will give you the position as to where you need to nail the rope on each side pulling the rope tight across the horizont...

Страница 25: ...supplied and press the screw covers in all the 32mm holes Step 20 Concreting structure Using postcrete and following the manufacturer s instructions concrete all the posts into the ground The frame s...

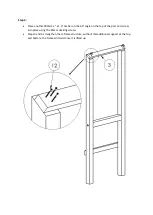
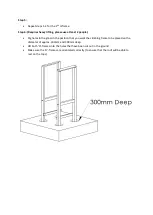
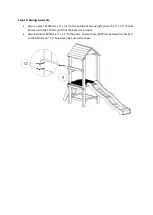
Страница 26: ...Step 21 Removing the H Frame supports Remove the lower H Frame supports that were added during steps 3 and 7...

Страница 27: ...final stage is to give everything a good sand down to avoid the children getting splinters from any rough edges All screws should also be checked to ensure they are flush to the surface they are secur...

Страница 28: ...used on your climbing frame has been pressure treated This essentially means that it has been put into a pressurised vessel and has been impregnated with wood preserve With time and due exposure to w...

Отзывы: