Function
Description
: Auto mode. The device is set to connect to the
mobile network automatically
: Manual mode. The device is set to connect to
the mobile network manually
: On demand mode. The device will connect to
the preferred mobile network when Internet access
is required
8
Connection
method
The name of the mobile network operator to which
the device is currently connected
9
Operator
The device is currently roaming on a network other
than the home network
10
Roaming
Quick Installation Guide
13
14
2
16
17
15
19
20
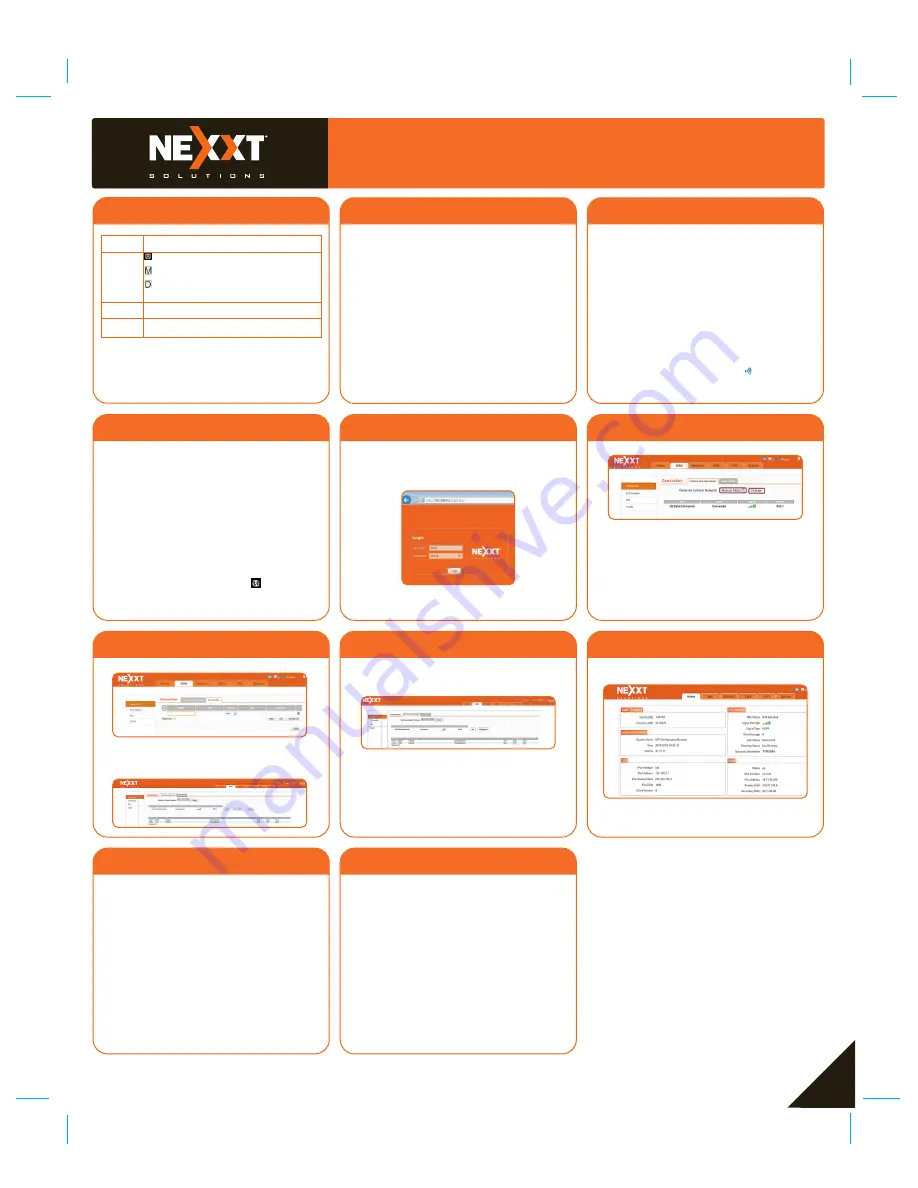
Installation
Initial configuration
Connect your device via Wi-Fi
Our hotspot can be accessed using a wireless connec-
tion from anywhere within the operating range of its
wireless network. Keep in mind that the quantity,
thickness and location of walls, ceilings, or other objects
After charging your device and installing a SIM card, you
can connect it via Wi-Fi, as described below:
Note:
The following example uses Windows 7 built-in
wireless connection utility. The process may differ if you
are using a different operating system, or a third party
connection utility.
Note:
If your computer is not set to
Obtain an IP
address automatically
and
Obtain DNS server address
automatically
, you will need to execute these three
initial steps. Otherwise, you may skip to step 4 of the
configuration process.
Press the power button on the side panel to switch
the hotspot on.
Nexxt Solutions
will be displayed on the screen as
the router performs its initialization process.
After a few moments, the OLED display will show the
current status of the router. For more details on the
OLED display functions, please refer to the table on
the previous section.
1.
2.
3.
Go back to the
Connection Operation
page, and select
the item you just configured in the previous step. Click
on
Set
and
Connect
to move on to the next step.
4.
When the link status of the device appears as
Connected
, it means that internet access is enabled.
5.
At this stage, the user can click on the
Home
tab.
This main page provides a summary of the current
status of your network, configuration settings, traffic
statistics, as well as all relevant information pertaining
to the device system. In addition, this page also gives
the user access to the more advanced settings, such
as WAN, Network, SMS, Wi-Fi, etc, if he later decides
to customize any special features on the device.
6.
18
Select
WAN
>
Connection
>
User Profile
, click
Add
to configure the
Name
,
APN
,
Protocol
,
User
,
password
(If you cannot locate this information,
contact your service provider). Then click
OK
followed by
Apply
.
3.
After successfully logging in, configure the router
according to the mode selected. In this case, the
Manual
mode is used to illustrate the process.
2.
21
22
23
This device complies with Part 15 of the FCC Rules.
Operation is subject to the following two conditions:
(1) This device may not cause harmful interference,
and (2) this device must accept any interference
received, including interference that may cause
undesired operation.
This equipment has been tested and found to comply
with the limits for a Class B digital device, pursuant
to Part 15 of the FCC Rules. These limits are designed
to provide reasonable protection against harmful
interference in a residential installation. This equipment
generates, uses and can radiate radio frequency energy
and, if not installed and used in accordance with the
instructions, may cause harmful interference to radio
communications. However, there is no guarantee that
FCC Statement
Reorient or relocate the receiving antenna.
Increase the separation between the equipment and
receiver.
Connect the equipment into an outlet on a circuit
different from that to which the receiver is connected.
Consult the dealer or an experienced radio/TV
technician for help.
•
•
•
•
interference will not occur in a particular installation.
If this equipment does cause harmful interference to
radio or television reception, which can be determined by
turning the equipment off and on, the user is encouraged
to try to correct the interference by one of the following
measures:
FCC ID:
X4YTRNTY3G
that the wireless signals must pass through may
adversely affect wireless signals.
3
Go to
Start
→
Control Panel
→
Network and Internet
→
Network and Sharing Center
→
Change adapter
settings
. Right click on
Wireless Network Connection
,
and select
Properties
.
On the item list, click on
Internet Protocol Version
(
TCP/IPv4
).
Check both options:
Obtain an IP address automatically
and
Obtain DNS server address automatically
.
Click
OK
to finish and exit the PC configuration.
Click on the wireless connection icon in the lower right
corner of the computer’s desktop. When done, proceed
to click on the refresh button, followed by the selection
of the default SSID of the router. Finish by checking the
1.
2.
3.
4.
Connect automatically
box in order to enable the
selected link.
Click on the
Connect
button. When the
Connected
message appears on the screen, it means that you have
successfully connected to your wireless router.
5.
Web browser configuration
By default, the hotspot is set to match your SIM card
settings automatically to gain Internet access.
Should the automatic mode fail, and no icon appears
on the screen, the user will need to execute the manual
procedure described below:
Note:
The default SSID of the network is
Nexxt_XXXXXX
(whereby XXXXXX represent the last unique six charac-
ters of each router's MAC address). No default wireless
password is required at this point.
Open a web browser and enter
192.168.0.1
on
the address field, and press enter. When prompted,
enter
admin
as the default user name and password,
both in lower case. Click
Login
to continue.
1.