background image

13. System Preference

13. System Preference

29

System Preference

System Preference       

28

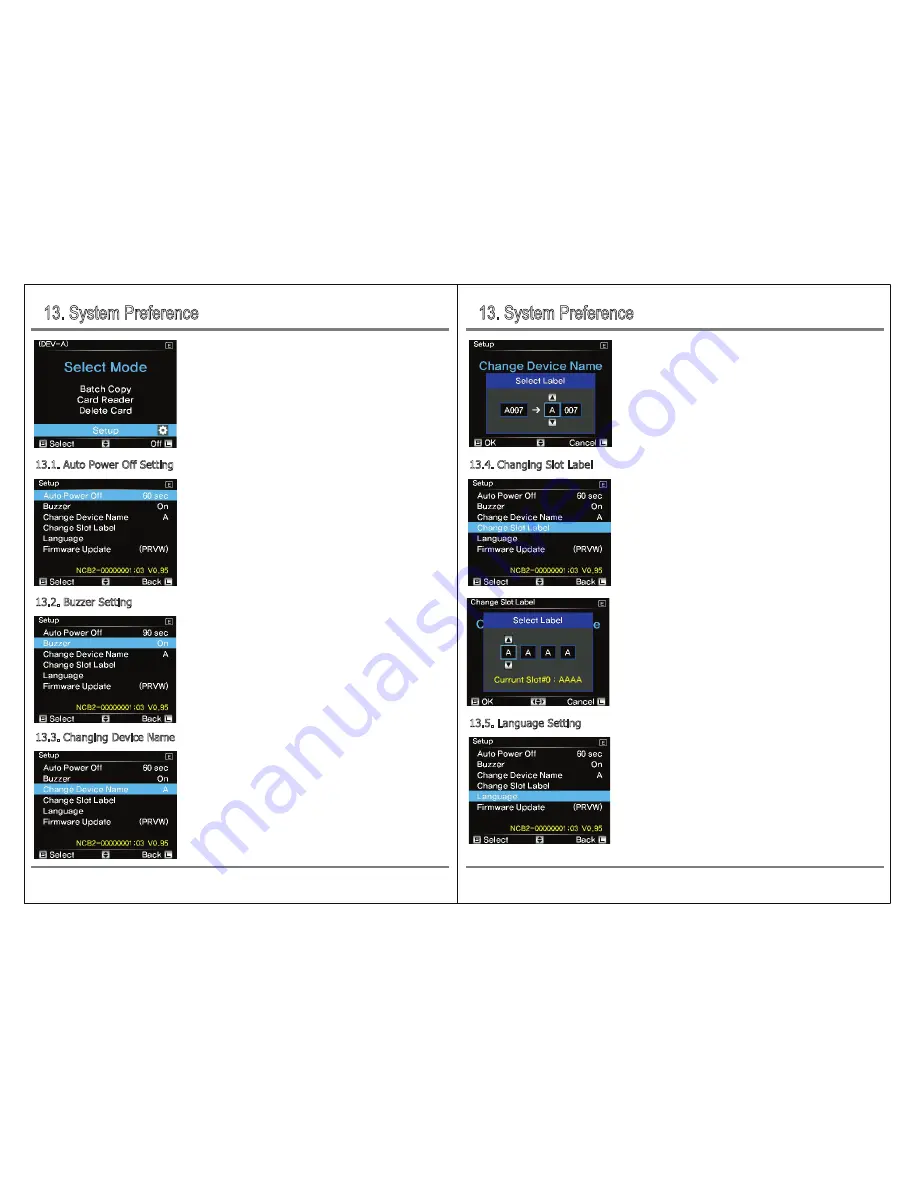
On the menu screen, move the control bar up or down to 

[Setup] menu by moving it to [

] and press [S] button briefly.

The power is turned off automatically when the NCB20 is not in 
operation.You can set the time as follows: Each time the button is 
pressed shortly, the auto power off status is repeated in the order 

of 'Off', 30/60/90 (sec), 3 minutes / 5 minutes.

If "Off" is selected, the power will not turn off automatically but will 
stay on.

13.1. 

Auto Power Off Setting

After selecting the device name change function, select the desired 
name by moving the control bar up or down as shown on the left.

You can set the slot label for each memory card slot.


Select the slot for which you want to change the slot label, and then 
move the control bar up, down, left, or right to set the desired 
name.

13.4. 

Changing Slot Label

You can set the buzzer ON / OFF to indicate various operation status 

such as backup success / failure.
Each time you press the button [S], the sound setting status is 

repeated as "On" and "Off". 

13.2. 

Buzzer Setting

After the backup, the top folder name is created by default 
(Axxx ~ 9xxx) and can be changed from A to 9.

A: Device name, xxx: Automatically generated by copy sequence 
number.

13.3. 

Changing Device Name

On the menu screen, move to the "Language" menu and press 

[S] button briefly.

13.5. 

Language Setting

Содержание NCB-20

Страница 1: ...a computer or loss of or damage to a program records or data or any consequential or incidental damages This product can be used for business purpose as registered by EMI compliance The information of...

Страница 2: ...tents 1 CONTENTS OF THE PRODUCT 2 DEVICE DIAGRAM 3 PRODUCT DESCRIPTION 4 SYMBOLS USED IN THIS DOCUMENT 5 SAFETY INSTRUCTIONS 6 POWER MANAGEMENT 7 BASIC FUNCTIONS 8 CONNECTING MEMORY CARDS AND USB DRIV...

Страница 3: ...ection 3 2 Card Reader The Card Reader Function works as a USB card reader by connecting to a computer Refer to 9 3 Card Reader Mode for details 3 3 Delete Card Delete Card function must be used after...

Страница 4: ...to 13 System Preference 3 9 Language Setting NCB20 is designed to support multiple languages Please refer to 13 System Preference Warning Caution Reference The flash icon in a triangle indicates warn...

Страница 5: ...ff circuit breaker and only then pull the AC power adapter unit from the socket Do not attempt to use t he product Take it to your dealer for repair immediately Never touch the AC power adapter unit w...

Страница 6: ...the left If there is no operation for a set time eg 60 seconds the power will turn off automatically Otherwise if the L Power Off menu is displayed at the bottom of the LCD screen you can manually tur...

Страница 7: ...the screen Buttons At the bottom of the screen it shows the commands that can be executed NCB20 can backup by connecting memory cards SDHC SDXC and USB external drives Refer to 9 Mode Selection The N...

Страница 8: ...SB Host port supports only storage devices such as USB memory or USB HDD NCB20 supports exFAT formatted USB external drive only When operating with USB power only USB 1 will be operated due to USB pow...

Страница 9: ...hen a new memory card is inserted Fast Copy Copy Verification Same Memory If a memory card that has already been backed up is inserted again Updated Memory Depending on the situation in which each mem...

Страница 10: ...ction screen 9 4 Delete Card Mode When you turn on the power and select DELETE CARD on the mode selection screen the detected memory will be displayed Select memory card that you want to delete and br...

Страница 11: ...10 2 Deleting All Files on Memory Card Select Delete Card from the detailed menu of the selected memory card and press the S button briefly To erase the memory card press the control button up and dow...

Страница 12: ...from the USB 1 or USB 2 submenu it displays the number of existing TMP folders and TMP folder delete functions that are activated Press the control button S briefly The TMP folder is being deleted Whe...

Страница 13: ...ges and files will be displayed Select Show Videos in the sub menu 11 1 Watch Video on Memory Card NCB20 can check contents of the memory card or USB external storage device by Folder Search function...

Страница 14: ...t etc will be displayed Then select Show Images 11 3 View photos on memory card Current playback speed Play Time Progress Bar Video playback screen Audio Bar Selectable Functions If you select Show Im...

Страница 15: ...sh from which device the backup folder is Group No A group number that is incremented by one for each backup The same value is assigned to the memory cards copied in the same rotation Slot ID The numb...

Страница 16: ...lect the desired name by moving the control bar up or down as shown on the left You can set the slot label for each memory card slot Select the slot for which you want to change the slot label and the...

Страница 17: ...the NCB20 will power off automatically after a while After power on NCB20 will operate with newly updated firmware Select USB 1 or USB 2 where the firmware file is and press the button briefly press S...

Страница 18: ...ted 4 An error occurs when backing up data stored in a USB external drive or SSD to a computer If an error message appears on the computer when copying a backed up USB external drive to the computer t...

Отзывы: