background image

Slideshow Settings

Date and Time

Movie settings

Music settings

Product Information

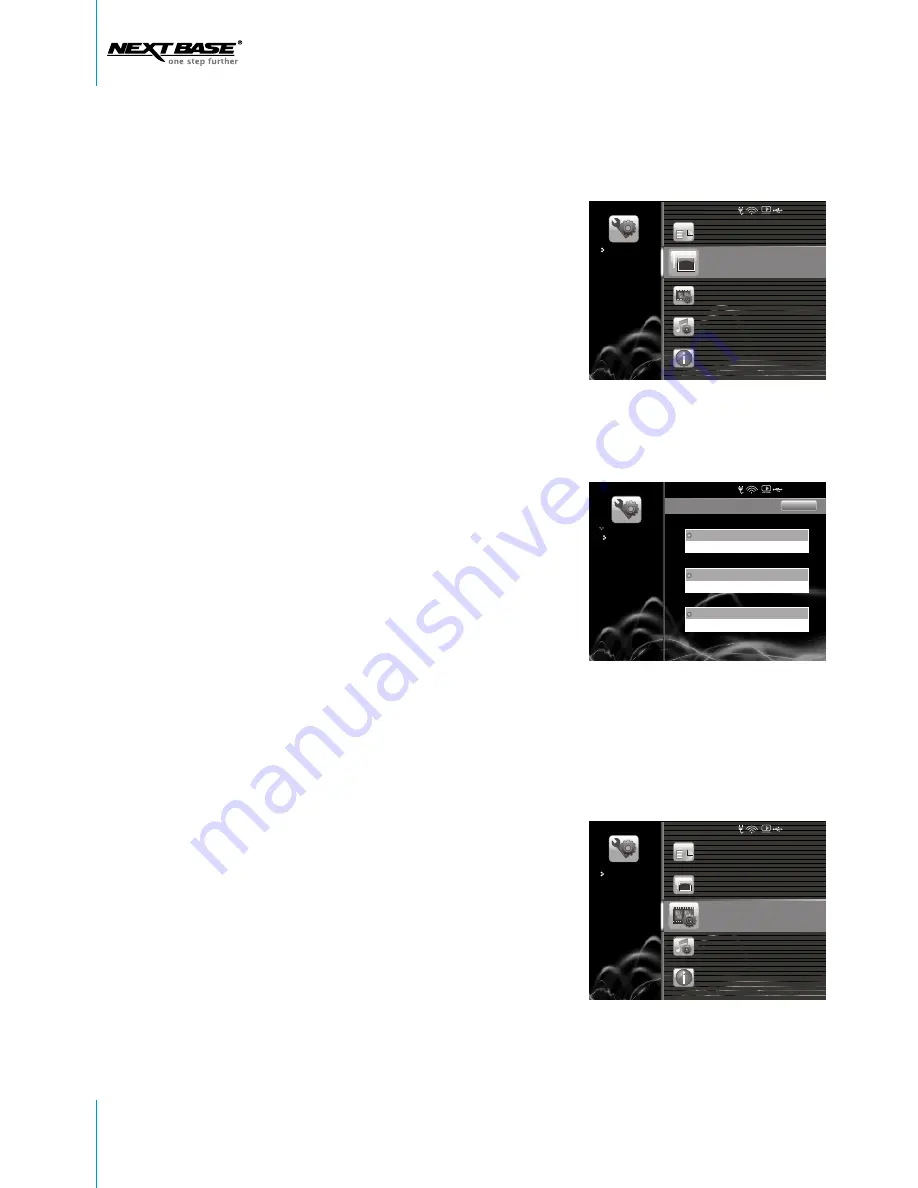
1. Navigate to 

Slideshow Settings

, and press 

OK


    to confirm. 

2. Press 

Right

 to set 

Delay Time. 

Use direction key 


Up/Down

 to select 

Second/Minute/Hour

, and 

    press 

Right

. Use 

Up/Down

 again to select 

5/10/30 

    Seconds

 (or 

1/5/30 Minutes

, or 

1/4/12/24 Hours

), 

    and press 

OK

 to confirm.

3. Navigate down to 

Sequence

, press 

OK, 

and use 

    direction key 

Up/Down

 to select between 

Sequential


    and 

Random. 

Press 

OK

 to confirm. 

4. Navigate down to 

Content

, press 

OK, 

and use 

    direction key 

Up/Down

 to select between 

One 

    Album

 or 

All Albums

, and press 

OK

 to confirm. 

5. Navigate down to 

Effect

, and press 

OK

 to enter 

    the option list. Use 

Up/Down

 to select the effect 

    you prefer, and press 

OK

 again to confirm.

6. Press 

ESC

 to go back to the previous menu.

SLIDESHOW SETTINGS

Slideshow Settings

Delay Time

Slideshow Sequence

Slideshow Effect

Slideshow Content

Se c        5

MOVIE SETTINGS

1. Navigate to 

Movie Settings

, and press 

OK

 to 

    confirm. 
2. Select 

Play Sequence

, and press 

OK

 to 

    choose between 

Sequential

 and 

Random

3. Navigate down to 

Play Mode

, and press 

OK


    to enter the option list. 


Sequential  

Random

One Album

 All Albums

Off

Random

Slideshow Settings

Date and Time

Movie settings

Music settings

Product Information

48 Setup

Change Settings

Change Settings

Change Settings

2 0 0 8 - 7 - 1         0 3 : 4 5

2 0 0 8 - 7 - 1         0 3 : 4 5

2 0 0 8 - 7 - 1         0 3 : 4 5

Содержание PhotoM@il-X

Страница 1: ...8 Wi Fi Digital Photo Frame www next base com Entertainment Unlimited Your Photo Mail Box PhotoM il X TM ...

Страница 2: ...end photos Begin slideshow Slideshow settings Delay time Sequence Content Effect Music on off Copy to 1 2 3 4 5 5 6 6 6 7 7 8 9 9 10 10 11 12 12 13 14 14 14 16 18 19 20 20 20 21 21 21 22 22 Zoom in Rotate Delete Properties VIEWING PHOTOM IL Email account View photom il Add to address book Copy to WATCHING MOVIES Watch movies Play Copy to Delete Movie settings LISTENING TO MUSIC Listen to music Pla...

Страница 3: ...ete outlet Prevent the power cord from being walked on or pinched particularly near plugs especially at the point where they exit from the device Only use attachments accessories specified by the manufacturer Unplug this device during lightning storms or when unused for long periods of time Refer all servicing to qualified service personnel Servicing is required when the device has been damaged in...

Страница 4: ...S MS PRO xD a 2GB internal memory you to store up to 10 000 photos send and receive emails provides up to 2 hour use memory cards and USB disks PhotoM il X has been designed to fit all standard 8 x 6 photo frames which enables it to be personalized to suit your photos or your room decor PhotoM il X includes an extendable stand as well as wall fixing points which allow you to use it on a table or h...

Страница 5: ...toM il X Quick Start Remote Control OK ES C MEN U SE TU P SR 3A Frame Mount Magic Strip x 4 Detachable Stand Frame Retaining Screw X 2 Operation Manual 8 Wi Fi Digital Photo Frame www next base com Entertainm ent Unlim ited Your Photo Mail Box PhotoM il X TM ...

Страница 6: ...k weather 4 STANDBY Escape BUTTON DEFINITIONS General Introduction 5 PARTS AND CONTENTS 1 2 3 4 FRONT 1 Remote control sensor The remote control signals are received here Remote control sensor Do not cover this Nextbase PhotoM il X User s Guide ...

Страница 7: ...n When PhotoM il X is off and the DC adapter is connected the LED indicator will be red to show the battery is charging When the battery is fully charged the indicator will turn off When PhotoM il X is on and the DC adapter is not connected the LED indicator will be green to show the battery is being used When the battery is discharged the indicator will turn off l X When PhotoM il X is in its sta...

Страница 8: ...Pro xD cards 1 Stereo Speaker 2 Pull out metal frame connectors that can be screwed into wooden frames by using screws provided See page 10 for details Wall hanging mount horizontal or vertical option 4 Detachable stand Flip out and adjust to either vertical or horizontal use Refer to page 11 for details Metal connectors 3 1 2 2 4 2 4 3 3 3 1 Nextbase PhotoM il X User s Guide ...

Страница 9: ...ight can be used to view the previous photo or the next photo Up 3 OK Press OK to confirm Press OK to enter the next menu or confirm the selection 4 HOT KEY Press HOT KEY to get the weather forecast 5 STANDBY Press STANDBY then the unit will enter standby mode Press it again then the unit will wake up and enter its normal operation mode Note Standby function would not work if the unit is not power...

Страница 10: ...g to the indicated direction Lithium Battery CR2025 To prevent leakage of fluid from the lithium battery remove the battery when not using the remote control unit for long periods of time one month or more If the battery leaks fluid carefully take the battery out and wipe the battery holder then replace with a new lithium battery Caution The battery may present a risk of fire if not handled proper...

Страница 11: ...ame locking latches to secure l X in place 3 If the chosen frame does not have its own locking latches l X Pull out the metal frame connectors as shown below Attach to the frame by using the screws supplied Your Nextbase PhotoM i can match with all standard 10 X 8 photo frames by included in the accessories l X using the frame mount Slide out both sides Note The remote control sensor is on both th...

Страница 12: ...your favorite 10 X 8 frame 2 Slot PhotoM i into 3 Then mount the f with PhotoM i into the standard 10 X 8 wooden frames l X the supplied Nextbase frame mount rame l X and fix securely Attach PhotoM il X to the frame mount and make sure that the remote control sensor is aligned with the remote control window Press down and click in to place it securely Remote control window Remote control sensor Fr...

Страница 13: ...e angle slightly if the memory card cannot be read 2 M PhotoM i xD cards can only be read but cannot be written 4 adjust ini SD adapter or dual voltage SD cards may not be recognized by l X 3 Please do not use the MS PRO adapter with a surface whose paint has fallen off Doing so may cause damages 2 INSERTING A MEMORY CARD INTO PHOTOM IL X Insert the card as shown ...

Страница 14: ...K INTO PHOTOM IL X Note 1 Support USB 2 0 2 Support JPEG AVI Motion JPEG MPEG 4 Xvid and DivX4 5 and MP3 3 Connect a USB disk to PhotoM il X directly Do not use an external cable or this may cause problems Insert the USB disk as shown below Nextbase PhotoM il X User s Guide ...

Страница 15: ... OFF for 3 seconds to turn on the power and the Nextbase opening screen will appear 1 2 3 TURNING ON THE UNIT BY USING THE BATTERY 1 PhotoM i also works without adapter if the battery is charged 2 The built in battery 3 7V 1500mAh allows up to 2 hour use 3 Press ON OFF for 3 seconds to turn on the power and the Nextbase opening screen will appear l X SELECTING WI FI NETWORK 1 Pull out the Wi Fi an...

Страница 16: ... on the screen Please enter Wi Fi Network under Change Settings to search for Wi Fi networks again Nextbase Security enable wirless network Kismet Security enable wirless network Xs Tsh Security enable wirless network WEP WEP WEP 2 Select the language you prefer and press OK to confirm The Language menu only appears after you reset the unit or it is the first time operation English Francaise Deuts...

Страница 17: ...rred network CONNECTING TO A WIRELESS NETWORK Scan For Wireless Networks Wi Fi Network Scan For Wireless Networks Change Settings Nextbase Security enable wirless network My Sweet Home Security enable wirless network Mary Home Security enable wirless network WEP WEP WEP Check Weather Forecast Change Settings Change Settings Wi Fi Network Change Settings 2008 7 1 03 45 1 In the right top corner of ...

Страница 18: ...ternet will pop up After 10 seconds PhotoM il X will automatically go back to the main menu Begin to synchronize with the website Connecting to AP router Begin to synchronize with the website Can not connect to AP router Successfully connected to internet Note The wireless channel of the Wi Fi module that PhotoM il X is currently applying is between 1 and 11 2 412 2 462GHz 17 Nextbase PhotoM il X ...

Страница 19: ...e displayed in albums and those in USB disk memory card will be displayed in their thumbnail forms 3 Use direction keys Up Down Left Right to select the photo you want to view and press OK to display it in full screen VIEW PHOTOS Check Weather Forecast Change Settings View PhotoM il Watch Movie Listen to Music View Photo Internal Memory Family View Photo Memory Card USB Disk Internal Memory Family...

Страница 20: ...board to re enter the email address Or select Delete this address to delete the email address choose an existing SEND PHOTOS While viewing a photo in full screen you can press OK to bring up an option list Address Book Add New Address One mail has been sent 1 2 3 4 5 6 7 8 9 0 q w e r t y u i o p a s d f g h j k l z x c v b n m Space Shift Enter Please enter the email address Nextbase009 gmail com...

Страница 21: ...irm the preferred delay time Navigate down to Begin Slideshow and press OK to start slideshow BEGIN SLIDESHOW DELAY TIME Note 1 The maximum quantity of the address book is 50 email addresses If a 51st email address is entered the 1st email address will be deleted automatically 2 If an email address is entered more than once the message The email address already exists will pop up SLIDESHOW SETTING...

Страница 22: ...andom to enable random transition SEQUENCE 1 Navigate down to Sequence and press OK to select Sequential or Random 2 Select Sequential to play photos in sequence 3 Navigate down to select Random to play photos randomly 1 Navigate down to Content and press OK to select All Albums or One Album 2 Navigate down to select All Albums to begin slideshow in only one album 3 Select One Album to begin slide...

Страница 23: ... Navigate to Copy One Photo and press OK to confirm 2 Select the storage base you prefer Internal Memory or Memory Card and press OK to confirm If Internal Memory is selected you need to choose an album you prefer to copy the photos to You can either select an existing album or create a new one If you want to use an existing album navigate to the album and press OK to confirm Navigate to Music On ...

Страница 24: ...e album list will be displayed again 4 Navigate to the album you prefer and press OK to confirm Once the copy is completed the message One photo file has been copied Will appear on the screen The steps of Copy All Photos are similar to those of Copy One Photo Please refer to Copy One Photo Note xD cards can only be read but cannot be written 3 If you want to create a new album navigate to Add New ...

Страница 25: ...to continue rotation to 180 degrees 270 degrees and back to 0 degree ROTATE 90 1 Navigate down to select Delete and press OK to pop up an option list 2 If you want to delete the photo you are viewing navigate to Delete one and press OK to confirm The message Are you sure you want to delete this file will pop up Select Yes delete the photo or select No to cancel the operation Once the deletion is c...

Страница 26: ...el the operation Once the deletion is completed the message Photos have been deleted will pop up PROPERTIES Navigate down to select Properties and press OK to confirm The file name file size resolution and create time of the photo will be displayed Press ESC to exit the page Properties File name vitas_02 jpg File size 72 994 Bytes Resolution 1024 768 Create time 2008 04 02 10 05 00 YES NO Photos h...

Страница 27: ... account of your own is provided in your PhotoM il X by Nextbase This account can send and receive photo mails but cannot edit Navigate down to Change Settings and press OK to enter the sub menu Navigate down to Product Information and press OK to confirm Then you can see your PhotoM il X email address on the top of the screen VIEW PHOTOM IL Kate kate igmail com 0 1 Check Weather Forecast Change S...

Страница 28: ...re the icon will be PhotoM il noreply nextbase om 0 1 My e mail address apollo000 link play com Jack jack igmail com 0 1 Please select View Email Delete Email Blacklist Delete Greeting from Kate 5 2008 7 1 11 06 00 Greeting from Paul 1 2008 6 6 11 08 00 4 Navigate to Delete Email and press OK to confirm The message Are you sure you want to delete all photos from this sender will pop up Select Yes ...

Страница 29: ...Auto Receive is selected under the Auto and Manual Receive settings For detailed information of Auto Receive please refer to page 44 5 Navigate to Blacklist Delete and press OK to confirm The message Are you sure you want to blacklist and delete all photos from this sender will pop up Select Yes to blacklist the sender and delete the photos and the message The sender has been added to blacklist an...

Страница 30: ...hoto is viewed in full screen press OK and an option list will pop up which includes Send Begin Slideshow Slideshow Settings Add to Address Book Zoom In Copy To Delete Blacklist Delete and Properties 1 Navigate to Add to Address Book and press OK 2 The message on the right will pop up Select Yes to add the email address to the address book The message The sender has been added to address book will...

Страница 31: ... Rotate Delete and Properties please refer to page 19 to page 26 Copy To USB Memory Card Internal Memory 3 If you want to copy the photo mail navigate to Copy One Mail and press OK to confirm Select the storage base you prefer USB Memory Card or Internal Memory and press OK again to confirm Once the copy is completed the message One mail has been copied will appear on the screen ...

Страница 32: ... to the previous clip Press Left for more than 2 seconds to fast forward the clip and press Right for more than 2 seconds to fast backward the clip Note 1 Users can sort the movie list by title date or size in the Movie settings in the Change settings section 2 When playing a movie the Wi Fi connection will pause Watch Movie Firmware version Movie Title 1 SweetHome avi 10MB Movie Memory Card Size ...

Страница 33: ...e Settings Navigate to Copy To and press OK to enter the sub menu When you are watching a video clip stored in the internal memory 1 If you want to copy the playing clip to another storage base select Copy One If you want to copy all the clips in the internal memory to an other storage base select Copy All Then press OK to select between USB and Memory Card COPY TO Copy One Copy All Play Copy To D...

Страница 34: ... this movie file to memory card Navigate to Delete and press OK to enter the sub menu 1 Navigate to Delete One and press OK The message Are you sure you want to delete this movie file will pop up Select Yes to delete the clip or select No to cancel the operation Once the deletion is completed the message This movie has been deleted will pop up Press ESC to exit the message 2 Navigate to Delete All...

Страница 35: ...ct Play All to play all the clips a nd the movie will stop when all the c lips finish playing once Select Repeat One to play this one clip repeatedly Select Repeat All to repeatedly play all the clips Play Sequence Play Mode Sort Sequence Sequential Random Play One Play All Repeat One Repeat All Play Copy To Delete Movie Settings 4 Navigate to Sort Sequence and press OK to enter the sub menu You c...

Страница 36: ... more than 2 seconds to fast backward the clip LISTENING TO MUSIC LISTEN TO MUSIC When a clip is playing press OK and an option list will pop up which includes Play Begin Slideshow Copy To Delete and Music Settings 1 The default option is Play 2 Press OK to pause the clip and press OK again to continue the clip PLAY Note Users can sort the music list by title artist or album in the Music Settings ...

Страница 37: ... if you want to copy it to a memory card 2 After pressing OK the message Are you sure to copy this music file to USB Disk Memory Card will pop up Select Yes to copy the clip Select No to cancel the operation COPY TO Navigate to Copy To and press OK to enter the sub menu A Copy One When you are listening to a music clip stored in the internal memory 01 L et start form Unknow Artist Unknow Album 3 0...

Страница 38: ...sic clip stored in the internal memory 1 Navigate to Copy All and press OK to enter the sub menu Select USB if you want to copy all the clips to a USB disk Select Memory Card if you want to copy them to a memory card 2 After pressing OK the message Are you sure you want to copy all music files to USB Disk Memory Card will pop up Select Yes to copy the clip Select No to cancel the operation Note Th...

Страница 39: ...Play All to play all the clips and the music will stop when all the clips finish playing once Select Repeat One to repeat the clip Select Repeat All to repeatedly play all the clips Play Sequence Play Mode Sort Sequence Sequential Random Play One Play All Repeat One Repeat All Play Begin Slideshow Copy To Delete Music Settings 4 Navigate to Sort Sequence and press OK to enter the sub menu You can ...

Страница 40: ... 2008 Dull Sunny Cloudy 19 28 ã C London London London London London 19 32 ã C 2 Or from the main menu navigate down to Check Weather Forecast in the main menu and press OK to confirm A 3 day weather forecast will appear on the screen which includes the weather information of today tomorrow and the day after tomorrow Note The weather forecast will be automatically updated every 15 minutes Tuesday ...

Страница 41: ...e city If several cities are found select the suitable city and follow step 3 LOCATE MY CITY Tuesday London Britain Wednesday Sunny Cloudy Dull Jul 1 2008 Jul 2 2008 Current Dull 23 C Jun 30 2008 Updated 6 30 08 10 10 AM 19 0 28 0 C Monday 19 0 32 0 C 19 0 32 0 C Tuesday London Britain Wednesday Sunny Cloudy Dull Jul 1 2008 Jul 2 2008 Current Dull 23 C Jun 30 2008 Updated 6 30 08 10 10 AM 19 0 28 ...

Страница 42: ...stal Code or City State London Britain Tuesday London Britain Wednesday Sunny Cloudy Dull Jul 1 2008 Jul 2 2008 Current Dull 23 C Jun 30 2008 Updated 6 30 08 10 10 AM 19 0 28 0 C 19 0 32 0 C 19 0 32 0 C Monday Could not find 44102 please enter ZIP postal code or city name and state Try Again Quit 5 If no suitable data is found the message below will pop up Select Try Again to enter the data again ...

Страница 43: ...1600x1200 and Original size The default resolution of storing photos is 800x600 Resize Resolution Please select the size of photo mail and internal memory photos 640 480 800 600 1024 768 1600 1200 Original size Change Settings Change Settings View PhotoM il View Photo Listen to Music Watch Movie Check Weather Forecast Change Settings Display Settings Wi Fi Network Auto and Manual Receive Language ...

Страница 44: ...e Security enable wirless network Kismet Security enable wirless network Xs Tsh Security enable wirless network WEP WEP WEP Wi Fi Network Enter Manually SSID Security IP address and DNS IP Address Connect Dynamic Static Subnet Mask Gateway Primary DNS Secondary DNS Change Settings Nextbase c Navigate to SSID press to keyboard and enter the SSID address by keyboard Navigate to Security and press to...

Страница 45: ...r Secondary DNS is filled the cursor will jump to Connect and press to finish the operation OK OK Note The IP address consists of 4 sections The number range of each section is 0 255 If a number over 255 is entered it will be automatically changed to 255 Once the third digit of a section is entered the cursor will move to the next section automatically 4 If the IP DNS information is wrong the mess...

Страница 46: ...nual Receive Language Change Settings Display Settings Language English Francaise Deutsch Italiano Espanola Nederlands Nordmann Svenska Language 3 Select Manual Receive and press OK to confirm Then the system will begin to synchronise with the website 4 If a new photo mail is received a message will pop up to inform you 5 If no new photo mail is received the message There is no new photo will pop ...

Страница 47: ...ous menu OK OK OK OK OK DISPLAY SETTINGS Display Settings Brightness Contrast 5 5 0 0 Change Settings Resize Resolution Wi Fi Network Auto and Manual Receive Language Display Settings A Set Date And Time 1 Navigate down to Set Date and Time and press to confirm 2 Navigate to Display Date and Time and use Left Right to select On or Off If On is selected date and time will be displayed on the top ri...

Страница 48: ...th and follow the same steps for date Press OK to confirm 6 Press OK to confirm B Display Format 1 Navigate down to select Time 2 Use Left Right to select 12 Hour or 24 Hour and press OK to confirm 3 Navigate to Date use Left Right to select the date display mode you prefer and press OK to confirm C Set Standby Time 1 Navigate down to select Set Standby Time and press to highlight the row 2 Use Le...

Страница 49: ... All Albums and press OK to confirm 5 Navigate down to Effect and press OK to enter the option list Use Up Down to select the effect you prefer and press OK again to confirm 6 Press ESC to go back to the previous menu SLIDESHOW SETTINGS Slideshow Settings Delay Time Slideshow Sequence Slideshow Effect Slideshow Content Sec 5 MOVIE SETTINGS 1 Navigate to Movie Settings and press OK to confirm 2 Sel...

Страница 50: ...ect Repeat One to play this one clip repeatedly Select Repeat All to repeatedly play all the clips Press OK to confirm 4 Navigate down to Sort Sequence and press OK to select the display sequence of the music list Choose among By Title By Artist and By Album and press OK to confirm Music Settings Play Mode Play Sequence Change Settings Repeat One Repeat All Sort Sequence By Title By Artist Select ...

Страница 51: ...Product Information and press OK to confirm The Email Account Firmware Version MAC Address and Internal Memory Status will be displayed PRODUCT INFORMATION Change Settings Slideshow Settings Date and Time Movie settings Music settings Product Information Blacklist Book Reset Software Update Product Information apollo link play com MailMPUI1 08NET1 08KER1 08 Space used 1280 KB Space left 1862 MB 00...

Страница 52: ... Blacklist Book 1 jack igmail com 2 kate igmail com 3 Paul igmail com Maximum storage of 500 email addresses Change Settings Select an email address to move the sender away from blacklist Blacklist Book Blacklist Book 1 123 abc com 2 456 efg com 3 789 hij com Maximum storage of 500 email addresses Are you sure you want to move paul igmail com away from blacklist YES NO Change Settings Select an em...

Страница 53: ...OT be deleted Reset Cancel Reset Reset all settings to default 2 Press OK again to select Reset all settings to default The message below will pop up Select Reset to reset the system Once the resetting is completed the message All settings have been reset will pop up once 52 Setup Change Settings Change Settings Reset Change Settings Reset all settings to defauil 2008 7 1 03 45 2008 7 1 03 45 2008...

Страница 54: ...olution Battery Screen Size Screen Ratio Dimension Net Weight PhotoM il X Input 100 240V AC Output 5V DC 2A 800 X 600 X 3 Pixels 1500mAh 8 4 3 200 X 150 X 23 3 mm 500g DIMENSIONS AND PARAMETERS 53 Setup Nextbase PhotoM il X User s Guide ...

Страница 55: ...not a cause for concern Pixel failure 1 B screen 2 Non warrantable damage roken see page 55 for broken screen identification Blurred or no picture 1 Change battery in the remote control 2 Ensure that the IR sensor is not covered by object or the frame Sensor location is shown on page 5 IR remote does not work 1 Make sure your router supports Wi Fi WLAN 2 Check the security password and make sure y...

Страница 56: ... the panel inoperable Symptoms are often a dark round mark a white screen without picture and maybe some multicolored lines Depending on the individual break an element of the TV picture may remain for a while but not for long as the fluid leaks away Some inky black staining may also appear upon the crack lines as the fluid escapes Unfortunately a break of this nature is not covered under the manu...

Страница 57: ...cturer E AWB100 050A e ONE AC input AC100 240V 50 60Hz 0 4 A DC output DC5V 2A Adapter 2 Model name Manufacturer AD 050200 US CHI AC input AC100 240V 50 60Hz 0 4 A DC output DC5V 2A Adapter 3 Model name Manufacturer KSAC0500200W1US KTEC AC input AC100 240V 50 60Hz 0 4 A DC output DC5V 2A ADAPTER INFORMATION ...

Страница 58: ...NEXTBASE PhotoM il X PhotoM il X ENG MANUAL NB B1 www next base com ...

Отзывы: