background image

IN VEHICLE INSTALLATION (CONTD.)

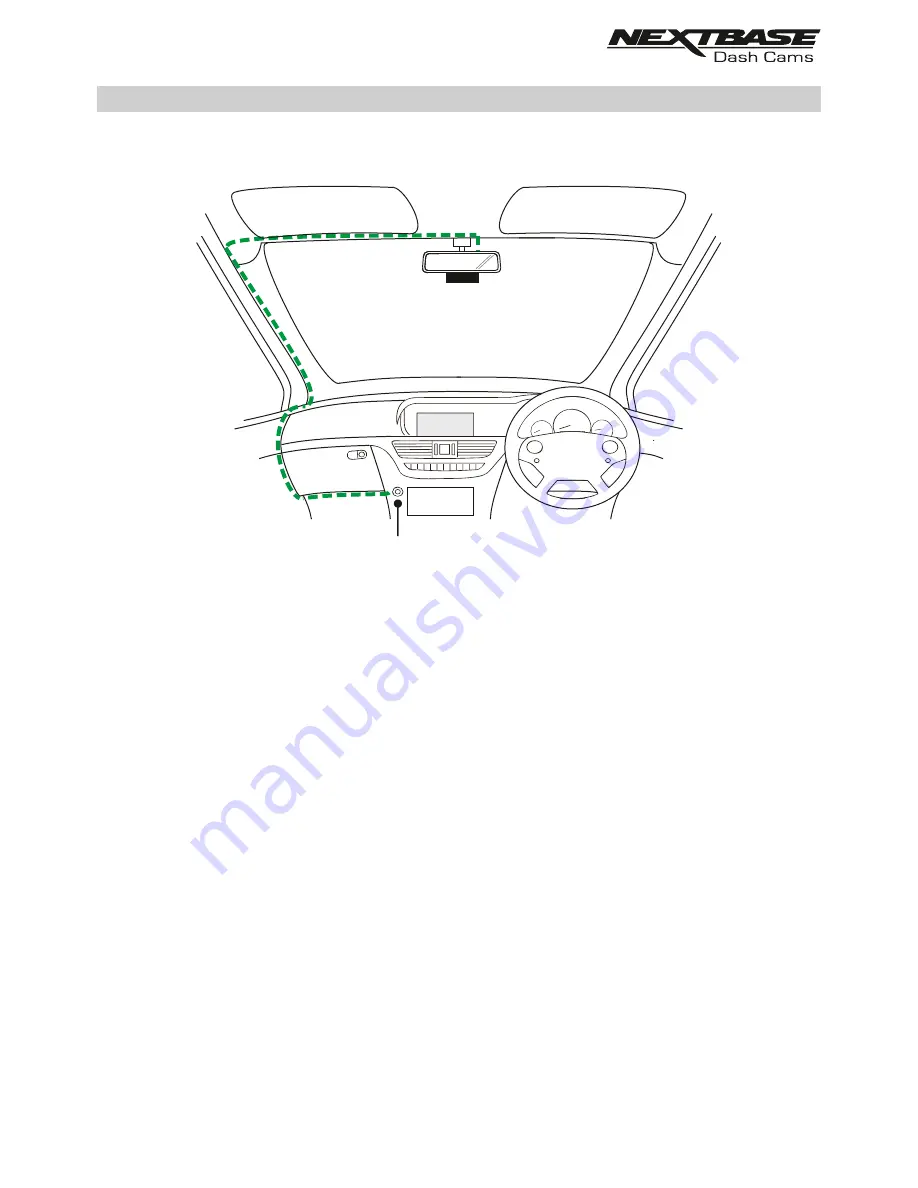
The above diagram is for illustration purposes only.

12-24V DC

  
  Route the supplied car power cable (as shown) and connect it to the DC-IN socket of the mount.

The Dash Cam will automatically power on and start recording once power is available. In some 
vehicles this will be when connections are made, for others the Dash Cam will power on once the 
ignition has been turned on.

If the vehicle in which the Dash Cam is installed has permanent live cigarette lighter sockets, the
user can simply use the power button to switch the Dash Cam off when the vehicle stops. To take
advantage of the Automatic Start / Stop Technology a Nextbase Hardwire Kit can be installed on
a switched-live power supply.

The Nextbase Hardwire Kit includes the necessary 12-24Vdc to 5Vdc convertor and battery
protection circuitry.

Should your vehicle not have a 12-24Vdc outlet, but does have a 5Vdc USB Outlet, this can be
used instead. Connect the USB cable supplied with your Dash Cam in place of the car power cable.

Note:
- Do NOT wire the Dash Cam directly to a 12V supply by cutting the cigarette plug off the
  end of the cable, or damage will result.

18

Содержание NBDVR300W

Страница 1: ...Instruction Manual...

Страница 2: ...IN VEHICLE INSTALLATION DRIVEGUARD APP INTRODUCTION VEHICLE INSURANCE DETAILS CONNECT YOUR DEVICE HOME SCREEN DOWNLOADING RECORDINGS iOS DOWNLOADING RECORDINGS ANDROID EDITING RECORDINGS SHARING RECO...

Страница 3: ...ring best video footage 1 1 Position the Dash Cam in the centre of the windscreen and ideally behind the rear view mirror so it is not an obstruction to the driver s field of view 1 2 Reduce the amoun...

Страница 4: ...n it Do not obscure the view of the road ahead or impede the deployment of any airbags in the event 2 of an accident When not in use please disconnect the car adaptor from both the 12 24Vdc outlet in...

Страница 5: ...D 960 minutes of recording MOV W35mm L96mm H47mm 46g V5 1 10 3 Windows7 10 7 PRODUCT SPECIFICATION 5 Android is a trademark of Google Inc in the United States and other countries Mac is a registered t...

Страница 6: ...heck the contents of your NEXTBASE product Product appearance may differ slightly to that shown above For Help and Support please call 02920 866 429 6 Car Power Cable USB Cable Window Sticker Dash Cam...

Страница 7: ...securely adhere the mount to your windscreen Note Before removing the red backing tape from the adhesive pad make sure you have determined the optimum position for the Dash Cam and that the windscree...

Страница 8: ...will also save the previous or subsequent recordings as follows If the protection takes place during the first 3rd of the recording the previous recording will also be protected If the protection take...

Страница 9: ...y connected the button will become solid blue If a connection is not established within 2 minutes then the Wi Fi function will turn off automatically and the blue flashing light will extinguish 7 Red...

Страница 10: ...fy there is an SD card issue that needs attention before recording can start i Please insert Class 10 SD card This is heard when there is no SD card inserted ii Card error format SD card The inserted...

Страница 11: ...socket Connect the supplied car power cable or USB data cable here 11 SD card slot Insert the MicroSD card here taking care that the gold contacts are facing towards the Dash Cams buttons 12 Microphon...

Страница 12: ...our smartphone tablet and download the Nextbase DriveGuard APP Install the APP upon your device and then open the APP in readiness to connect to the Dash Cam Nextbase DriveGuard can be used to view an...

Страница 13: ...TD 2 Insert micro SD Card Insert the MicroSD card here taking care that the gold contacts are facing towards the Dash Cams buttons 3 Connect power Connect the supplied Car Power cable in to the Mini U...

Страница 14: ...nnect the Cigarette lighter plug to the vehicles 12Vdc or 24Vdc supply 5 Turn on Wi Fi upon the 300W After the Dash Cam has powered on then press the Wi Fi button until the button starts to flash Blue...

Страница 15: ...veGuard APP working upon the Smartphone tablet press Connect to Dash Cam and then choose the 300W Dash Cam option This will show the Live View image from the Dash Cam upon the DriveGuard APP 7 Remove...

Страница 16: ...iew on the connected Smartphone Tablet Ensure that the Live View shows the desired image by moving the Dash Cam to the best position possible on the windscreen and adjusting the lens accordingly Avoid...

Страница 17: ...ect Make any adjustments if required prior to pressing the Dash Cam firmly against the windscreen to ensure that the 3M tape is securely attached 10 Adjust lens position as required If any final adjus...

Страница 18: ...rette lighter sockets the user can simply use the power button to switch the Dash Cam off when the vehicle stops To take advantage of the Automatic Start Stop Technology a Nextbase Hardwire Kit can be...

Страница 19: ...the device securely against the windscreen and where possible conceal the power cable under trim Make sure that the Dash Cam power cable does not interfere with the drivers operating controls such as...

Страница 20: ...watch previous recordings and then download selected recordings accordingly The recordings can then be used as evidence for any situation incident or accident witnessed and can be shared accordingly T...

Страница 21: ...Reporting function within the DriveGuard App Should you wish not to enter your details at this time then simply use the back button on your handset this will take you to the opening screen You may al...

Страница 22: ...d tap Confirm to proceed CONFIRM Please enter your vehicle details below as they appear on your insurance policy Vehicle 1 Add additional vehicles Vehicle Registration ABCD 123 Insurance Provider Prot...

Страница 23: ...elcome Screen as shown below Tap the CONNECT TO DASH CAM button and Nextbase DriveGuard will then open the Settings screen for your mobile device Connecting to the Dash Cam is the same process as you...

Страница 24: ...base DriveGuard Menu options 1 Menu Tap here to access the Nextbase DriveGuard Menu options these include Dash Cam Settings 2 Live View This window displays a live image from your Dash Cam Tapping the...

Страница 25: ...le device or share them online 5 NEXTBASE News Tap here to subscribe to the NEXTBASE UK news feed to keep up to date on new products and promotions 6 Incident Reporting Tap here to easily select edit...

Страница 26: ...me to deselect it When you have selected all of the files that you wish to download tap the Done button in the top right corner of the screen When you tap the Done button Nextbase DriveGuard will disp...

Страница 27: ...have appeared at the top of the screen When all of the videos that you wish to download are selected tap the Download Videos button When you tap the Download Videos button Nextbase DriveGuard will dis...

Страница 28: ...begin to play allowing you to confirm that you have selected the correct video Next tap the Menu button in the top right corner of the Video Playback screen and then tap Edit video Continued on next...

Страница 29: ...e 3 End Marker The red End Marker indicates the position where you would like your trimmed file to end Drag the marker to adjust the end of the trimmed file 4 Options Allows you to select additional e...

Страница 30: ...see below Tapping the Share button when files are selected will display the sharing options available on your device This will include social media applications if installed on your device such as Fac...

Страница 31: ...select edit and upload the recording to our secure server Once this has been done then you will receive an email which contains a link to download the recording this email can then be sent on to your...

Страница 32: ...on Dash Cam directory it will automatically download to the Video downloaded to mobile Device directory this then allows the editing and uploading of the recording Once the download has been completed...

Страница 33: ...edited to reduce it file size a smaller file size is preferable when uploading and downloading the recording This is achieved by trimming the recording i e removing unwanted content from before and a...

Страница 34: ...is email to your insurance provider DRIVEGUARD APP INCIDENT REPORTING CONTD Incident Reporting Step 3 confirm your contact details If you entered your insurance policy details the first time you opene...

Страница 35: ...OS Android version your mobile device is using VIEW DOWNLOADED VIDEOS VIEW DASH CAM VIDEOS REC HOME INCIDENT REPORTING NEXTBASE News REC Dash Cam Settings Dash Cam Update Disconnect Dash Cam REC Dash...

Страница 36: ...elow Note Menus are not accessible whilst the Dash Cam is recording 1 Audio Recording Turn On Off the microphone Options On and Off Default Setting On 2 Number Licence Plate Enter the registration num...

Страница 37: ...g Mode has been turned on the Dash Cam will enter standby mode when there is no physical movement detected for a 5 minute period Should physical movement of the vehicle be detected the Dash Cam will p...

Страница 38: ...s However should you wish to change a setting then please see below Note Menus are not accessible whilst the Dash Cam is recording 1 Format SD Card Format the inserted memory card This will delete all...

Страница 39: ...ted or the SD card has an error and needs to be formatted using the Dash Cam Options On and Off Default Setting On 7 Language Select preferred language for the spoken announcements Options English Dan...

Страница 40: ...s Options On and Off Default Setting Off 10 System Info Use this function to view the available System Information tap the screen for details The Model number and installed Firmware version of your Da...

Страница 41: ...ay want to keep as formatting the card will remove all content There are two methods of formatting the SD card available 1 Using the Dash Cam buttons Press and hold for red button for 5 seconds until...

Страница 42: ...more information Note Update mode is read write this means that content on the SD card can be updated and erased This in turn lets NEXTBASE Replay 3 write the new firmware to the SD card allowing the...

Страница 43: ...if you have difficulty With the card previously installed you now need to push the card further inwards slightly using your finger nail until you hear and feel a small latch Use the edge of a small c...

Страница 44: ...card of 8 to 128GB recommended size PC may not be sufficient for the playback task try a different PC Copy the recorded video files onto the PC Mac for playback directly rather than use the Dash Cam...

Страница 45: ...m If the password has been changed from default and then forgotten then the Dash Cam will need to have new firmware installed to reset the password and all other settings back to the defaults Visit ww...

Страница 46: ...NBDVR300G IM ENG R2 www nextbase com...

Отзывы: