background image

49 

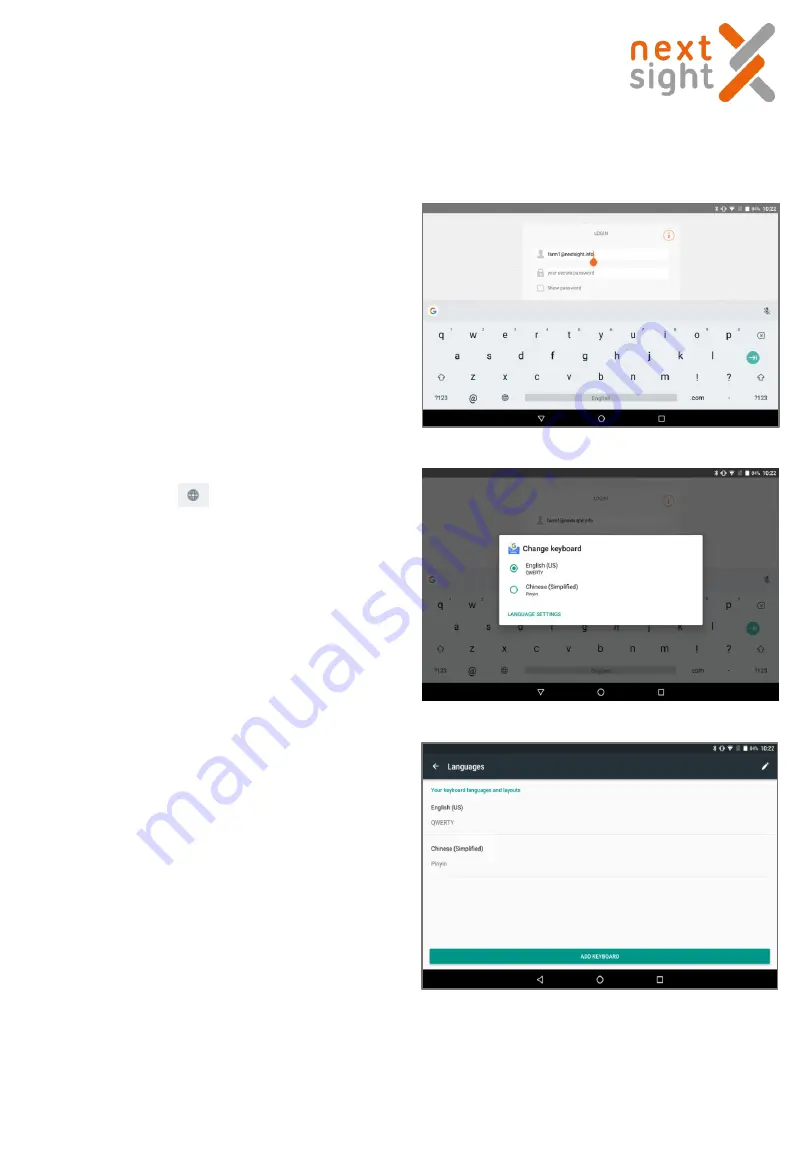
LANGUAGE CHANGE ON THE TABLET KEYBOARD 

To change the language of the tablet keyboard, proceed as follows: 
  

-

At login, click either in the username field or in the 
password field, so that the keyboard is shown 

-

Holding the icon            on the keyboard, 
the following window will appear 


-

At the window that appears, then click on 
"ADD KEYBOARD" 

Nexy user guide 2018-11-08 Rev. 02 

Содержание NEXY

Страница 1: ...NEXY USER GUIDE AND TRAINING 1 Nexy user guide 2018 11 08Rev 02 ...

Страница 2: ...llowed by a practical part During the theoretical part explanations are accompanied with illustrations During the practical part the subject who underwent the training performs the operations of normal use of the Nexy device NEXY USER GUIDE AND TRAINING Now let s start Next Sight Team 2 Nexy user guide 2018 11 08Rev 02 ...

Страница 3: ... POWER ON 7 1ST ACCESS PROCEDURE 8 TABLET POWER ON 10 USE OF TABLET 11 PERFORM AN EXAM 14 NEXY ACCOUNTS 28 IMAGE PRINTING 29 NEXY AND TABLET POWER OFF 30 NEXY WEB FEATURES 31 TELEMEDICINE 33 NEXY USER GUIDE AND TRAINING 3 Nexy user guide 2018 11 08Rev 02 ...

Страница 4: ...IMAGES FOR THIRD PARTY 41 A I SOFTWARE OPTIONAL FUNCTIONALITY OF TEAMVIEWER FOR 43 REMOTE SUPPORT NEXY ADAPTER OPTIONAL ACCESSORY NOT AVAILABLE FOR US 45 LANGUAGE CHANGE ON THE TABLET KEYWORD 49 SHARED FOLDER 51 NEXY USER GUIDE AND TRAINING 4 Nexy user guide 2018 11 08Rev 02 ...

Страница 5: ...UNPACK AND INSTALL YOUR NEXY This is how the Nexy and all the components are packed Tablet Nexy AC DC adaptor 5 User Manual Nexy user guide 2018 11 08Rev 02 ...

Страница 6: ...SE FOLLOW STEP BY STEP THE PROCEDURE HEREAFTER 3 Remove the 1st center upper foam 1 Open the box 2 Remove the Tablet box and Accessories box 4 Device in the right position 6 Nexy user guide 2018 11 08Rev 02 ...

Страница 7: ...se make sure all material and components are on flat surface 7 5 Hold the device at its base and pull it up carefully 6 Keep the box and all foam parts in a safe and dry place Nexy user guide 2018 11 08Rev 02 ...

Страница 8: ...icates that the machine is ready Insert the power supply into the wall socket and switch the Nexy on by pushing for 3 seconds the on off green button located on the side 1 Ethernet socket 2 USB socket 3 Power ON OFF button 1 2 3 Remove the cap from the Nexy front lens Make sure the lens is free of dust Do not touch the lens with your fingers If cleaning is needed please use Berkshire Bluesorb 750 ...

Страница 9: ...nerated automatically by Next Sight Temporary Password password IMPORTANT The USER must run the 1st access on the Reserved Ares of Next Sight website https web nextsight info login During the 1st access the user is required to create their own password Insert the username and the temporary password Create your own password Nexy user guide 2018 11 08Rev 02 ...

Страница 10: ...ase save the PUK in a safe place Insert the PUK Now the procedure is done you can enter with your credentialdirectly from the Tablet IMPORTANT For the 1st time access the Tablet must be connected to internet Nexy user guide 2018 11 08Rev 02 ...

Страница 11: ...rcular button on the left Charger and micro USB cable Click on the orange NEXY icon and enter the login and password assigned to you in on the screen below TABLET POWER ON After switching on a screen like this will appear 11 Nexy user guide 2018 11 08Rev 02 ...

Страница 12: ...ive if OFF enable the Tablet s Bluetooth communication and or bring the tablet closer to the device INTERNET CONNECTIVITY indicates the status of the tablet WI FI DICOM CONNECTIVITY indicates if there is a connection to a DICOM server BATTERY indicates the charge status of the tablet battery USE OF THE TABLET CONFIGURE PATIENT DATA A IF REGISTERED PATIENT Search on Patients list 12 Nexy user guide...

Страница 13: ...wing information Year of birth Sex Race Once patient details are completed click on CREATE To enter the patient s information click on DO EXAM From here select and click on ENTER NEW PATIENT Quick Entry Procedure 13 Nexy user guide 2018 11 08Rev 02 ...

Страница 14: ...ation into corresponding fields Full Entry Procedure Choose Full Entry Once patient details are completed click on CREATE 14 Both in quick and full entry procedure you can add Patient s anamnesis Nexy user guide 2018 11 08Rev 02 ...

Страница 15: ...he orange cleats For patients with small pupil please bring them inside the dark room and wait a few minutes for the pupil to naturally become larger With elderly it can take more time Fixation using an eye patch to cover the other eye will help with the fixation Instruct the patient to position himself facing the machine by first placing the cheekbones on the orange cleats and then the forehead o...

Страница 16: ... help support or hold the head in a stable position Patient should fixate on the green light and without blinking the eye During this process 2 red lights are flashing The patient should not fix on red lights It is just to calibrate the measurement Once all parameters are ok a single white flash will record patient s retina After the first eye exam is finished the exam will start on the other eye ...

Страница 17: ...e Nexy allows using 7 different fixations The machine will move by itself Patient MUSTkeep looking straightat the green light without blinking the eye 1 Select the Central fields for the right eye and the left eye as illustrated and click the START button 2 Select the Nasal fields for the right eye and the left eye as illustrated and click the START button 17 Nexy user guide 2018 11 08Rev 02 ...

Страница 18: ...elds for the right eye and the left eye as illustrated and click the START button 4 Select the Superotemporal fields for the right eye and the left eye as illustrated and click the START button 18 Nexy user guide 2018 11 08Rev 02 ...

Страница 19: ...ields for the right eye and the left eye as illustrated and click the START button 6 Select the Inferior fields for the right eye and the left eye as illustrated and click the START button 19 Nexy user guide 2018 11 08Rev 02 ...

Страница 20: ...TART button Select the All fields for the right eye and the left eye as illustrated and click the START button Capture all 7 fixations is useful to have a widefield view of the retina however the process should take a long time and each eye must be flashed 7 times 20 Nexy user guide 2018 11 08Rev 02 ...

Страница 21: ...If the pupil diameter is too small you ll get this message If the patient is not well positioned too high or too low you ll get this message Warning messages 21 Nexy user guide 2018 11 08Rev 02 ...

Страница 22: ...ansferred via Bluetooth to the tablet and will be shown on the tablet as in the figure below and you will be asked to confirm the image or if you reject you will be asked to retry the exam In the case of the image is rejected this screen will appear 22 Nexy user guide 2018 11 08Rev 02 ...

Страница 23: ...You can proceed to acquire the next eye The procedure will be the same In case the image is accepted this screen will appear 23 Nexy user guide 2018 11 08Rev 02 ...

Страница 24: ...e in patients list and click on it Extract data analysis If you want to consult the data of patient already checked please proceed in the following way Choose the images you want to consult 24 Nexy user guide 2018 11 08Rev 02 ...

Страница 25: ...lyze the retina The image or images will appear on the screen There is a Red Free and Deep Layer Filter features which if enabled produces the following result Another useful feature is the Compare Images You can tap on one of the images in that vertical list and you will see a comparison between 2 image 25 Nexy user guide 2018 11 08Rev 02 ...

Страница 26: ...Mosaic You can use the Mosaic feature in order to have a single retina image with a larger field of view Select Mosaic on the Action menu This screen will appear 26 Nexy user guide 2018 11 08Rev 02 ...

Страница 27: ...o use for the mosaic The mosaic could be done with 2 or more images The images will automatically fill the grid Click on Create Mosaic At this point you can decide if accept or reject the mosaic image 27 Nexy user guide 2018 11 08Rev 02 ...

Страница 28: ...Wait while mosaic images is being saved Mosaic image saved 28 Nexy user guide 2018 11 08Rev 02 ...

Страница 29: ...nt only web based connected to A Type accounts and allowed to do remote referrals on A Type account images 1 A Type Account allowed to detect retina images The features of A Type accounts are already explained on the previous part of this guide 2 B Type Account allowed to detect retina images and do direct evalautions 3 A Type accounts the availability of doing referrals 2 C Type Account Explained...

Страница 30: ...n Select Retinas Drag and drop the retinas on the central part of the screen and press Print If there is an Android compatible printer connected on the same network of the Tablet the report will be printed 30 IMAGE PRINTING Nexy user guide 2018 11 08Rev 02 ...

Страница 31: ...oceed like this and press here Then choose SHUTDOWN and wait 10 seconds Nexy will switch off automatically Switch off the Tablet pressing the button on the left side 31 NEXY AND TABLET POWER OFF Nexy user guide 2018 11 08Rev 02 ...

Страница 32: ...EATURES A Type Account Enter your credentials in https web nextsight info login On this screen you can See your patient list Enter new patient data Change the parameters of your own profile i e the password If you click on a patient s name you will open the patient folder Here you will find the list of pictures taken on that patient and you can open the images Nexy user guide 2018 11 08Rev 02 ...

Страница 33: ... Account In B Type account you will find all the features of A Type account and in addition you can make direct evaluations on images Once you open the patient s folder and you see the image you will find a list of pathologies on the right You can choose maximum of 2 pathologies per eye The pathologies will appear on the medical report Nexy user guide 2018 11 08Rev 02 ...

Страница 34: ...exy C Type account is a web based account linked to A Type accounts C Type account A Type account A Type account sends the images to C Type account C Type account makes referrals on images and sends the reports to A Type account Data Flow This model can be replied with several A Type accounts and 1 C Type account C Type account A Type account A Type account A Type account A Type account Nexy user ...

Страница 35: ...ype accounts haveno access on them neither access to A Type account personaldatanor the personaldataof the patients This is the main screen of a C Type account It can only access the A Type codes C Type account can see the patients images by clicking on patient s code C Type account can open the patients images by clicking here Nexy user guide 2018 11 08Rev 02 ...

Страница 36: ...is icon turns from grey to green A Type Account view This is the PC screen of A Type account after the evaluation of the images made by C Type account If the referral is done the icons on the right turn from grey to green This is the Tablet screen of A Type account after the same evaluation Nexy user guide 2018 11 08Rev 02 ...

Страница 37: ...the Profile section and select Email Template 1 Log using your front end credentials of the Nexy system via the browser 3 A window will open in which you can edit the following fields Subject subj of the email Body body of the email Signature signature to which you can attach a file of type jpg png gif Attachment file to be attached of the type pdf Then click on Save Nexy user guide 2018 11 08Rev ...

Страница 38: ...licking once you have made the changes UPDATE as shown in the figures below Go to the Patients section then click on a patient and then click Edit A window will then open showing the user s details Within the details select e mail and phone number it is necessary that both e mail and phone number are inserted as they are essential to proceed with the following steps Then click on UPDATE Nexy user ...

Страница 39: ...the figure the maximum email size is 5MB the user can verify the size of email on the bottom left After inserting the desired images taking care to respectthe maximum size of 5MB click on write email In this phase as shown in the figure below it is possible to edit the fields e mail phone subject and email text Nexy user guide 2018 11 08Rev 02 ...

Страница 40: ...he previous points will remain unchanged Then click on SEND The user will then receive an e mail of the type In order to view and download the images it is necessary to click on Click here to download This will open a default browser window with the password entry request the password is the phone number entered in the previous step before clicking SEND on the tablet and then click Send The images...

Страница 41: ...onality described above inserting the HOST fields PC name Username of the PC account in which the folder in which the images will be transferred is created Password of the PC account Folder Name name of the user s PC folder in the images will be transferred and then click on UPDATE NOTE the folder on the PC must have enabled the Advanced Sharing Share Folder setting to transfer the images Then sel...

Страница 42: ...ill appear on your PC folder on the shared folder set as shared folder the AI folder will automatically be created with the images of the selected patients These images may be processed by third parties software applications not provided by Next Sight ...

Страница 43: ...t that the distributor takes care of the remote support he must have purchased the license of TeamViewer necessary to provide this type of support to its customers To allow the identification of the problems encountered by the user the user must click on the icon Then click on the TEAMVIEWER icon The QuickSupport Team Viewer will then open and you need to wait for the ID as shown in the figures he...

Страница 44: ...ck ALLOW to allow remote connection by service personnel The notification will appear on the tablet that is active sharing the screen between the user and the service staff The service staff is now able to find the problems encountered by the user Nexy user guide 2018 11 08Rev 02 ...

Страница 45: ... cable of the Nexy Adapter to any USB port on the user s PC if this is the first time you use the Nexy Adapter wait until the PC loads the appropriate drivers which happens automatically Afterwards the user will see a new WiFi network called Nexy Adapter it is necessaryto connect to this network using the nextsight password If the tablet is within range of the Nexy Adapter the corresponding icon o...

Страница 46: ...will also show you an example of the name of the final file step 5 4 5 Alternatively you can share images in json format by selecting the other option as shown in the figure below step 5 A 5 A Image transfer The presence of Nexy Adapter does not change the way Nexy is normally used Each accepted image will be transferred to the adapter and will be displayed in the USB folder Nexy user guide 2018 1...

Страница 47: ...ages are to be exported You can choose one or more patients by selecting the appropriate check boxes step 6 or select all patients step 7 6 7 When the selection is complete touch the small orange triangle step 8 and select Send to Nexy Adapter step 9 9 8 If the Nexy Adapter is within range the transfer will begin immediately Wait until transfer is complete Nexy user guide 2018 11 08Rev 02 ...

Страница 48: ...g of the message is related to the specific version of Windows installed on the PC You can select an option Analyze and correct or Continue without analyzing You need to copy and paste to a desired folder the images on the Nexy Adapter on your local computer Recommendations Always select Safely Remove Hardware before disconnecting the Nexy Adapter The USB memory of the Nexy Adapter must be conside...

Страница 49: ... keyboard proceed as follows At login click either in the username field or in the password field so that the keyboard is shown Holding the icon on the keyboard the following window will appear At the window that appears then click on ADD KEYBOARD Nexy user guide 2018 11 08Rev 02 ...

Страница 50: ...on on the keyboard and the desired language will be set In all the screens in which a text field is inserted the chosen language will be retained If you want to change the keyboard language click on the icon Once if you want to set a language already on the list or repeat the procedure described above to add a new language Nexy user guide 2018 11 08Rev 02 ...

Страница 51: ...tton set the permission level to read write and click Share then Done To check if everything is correct right click on the folder and select properties sharing advancedsharing permissions Full Control should be allowed if it isn t click the allow checkbox You can get more detailed OS specific instructions OS is for Operating System by googling for windows yourwindows version share folder NOTE FOR ...

Страница 52: ...to make sure the remote PC has read write permissions 5 Take the tablet make sure that it s on the same network as the PC with the shared folder and log in with the personal credentials user name and password 7 Tap on the Settings icon on the lower left corner see the figure below and choose what kind of sharing you need either jpg images with the patient s info in the file name or a combination o...

Страница 53: ...re contained in the json it s up to the program that reads it to pick the information that it needs 9 By scrolling up a bit see figure below you will see a page titled PC SHARED FOLDER asking you the HOST the FOLDER NAME the USERNAME and the PASSWORD optionally the DOMAIN Fill these fields using the data from step 1 9 1 The HOST is the name or the IP address of the PC that contains the shared fold...

Страница 54: ...on the PC 13 If you need to re send one or more exams tap the PATIENTS icon on the left you should see a column of checkboxes on the right one for every patient see figure below Check the patients that you want to re send then tap the orange downward pointing triangle at the top of the column and choose SEND TO SHARED FOLDER The selected patients should appear as a set of jpg and or json files on ...

Страница 55: ...55 Nexy user guide 2018 11 08Rev 02 ...

Отзывы: