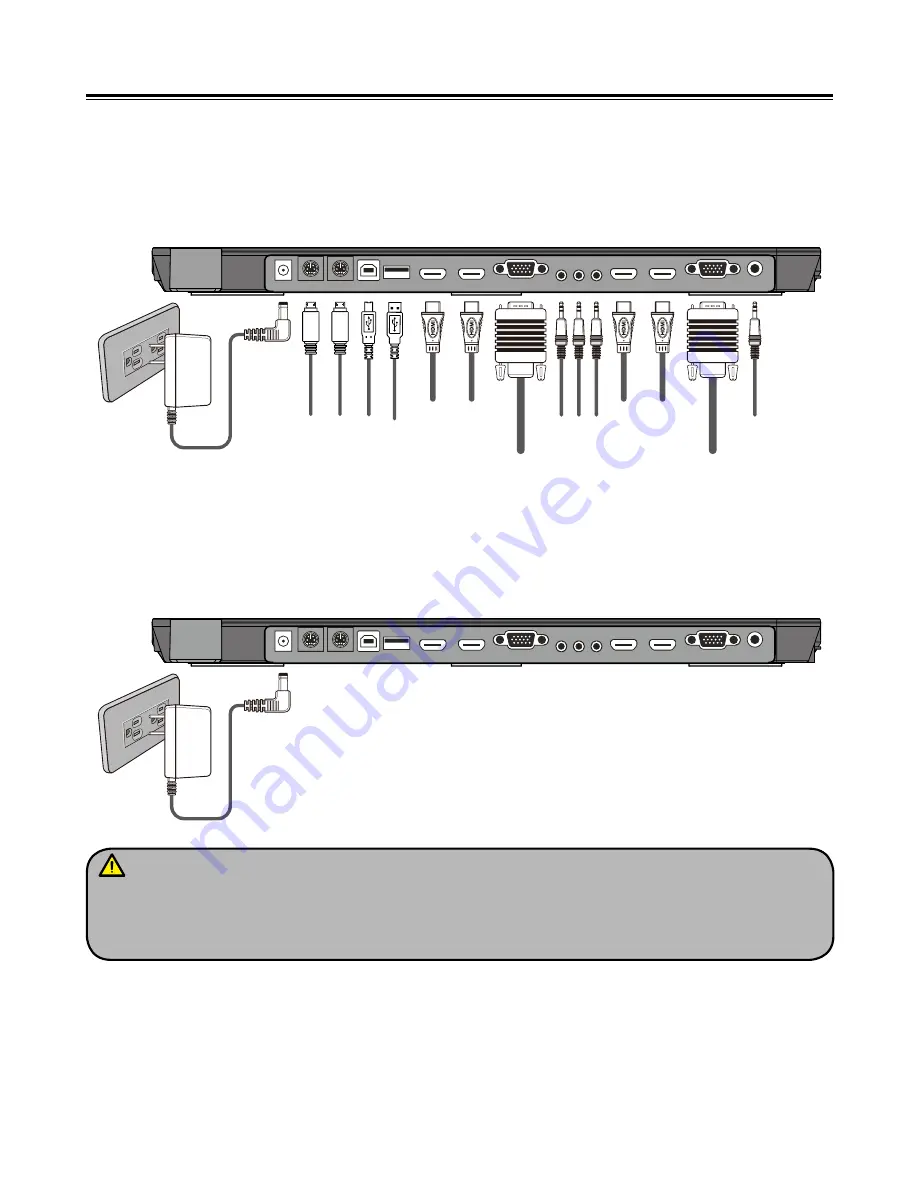
background image

- 8 -

Making Connections

Before making any connection, please ensure that the Visualizer along with all other 
equipment to be connected are turned off.

● System diagram

● Connect power source

         Plug in the power adapter to the device DC 12V IN power socket first and then connect 

the AC power cord to a stand 100V~240V AC power source.


1.  The type of power adapter is depending on your countries/regions.
2.  Be sure to use the power adapter come with the machine.
3.  No wet hands to touch the plug.
4.  Be sure to plug the power adapter and AC cord in place.

Содержание TC-51D

Страница 1: ...Manual FULL HD VISUALIZER Model TC 51D...

Страница 2: ...low combustible or metallic objects to get inside the cabinet 5 Unplug the AC power cord from the wall outlet when it is not in use for an extended period of time 6 Clean cabinet with a soft cloth lig...

Страница 3: ...nect USB 10 Connect a Wireless Tablet 11 Connect VIDEO OUT 11 Connect to an external microphone 12 Menu Operating Instructions Operation the Visualizer by tool bar 13 Setting the Visualizer 13 Basic O...

Страница 4: ...ndby 16 Projector inputs selection 17 Image rotation 17 Image reversion 17 Infrared remote control 17 Installing Visualizer software 17 USB Port USB image video capture 18 Controlling Visualizer by co...

Страница 5: ...Brightness Control Arm Lamp Zoom In Zoom Out Camera Head IR Receive Area Built in MIC SD Card Slot 11 10 13 12 14 8 9 Work Stage Pilot Light Control Panel LCD Anti theft Slot Connection Panel Camera S...

Страница 6: ...e display stored images and videos Freeze the image Press again to unfreeze Select Projector output signal Select Visualizer output signal Flip the current image Press again to normal Rotation the ima...

Страница 7: ...deo clip and save in SD Card Press again to stop recording Freeze the image Press again to unfreeze Re display stored images and videos Increase the arm lamp brightness Decrease the arm lamp brightnes...

Страница 8: ...ic Preparations Set up Visualizer 1 Place one hand firmly on the base of the Visualizer while carefully lifting up the camera stand using the other hand 2 Set up arm lamp and camera head to desired po...

Страница 9: ...power source Plug in the power adapter to the device DC 12V IN power socket first and then connect the AC power cord to a stand 100V 240V AC power source 1 The type of power adapter is depending on y...

Страница 10: ...sktop computer Mode 1 Connect VGA cable and audio cable 1 Use VGA cable to connect VGA IN port on the Visualizer to the VGA OUT port on the computer 2 Use Audio cable to connect AUDIO IN port on the V...

Страница 11: ...is required for this operation Press MENU button select icon select System Choose UMS to connect mass storage Choose UVC to be as a PC Cam Note The signal HDMI IN1 just pass through out from HDMI OUT...

Страница 12: ...ble yellow to connect to the VIDEO IN on your television 2 Press MENU button select icon select System Choose PAL or NTSC Note 1 If you use the Wireless Tablet the first time be sure to put batteries...

Страница 13: ...12 Connect to an external microphone Plug a 3 5mm mono microphone to MIC IN port on the product Note The built in microphone will be disabled when an external microphone is connected...

Страница 14: ...n on the control panel to bring up tool bar 2 Use left and right arrow button or as the selection keys 3 Use confirm button to confirm 4 Use backspace to return to the previous menu 5 Use home icon to...

Страница 15: ...using the zoom In zoom out knob 3 Adjust the focus using the AUTO button Working outside the stage If the object is too large for the stage or if you would like to show it from one of its side or a d...

Страница 16: ...when the power is on To display negatives turn on the backlight by pressing the LAMP button and then press the Negative icon to display the film negatives Press the Negative icon again to display norm...

Страница 17: ...TO button to auto adjust the white balance and the focus Text image mode Press the icon to switch between image text modes To display a text file switch to the text mode to get a clearer text effect C...

Страница 18: ...software This function is to snap and display images with the USB interface which includes displaying static and dynamic pictures snapping dynamic images and playback the dynamic images with the Wind...

Страница 19: ...with the supplied USB cable The Visualizer software is available on the supplied CD ROM USB Port USB image video capture You can capture images and videos on the Visualizer from a computer connected w...

Страница 20: ...Programs Visualizer and the following dialog box appears as below When the indicator of Current RS232 Connection Status is green that means the connection between the Visualizer and the computer s RS...

Страница 21: ...lows a If the data is in the numerical value format please input data directly block them off with comma do not distinguish lowercase and uppercase For example the POWER ON code in Hitachi projector m...

Страница 22: ...pin 4 is GND Ground Other pins are not defined The pin location information of the projector is provided by the projector s manufacturer The projector s RS232 control port normally has RXD pin TXD pin...

Страница 23: ...projector s Baud rate then click Open Click the projector control buttons on the Visualizer s operating panel to check if the control code that the program received is the same as the sending code If...

Страница 24: ...o the camera stand Rotate the camera head until the camera head is parallel to the camera stand then down onto the control panel Cautions a Do not lay the unit down flat b Do not try to stand it on it...

Страница 25: ...correct source of signals Switchtothecorrectsourceofsignals The computer transfer key VGA is activated Press the source of signal CAM HDMI is activated Press the source of signal CAM The image can no...

Страница 26: ...k white and color selection Yes Image Split Yes Image Freeze Yes Image Rotate 0 90 180 270 Image Save Recall RAM about 32 frames SD Card Support up to 32G 3 x 4 multiple screen display Image Flip Yes...

Страница 27: ...Connector 6 Pin PS 2 2 Shooting Area 508 x 279mm Power Requirement 12V external adapter Power Consumption 12W Dimension W x D x H Folded 510 x 380 x 140mm Setup 490 x 380 x 530mm Weight N W 5 3Kg Acc...

Страница 28: ......

Отзывы: