


SM1733
17
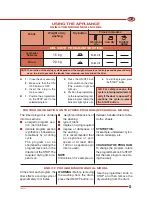
INSTALLING THE APPLIANCE
■
Position the drier in a
well-ventilated room.
■
Do not cover the ventila-
tion grills on the front and
back (fig. 1 and 2) and do
not place the drier on
thick carpet.
■
Position the filters (fig. 10
& 12).
■
Clean the drum using a
soft cloth to remove any
dust or grease.
■
Do not install the drier in
rooms subject to freezing
temperatures as these could
damage the electronics.
Connecting the condensa-
tion drain to the drainage
system.
The condensation can be col-
lected in the reservoir (fig. 11)
or, alternatively, the hose can
be connected directly to the
drainage system.
In this case, the collected wa-
ter is pumped out.
To connect the condensation
hose directly to the drainage
system, proceed as follows:
■
before starting any opera-
tions, unplug the appliance
from the mains socket.
■
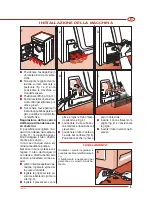
remove the grill on the
back of the drier after first
removing the screw (fig. 3).
■
remove the hose clip us-
ing a pair of pliers and
carefully remove the
hose (fig. 4).
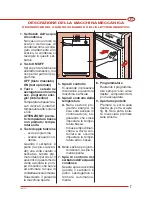
■
place the hose on the
front nozzle and replace
the hose clip.
■
position the hose sup-
plied on the free nozzle
LEVELLING
The appliance can be levelled by
rotating the adjustable feet.
The appliance must be levelled in
order to ensure its correct opera-
tion.
1
3
4
5
6
(fig. 5). Place the hose
clip supplied in position.
■
pass the hose through
the grill (fig. 5) while refit-
ting the grill itself.
■
inser t the hose in the
drainage pipe.
2
2
GB
Содержание 251CO
Страница 1: ......
Страница 2: ...SM1733 2 ITALIANO 3 14 ENGLISH 15 26 ESPA OL 27 38 PORTUGU S 39 50 FRAN AIS 51 62 ES PT FR GB IT...
Страница 63: ...SM1733 63 NOTES...
Страница 64: ...461305894 SM1733 11 01 2005 IT GB ES PT FR...