background image

21

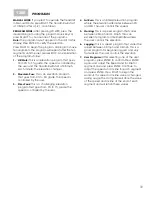
6. Jogging:

This is a speed program that varies the

speed between 4.0mph and 4.8mph. This is a
good program for beginner joggers and very
fast walkers. The user controls the elevation.

7.

Target Distance:

This program counts down the

distance goal that the user sets before exercis-
ing. After confirming the program, the user
enters the distance goal using the speed or
incline arrow keys. Increments are 0.5 miles.
Press ENTER to confirm the distance goal, press
START, the Treadmill Belt starts and the user 
controls the speed and incline. The distance 
will count down in the distance window.

8.

Target Calories:

This program counts down the

calorie goal that the user sets before exercising.
After confirming the program, the user enters
the calorie goal using the Speed or Incline 
arrow keys. Increments are 10 calories. Press
ENTER to confirm the calorie goal, press START,
the Treadmill starts and the user controls the
speed and incline. The calorie goal will count
down in the Calories window.

9. User 

Programs: 

After selecting one of the user

programs, press ENTER to confirm. Press ENTER
again and adjust the Speed and Incline for 
segment one and press ENTER. Continue to
adjust the speed and incline for each segment
and press ENTER. Press START to begin the 
workout. If a speed or incline value is changed
during usage, the Computer will store the value
of the speed and incline at the end of each
segment and will retain these values.

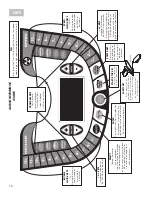
PROGRAMS

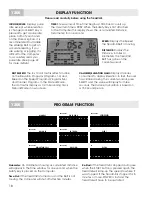
MANUAL MODE:

If you elect to operate the Treadmill

in Manual Mode, press START. The Treadmill will start
at 0.5mph after a 3,2,1 countdown.

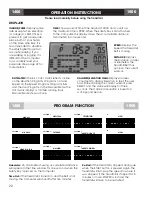
PROGRAM MODE:

After pressing POWER, press the

desired program using the program Quick Keys or
press SELECT to choose one of the programs.

Note: 

The program layout appears in the dot matrix

display. Press ENTER to verify the selection.

Press START to begin the program. All programs have
ten segments. The program will repeat after the ten
segments until the user presses STOP. An explanation
of the programs follow:

1.

Hill Walk:

This is an elevation program that goes

from 0% to 3% grade. The speed is controlled by
the user and the Treadmill will start at 0.5mph.
Each minute, the elevation changes.

2. Mountain 

Pass:

This is an elevation program 

that goes from 0% to 5% grade. The speed is
controlled by the user.

3. Pikes 

Peak:

This is a challenging elevation 

program that goes from 0% to 7% grade. The
speed is controlled by the user.

4. Fat 

Burn: 

This is an interval elevation program

where the elevation alternates between 0% 
and 5%. The user controls the speed.

5. Walking:

This is a speed program that varies

between 2.5mph and 3.3mph. This is an 
excellent program for intermediate walkers.
The user controls the elevation.

1400/1500

Содержание 1200, 1400, 1500

Страница 1: ...MANUAL BEFORE USING YOUR NEW BALANCE 1200 1400 1500 TREADMILL 1200 1400 and 1500 Treadmills Serial No _______________________ Date of Purchase ___ _________ Write the serial number in the space above...

Страница 2: ...to Exercise 24 Measuring Your Heart Rate 24 25 Clothing 25 Tips to Keep You Going 25 Heart Rate Target Zone Chart 26 Warm Up Cool Down Stretches 27 28 Troubleshooting Guide 29 Workout Progress Charts...

Страница 3: ...e session cool down with slow walking and stretching 10 This equipment should not be used by or near children 11 Handicapped or disabled people must have medical approval before using this equipment a...

Страница 4: ...ough Friday 8 30am to 8 00pm EST IMPORTANT You must have your serial number and this manual ready when calling for parts Serial ____________________________ Please also provide the following informati...

Страница 5: ...nsole Foot Rail Rear End Cap Wheel Power Cord Fan Left Console Pulse Sensors Pulse Sensors Suspension Walking Deck FRONT REAR WARNING LABEL 1 WARNING LABEL 2 WARNING LABEL 2 WARNING LABEL 1 WARNING LA...

Страница 6: ...wly lower the deck to the floor and keep your hands and feet clear to avoid crushing or other serious injury WARNING LABEL 6 10 power cord on off switch WARNING LABEL 5 safety switch WARNING LABEL 4 W...

Страница 7: ...s screwdriver safety key M8 x 20mm allen bolt 6 M4 x 6mm phillips screw 6 For Maximum Effectiveness and Safety Please Read This Owner s Manual Before Assembling or Using Your New Balance 1200 1400 150...

Страница 8: ...g Belt put the Console Base Assembly in the user position by pivoting it carefully down See Figure 2b Note During assembly DO NOT PINCH WIRES when the Console is folded down and secured to the Upright...

Страница 9: ...Console Base Assembly Insert Cup Holders into the two holes provided Please make sure the taller side of the Cup Holder is facing away from the Walking Belt Figure 3 Install Side Caps upright M4 x 6mm...

Страница 10: ...ly is complete you must fold and move the Treadmill to remove the box To fold the Treadmill raise the deck Secure the Deck in the upright position by lowering the latch It will snap on the handle and...

Страница 11: ...readmill Turn the ON OFF switch to the ON position ASSEMBLY AND SETUP ARE NOW COMPLETE IMPORTANT Please read this owner s manual before beginning your workout for important instructions on how to use...

Страница 12: ...L DECREASE INCLINETO 0 LEVEL FAILURETO DO SO MAY RESULT IN SERIOUS DAMAGETOTREADMILL ANDVOIDWARRANTY 1200 1400 UNITS TO FOLD THE TREADMILL You may fold the Treadmill into the upright position for stor...

Страница 13: ...ety feature to help the Deck lower slowly when unfolding Please make sure there are no children or other things under the Deck when you lower it WARNING CRUSH HAZARD KEEP HANDS CLEAR OF DECK FAILURE T...

Страница 14: ...level surface Have plenty of clearance behind and in front of your Treadmill It is important to keep children pets furniture and other objects out of the way when using your Treadmill You should have...

Страница 15: ...leeve to retain moisture 14 WARNING Always turn off and unplug the Treadmill from the electrical outlet before cleaning lubricating or servicing the Treadmill CLEANING Keeping the Treadmill clean will...

Страница 16: ...ore exercising to ensure the Treadmill will stop if the user accidentally walks off the Treadmill If the user falls off the Treadmill the Safety Key will come off the Computer and the Treadmill will s...

Страница 17: ...ssing these keys slowly changes the Incline to that value SAFETY KEY or KEYS Increases or decreases the INCLINE when pressed START STOP KEY Pressing this starts and stops the Treadmill Belt The Comput...

Страница 18: ...STOP KEY Pressing this starts and stops the Treadmill Belt The Computer can be operated only with the Safety Key attached to the Treadmill The Computer shuts off and the Treadmill stops when this key...

Страница 19: ...ximum time is 99 59 When the Safety Key is first attached to the Computer this display shows the accumulated Distance odometer for one second 1200 DISPLAY FUNCTION MANUAL FAT BURN USER 2 HILL WALK WAL...

Страница 20: ...ed and incline at the end of each segment and will retain these values PROGRAMS MANUAL MODE If you elect to operate the Treadmill in Manual Mode press START The Treadmill will start at 0 5mph after a...

Страница 21: ...it is difficult for the Computer to accurately read your pulse rate See page 22 for more details TIME Shows workout Time Time begins at 00 00 and counts up The maximum time is 99 59 When the Safety K...

Страница 22: ...begin the workout If a speed or incline value is changed during usage the Computer will store the value of the speed and incline at the end of each segment and will retain these values PROGRAMS MANUAL...

Страница 23: ...e 26 of this manual For additional information about the importance of working within certain heart rate ranges see pages 24 25 Measuring Your Heart Rate 5 This estimate is not exact and persons with...

Страница 24: ...d to remove wastes over sustained periods of time Using your Treadmill will improve this MUSCULAR STRENGTH the ability of a muscle to exert force for a brief period of time Upper body strength for exa...

Страница 25: ...tant to exercise at an intensity vigorous enough to cause your heart rate and breathing to increase How hard you should exercise depends to a certain degree on your age and is determined by measuring...

Страница 26: ...lay monitor provide a reasonably accurate estimate of your actual heart rate This estimate is not exact and persons with medical conditions and or a specific need for accurate heart rate monitoring sh...

Страница 27: ...3 90 min 9 10 5 min 70 85 25 5 min 35 min 3 105 min 11 12 5 min 70 85 25 5 min 35 min 3 105 min HEART RATE TARGET ZONE FOR CARDIOVASCULAR FITNESS TABLE 1 Maximum Attainable Heart Rate 85 Target Zone 7...

Страница 28: ...when you feel the stretch Keep your kneecap pointing straight down and keep your knees close together Do not let the lifted knee swing outward Hold the stretch for 20 to 30 seconds Repeat for the oth...

Страница 29: ...gently grasp the bent knee with your hands and pull it over your body and towards the ground You should feel a stretch in your hips abdominals and lower back Hold for 20 to 30 seconds and release Repe...

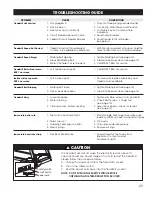
Страница 30: ...ill recalibrate Treadmill Belt Slipping 1 Walking Belt loose 1 Tighten Walking Belt see page 13 2 Deck needs lubrication 2 Lubricate Belt and Deck see page 14 Treadmill Noisy 1 Loose hardware 1 Tighte...

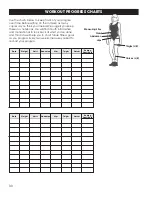
Страница 31: ...u will find it both informative and motivational to look back at what you ve done and this data will help you to chart future fitness goals as you progress Every two weeks measure yourself to rechart...

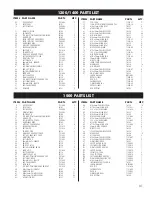
Страница 32: ...T NAME PART QTY 8 ARC BRACKET T1214 08 2 14 SAFETY KEY TM 01 1 15 LEFT HOLDER T1500 04 1 17 RIGHT HOLDER T1500 05 1 18 BOOK RACK TM 04 1 20 TOP BOTTOM PULSE SENSOR W WIRE TM 06 2 21 HAND GRIP TM 07 2...

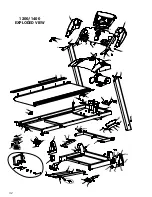
Страница 33: ...22 61 60 59 55 54 89 51 27 29 62 86 62 30 62 78 62 34 85 35 79 66 08 66 67 68 63 74 50 46 48 45 49 44 60 97 47 57 62 40 60 41 60 42 60 12 84 60 60 50 74 66 66 66 37 69 88 63 63 75 69 39 88 69 38 82 81...

Страница 34: ...08 66 67 62 62 111 111 39 88 69 82 36 38 50 50 74 51 89 104 100 54 103 29 27 62 86 62 101 57 61 62 47 60 44 44 49 45 48 46 81 108 102 69 75 63 63 88 69 37 66 66 74 84 84 60 42 60 40 60 40 51 63 68 34...

Страница 35: ...from all defects in material and workmanship when used according to the manufacturer s instructions See Limited Warranty Card for details Save your sales receipt You may wish to staple it into this ma...

Отзывы: