Wireless-B Broadband Router
25
Network Everywhere
®
Series
24
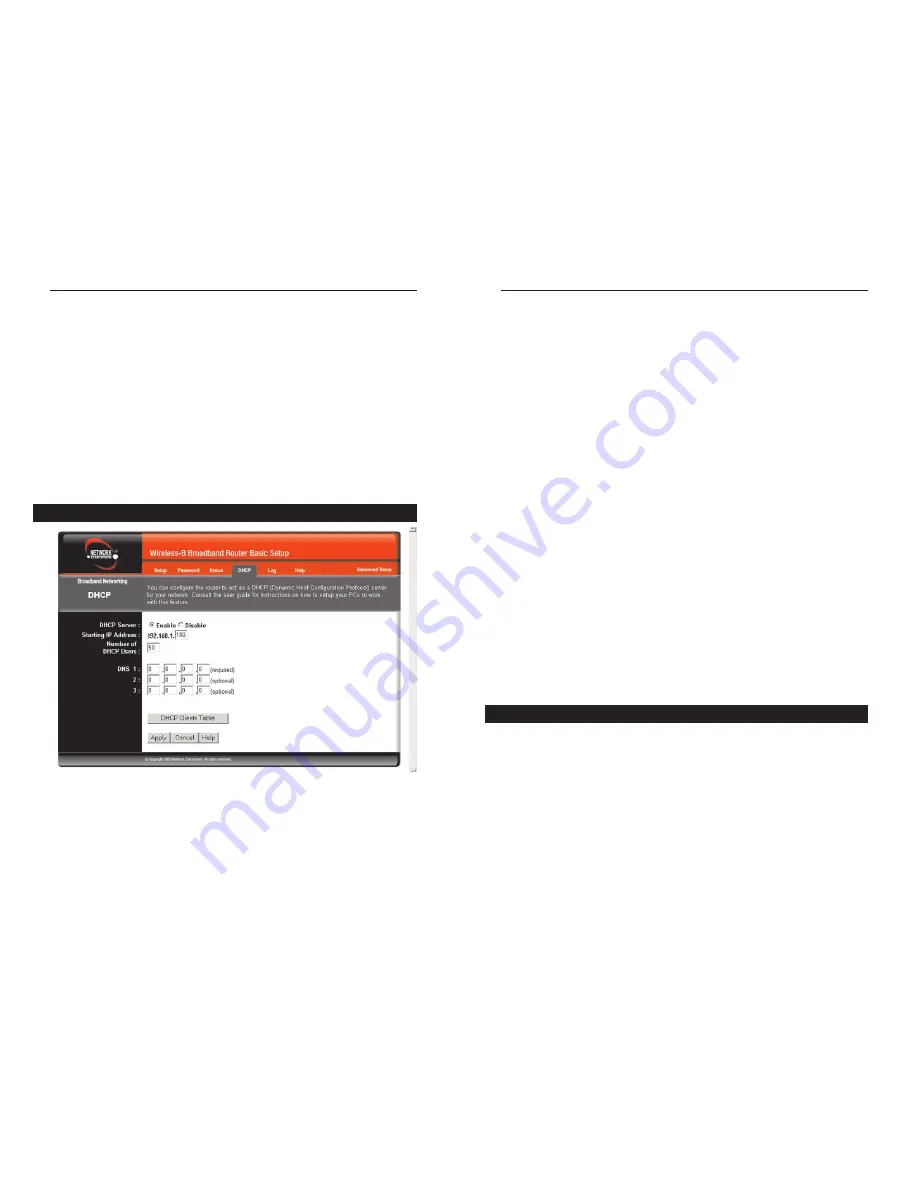
DHCP Server
DHCP is already enabled by factory default. If you already
have a DHCP server on your network, set the Router’s DHCP option to
Disable
. Click the
Apply
button. If you disable DHCP, remember to assign a
static IP address to the Router.
Starting IP Address
Enter a value for the DHCP server to start with when
issuing IP addresses. This value must be 192.168.1.2 or greater, because the
Router’s default IP address is
192.168.1.1
.
Number of DHCP Users
(Optional) Enter the maximum number of PCs for
the DHCP server to assign IP addresses. This number cannot be greater than
253.
DNS 1-3
The Domain Name System (DNS) is how the Internet translates
domain or website names into Internet addresses or URLs. Your ISP will pro-
vide you with at least one DNS Server IP Address. If you wish to use another,
type that IP Address in one of these fields. You can type up to three DNS Server
IP Addresses here. The Router will use these for quicker access to functioning
DNS servers.
DHCP Clients Table
Click the
DHCP Clients Table
button to show the cur-
rent DHCP Client data. (This data is stored in temporary memory and changes
periodically.)
To apply any of the settings you’ve changed on this page, click the
Apply
but-
ton. To cancel any values you’ve entered on this page, click the
Cancel
button.
If you should need any further information about anything on this screen, click
the
Help
button.
The Log tab, shown in Figure 5-9, provides you with a log of all incoming and
outgoing URLs or IP addresses for your Internet connection.
Access Log
To access activity logs, select the
Enable
option next to Access
Log. This function can be disabled by clicking the
Disable
radio button.
Temporary logs can be accessed from the Log screen by clicking either the
Incoming Access Log
or
Outgoing Access Log
button. The Incoming Access
Log gives you a log of all the incoming Internet traffic while the Outgoing
Access Log lists all the URLs and IP addresses of Internet sites that users on
your network have accessed.
Log
the DNS server(s) currently used by the Router. Multiple DNS IP settings are
common. In most cases, the first available DNS entry is used. The DHCP
Server, DHCP leased Time, and DHCP Time Remaining are also shown.
DHCP Release
Available for a DHCP connection, click the DHCP Release
button to release the current IP address of the device connected to the Router’s
Internet port.
DHCP Renew
Available for a DHCP connection, click the DHCP Renew but-
ton to replace the current IP address of the device that is connected to the
Router’s Internet port with a new IP address.
DHCP Clients Table
Click the
DHCP Clients Table
button to view the list of
PCs that were given IP addresses by the Router.
DHCP
From the DHCP screen, shown in Figure 5-8, you can configure the settings to
your DHCP server. A Dynamic Host Configuration Protocol (DHCP) server
automatically assigns an IP address to each PC on your network for you. Unless
you already have one, it is highly recommended that you leave the Router
enabled as a DHCP server.
DHCP
Figure 5-8
Содержание NWR11B
Страница 1: ......


