background image

NetUP Streamer HDMI 8x. User manual 


Introduction 

NetUP Streamer HDMI 8x is an all-in-one device, that integrates encoding, (MPEG-4/AVC H.264) 
multiplexing and modulation functions in a 1U case. It is capable of converting 8 HDMI signals and 1 
ASI input to 2 DVB-T RF outputs in the frequency range of 30~999MHz. It is also equipped with 2 ASI 
ports and an IP port. The source signal may come from a satellite receiver, closed-circuit television 
camera, etc. The device’s output can be received by DVB-T standard TVs or DVB-T STBs. 
This device can be used for advertising or monitoring purposes in public places such as metro, market 
halls, theatres, hotels, resorts, etc. 

Appearance and illustration 


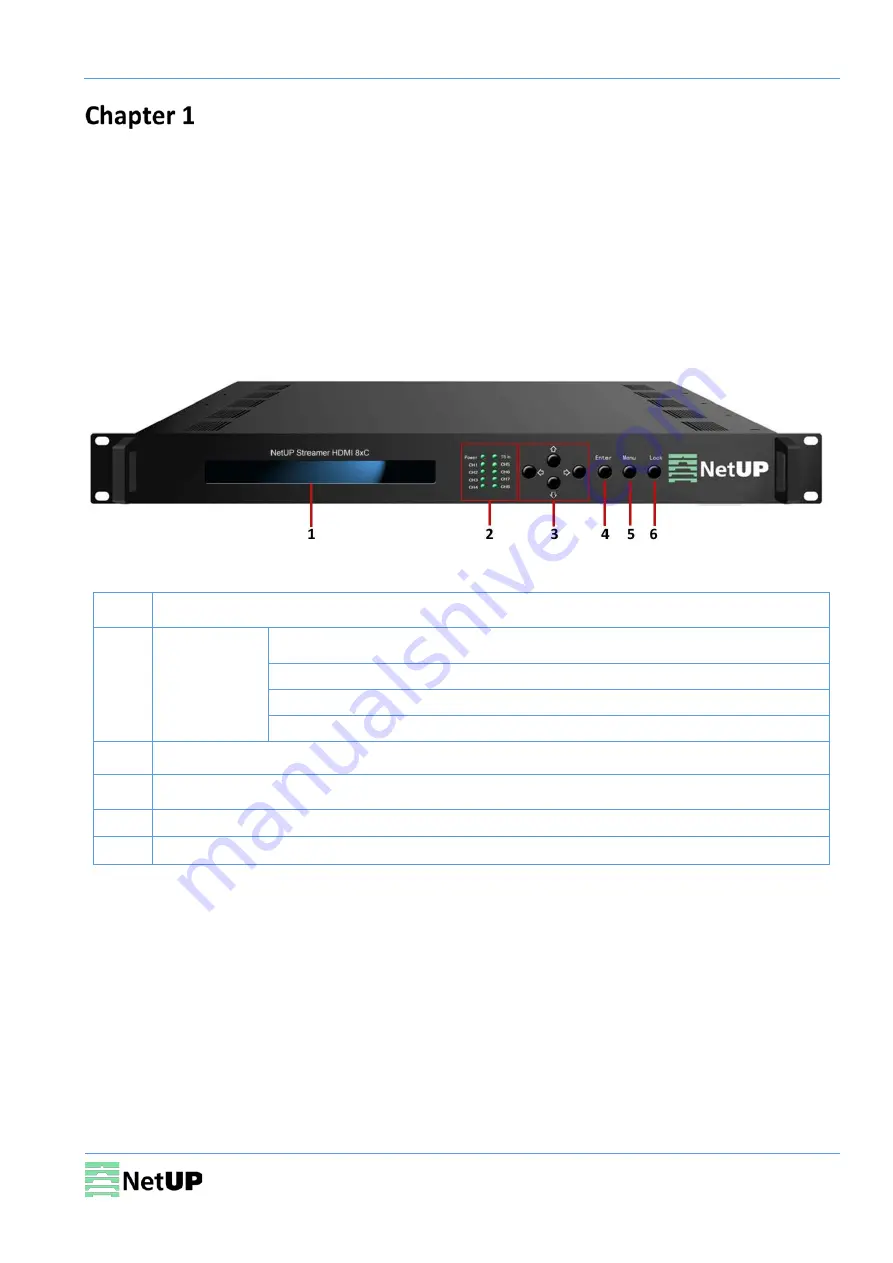
Front panel: 

LCD screen 

Indicators 

Power 
TS in – the input lock indicator 
CH1-CH8 coding channels  
All indicators will light on when the device is switched on 

UP/DOWN, LEFT/RIGHT keys 

ENTER key 

MENU key 

LOCK key 


Содержание Streamer HDMI 8x

Страница 1: ...1 7 Ulofa Palme str Moscow Russia 7 495 510 1025 info netup tv http netup tv NetUP Streamer HDMI 8x User manual 9 April 2019...

Страница 2: ...ons 6 Environment requirement 7 Grounding requirement 7 LCD screen feature description 8 Initializing and general settings 8 1 System Param 9 2 Modulator 10 3 Output Settings 11 4 MUX Setting 11 5 Net...

Страница 3: ...IP port The source signal may come from a satellite receiver closed circuit television camera etc The device s output can be received by DVB T standard TVs or DVB T STBs This device can be used for ad...

Страница 4: ...ser manual 4 Rear panel 1 HDMI ports 2 RF test port 3 RF output port 4 ASI input port 5 ASI output ports 6 DATA port for IP signal output 7 NMS Network management port 8 Power switch 9 Fuse 10 Power s...

Страница 5: ...g automatically or manually Accurate PCR adjusting Generate PSI SI table automatically Modulator Standard EN300744 FFT mode 2K 8K Bandwidth 6MHz 7MHz 8MHz Constellation QPSK 16QAM 64QAM Guard Interval...

Страница 6: ...ns Before installing and connecting the device make sure that the device was not damaged during delivery Install the device in an appropriate place The device is designed to work in a clean and dry ro...

Страница 7: ...windows Walls Can be covered with wallpaper or dark paint Fire protection Fire alarm system and extinguisher Power The device requires AC 100V 220V 10 50 60Hz Please carefully check before running Gr...

Страница 8: ...ou select No the LCD will display the current configuration state Initializing and general settings After powering on the device it will take a few seconds to initialize the system and then the LCD wi...

Страница 9: ...m Valid values 1 1 Bitrate Mbps 08 000 range from 0 8 to 19 Mbps 1 2 Bitrate Mode 1 CBR CBR Constant Bit Rate VBR Variable Bit Rate 1 3 Profile 1 HIGH HIGH or MAIN 1 4 Level 1 1 2 range from 1 2 to 10...

Страница 10: ...ou access to the following settings Item Valid values 3 1 Program Number 0x0101 integer 2 Modulator The Modulator menu gives you access to the following settings Item Valid values Bandwidth 1 6M 6 7 a...

Страница 11: ...an output 2 Destination IP Address 224 002 002 002 IP address 3 Destination Port 1002 port 4 Filter Null Packet YES YES or NO 5 TSID and ONID TSID Trans Stream ID ONID Original Network ID Select the A...

Страница 12: ...e items and press ENTER Both of them give you access to the following settings 5 1 1 IP Address 192 168 002 136 5 1 2 Subnet Mask 255 255 255 000 5 1 3 Default Gateway 192 168 002 001 5 1 4 MAC Addres...

Страница 13: ...ing menu gives access to following settings Save Config Yes Restore Configuration Yes Factory Set Yes 7 Version Use the Version menu to check the current firmware versions 7 1 SW Version X XX 7 2 HW V...

Страница 14: ...s different from the device s IP address otherwise it would cause an IP conflict The default IP address of NetUP Streamer HDMI 8x is 192 168 0 136 Thus set the computer s IP address to 192 168 0 X whe...

Страница 15: ...tatus After login you will get the Status page which displays the current system status Figure 2 Figure 2 Use this menu to navigate between the interface pages States of the HDMI inputs and the ASI in...

Страница 16: ...8x User manual 16 Encoder Open the Encoder page to set coding parameters for each channel Figure 3 Figure 3 Set parameters Select a channel See the channel s input resolution encoding status and bitr...

Страница 17: ...expand or collapse program lists enable or disable PID remapping refresh an input or an output move programs between the input and the output areas modify program information Operation area Parse the...

Страница 18: ...NetUP Streamer HDMI 8x User manual 18 Program modification window Select a program and click on Edit to modify program information Figure 5 Figure 5 Parameters that can be changed Confirm changes...

Страница 19: ...Hz 7 MHz 8 MHz Constellation QPSK 16QAM 64QAM FFT 2K 8K Guard Interval 1 4 1 8 1 16 1 32 Code Rate 1 2 2 3 3 4 5 6 7 8 RF1 2 Frequency 30 960 MHz RF Level 30 0 10 0 dbm Figure 6 Output Use the Output...

Страница 20: ...utputs Figure 7 Figure 7 Output Set window Green indicates that the output bitrate is normal Red indicates that the output bitrate overflow Press the button to adjust output SPTS Select one of the opt...

Страница 21: ...nual 21 DATA IP Settings Use the DATA IP Settings tab to set network parameters Figure 8 Figure 8 ASI Output Use the ASI Output tab to select TS output from ASI Figure 9 Figure 9 Confirm changes Selec...

Страница 22: ...Config Use the TS Config page contains the output TS NIT and VCT settings for each of the output channels Figure 10 Figure 10 Select the channel Confirm changes Add a program descriptor to NIT Network...

Страница 23: ...HDMI 8x User manual 23 Descriptor settings System Use the System page to save or restore the system configuration return to the factory settings and load the configuration file Figure 11 Figure 11 Co...

Страница 24: ...8x User manual 24 Network Use the Network page to edit networking parameters Figure 12 Figure 12 Password Use the Password page to change current password and username Figure 13 Figure 13 Confirm chan...

Страница 25: ...ge Are all cables connected correctly Turn off the device and unplug the power cord in the following cases The power cord or socket is damaged A liquid is splashed on the device A short circuit has oc...

Отзывы: