background image

09

intelligent 

payments

For technical support call:

 0333 311 0200 (Option 3)

Visit our website at 

www.netpay.co.uk

05.02. Conducting a Sale

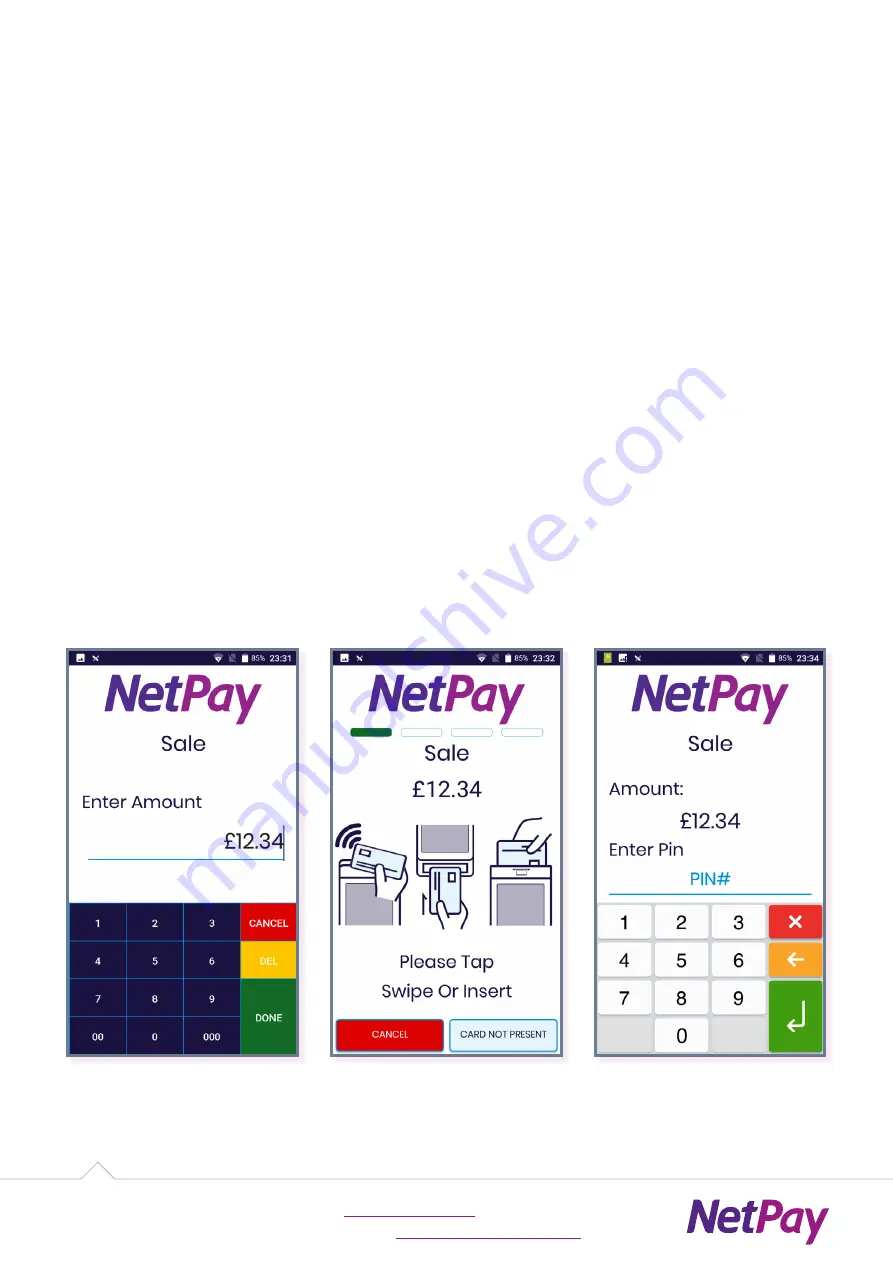
To conduct a sale, from the Main Menu shown in Figure 04, choose “Sale”.

Key in the amount of the sale and select “Done”, as shown in Figure 05.

You will be prompted to “Tap, Swipe or Insert”; or complete the transaction with the 
“Card Not Present” feature, as shown in Figure 06.

If the customer is present, please ask the customer to do one of the following:

• 

Tap the card on the contactless reader.

• 

Swipe the card through the magstripe reader.

• 

Insert card into the card reader, Figure 07 will display on the screen.

If the customer is not present, select the Card Not Present button:

• 

Key in the card number and expiry date and select “Done”.

• 

Key in the CSC number and select “Done”.

If all details are valid the terminal will process the transaction.

Figure 05

Figure 06

Figure 07

Содержание Pax A Series

Страница 1: ...920 USER GUIDE Food and Beverage Fashion and Retail Transportation Field Sales Health and Beauty intelligent payments For technical support call 0333 311 0200 Option 3 Visit our website at www netpay co uk ...

Страница 2: ... Connecting to Wi Fi 06 POSitive user guide 07 05 Using the POSitive Payment application 07 05 01 Features of POSitive 08 05 02 Conducting a Sale 09 05 03 Conducting a Sale with Gratuity 11 05 04 Conducting a Sale with Cashback 14 05 05 Conducting a Refund 16 05 06 Conducting a Sale or Refund when the customer is not present 18 05 07 Conducting a Pre Authorisation 19 05 08 Conducting a Completion ...

Страница 3: ...s For technical support call 0333 311 0200 Option 3 Visit our website at www netpay co uk A920 quick start guide Contactless reader Card reader Volume down button Volume up button Power button Micro USB port Magstripe reader ...

Страница 4: ...is 1234 Finally navigate to the Admin Menu and tap the Cycle Keys function to establish a connection to the acquirer 02 02 Changing the thermal paper roll Removing the thermal paper roll To remove the thermal paper turn the device over and pull the paper cover latch away from the device The top section of the device will pivot downwards To remove the paper simply pull the paper roll out Installing...

Страница 5: ... battery connectors Next insert the battery with the gold connectors towards the top right side Slide the battery upwards whilst carefully pushing the bottom into place Insert the top of the battery lid into the lid hinges Then lower the bottom of the lid cover until it is flush with the case Finally slide the lid switch to the left to lock the battery cover 03 Power On Off and Sleep Mode 03 01 Po...

Страница 6: ...he screen and select Wi Fi Settings as shown in Figure 01 The device will then be redirected to the Wi Fi settings page The device will automatically search and bring up available Wi Fi networks Please complete the connection process and click the back arrow on the bottom left of the screen when complete as shown in Figure 02 If you have come from the 02 01 Initial device setup section click here ...

Страница 7: ...u will be prompted for an ID and password as shown in Figure 03 By default both these fields are 1234 You will then be prompted to set a new password This is the manager account Once you are logged you will be at the main menu of the POSitive payment application this is shown in Figure 04 The main menu shown in Figure 04 is the Home Screen for the POSitive payment app and will be heavily reference...

Страница 8: ... able to Conduct sales with gratuity and cashback Conduct refunds Conduct card not present sales Conduct pre authorisations and completions Reprint and view receipts Test the acquiring connection From the Admin Menu you are able to Print software and hardware information Reconcile with Z reports Generate X reports Print the transaction history Manage user accounts ...

Страница 9: ...n with the Card Not Present feature as shown in Figure 06 If the customer is present please ask the customer to do one of the following Tap the card on the contactless reader Swipe the card through the magstripe reader Insert card into the card reader Figure 07 will display on the screen If the customer is not present select the Card Not Present button Key in the card number and expiry date and se...

Страница 10: ... website at www netpay co uk If the transaction has been approved a green tick is displayed shown in Figure 08 If the transaction has failed a red cross is displayed as shown in Figure 09 The sale process is now complete the application will return to the Main Menu Figure 08 Figure 09 ...

Страница 11: ...ty from the Main Menu Figure 04 choose Sale Key in the amount of the sale and select Done as shown in Figure 10 If gratuity is enabled you will then be prompted to add a gratuity to the payment as shown in Figure 11 If Yes is selected you will be asked to select the gratuity amount as shown in Figure 12 Once the amount is chosen please select Accept Figure 10 Figure 11 Figure 12 ...

Страница 12: ...s present please ask the customer to do one of the following Tap the card on the contactless reader Swipe the card through the magstripe reader Insert card into the card reader Figure 14 will display on the screen If the customer is not present select the Card Not Present button Key in the card number and expiry date and select Done Key in the CSC number and select Done If all details are valid th...

Страница 13: ...e at www netpay co uk If the transaction has been approved a green tick is displayed shown in Figure 15 If the transaction has failed a red cross is displayed as shown in Figure 16 The sale with gratuity process is now complete the application will return to the Main Menu Figure 15 Figure 16 ...

Страница 14: ...mplete the transaction with the Card Not Present feature as shown in Figure 17 As cashback can only be processed through the card reader or magstripe reader please ask the customer to do one of the following Swipe the card through the magstripe reader Insert card into the card reader If cashback is enabled you will then be prompted if cashback is required as shown in Figure 18 If Yes is selected y...

Страница 15: ...r PIN code if all details are valid the terminal will process the transaction If the transaction has been approved a green tick is displayed as shown in Figure 20 If the transaction has failed a red cross is displayed as shown in Figure 21 The sale with cashback process is now complete the application will return to the Main Menu Figure 20 Figure 21 ...

Страница 16: ...ction with the Card Not Present feature as shown in Figure 23 If the customer is present please ask the customer to do one of the following Tap the card on the contactless reader Swipe the card through the magstripe reader Insert card into the card reader Figure 24 will display on the screen If the customer is not present select the Card Not Present button Key in the card number and expiry date an...

Страница 17: ...site at www netpay co uk If the refund has been approved a green tick is displayed as shown in Figure 25 If the transaction has failed a red cross is displayed as shown in Figure 26 The sale or refund process is now complete the application will return to the Main Menu Figure 25 Figure 26 ...

Страница 18: ...Present Choose either Sale or Refund as shown in Figure 27 the terminal will then redirect to a secure payment screen Type in the amount Type in the card details Enter optional reference Select Start Transaction If all details are valid the terminal will process the transaction If the transaction has been approved a green tick is displayed If the transaction has failed a red cross is displayed The...

Страница 19: ...be prompted to Swipe or Insert or complete the transaction with the Card Not Present feature as shown in Figure 29 If the customer is present please ask the customer to do one of the following Swipe the card through the magstripe reader Insert card into the card reader Figure 30 will display on the screen If the customer is not present select the Card Not Present button Key in the card number and ...

Страница 20: ...site at www netpay co uk If the transaction has been approved a green tick is displayed as shown in Figure 31 If the transaction has failed a red cross is displayed as shown in Figure 32 The pre auth process is now complete the application will return to the Main Menu Figure 31 Figure 32 ...

Страница 21: ...mpletion from the Main Menu shown in Figure 04 choose Completion Enter the amount of the pre auth and select Done as shown in Figure 33 Enter the amount of the completion and select Done as shown in Figure 34 Enter the RRN Code of the pre auth and select Done as shown in Figure 35 this code can be found on the pre auth receipt Figure 33 Figure 34 Figure 35 ...

Страница 22: ...ite at www netpay co uk If the transaction has been approved a green tick is displayed as shown in Figure 36 If the transaction has failed a red cross is displayed as shown in Figure 37 The completion process is now complete the application will return to the Main Menu Figure 36 Figure 37 ...

Страница 23: ...ill appear as shown in Figure 38 If accessibility mode is enabled within the application settings whenever a transaction is initiated a modified version of the payment screen with an additional Access Mode button will be displayed as shown in Figure 39 To start accessibility mode press the Access Mode button and select OK on the information prompt as shown in Figure 40 Figure 38 Figure 39 Figure 4...

Страница 24: ... the number 5 has two dots The numbers are not spoken but the OK and cancel buttons speak the words OK and cancel Use the tactile markings to orientate yourself Slide your finger onto the screen and then use the beeps to find the right digit When you have found the digit you want lift your finger and double tap anywhere on the screen to enter it Once you have input all digits move to the OK button...

Страница 25: ...The terminal will also read out the following The keypad is standard telephone layout with 1 2 3 towards the middle of the screen and cancel zero and OK at the bottom If you are too high on the screen the device will tell you PIN pad below Please enter your PIN Find the desired key using the beeps and tactile markings then double tap anywhere on the screen to confirm When finished select enter at ...

Страница 26: ...rminal will process the transaction If the transaction has been approved a green tick is displayed as shown in Figure 42 If the transaction has failed a red cross is displayed as shown in Figure 43 The transaction is now complete the application will return to the main menu Accessibility mode will need to be re enabled each transaction by pressing the Access Mode button Figure 42 Figure 43 ...

Страница 27: ...r choose a specific receipt using the receipt number as shown in Figure 44 If you choose Reprint Number you will be prompted to provide the receipt number before continuing After choosing Reprint Last or entering the receipt number the receipt menu will show as shown in Figure 45 You are able to view the receipts on the screen as shown in Figure 46 or choose to print the receipts Once you are fini...

Страница 28: ...tion Type The connection type e g Wi Fi Ethernet Terminal Firmware Version The base software of the terminal e g Paydroid 7 1 PTID The Permanent Terminal ID Serial number Terminal Serial Number The Serial number of the device Terminal Model The device model number e g A920Pro Reconciliation time The time of the last reconciliation Z Report POSitive Version The version of POSitive Payment Applicati...

Страница 29: ...nds figure and the net total of these amounts It will also show the net total of each card scheme for the day The date and time of the Z Report was taken as well as the serial number of the terminal is also shown To reprint the Z Report from the Main Menu shown in Figure 04 swipe across to the Admin menu and choose Reprint Z Report 05 13 Generating an X report To generate an X Report from the Main...

Страница 30: ... time of the report and the serial number of the terminal For each transaction the report will show The transaction history is reset after generating a Z Report but it is not reset after generating an X Report Transaction Type The transaction type e g sale or refund Amount The transaction amount Method of Payment The method of payment e g Contactless PIN Entry Transaction Status Whether the transa...

Отзывы: