


5
The SCR+ can accept up to four Ness
transmitters such as Radio Keys, Radio Reed
Switches, Radio PIRs, Radio Smoke Detectors
and other devices.
In Program Mode, the SCR+ will learn the radio
code of up to four transmitters into four code
'slots'. The data is stored in non-volatile memory
and is retained even if power is removed.
PRogRammIng stePs
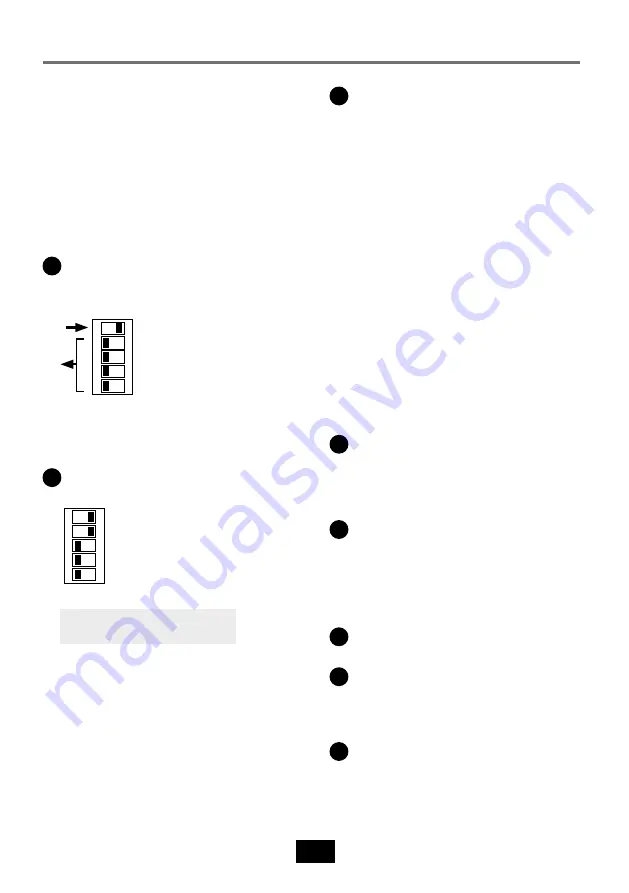
1
To enter program mode set switch 1 to the
ON position.
Set switches 2-5 to the OFF position.
1
O
n
2
3
4
5
ON
OFF
Program Mode OFF/ON
Code Slot 1
Code Slot 2
Code Slot 3
Code Slot 4
The LED will flash fast to indicate program
mode.
2
Turn ON only the switch for one of the four
code slots to be programmed.
1
O
n
2
3
4
5
Program Mode OFF/ON
Code Slot 1
Code Slot 2
Code Slot 3
Code Slot 4
example.
Code Slot 1 is ready for programming.
If the selected code slot is blank the LED
will remain flashing fast. If the code slot
already has a device programmed the LED
will be ON. The existing radio device must be
erased before programming a new one.
See How To Erase a Code.
3
Send a Learn signal from the radio device
to be programmed.
To send a Learn transmission:
RADIO KeyS, unencrypted
-
Press the OFF
Button 3 times.
RADIO KeyS, encrypted
-
Press and hold Panic
for at least 8 seconds.
RADIO PIRS - Insert the battery.
RADIO Key PeNDANT - Press the Panic button
3 times (be aware of the 1.5 second delay on
the button press).
RADIO ReeD SWITCh - Insert the battery.
If the device being programmed already
exists in another code slot the LED will triple
flash on receiving the learn signals. If so the
device does not need to be programmed.
to program more devices repeat steps 1
and 2 for the remaining code slots.
4
When finished programming set switch 1
OFF.
The LED will flash slowly indicating normal
operating mode.
5
Set switches 2 to 5 to the required position
to select toggle or pulse modes for the
relay output. See the Dipswitches Table.
how to eRase a Code
To erase a programmed code slot.
1
enter program mode by setting switch 1 to
the ON position.
2
Turn ON the switch for the code slot to be
erased.
The LED will be ON indicating the slot is
programmed.
3
Press the ON button on any Ness radio
key.
The LED will flash fast indicating the code
slot is blank.
PRogRammIng / leaRnIng tRansmItteRs