background image

Installation and connection  

en

7

Tips for saving energy

If you follow the instructions below, your appliance will use less power.

Note:  

The arrangement of the features does not affect the energy consumption of 

the appliance.

--------

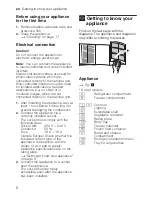
Installing the appliance

Keep the appliance out of direct sunlight.

The appliance must cool less frequently at low 

ambient temperatures and therefore consumes less 

power.

Install the appliance as far away as possible from 

heating elements, cooker and other heat sources:

3 cm to electric or gas cookers.

30 cm to an oil or solid-fuel cooker.

Note:  

If this is not possible, attach an insulating 

plate between the appliance and heat source.
Select an installation location at a room temperature 

of approx. 20 °C.
Use a cavity depth of 56 cm. 
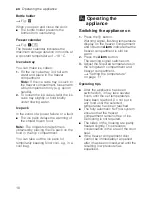
Caution!

Risk of burns!

Individual parts of the appliance become hot during 

operation. Touching these parts may result in burns.

The air on the rear panel of the appliance does not 

warm up so intensely. The appliance consumes less 

power if the warm air can escape.

Do not cover or block the ventilation openings.
Ventilate the room daily.
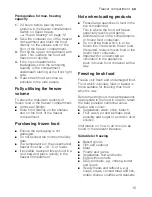
Using the appliance

Open the appliance door only briefly. 

The air in the appliance does not warm up so 

intensely. The appliance must cool less frequently 

and therefore consumes less power.

Transport purchased food in a cool bag and place 

quickly in the appliance.
Allow warm food and drinks to cool down before 

placing in the appliance.
Thaw frozen food in the refrigerator compartment in 

order to utilise the low temperature of the frozen 

food.
Always leave a space between the food and the rear 

panel.

The air can circulate and the air humidity will 

remain constant. The appliance must cool less fre-

quently and therefore consumes less power.

Pack food airtight.
Vacuum the back of the appliance once a year.

The air on the rear panel of the appliance does not 

warm up so intensely. The appliance consumes less 

power if the warm air can escape.

Do not cover or block the ventilation openings.

Содержание KI78 SERIES

Страница 1: ...en User manual Fridge freezer KI78...

Страница 2: ...liance 10 Switching the appliance on 10 Switching off and disconnecting the appliance 11 Setting the temperature 11 Super cooling 11 Super freezing 12 Holiday mode 12 M Alarm 12 Door opening alarm 12...

Страница 3: ...ble propellants e g spray cans or explosive substances in the appliance Store high percentage alcohol tightly closed and standing up Risk of electric shock Improper installations and repairs may put t...

Страница 4: ...have inadequate knowledge concerning safe operation of the appliance Measures Ensure that children and vulnerable people have understood the hazards Children or vulnerable people must be supervised by...

Страница 5: ...scape Do not damage the tubes of the refrigerant circuit and insulation 1 Remove the mains plug 2 Sever the power cord 3 Have the appliance disposed of professionally This appliance is labelled in acc...

Страница 6: ...ing to know your appliance on page 8 The weight of the appliance may be up to 70 kg depending on the model Permitted room temperature The permitted room temperature depends on the climatic class of th...

Страница 7: ...n the rear panel of the appliance does not warm up so intensely The appliance consumes less power if the warm air can escape Do not cover or block the ventilation openings Ventilate the room daily Usi...

Страница 8: ...Connect the appliance via a correctly installed socket The socket must comply with the following data Outside Europe Check whether the indicated current type of the appliance corresponds with the val...

Страница 9: ...wards The flap is pushed under the compartment Storage compartment Fig You can remove the storage compartments Lift up storage compartment and remove Storage compartment Vario Fig You can store large...

Страница 10: ...emporarily keeping food cool e g in a cool bag 1 Operating the appliance Operatingtheappliance Switching the appliance on 1 Press the button Warning signal flashing temperature display on the freezer...

Страница 11: ...he required temperature Sticker OK not all models You can use sticker OK to check whether the temperature in the refrigerator compartment reaches 4 C or lower If the sticker does not indicate OK gradu...

Страница 12: ...ator compartment temperature display no longer indicates a temperature M Alarm Alarm Door opening alarm The door opening alarm continuous sound switches on if the appliance door is open for longer tha...

Страница 13: ...ucts and bottled goods do not exceed the minimum sell by date or use by date indicated by the manufacturer To retain aroma colour and freshness pack or cover food well before placing it in the applian...

Страница 14: ...stored Remove condensation with a dry cloth and adjust air humidity in the vegetable container with the humidity controller W Freezer compartment Freezercompartment The freezer compartment is suitable...

Страница 15: ...ol bag and place quickly in the freezer compartment Note when loading products Freeze large quantities of food in the top compartment This is where the food will freeze especially quickly and gently D...

Страница 16: ...lips Cold resistant adhesive tape Not suitable packaging Wrapping paper Greaseproof paper Cellophane Refuse bags and used shopping bags Shelf life of frozen food at 18 C Thawing frozen food The thawin...

Страница 17: ...The metallic surfaces may corrode Never clean the shelves or containers in the dishwasher The parts may become deformed Proceed as follows 1 Switch off the appliance 2 Pull out the mains plug or swit...

Страница 18: ...res a maintenance free LED light Only customer service or authorised technicians may repair the light Noises Noise Normal noises Droning A motor is running e g refrigerating unit fan Bubbling buzzing...

Страница 19: ...ses The power has failed Check whether the power is on Display indicates E Electronics have detected a fault Call the customer service Customer service on page 20 A warning signal sounds and button Al...

Страница 20: ...customer service can rectify 1 Switch off the appliance and wait 5 minutes 2 Switch on the appliance 3 Within the first 10 seconds after switching on the appliance press and hold down button Super fr...

Страница 21: ...nclosed customer service list Guarantee Detailed information on the warranty period and warranty conditions in your country are available from your customer service your dealer and on our website GB 0...

Страница 22: ...6...

Страница 23: ...6...

Страница 24: ...6...

Страница 25: ...6...

Страница 26: ...6...

Страница 27: ...6XSHU 6XSHU ROLGD ODUP K E M 5...

Страница 28: ......

Страница 29: ......

Страница 30: ......

Страница 31: ...9000940972 9000940972 9409 en...

Отзывы: